With the release of Proxmox 8.1, Proxmox introduced new networking features in the way of Proxmox SDN, or “software defined networking” that is fully integrated out of the box for use in the datacenter. Thanks to virtualization infrastructure, Software defined networking allows taking networking into software without having the need for physical network devices to spin up new networks, subnets, IP ranges, DHCP servers, etc. Proxmox SDN allows creating these virtualized network infrastructures. This post will look at Proxmox SDN configuration step-by-step and how it is setup.
Table of contents
Introduction to Proxmox SDN
Virtualization is not just for compute and storage or SD-WAN. Proxmox SDN is a new feature in Proxmox VE that allows you to create virtualized networks and isolated private network configurations in code. Think of it like creating your own little switch in software. These network are made up of virtual zones and networks (VNets) for communication. Using SDN, admins have much better control over networking management and virtual networks that are attached to VM guests and it is all free and open-source.
Note the following components of Proxmox software-defined network:
- Zones – a virtually separated network configuration or area
- Virtual networks (VNets) – Virtual network that is part of a zone
- Subnets – The network IP space insde a VNet.
Comparison with VMware NSX
You have probably heard about VMware’s SDN solution called VMware NSX. There are many similarities with NSX and Proxmox SDN in capabilities. Arguably VMware NSX is a more robust solution that is a paid add-on to VMware vSphere. However, the Proxmox SDN solution is not as mature as VMware NSX that has been around for years now. I would like to see some of the additional micro-segmentation firewall features added to Proxmox SDN that we have in VMware NSX to create any number of connectivity rules and it can be integrated with ID sources for users, like AD domain configurations.
Use Cases of Proxmox SDN
What is the application of this technology? Using these components, you can create complex overlay networks on top of your existing network. The SDN network is a layer above the physical IP network where physical devices and hosts are connected.
Also, you can create your own isolated private network on each Proxmox VE server and span this to networks across multiple Proxmox VE clusters in many different locations.
Prerequisites
While Proxmox version 8.1 has the SDN components preloaded and the integration is available, according to the documentation, you will need to load the SDN package in Proxmox 7.X for every node in the cluster config:
apt update
apt install libpve-network-perl
After installation, you need to ensure that the following line is present at the end of the /etc/network/interfaces configuration file on all nodes:
source /etc/network/interfaces.d/*Proxmox requires the dnsmasq package for SDN functionality to enable features like DHCP management and network addressing. To install the DNSmasq packages:
apt update
apt install dnsmasq
# disable default instance
systemctl disable --now dnsmasq
For advanced routing:
apt update
apt install frr-pythontools
Setting Up Proxmox SDN
Let’s take a look at setting up software defined networking SDN on a Proxmox host and enabling an existing local Linux machine to connect. In this overview, we will enable automatic DHCP on the network interface so the machine can pull an IP from the IP range.
To Install Proxmox SDN as a simple network, we will do that in the following order:
- Create a Simple SDN Zone
- Create a VNet
- Create a Subnet and DHCP range
- Apply the SDN configuration
1. Create a Simple SDN Zone
There are a few types of Zones you can create. These include:
- Simple: The simple configuration is an Isolated Bridge that provides a simple layer 3 routing bridge (NAT)
- VLAN: Virtual LANs enable the traditional method of dividing up a LAN. The VLAN zone uses an existing local Linux or OVS bridge to connect to the Proxmox VE host’s NIC
- QinQ: Stacked VLAN (IEEE 802.1ad)
- VXLAN: Layer 2 VXLAN network that is created using a UDP tunnel
- EVPN (BGP EVPN): VXLAN that uses BGP to create Layer 3 routing. In this config, you create exit nodes to force traffic through a primary exit node instead of using load balancing between nodes.
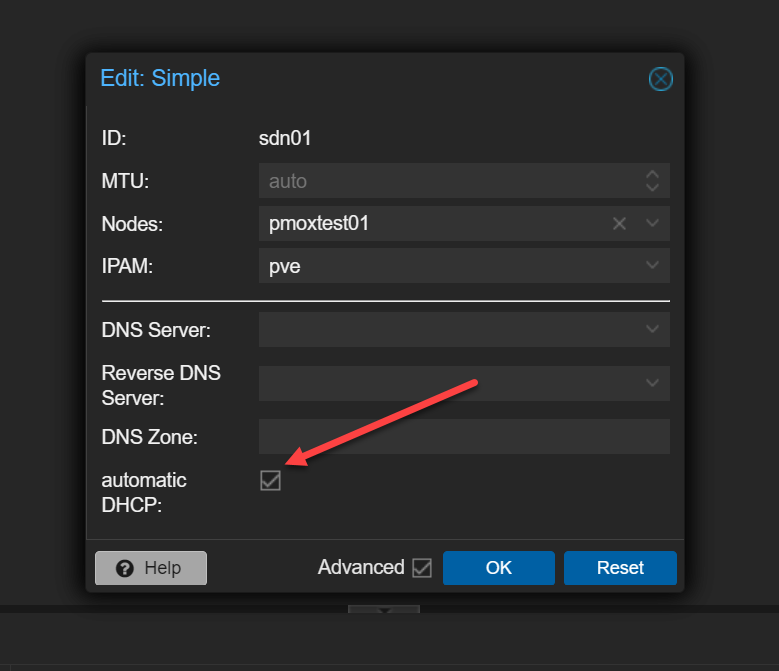
First, we need to create a new Zone. For this walkthrough, we will just be creating a Simple Zone. Login to your Proxmox node in a browser as root for the proper permissions. At the datacenter level, navigate to SDN > Zones > Add.

The SDN Zone configuration also allows you to set the zone for automatic DHCP configuration that will allow your VMs to pull an IP address from the VNet and Subnet configuration we will setup below. You can also set the MTU value for the size of the ethernet frames (packet), and DNS configuration, including DNS server, DNS zone, etc. In this example, I am creating a SDN Zone called sdn01.
The MTU value is important to note as with VXLAN, it uses 50 bytes to encapsulate the packet, you need to reduce the size by 50 bytes less than the normal MTU value. Optional will default to a size of 1450 on auto. In the case of VXLAN with IPSEC security, customers will need to reduce the MTU by 60 with IPv4, or 60 for IPv6 for guest traffic or you will see an issue with connectivity that may be a problem that is hard to uncover.
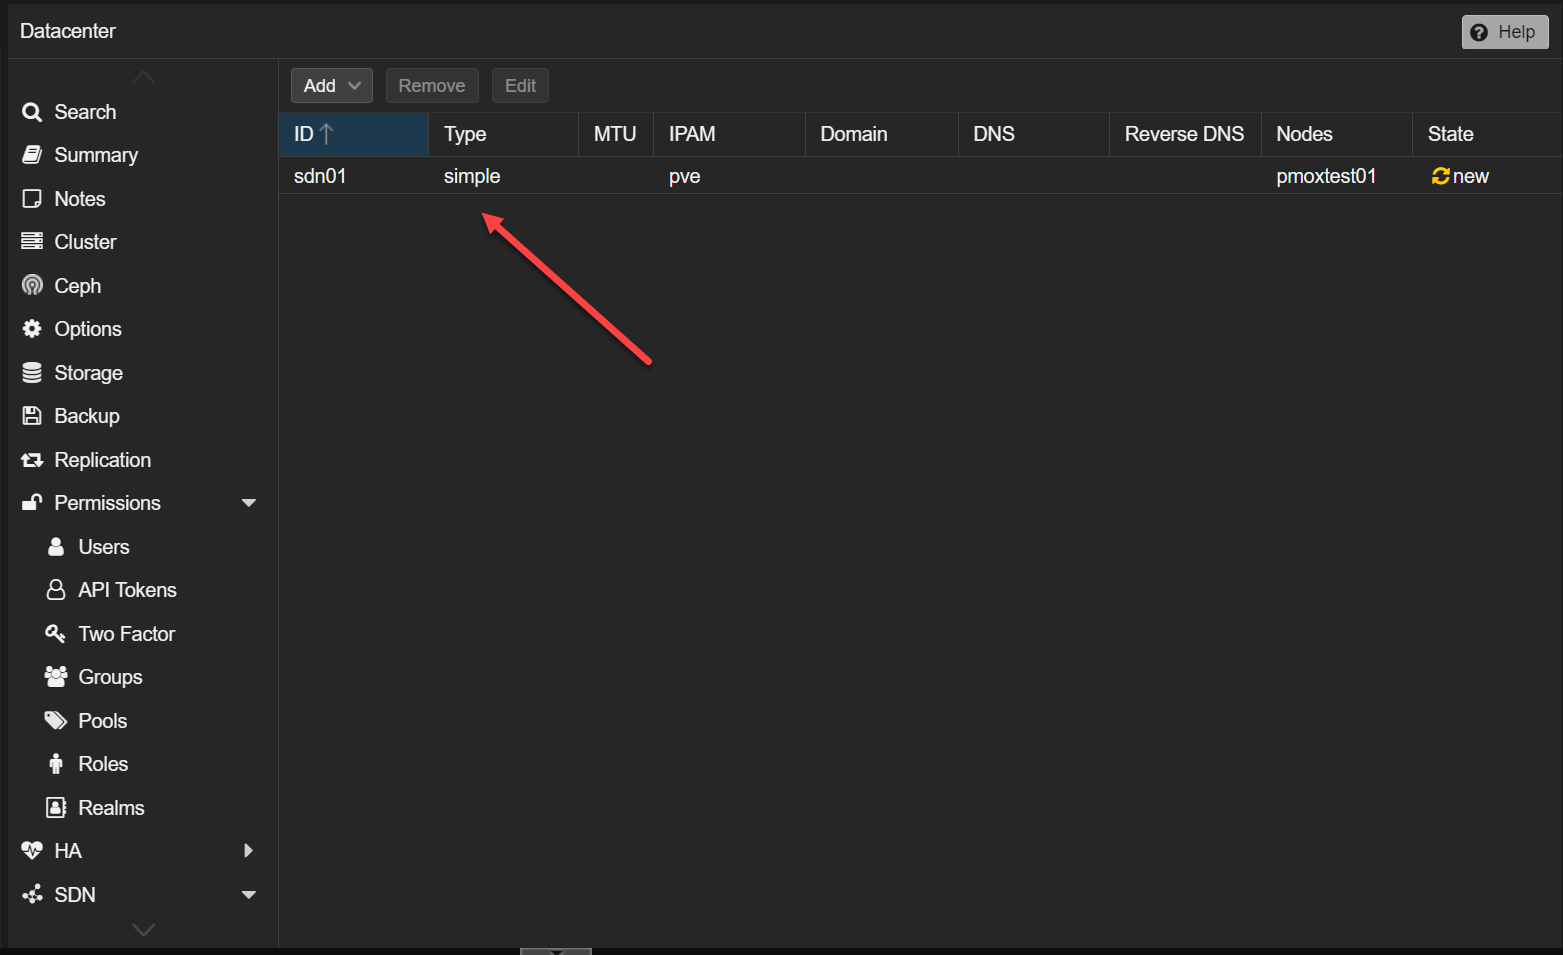
After clicking OK above, we see the new sdn01 Simple Zone.
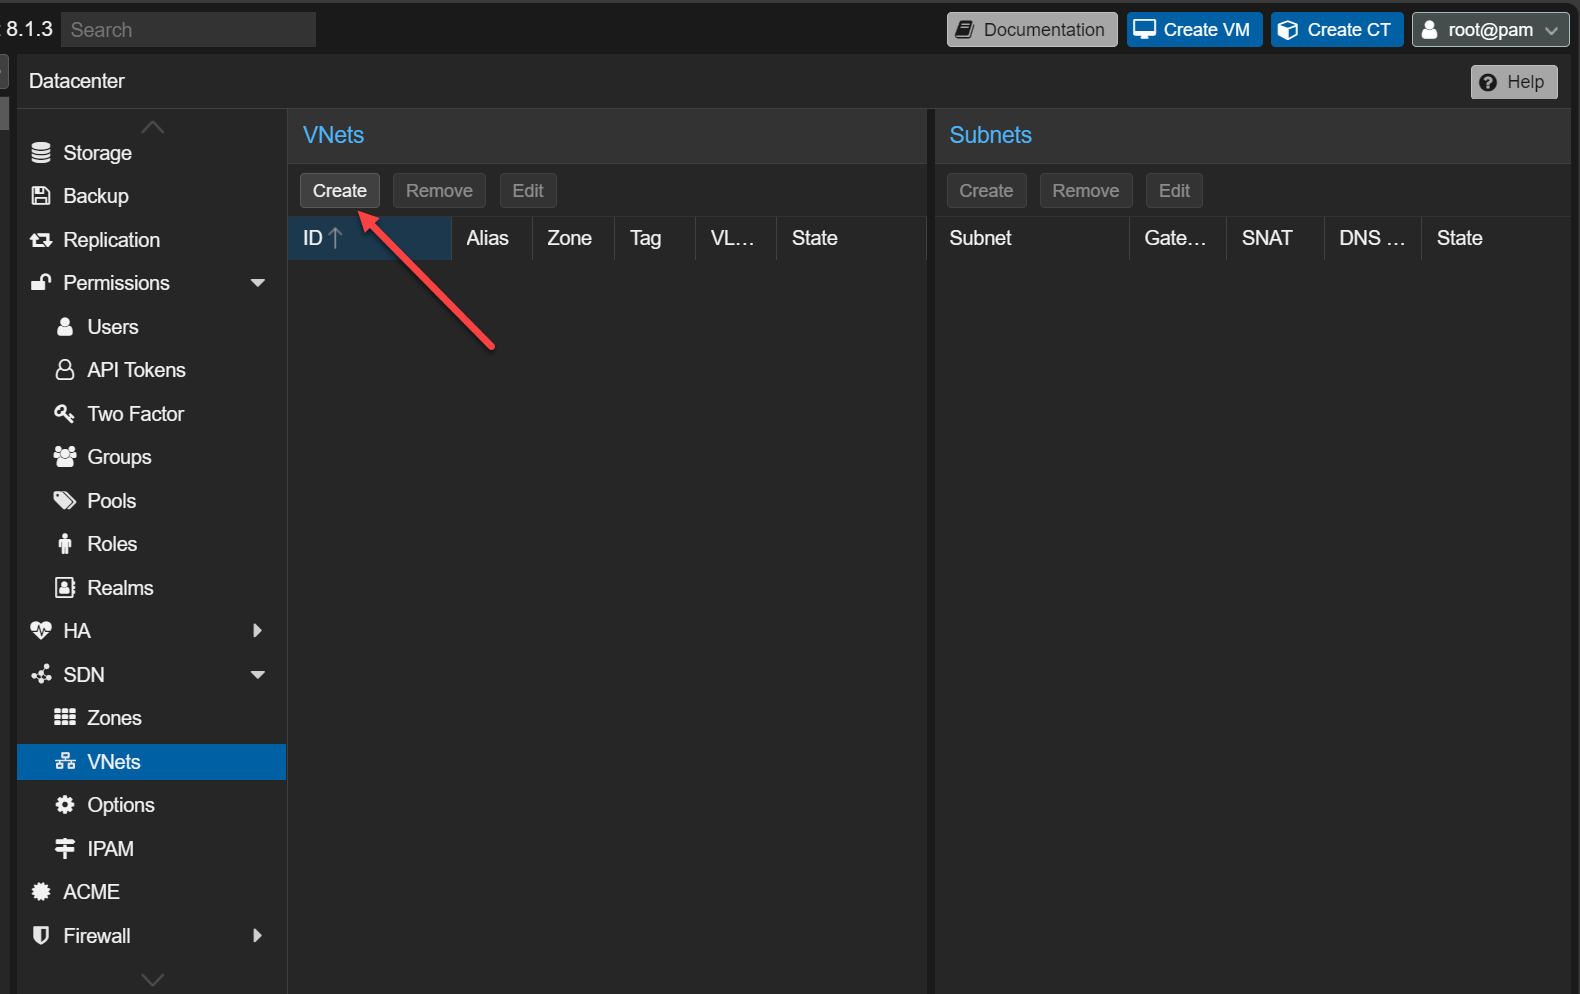
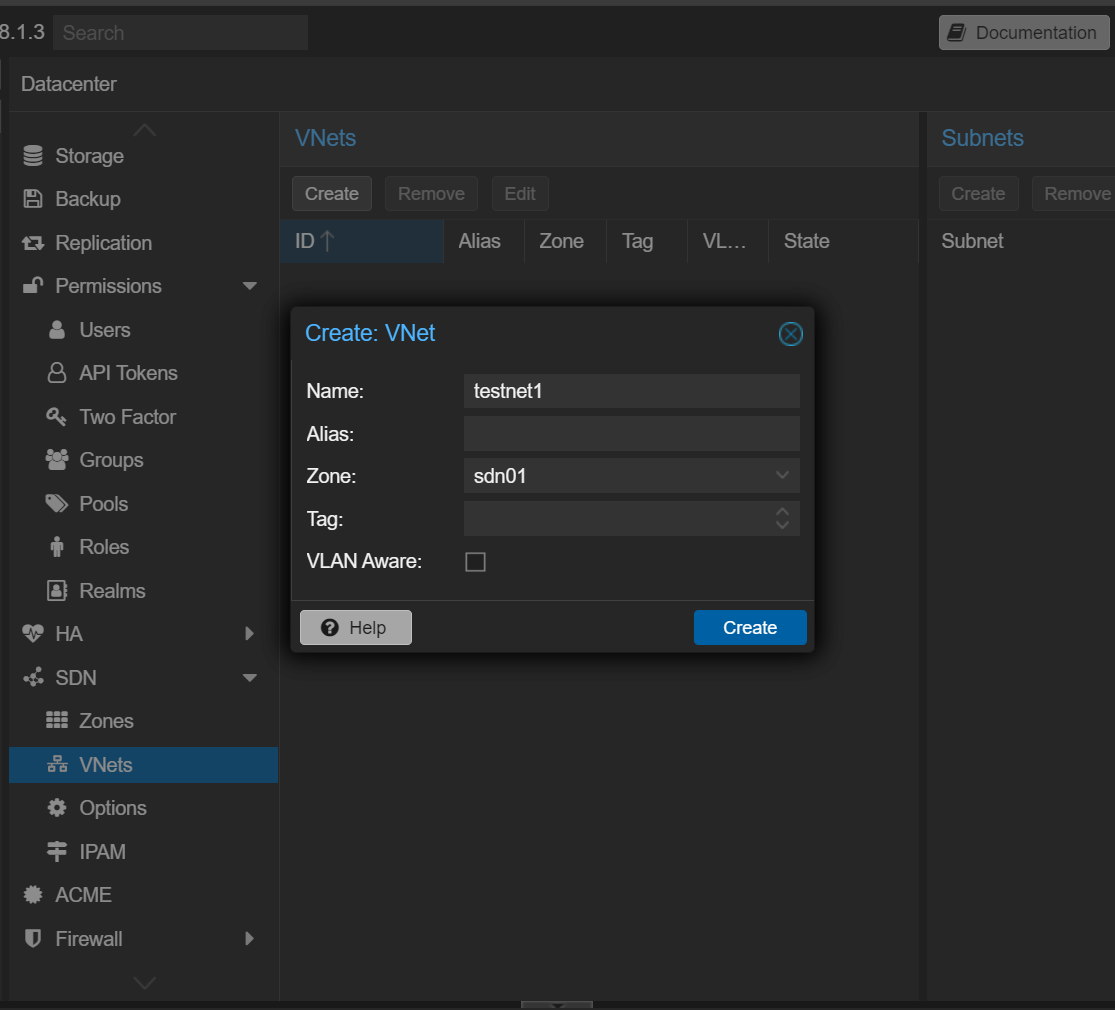
2. Create a VNet
Next, we need to create a VNet in PVE. Navigate to the VNet menu under the SDN menu and click to Create a new VNet.
Create a name for the VNet and select the Zone we created above. You also have the option to make these VLAN aware with a tag and also create an alias.
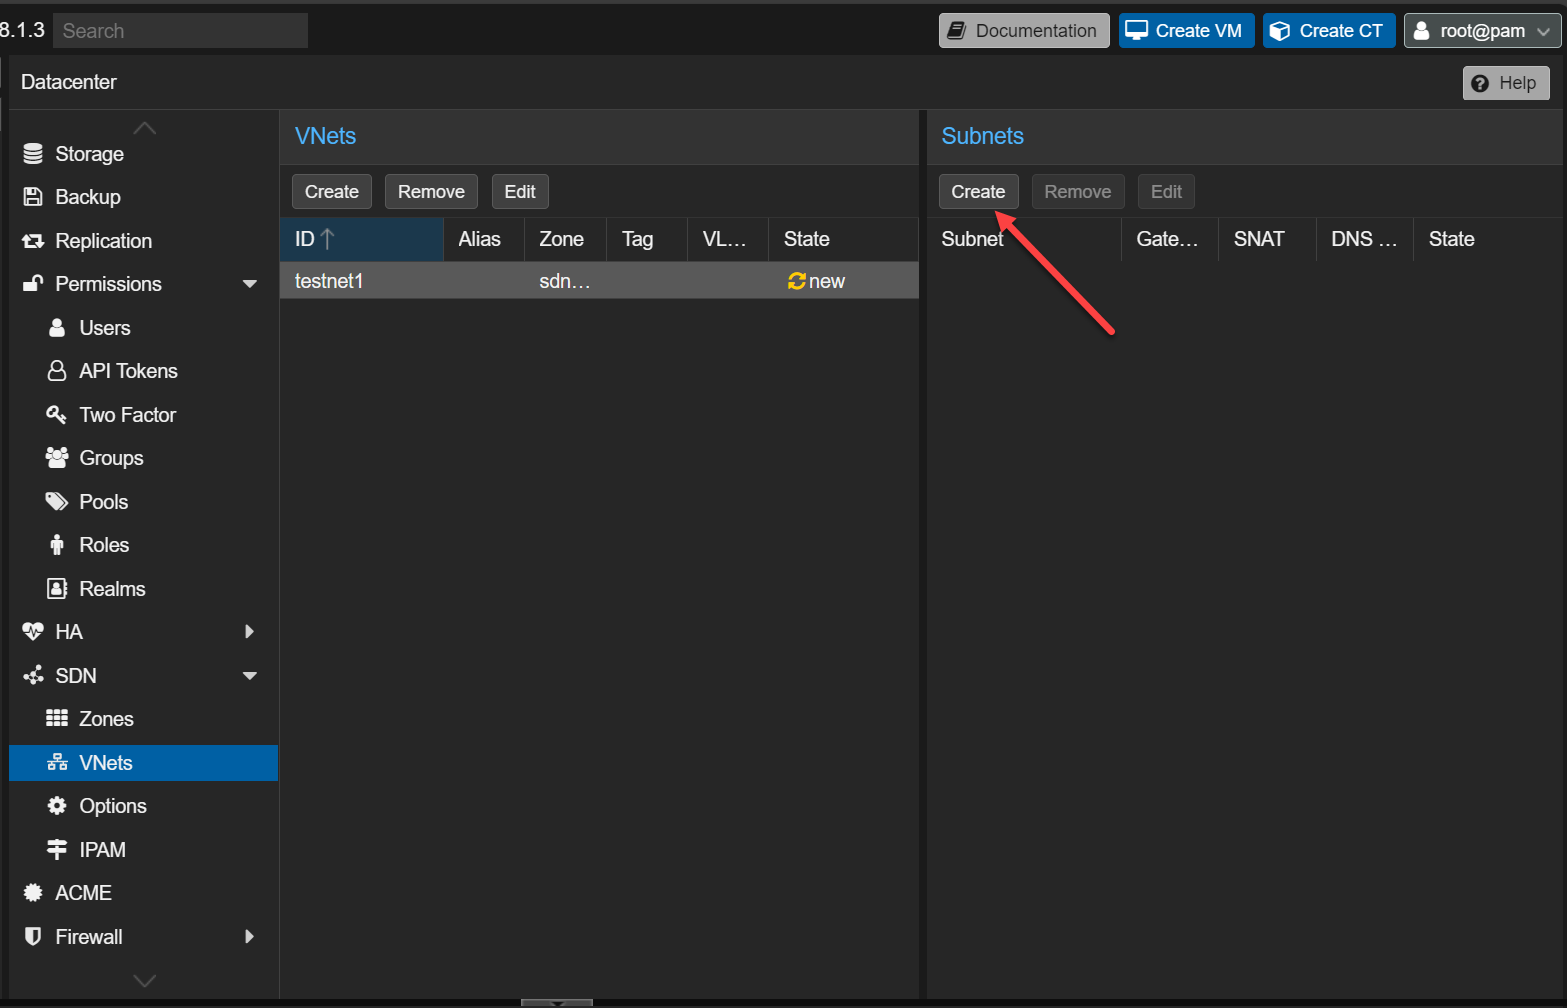
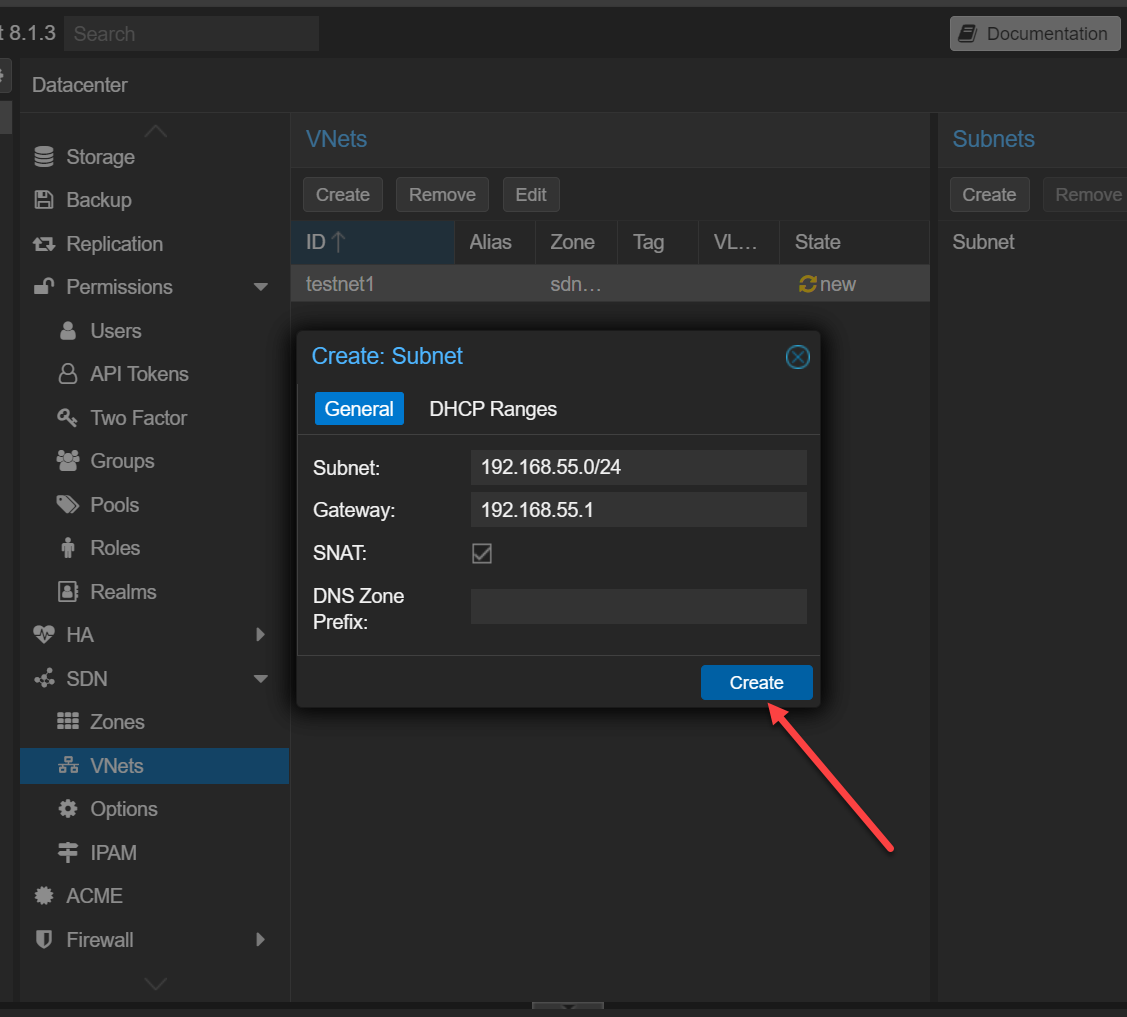
3. Create a Subnet and DHCP range
After creating the VNet, we can create a Subnet. Click the Create button on the Subnets screen.
Enter your IP address CIDR information and Gateway. If you populate the Gateway here, your Proxmox server will assume this IP address. Also, you can check the SNAT box. This will allow your VMs connected to the SDN network to easily connect to external networks beyond the SDN network (aka the Internet and your physical network) by masquerading as the IP and MAC of the host. Click Create.
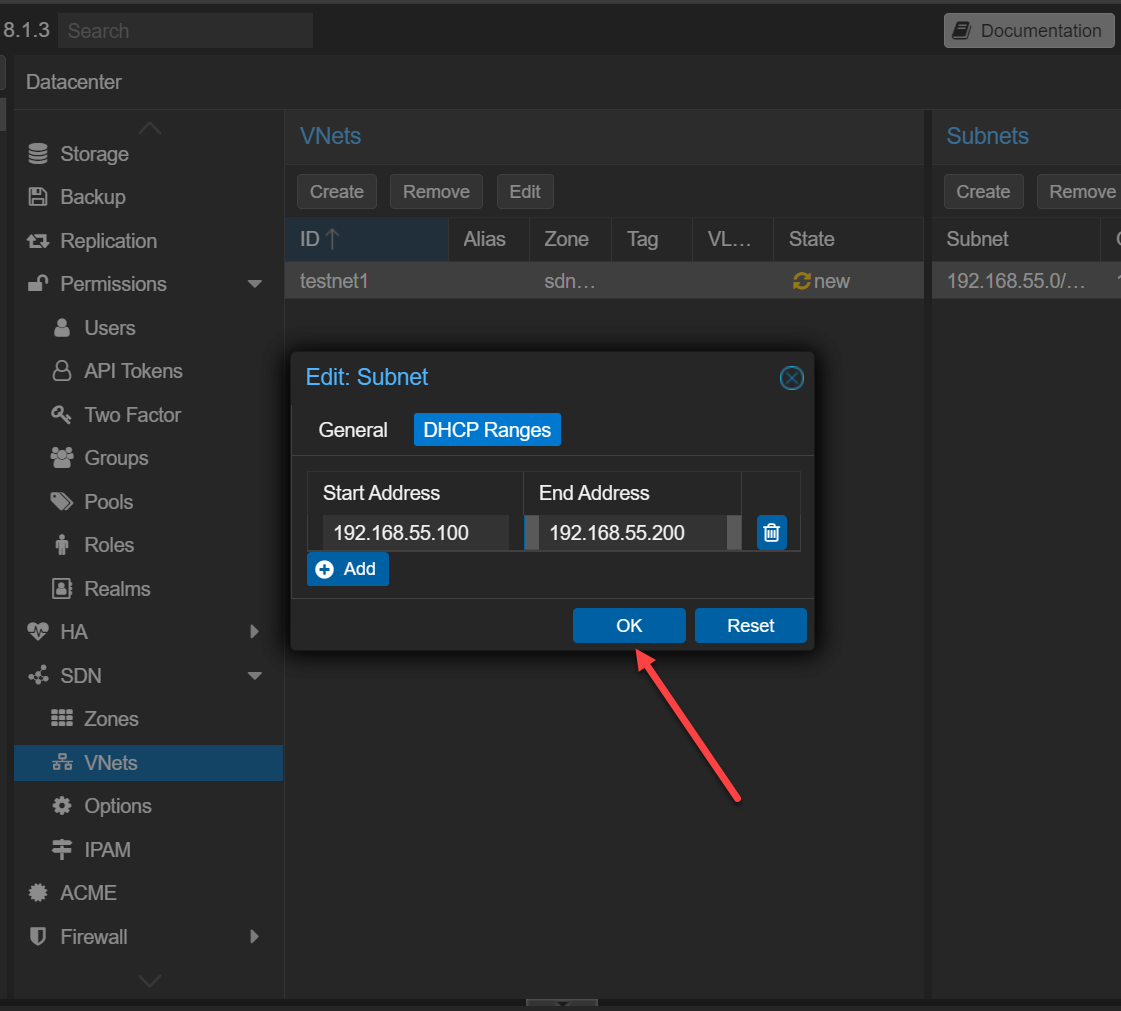
Click on the DHCP Ranges and enter your start and end address for the DHCP range. It will hand out addresses from this range of IPv4 IPs.
After clicking OK, we will see the new VNet and Subnet displayed.

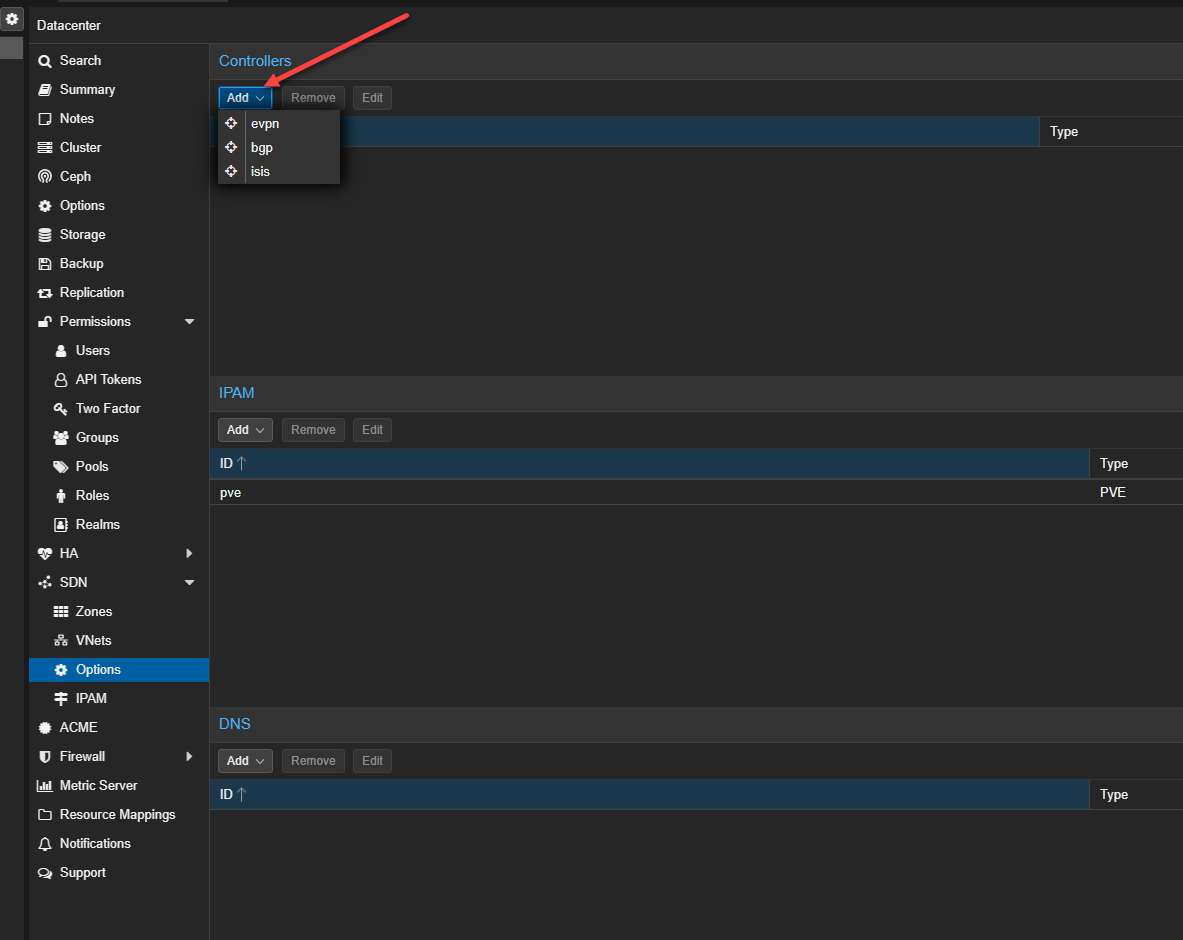
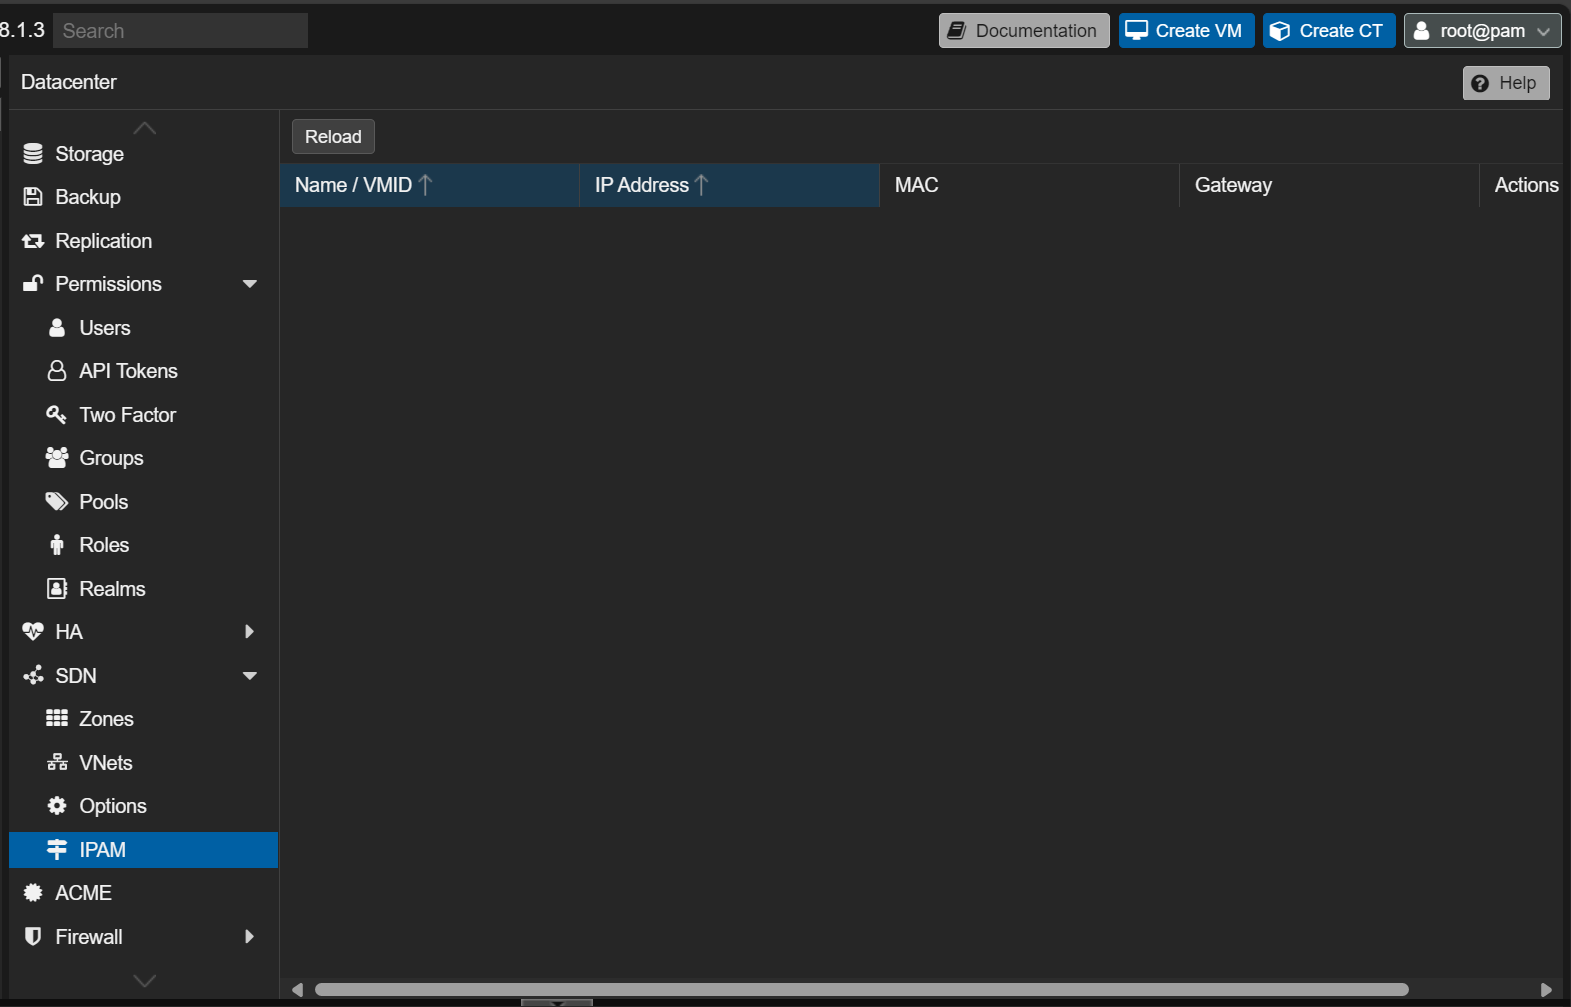
We are not setting anything in the Options screen or IPAM. However, let’s take a look at what those screens look like. Under the Options screen and the Controllers section, we can add network controllers for more advanced configurations like VXLAN to configure network tunnel configurations between peers, which are the Proxmox nodes. Under the Controllers section, we can add EVPN, EBGP, and ISIS.
For BGP controllers, these are not used directly by a zone. You can configure FRR to manage BGP peers. BGP-EVPN configuration define a different ASN by node. When you click the controller dropdown, you will see a list of options.
4. Apply the SDN configuration
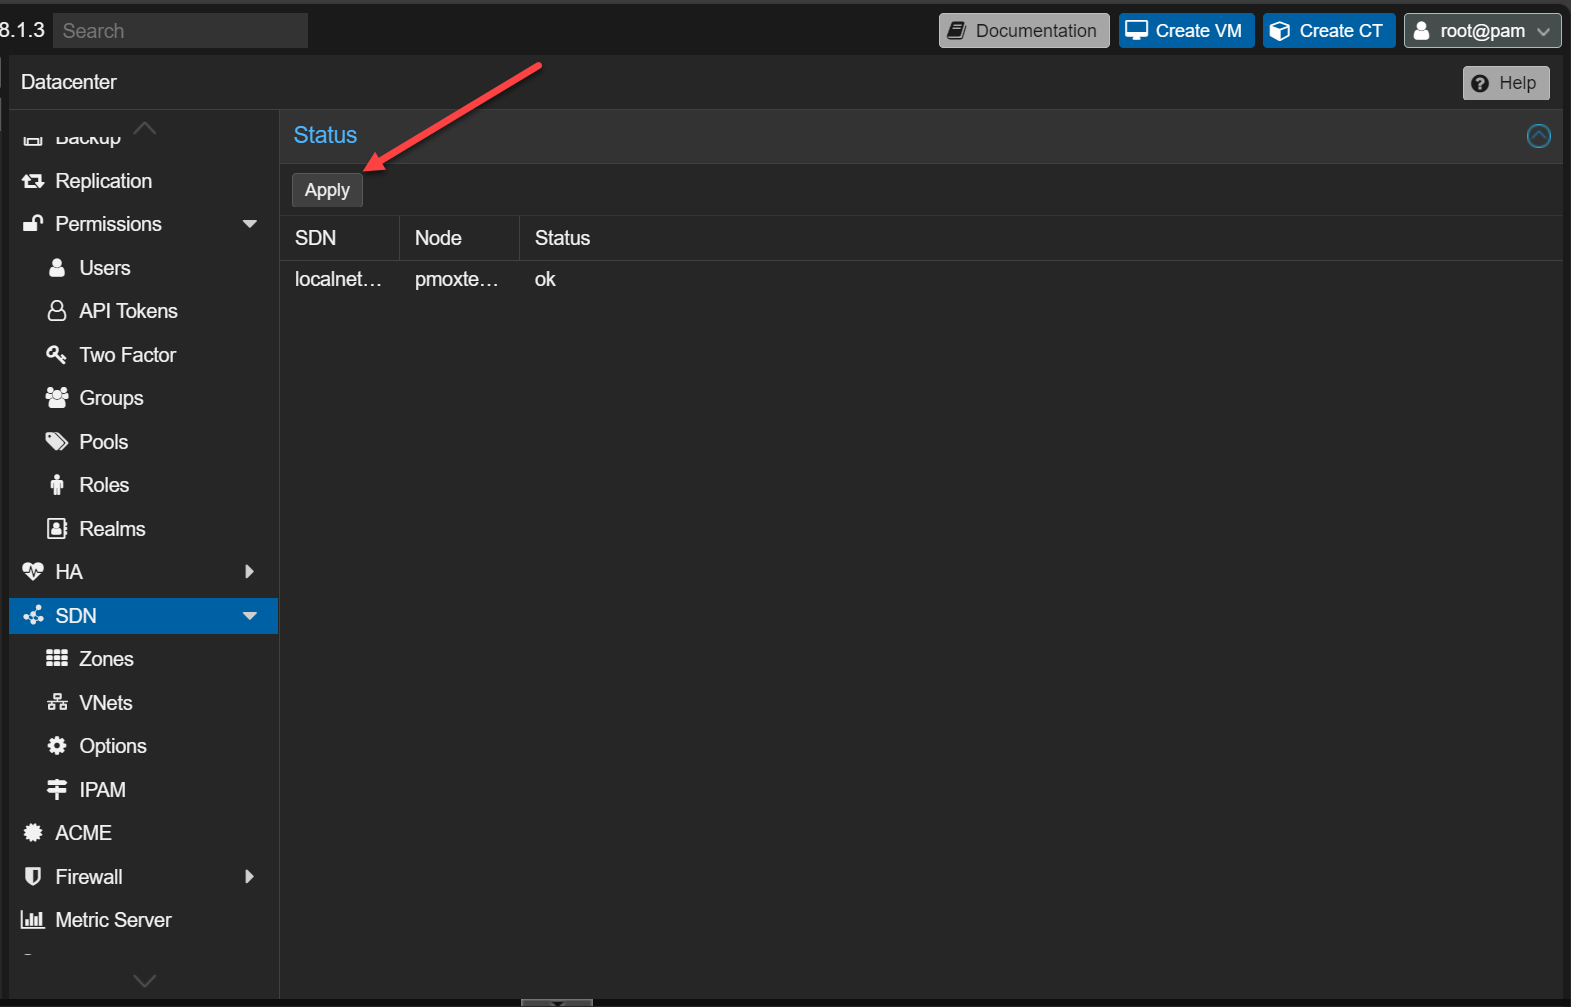
It is very important to understand that creating the configuration we have created does not apply the configuration. It only stages the configuration so to speak. You need to click the SDN parent menu and click the Apply button.
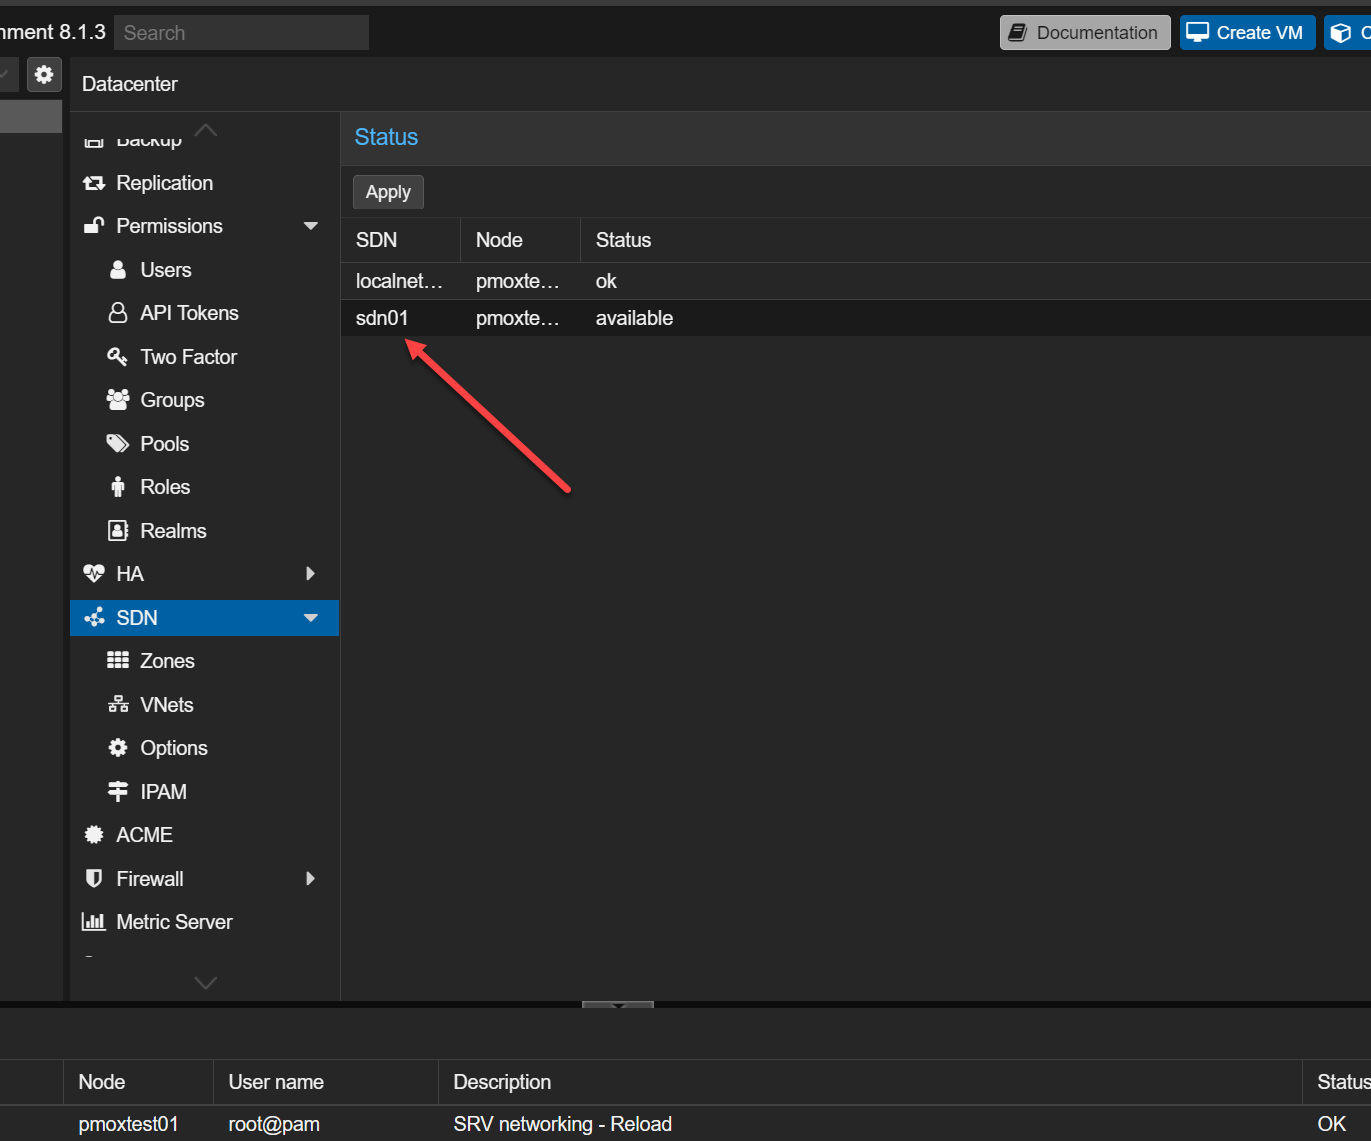
Now we see the new SDN network status after the configuration is applied and the Proxmox networking services are restarted.
Connect Virtual Machines and Containers to the SDN network
Now that we have the configuration for SDN in place on our virtual switches bridge in the hypervisor, we can connect the virtual machine or container (CT) to the new SDN network.
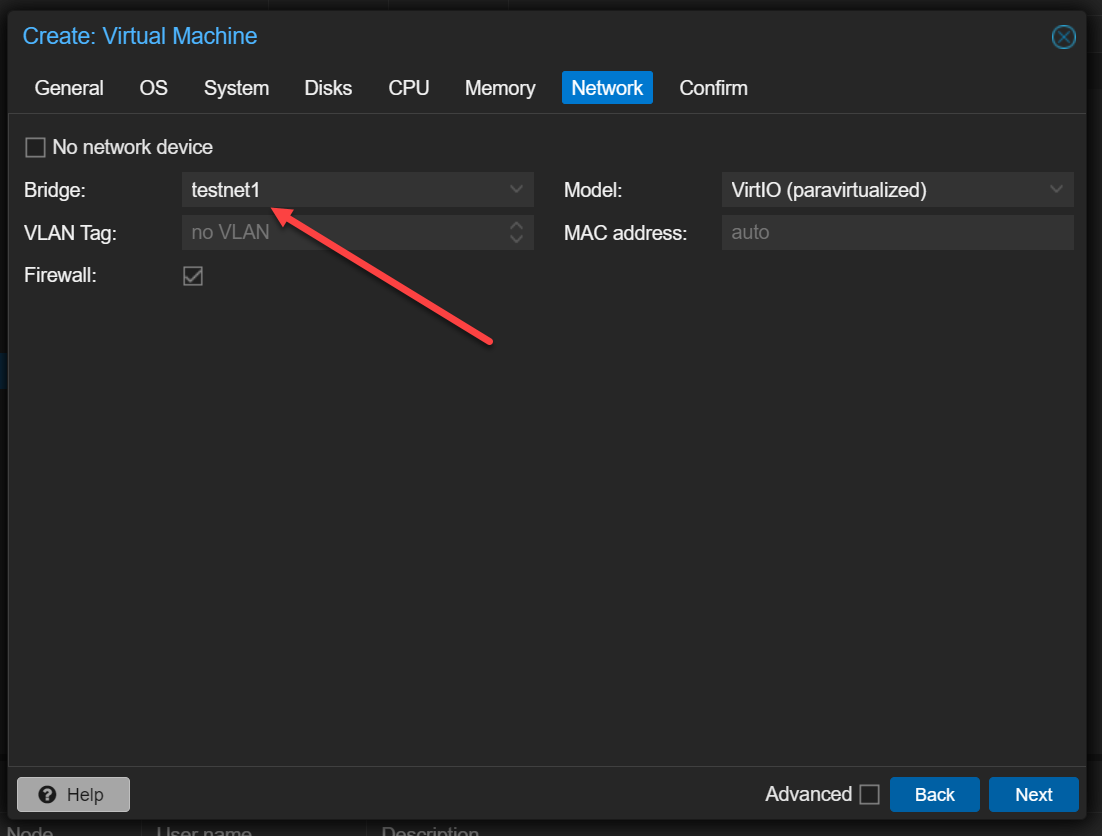
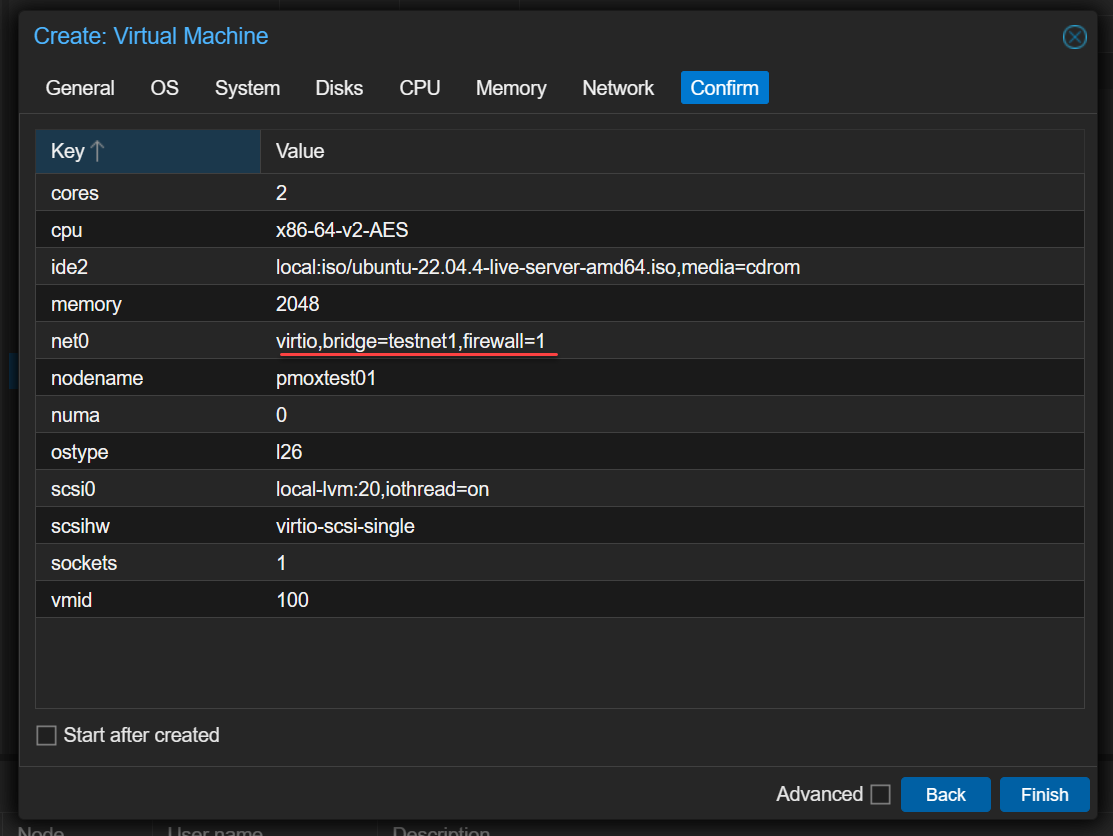
Below, you see the summary screen of creating a new virtual machine and we see I have connected it to the new SDN network.
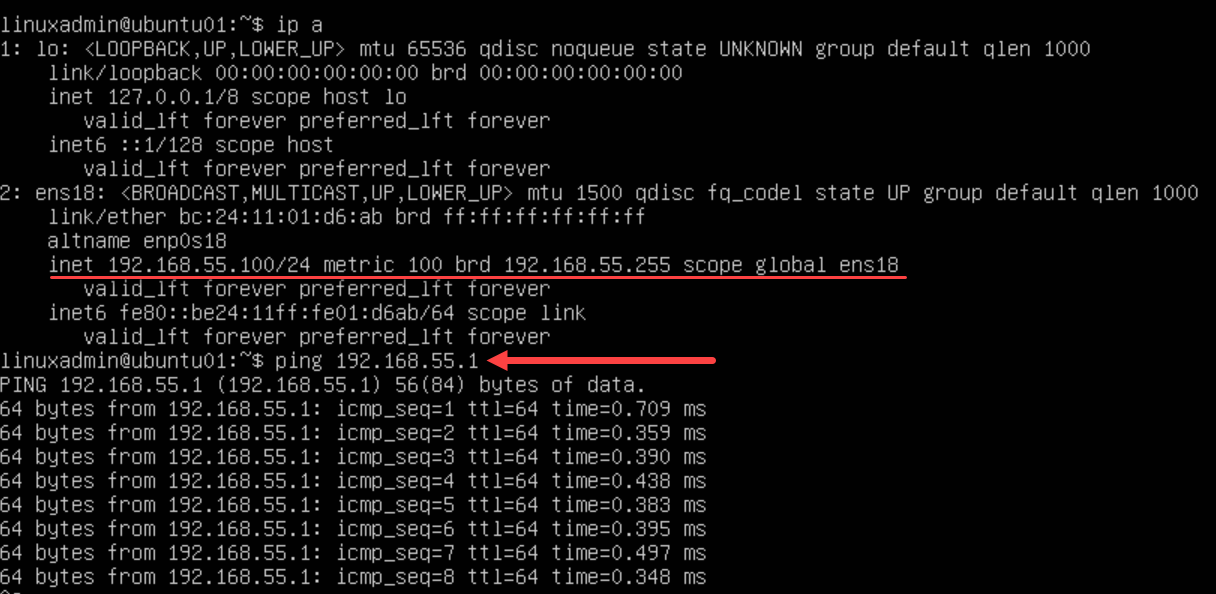
After installing Ubuntu, the VM correctly grabs a DHCP address from the range configured. Also, we can ping the gateway that was established in the configuration. Keep in mind how cool this really is. We have a network with total separation from the other physical network technologies for VM traffic and it is totally defined in software.
Key points to remember
Let’s consider a few key points to remember about the Proxmox SDN solution.
Network Interfaces and VLAN Configuration
Network interfaces are the gateways between your virtual machines and the broader network (Internet). Make sure to give attention to detail to configure these correctly for proper connectivity and optimal performance.
VLANs enable you to segment your network into isolated sections. With VLANs you can create a secure, organized network zones.
VXLAN Zone Implementation
VXLAN zones extend VLAN capabilities and create overlay networks across even different physical network locations. With VXLAN, you can build a complex, scalable network architecture.
Advanced Proxmox SDN Features
Some of the advanced Proxmox SDN features include automatic DHCP assignment to IP address management. Understand how you can use these features to enhance your network management.
Virtual Zones and Traffic Isolation
Creating virtual zones within Proxmox SDN allows network traffic segregation. This enhances the security and performance of your network. Traffic isolation is crucial for security.
Wrapping up Proxmox SDN configuration
The new Proxmox SDN features in Proxmox 8.1 and above are a great new feature that allows you to create new networks quickly and easily in software. Networking has traditionally been a challenge to configure quickly and easily since physical network devices and configurations have to be changed. With SDN, all of this changes with the network overlay created. The underlying physical network no longer has to be updated, like network switches, or changed for new networks and connectivity to be created.
Proxmox SDN is easy to configure and you can create a simple new network as shown in the walkthrough to start playing around with the new feature in your home lab. Let me know in the comments or VHT forum if you have played around with Proxmox SDN as of yet and what use cases you are finding in the home lab.
Google is updating how articles are shown. Don’t miss our leading home lab and tech content, written by humans, by setting Virtualization Howto as a preferred source.
About The Author


Hi Brandon
I have just installed ProxMox 8.2 on a Dell server. My problem is i cannot access the web interface to begin using ProxMox. Can you please advise.
Hi, Appreciate for the steps by steps, how about IPv6 ?
James,
Thank you for the comment. I have not configured IPv6 with Proxmox SDN as of yet. However, in a quick look, it looks like there may be some limitations with IPv6 and Proxmox SDN currently: https://forum.proxmox.com/threads/pve8-1-sdn-problematic-experiences-and-and-other-fun-with-ipv6-configurations.144838/
Brandon