If you have configured your Promox server in the home lab, most want to segregate their management traffic from the other types of traffic in their lab environment as part of their network configuration. Making the management interface VLAN aware ensures your Proxmox server can be connected to a trunk port and carry traffic for various VLANs. Let’s see how to set up the Proxmox management interface VLAN tagging configuration and the steps involved.
Why segment your Promox VE management traffic?
First, why do you want to segment Proxmox VE management VLAN traffic from the rest of the traffic? Having management traffic on the same VLAN interface as virtual machines and other types of traffic is a security risk.
You never want to be able to manage the hypervisor host on the same network on which other clients and servers exist. as you can imagine, if an attacker has compromised the network where a client resides, you don’t want them to have easy Layer 2 access to the management interface of your hypervisor.
What are VLANs?
VLAN traffic refers to “virtual local area network” traffic that essentially allows creating of many virtual networks on the same Ethernet wire. It is a layer 2 construct. Multiple VLANs allow segmenting traffic across the same physical network switch. Physical interfaces on switch ports are configured with VLAN-aware trunk port configuration, allowing the switch to see the VLAN tags added to Ethernet frames. You can essentially have one port that carries all the different VLAN networks. Two VLANs will flow across the same physical cabling and port.
There are many types of VLAN configurations. You can configure “untagged traffic,” meaning traffic that does not have VLAN tagging, automatically get a specific VLAN tag. Generally, for many, the default VLAN is used for untagged traffic.
VLAN tagging can happen at the switch port level, or the network interface level, as well as the network interface tags VLAN traffic as it traverses the network. We can tag VLANs from the Proxmox side of things so that traffic is correctly tagged with the appropriate VLAN.
VLAN for Guest networks
Below is straight from the Proxmox documentation from the Proxmox server when you click the Linux vlan help button:
Proxmox VE supports this setup out of the box. You can specify the VLAN tag when you create a VM. The VLAN tag is part of the guest network configuration. The networking layer supports different modes to implement VLANs, depending on the bridge configuration:
VLAN awareness on the Linux bridge: In this case, each guest’s virtual network card is assigned to a VLAN tag, which is transparently supported by the Linux bridge. Trunk mode is also possible, but that makes configuration in the guest necessary.
“traditional” VLAN on the Linux bridge: In contrast to the VLAN awareness method, this method is not transparent and creates a VLAN device with associated bridge for each VLAN. That is, creating a guest on VLAN 5 for example, would create two interfaces eno1.5 and vmbr0v5, which would remain until a reboot occurs.
Open vSwitch VLAN: This mode uses the OVS VLAN feature.
Guest configured VLAN: VLANs are assigned inside the guest. In this case, the setup is completely done inside the guest and can not be influenced from the outside. The benefit is that you can use more than one VLAN on a single virtual NIC.
Proxmox management interface VLAN tagging
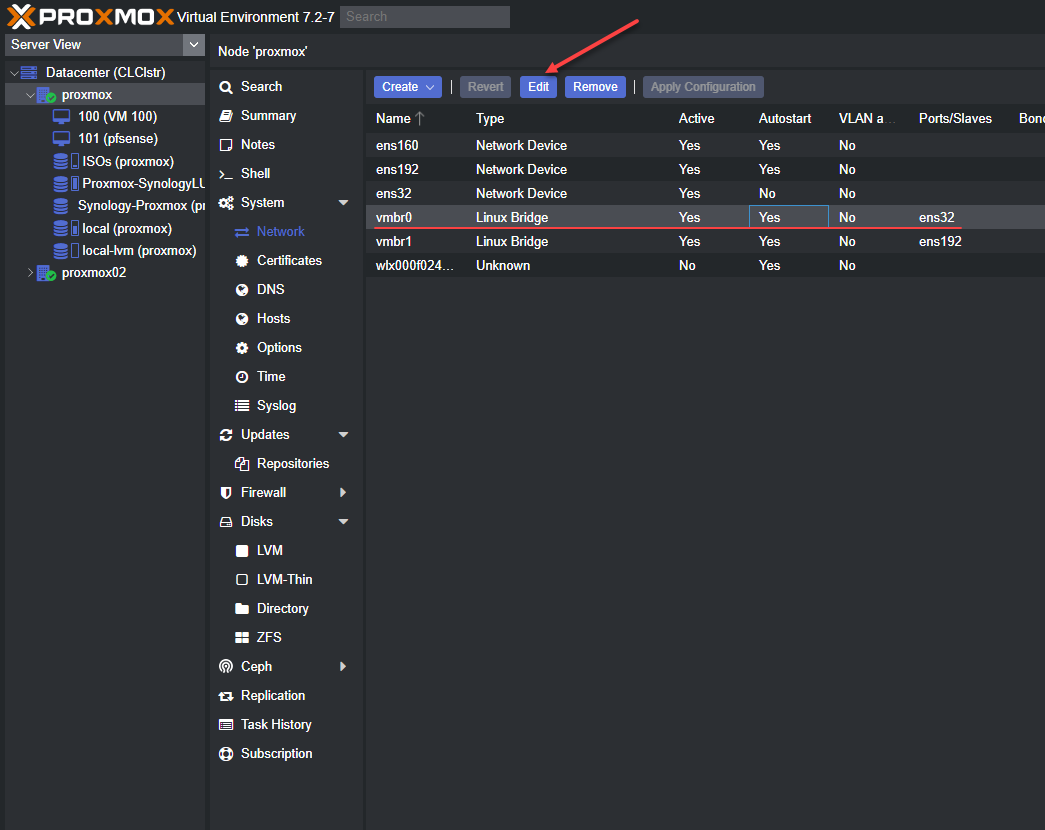
A couple of steps are involved to correctly tag VLANs from the Proxmox VE side of things. First, we must make the Linux bridge in Proxmox Server VLAN aware. This first step can be completed from the web interface.
Configuring the Linux Bridge to be VLAN aware
We need to navigate to the Promox host > System > Network and then Edit the properties of the default linux bridge interface in Promox.
Navigating to the default Linux bridge interface in Proxmox server and editing the default bridge in the Proxmox GUI, we click the Edit button in the user interface.
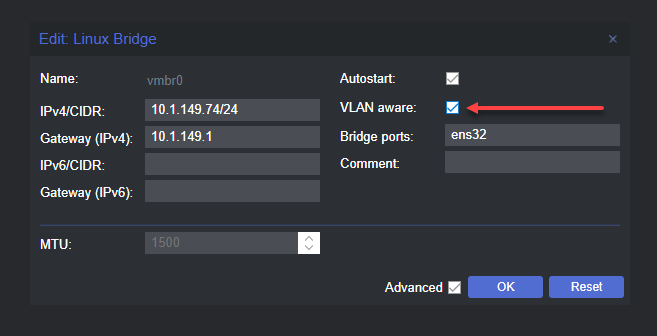
Checking the box next to VLAN aware
The first change we need to make is small. We need to tick the box next to VLAN aware. This allows us to configure Proxmox and the Linux bridge to be aware of vlan tagging for the Linux bridge interface.
Applying the configuration
When we edit the network configuration of the Proxmox node, we need to Apply configuration to the network changes. This will apply the changes and restart networking services.
The Proxmox Server displays a preview of the etc network interfaces file, which shows the changes made to the default bridge interface:
bridge-vlan-aware yes
bridge-vids 2-4094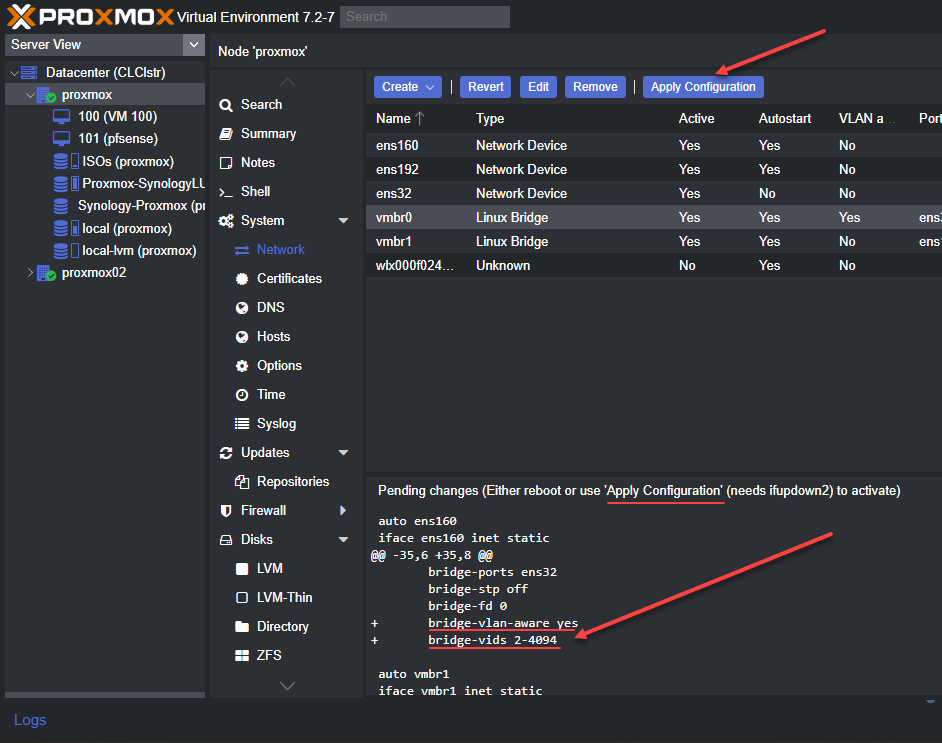
Making changes to etc network interfaces file for the new Linux bridge interface
This is the first part of the Proxmox server configuration for VLAN-aware traffic on the management VLAN for the Proxmox system. Now we need to make some low-level changes to the etc network interfaces file on the Proxmox host.
Editing the default Linux bridge
We need to edit the file to set the VLAN for the management VLAN and IP address, which is a static address to the new bridge interface tagged with a VLAN.
Below is an example of the default configuration after we have turned on the VLAN aware setting.
Default configuration
auto vmbr0

iface vmbr0 inet static

	address 10.1.149.74/24

	gateway 10.1.149.1

	bridge-ports ens32

	bridge-stp off

	bridge-fd 0

	bridge-vlan-aware yes

	bridge-vids 2-4094

auto vmbr1

iface vmbr1 inet static

	address 172.16.16.254/24

	bridge-ports ens192

	bridge-stp off

        bridge-fd 0
New Linux Bridge VLAN configuration
However, we want to add VLAN tagging from the management interface bridge interface. To do this, we need to change the configuration to the following. Note below, we take the IP address off the iface vmbr0 configuration or iface eno1 inet manual config. However, we leave the VLAN configuration intact. We then create another network interface that is very similar to “subinterface” configuration syntax. We create a vmbr0.<vlan tag> configuration. It is where we place the IP address configuration for the Linux bridge network device.
With this configuration, the Proxmox IP will now be the static IP address and subnet mask is configured in the new bridge interface, since these are virtual interfaces off the main Linux bridge shown with the iface vmbr0 inet manual stanza. You also place the default gateway on the new Linux bridge. You can configure multiple IP addresses across different bridges configured on your Proxmox server.
VLAN config
auto vmbr0

iface vmbr0 inet manual

	bridge-ports ens192

	bridge-stp off

	bridge-fd 0

	bridge-vlan-aware yes

	bridge-vids 2-4094

auto vmbr0.333

iface vmbr0.333 inet static

    address 10.3.33.16/24

    gateway 10.3.33.1
Network Switch network configuration
After configuring your new Linux Bridge virtual interface, we need to make sure the physical interface of the network switch port is configured as a trunk port to “understand” the VLAN tagging coming across from the Promox server. The physical port of the switch allows carrying the tagged VLAN traffic to the rest of the network.
The VLAN ID is part of the Layer 2 ethernet frame. If the physical interface of the switch port is not configured correctly, VLAN traffic for the VLAN ID is discarded.
Virtual machines VLAN traffic
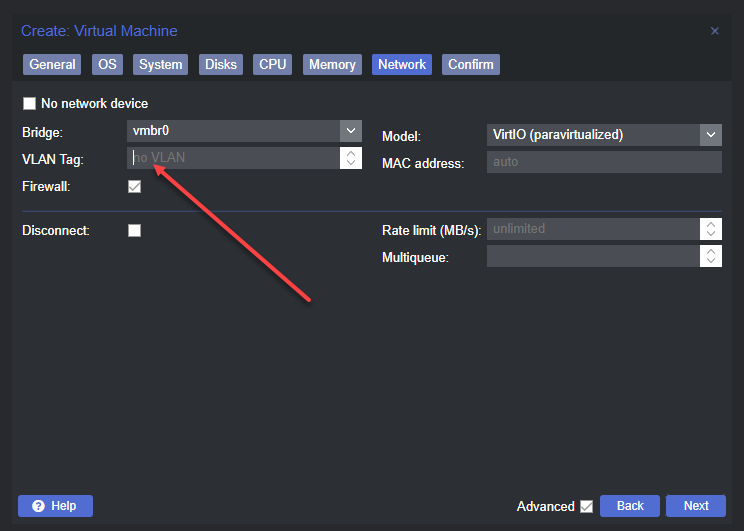
Once we have made the default Linux bridge VLAN aware, virtual machines can also have a VLAN tag associated with their network configuration. It allows the virtual machine to tag VLAN traffic and be placed on that particular VLAN.
Creating VM with the VLAN tag
When you create VMs, you can choose to tag the network traffic with a VLAN ID. This allows sending the virtual machine traffic through the physical device VLAN interface to the rest of the physical network.
The beauty of the VLAN aware bridge is you can have other VLANs configured on other virtual machines, and each can communicate on the required VLAN interface.
Below is an example of the screen to create a new VM and the networking screen. The VLAN tag field allows typing in your VLAN interface number.
Home Lab network configuration
Proxmox is a great choice for building a home lab environment and run VMs on your home network. Once you create your new VLAN in Proxmox server and on your network device, you can start building out your lab environment and have traffic flow as expected. You can make sure your virtual machines are connected to the appropriate networks.
You can also ensure you have Internet access via inter-VLAN routing on your network switch, firewall, router, etc. VLANs create a lot of flexibility from a physical cabling, ports, and virtual configuration, providing many opportunities to allow traffic to flow from your VM guests or physical hosts.
Proxmox resources
Take a look at my Proxmox resources that I have written about below:
- Proxmox vs ESXi – ultimate comparison 2022
- pfSense Proxmox Install Process and Configuration
- Proxmox Update No Subscription Repository Configuration
- Proxmox iSCSI target to Synology NAS
- Nested Proxmox VMware installation in ESXi
Google is updating how articles are shown. Don’t miss our leading home lab and tech content, written by humans, by setting Virtualization Howto as a preferred source.
About The Author