ECS Anywhere: Run AWS Containers on your Home Server On-premises!
So many services are either “cloud only” or “only on-premises” technologies. However, what if you wanted a blend of both running in your home lab or in production when it comes to running your containers? If you haven’t heard about it before, AWS ECS Anywhere is just such a service that allows you to house the management plane for your containers in the AWS cloud while you have the actual containers running on-premises in a virtualization stack. Let’s take a look at ECS Anywhere and how we can use it to spin up containers on top of on-premises VMs and run software clusters using your own infrastructure architecture.
Table of contents
- What is ECS Anywhere?
- 1. Installing ECS Anywhere
- 2. Export environment variables
- 3. Create the AWS IAM role
- 4. Create the AWS ECS Cluster
- 5. Create the cluster activation key
- 6. Install the ECS anywhere agent
- 7. Check the AWS ECS agent installation
- 8. Create a new AWS ECS Anywhere container task definition
- 9. Register the new task definition with the AWS ECS Anywhere cluster
- 10. Check the running containers on your Docker host
- 11. Check the AWS ECS cluster tasks
- Other things to note
- Wrapping up
What is ECS Anywhere?
It is part of Amazon Elastic Container Service (Amazon ECS, including managed instance configurations and AWS Fargate) that is purpose-built to extend its capabilities beyond the confines of the AWS cloud and EC2 instances, all without AWS Outposts. If you remember Outposts (not that great of adoption), it is the service that allowed organizations to run AWS on-premises.
However, this is not needed with Amazon ECS Anywhere. Instead, it allows using the Amazon ECS control plane for ECS in the AWS cloud and have your container workloads running in your own environment as an external instance. This can be a great solution for businesses who may need containers to run adjacent to other backend on-premises servers like database servers on-premises, or who for various reasons, like compliance, efficiency, and the need to keep all the data locally, including data running in their containers.
Helps when AWS regions are lacking
Also, what if Amazon does not have an AWS region in the edge location that would be geographically optimal for your application? ECS Anywhere helps to solve this challenge since you can run it in your own data center.
Using ECS Anywhere, developers and DevOps alike can deploy applications to their on-premises container hosts from the cloud. This offsets the cost of compute capacity in AWS, since it runs on-premises on your own hardware.
Simplified Management Across Environments
One of the features of ECS Anywhere is the simplified management experience. Admins can monitor and manage their container instances across AWS and on-premises environments from a single pane of glass from the Amazon ECS Console.
1. Installing ECS Anywhere
One of the things I like about ECS Anywhere is getting started involves a few steps. The initial setup includes registering your external instances (such as virtual machines or physical servers) with the ECS control plane, installing the ECS agent, and configuring network connectivity.
Prerequisites
The prerequisites you will want to make sure of include having the AWS CLI installed, also an active AWS account, and the SSM Agent installed on your instances. Also, make sure you have a supported operating system for ECS Anywhere, including Amazon Linux 2, Ubuntu, and RHEL, among others.
Also, make sure you have updated your Linux distro. Here I am updating my Ubuntu Server 22.04 LTS instance:
sudo apt-get update && apt-get upgrade -yAlso, I am using a Windows workstation with WSL installed with the AWS CLI installed.
2. Export environment variables
The first thing we need to do is update the environment variables to work with the ECS cluster. This assumes you have already setup your AWS CLI tools and you have ran an aws configure which will ask for your AWS ID and secret key.
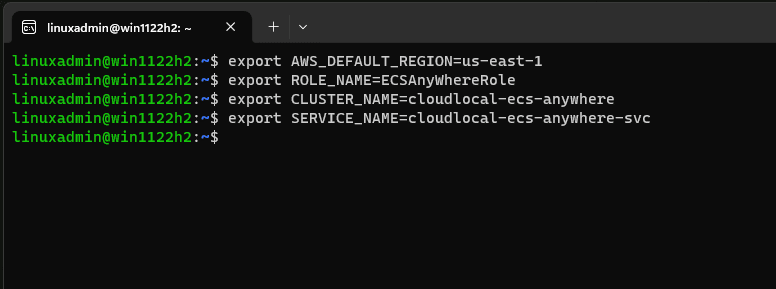
After connecting your AWS CLI to your AWS environment, run the following export commands. As a note, the ROLE_NAME, CLUSTER_NAME, and SERVICE_NAME can be named anything you want them to be. These don’t have to be anything specific. But as a best practice, make them intuitve.
export AWS_DEFAULT_REGION=us-east-1
export ROLE_NAME=ECSAnyWhereRole
export CLUSTER_NAME=cloudlocal-ecs-anywhere
export SERVICE_NAME=cloudlocal-ecs-anywhere-svc3. Create the AWS IAM role
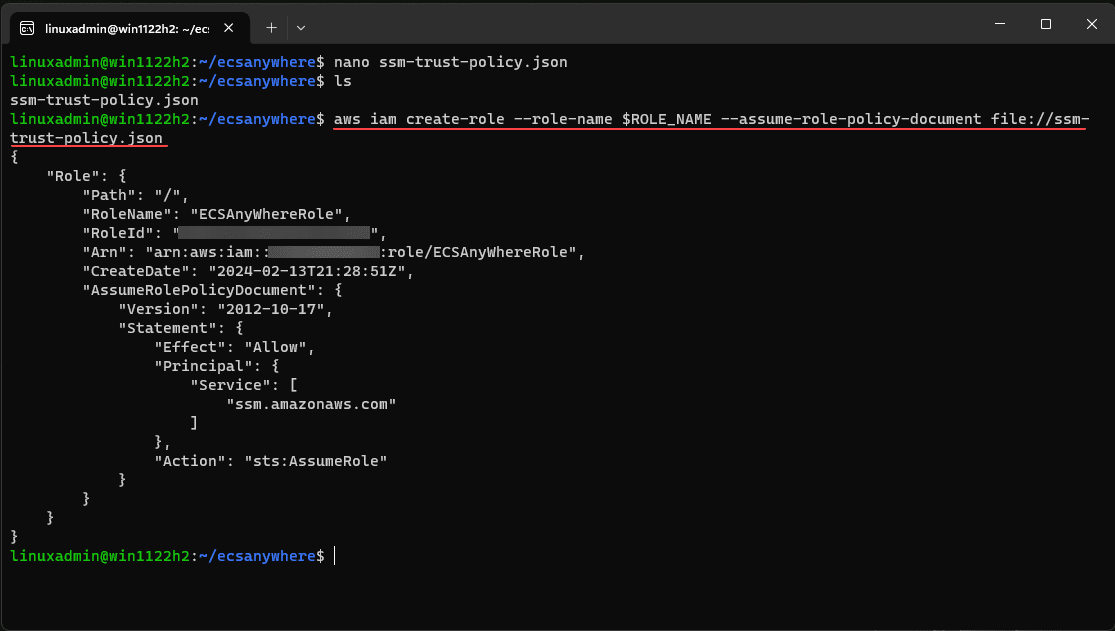
The next thing we need to do is create the AWS IAM role to work with the ECS environment. To create the IAM role, we need to create a file called ssm-trust-policy.json file with the following contents:
{
"Version": "2012-10-17",
"Statement": {
"Effect": "Allow",
"Principal": {"Service": [
"ssm.amazonaws.com"
]},
"Action": "sts:AssumeRole"
}
}Next, we run the following aws cli commands:
aws iam create-role --role-name $ROLE_NAME --assume-role-policy-document file://ssm-trust-policy.json

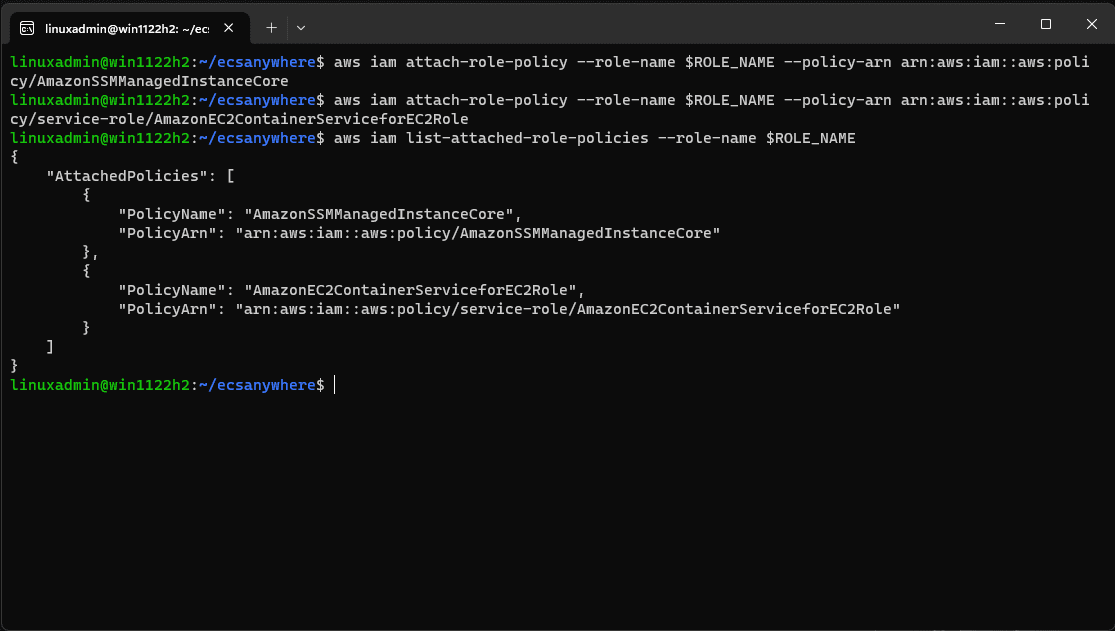
aws iam attach-role-policy --role-name $ROLE_NAME --policy-arn arn:aws:iam::aws:policy/AmazonSSMManagedInstanceCore

aws iam attach-role-policy --role-name $ROLE_NAME --policy-arn arn:aws:iam::aws:policy/service-role/AmazonEC2ContainerServiceforEC2Role

# Verify
aws iam list-attached-role-policies --role-name $ROLE_NAME4. Create the AWS ECS Cluster
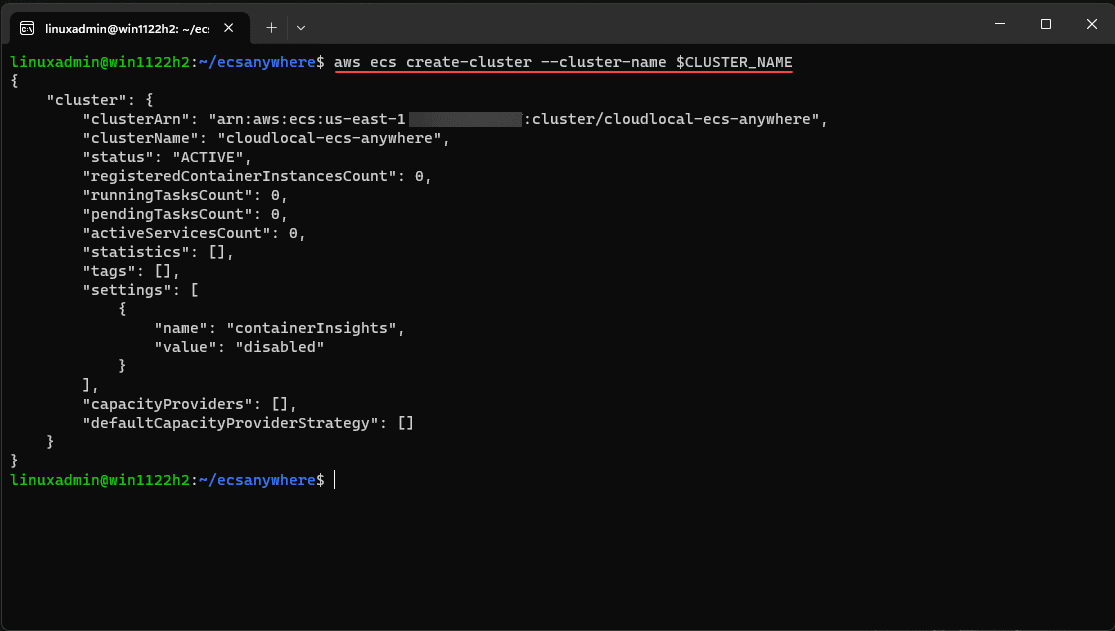
Now that we have the AWS IAM roles in place, we can create the AWS ECS cluster.
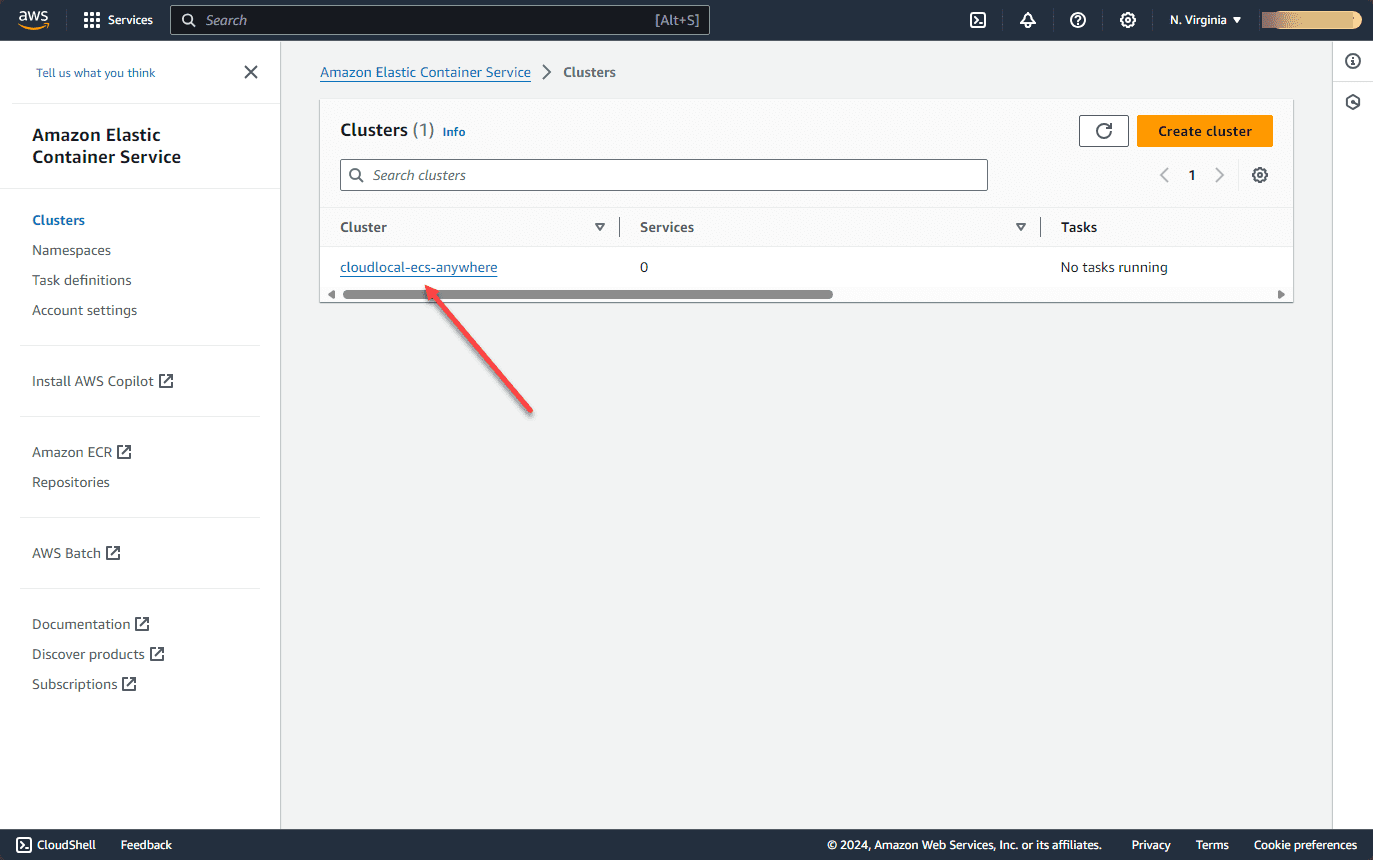
aws ecs create-cluster --cluster-name $CLUSTER_NAMEIf you log into your AWS console and head over to the ECS dashboard, you should see your cluster:
5. Create the cluster activation key
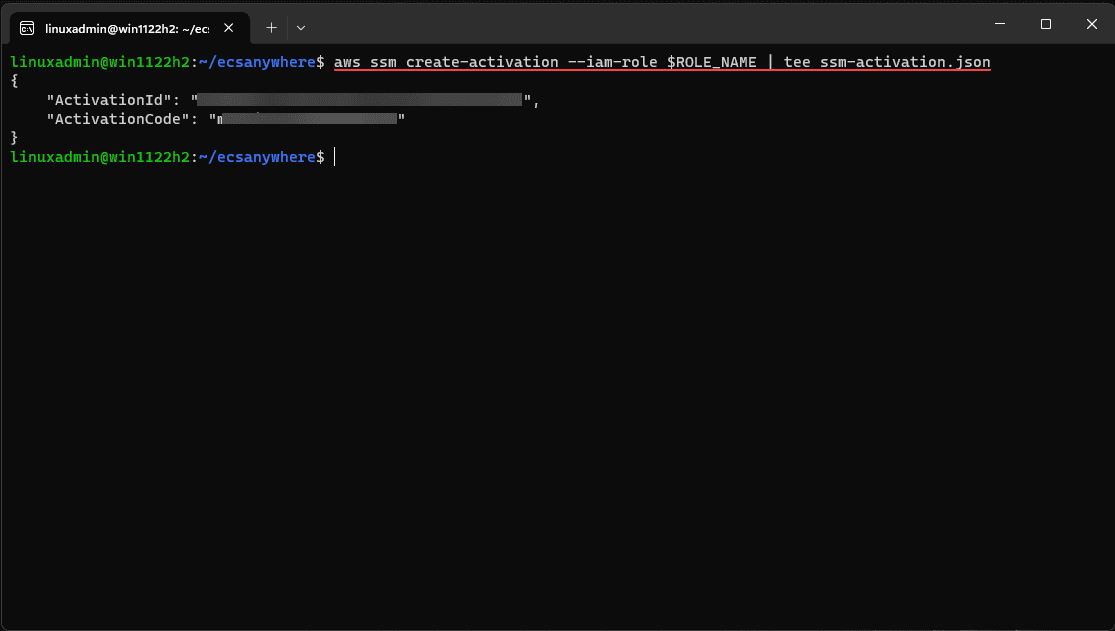
Now, we need to create the activation key pair that includes the activation ID and activation code.
aws ssm create-activation --iam-role $ROLE_NAME | tee ssm-activation.json6. Install the ECS anywhere agent
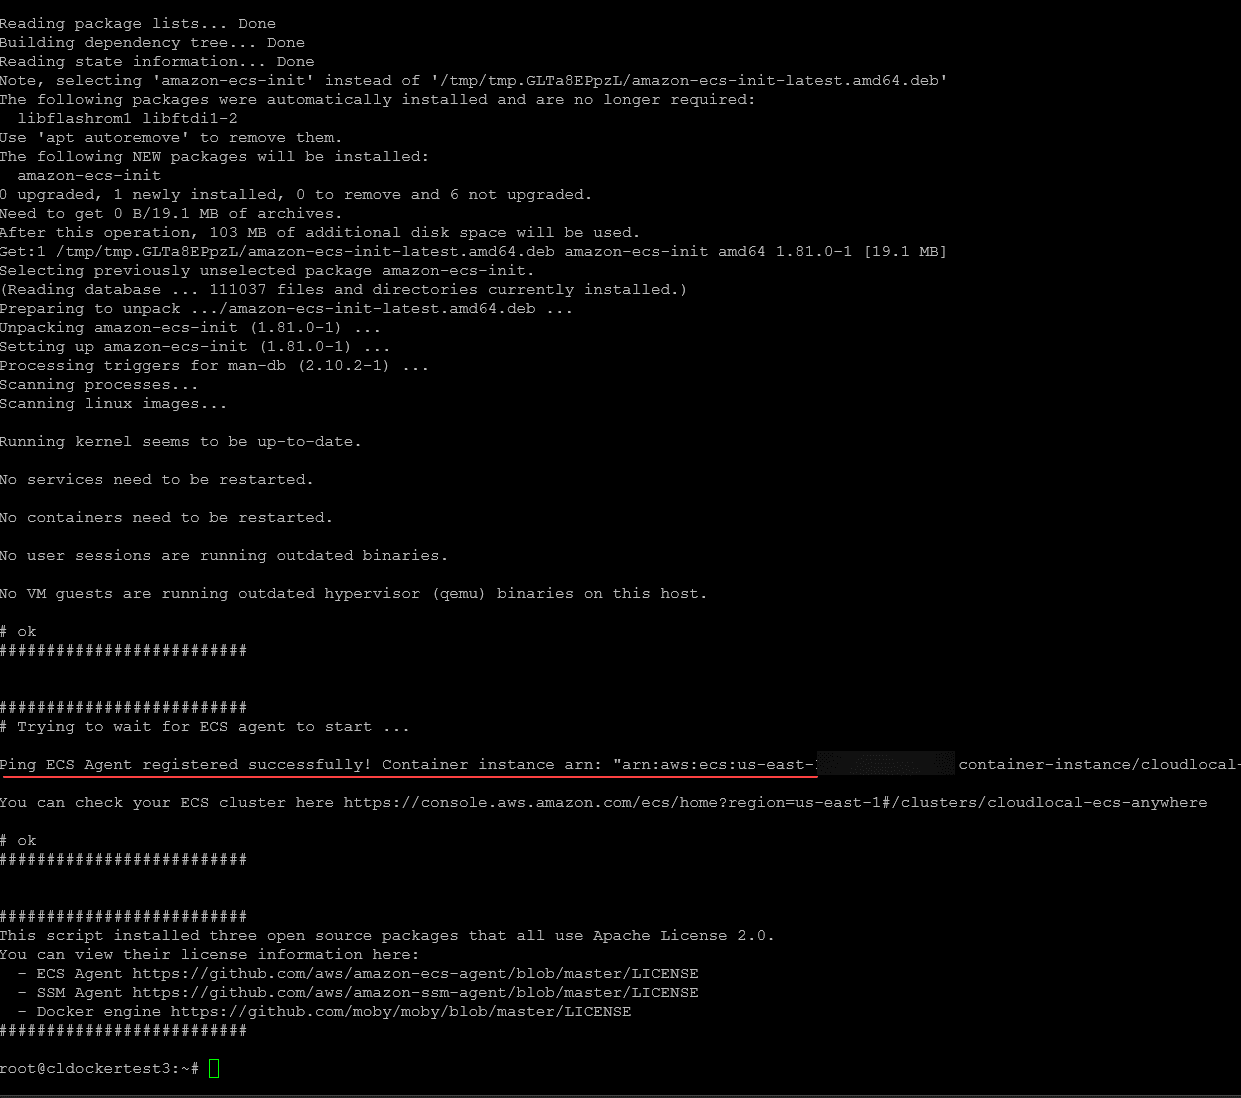
Now that we have the cluster activation information, we can now install the ECS anywhere agent.
#Run the commands to install the agent

export ACTIVATION_ID=<your activation ID>
export ACTIVATION_CODE=<your activation code>

# Download the ecs-anywhere install Script
curl -o "ecs-anywhere-install.sh" "https://amazon-ecs-agent-packages-preview.s3.us-east-1.amazonaws.com/ecs-anywhere-install.sh" && sudo chmod +x ecs-anywhere-install.sh

# (Optional) Check integrity of the shell script
curl -o "ecs-anywhere-install.sh.sha256" "https://amazon-ecs-agent-packages-preview.s3.us-east-1.amazonaws.com/ecs-anywhere-install.sh.sha256" && sha256sum -c ecs-anywhere-install.sh.sha256

# Run the install script
sudo ./ecs-anywhere-install.sh \
--cluster <your ecs cluster name> \
--activation-id $ACTIVATION_ID \
--activation-code $ACTIVATION_CODE \
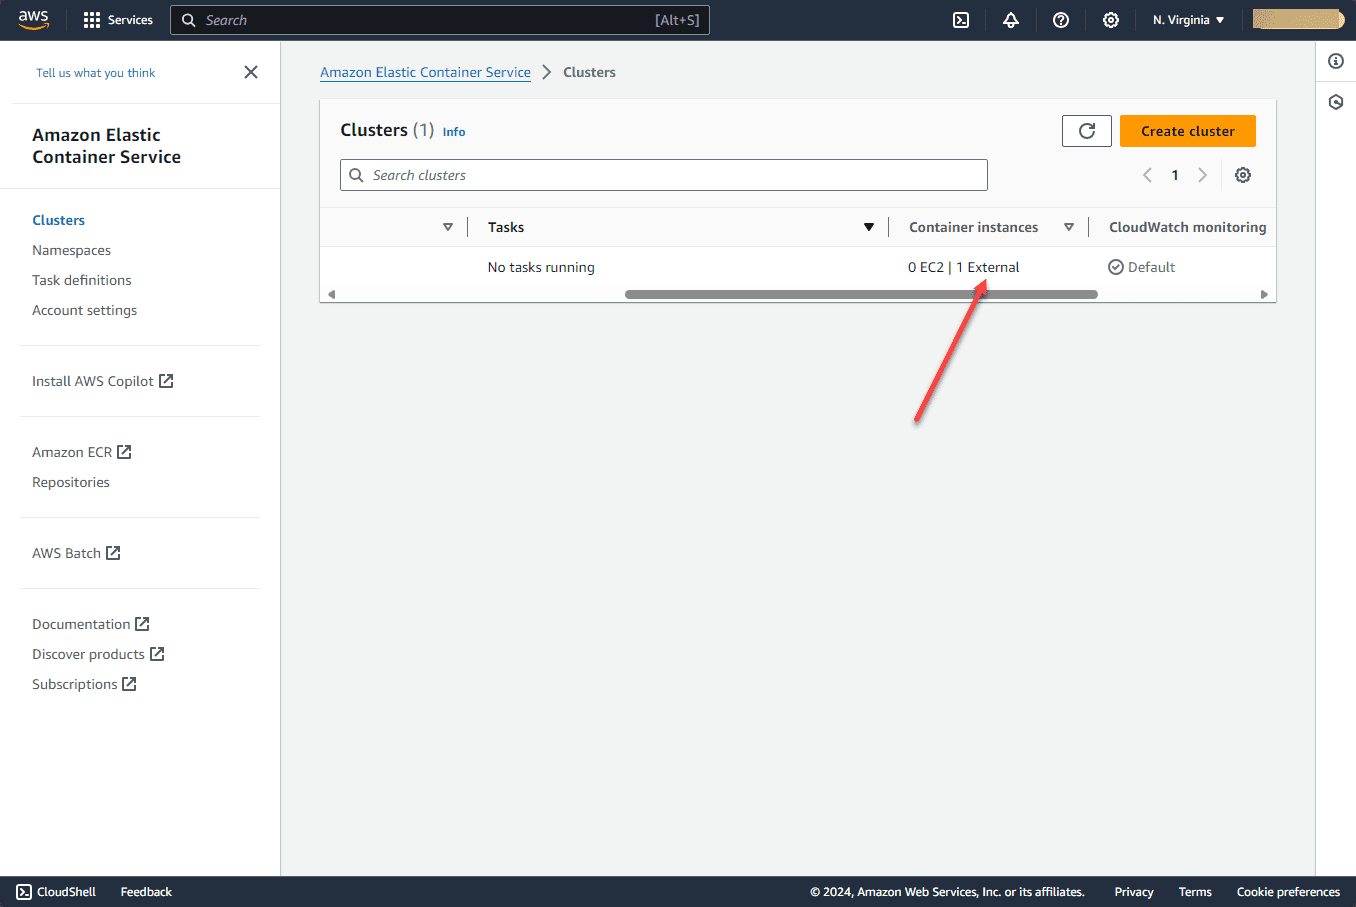
--region us-east-1Below, you can see the External instance has been registered.
7. Check the AWS ECS agent installation
You can use the following commands to check the installation of the ECS agent:
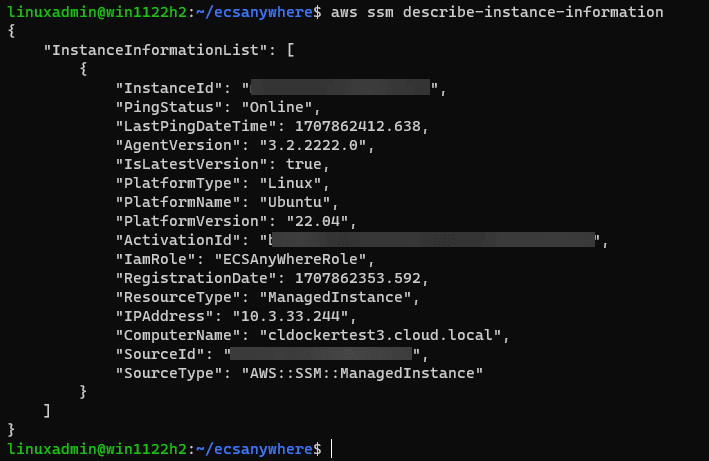
aws ssm describe-instance-information
aws ecs list-container-instances --cluster $CLUSTER_NAME8. Create a new AWS ECS Anywhere container task definition
Now that we have the infrastructure in place, we can create a new task definition.
Task definitions are a JSON-formatted text file that outlines one to ten containers, making up the components of your application. It serves as a blueprint, detailing the configuration of your application.
This includes specifying the containers that will be used, including the container image, the launch type, the ports, and the data volumes associated with the containers in the task. The range of parameters that can be defined within a task definition is determined by the chosen launch type.
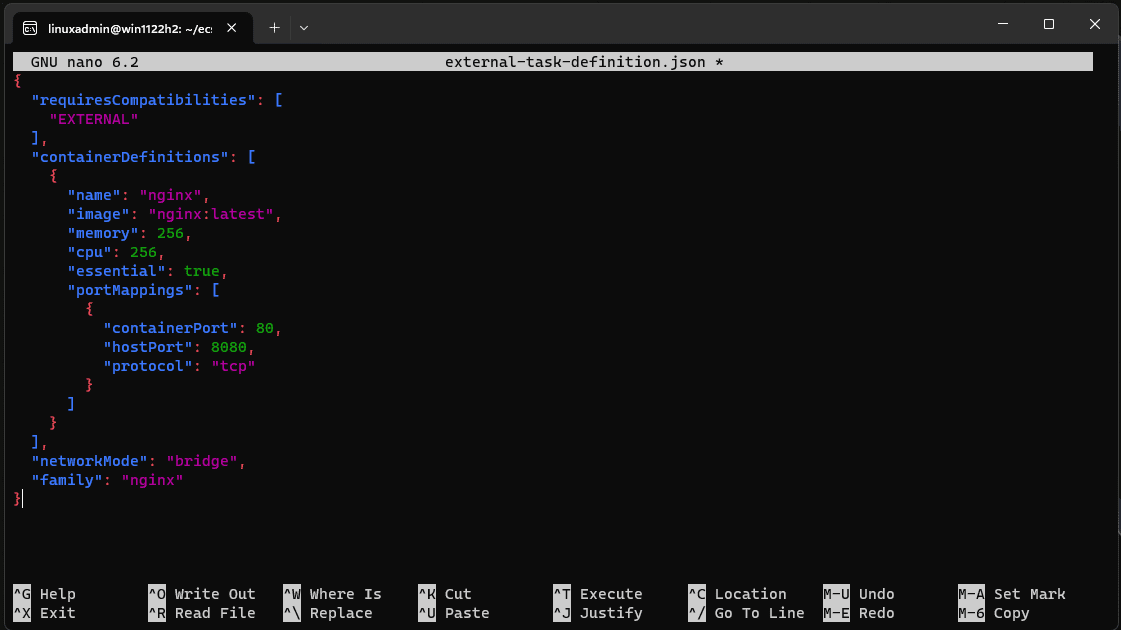
You will note in the below, the task definition for ECS Anywhere is configured as EXTERNAL. Save the following on your management workstation that has the AWS CLI tools installed as task-definition.json. It creates a simple nginx container with port 8080 exposed on the container host.
{
  "requiresCompatibilities": [
    "EXTERNAL"
  ],
  "containerDefinitions": [
    {
      "name": "nginx",
      "image": "nginx:latest",
      "memory": 256,
      "cpu": 256,
      "essential": true,
      "portMappings": [
        {
          "containerPort": 80,
          "hostPort": 8080,
          "protocol": "tcp"
        }
      ]
    }
  ],
  "networkMode": "bridge",
  "family": "nginx"
}9. Register the new task definition with the AWS ECS Anywhere cluster
#Register the task definition
aws ecs register-task-definition --cli-input-json file://external-task-definition.json

#Run the task
aws ecs run-task --cluster $CLUSTER_NAME --launch-type EXTERNAL --task-definition nginx

#Get the Task ID
TEST_TASKID=$(aws ecs list-tasks --cluster $CLUSTER_NAME | jq -r '.taskArns[0]')

#Verify Task is Running
aws ecs describe-tasks --cluster $CLUSTER_NAME --tasks $TEST_TASKID10. Check the running containers on your Docker host
Now that we have created and registered the new task definition, we can check the Docker host and see if the nginx container has been spun.docker ps
Awesome! We see the new nginx container runnning and we also can see the Amazon ECS Anywhere agent container running.
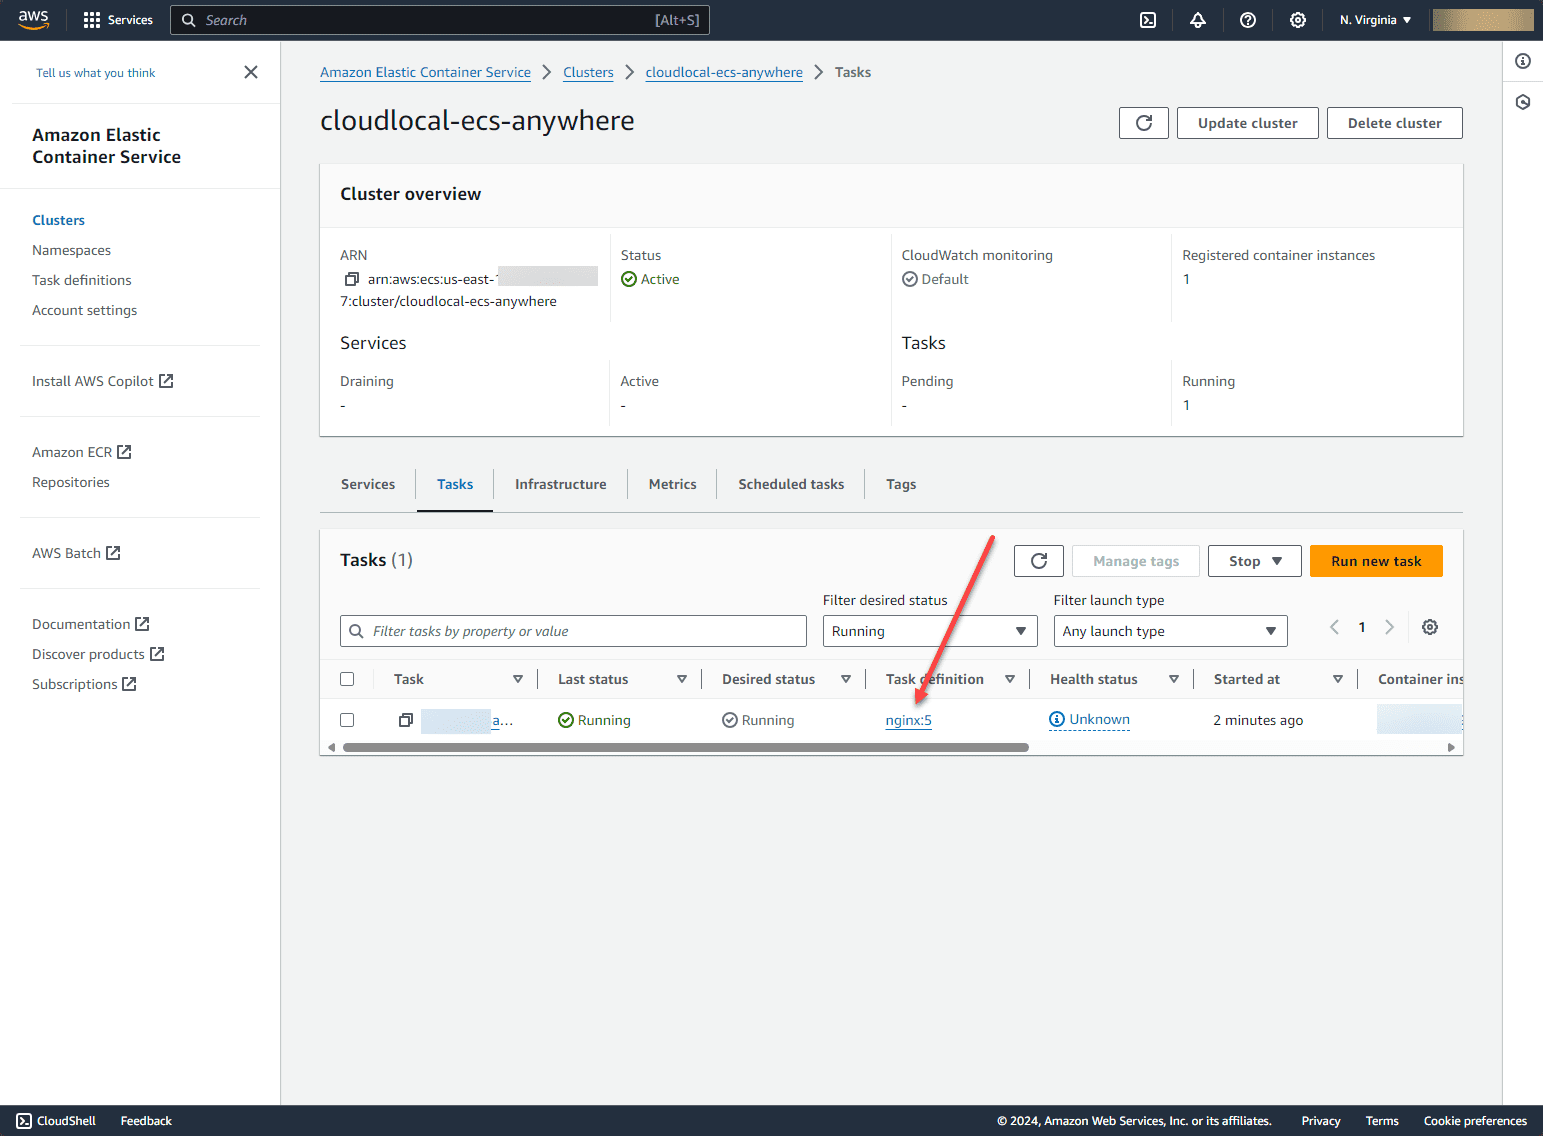
11. Check the AWS ECS cluster tasks
We can jump back to the AWS console and check the AWS ECS Cluster tasks.
Other things to note
ECS Anywhere not only simplifies container management across diverse environments but also integrates seamlessly with various AWS services. This includes AWS Lambda for serverless computing, Amazon Elastic Container Registry (ECR) for storing container images, and Amazon CloudWatch for monitoring and logging. So in other words, it opens up a large part of the AWS catalog you can run on-premises that otherwise you wouldn’t have access to unless running natively in AWS.
Cost
What does it cost? It is important to note that ECS Anywhere does have a cost associated with it. However, in terms of playing around with it and running a single instance in your home lab, it isn’t much. First, what is an instance? An instance is a customer-managed instance, which really equates to your Docker host, that has been registered with Amazon and is running the ECS Anywhere agent. So it is not each container.
The price is calculated based on the number of hours ECS Anywhere is managing an on-premises instance, with a minimum charge of 1 minute per instance. The price is $0.01025 per managed instance.
Amazon notes the following as an example:
- 10 on-premises instances that are connected to the Amazon ECS cluster for 30 days continuously
- Total fee for ECS Anywhere = 10 on-premises instances x 30 days x 24 hours x $0.01025 instance hour = $73.80
Scalability and Security
With ECS Anywhere, it has tremendous scalability and security. AWS’s security model extends to protect your container workloads. You can use AWS IAM roles and policies to manage access and leverage AWS’s infrastructure for secure, scalable container deployments.
Home Lab Implementations
ECS Anywhere is exceptionally cool for a home lab environments, and allows tech enthusiasts and professionals to run AWS containers on their own hardware. If you are experimenting with new applications or testing deployments, ECS Anywhere brings AWS container orchestration into your home lab or on-premises production environment.
Key Benefits and Features
You can run containers on-premises with the same ease as in the cloud which has benefits to efficienty, flexibility, and consistency in management and operations. Many operating systems are supported and the ECS extended capabilities ensure a seamless transition of container workloads between environments.
Considerations
Using your own infrastructure means there are several considerations to be made in terms of backup and disaster recovery of compute, network, and storage infrastructure. Reliability and availability depend on the same mechanisms that must be considered with any other on-premises workloads. So, you will need to protect your Docker hosts as you would other virtual machines running in production.
Wrapping up
Amazon ECS Anywhere is a great way to have a single management platform, without the need to run full-blown Kubernetes environments. You can keep your containers deployment close to the data they need to pull from, or if you are limited in an AWS region that makes sense, you can place the ECS hosts locally in the environment without the added latency and degraded performance of needing to place the containers in an AWS region far away. Also, there is just something really cool about having your containers running in your home lab show up in the AWS console in the cloud.


