


If there is one thing about Proxmox storage to note, it is that it fully embraces ZFS storage. ZFS is a native storage type in Proxmox and it has a lot of benefits in the home lab and even production with using it. However, it can also have its quirks and things to note BEFORE you start to use it so that you don’t have surprises along the way. I have covered broader Proxmox storage best practices before, but I want with this post to put laser focus on ZFS and the details around it. These are the 7 Proxmox ZFS settings I would want to know before using ZFS with Proxmox.
1. A VM might be almost empty but reserve its whole disk space
I recently was bit by a default with creating ZFS storage with the GUI in the home lab. Don’t just assume your ZFS is thin provisioned when creating a new volume. I recently was working on a Dell Precision workstation that was going to be used for a development environment and created a ZFS mirror with 2 NVMe drives that were going to be the storage target for virtual machines.
I also was creating a single SQL server that had some pretty large space requirements as well. One of the first things I noticed when checking my new mirror was there is definitely a difference between the volume size, the used space, and the reservation of space. That last part is key.
After creating the VM on the new ZFS storage and then checking the storage space after I created the 500 GB disk and expecting only to see the used space, instead I saw the whole 500 GB taken. What in the world?
Then, I checked the space, used, and then the reservation with this command:
zfs list -t volume -o name,volsize,used,refer,refreservationFor my main VM disk, the output looked like this:
NAME                      VOLSIZE   USED  REFER  REFRESERV
VM-storage/vm-100-disk-1     500G   508G  3.81G       508G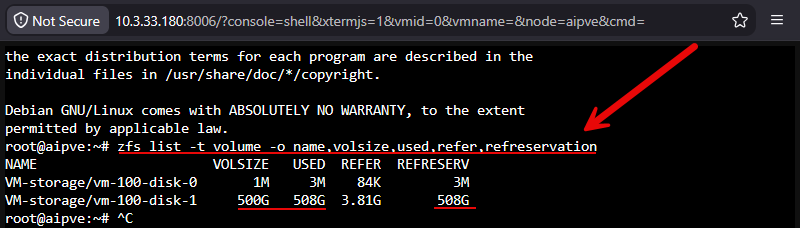
So, the important column in this case is the REFRESERV column where you see the 508G listed. So, the volume had a space reservation that accounted for the 508 GB of size. It didn’t mean the guest operating system had taken this space already. ZFS was keeping the capacity available for the volume. Also, the reservation calculation allows for overhead.
Keep in mind that when you create ZFS storage in Proxmox, it doesn’t by default at least in the GUI switch on “thin provisioning. You have to retroactively add this if you have already created your ZFS storage pool. To make this change, navigate to Datacenter > Storage and edit the ZFS storage properties to check of “thin provisioning”.
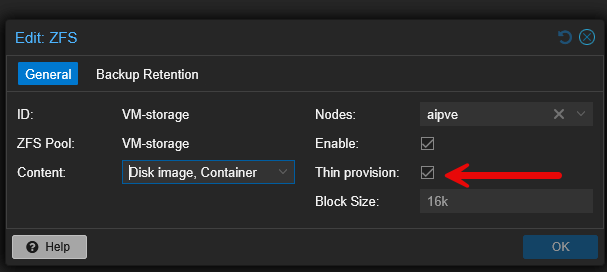
Then, if you have already created a VM, you need to retroactively remove the reservation in a separate operation. You can easily do this from the command line:
zfs set refreservation=none VM-storage/vm-100-disk-1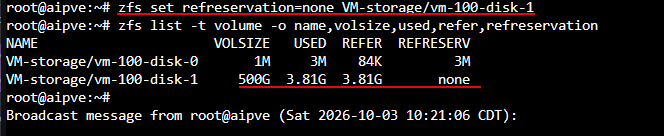
When you remove the reservation, it doesn’t shrink the guest disk or delete any contents or anything like that. But, it makes capacity monitoring more important because multiple thin disks can allow you to “overprovision” the storage which can also get you in trouble if a disk quickly fills up on a VM.
2. Snapshots can make it where deleted data still consumes space in your pool
There is another detail with ZFS to note. Snapshots can be an Achilles heel when it comes to your space capacity. With ZFS, snapshots keep a point in time as they refer to certain specific blocks. It doesn’t create a full second copy of the VM disk immediately.
So, what this means is as the volume changes, older blocks may still be needed by a snapshot. This is why deleting a large file inside a virtual machine doesn’t necessarily give you that space back into your pool.
I like to check out the snapshots and space used which you can do this with the following commands:
zfs list -t snapshot -o name,used,refer -s creation
zfs get usedbydataset,usedbysnapshots,usedbyrefreservation VM-storage/vm-100-disk-1
With these commands you can see the live data use, snapshots, retention and reservations. Where this is helpful to note is that you don’t want to spend a ton of time troubleshooting the discard setting when the storage is doing what it is doing due to a snapshot.
With Proxmox VMs that have snapshots managed by Proxmox, you can use Proxmox to review your snapshots and remove recovery points. Also, it is a good idea to make sure that replication or linked clones don’t depend on a snapshot before you remove them.
Snapshots have always been something that we have had to keep a close eye on, even outside of Proxmox environments. So keep a check on your snapshots. They usually become a problem when they are forgotten and left a long time. Put an expiration date on your snapshots. Use something like Pulse to alert you to snapshots that may be old and forgotten.
3. Block size matters between ZFS filesystem and ZFS volumes
Often there is confusion when it comes to tuning ZFS between filesystem and volumes. Keep in mind that a filesystem stores files. A zvol gives you a block device. This is the storage type that Proxmox local ZFS uses for VM disks that you provision.
You can inspect the actual ZFS volumes and look at their settings with the command here:
zfs get -r -t volume volblocksize VM-storage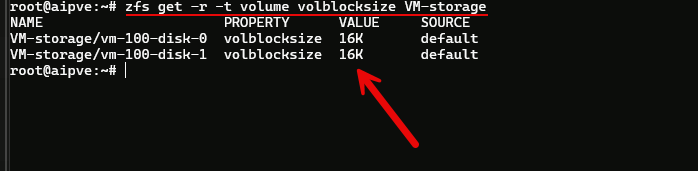
Another thing you can check is the block size field in the storage config. This affects volumes that are newly created. But this doesn’t affect existing VM disks to change their block size from what they were built with.
Using smaller blocks is usually better for small random writes. However, they also lead to more overhead that comes from the extra metadata. This can impact your efficiency.
I also check the Block Size field in the Proxmox ZFS storage configuration. That setting affects newly created volumes. Changing it does not rebuild existing VM disks with a different block size. Are smaller or bigger block sizes better? Well, like everything, it depends.
Smaller blocks can be useful for small random writes, but they also increase metadata overhead and can reduce your space efficiency. Larger blocks can help with the compression opportunities in your storage pool and are more tuned for sequential access, but small updates create way more overhead. The pool layout and guest workload both matter.
| Consideration | Smaller blocks | Larger blocks |
|---|---|---|
| Best suited for | Small random writes | Large sequential I/O |
| Metadata overhead | Higher | Lower |
| Compression potential savings | Lower | Higher |
| Small updates | Less read/write amplification | More read/write amplification |
Keep in mind it is not a good idea to just choose the block size based on the guest filesystem. For instance, if your guest filesystem uses 4 KB blocks, that doesn’t necessarily mean that is what you should choose for your ZFS pool. There are just several layers between an application and the physical devices. One matching block size between them, doesn’t mean that will give you the best results.
For a VM that already exists, you will need to migrate the disk or restore the disk to change the block size. For virtualization environments, my recommendation is to keep just a sensible baseline. Look at what was actually created and test a workload before thinking you need to tune it.
4. Compression savings depend
Compression is usually a feature of ZFS that you want to take advantage of. But don’t assume that just every virtual machine disk will net you great savings with compression. Different file types that are stored on guest disks will respond differently to compression. Things like text, logs, and even things stored in databases can compress differently than already compressed file types.
You can check your compression settings and what results you are getting:
zfs get -r compression,compressratio,refcompressratio VM-storage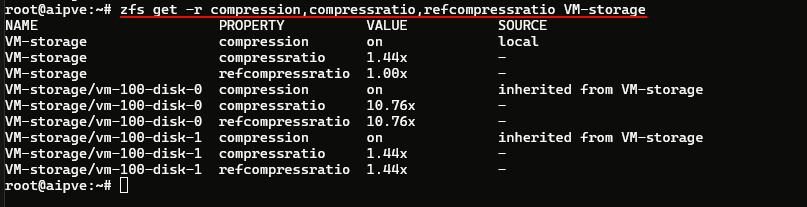
In the above screenshot, my main virtual machine showed around 1.44x compression ratio. This might not sound like much but that is actually a 31% space savings on this ZFS pool before other storage overhead is added. That is nothing to sneeze at.
The 10.76x compression value is on the tiny volume contained in the vm-100-disk-0. So even though compression on that one is super high, it doesn’t have the impact that the 1.44x compression has on the much larger disk.
Here is a table breakdown:
| ZFS volume | Compression ratio | Approximate space savings |
|---|---|---|
| Main VM disk (vm-100-disk-1) | 1.44x | 31% |
| Tiny supporting volume (vm-100-disk-0) | 10.76x | 91% |
| Overall pool (VM-storage) | 1.44x | 31% |
My numbers above are using LZ4 compression which has a really good mix of space savings and low CPU overhead. The above command shows whether compression is on. If it is “on”, you can also check to see if it is using LZ4 by default with the command:
zpool get feature@lz4_compress VM-storageIf it is using LZ4, it will show active as it displays in the screenshot below:

You can also explicitly set this algorithm for your compression with the command:
zfs set compression=lz4 VM-storage5. ZFS memory usage needs context
When I look at memory usage on a Proxmox host running ZFS, I want to distinguish VM memory from the Adaptive Replacement Cache, or ARC. ARC uses RAM to cache storage data and metadata, reducing the need to read from the devices repeatedly.
That means a higher host memory figure is not automatically evidence of a memory leak. It also does not mean I can ignore memory pressure just because some usage is cache.
I start with these checks:
free -h
arc_summary
cat /sys/module/zfs/parameters/zfs_arc_max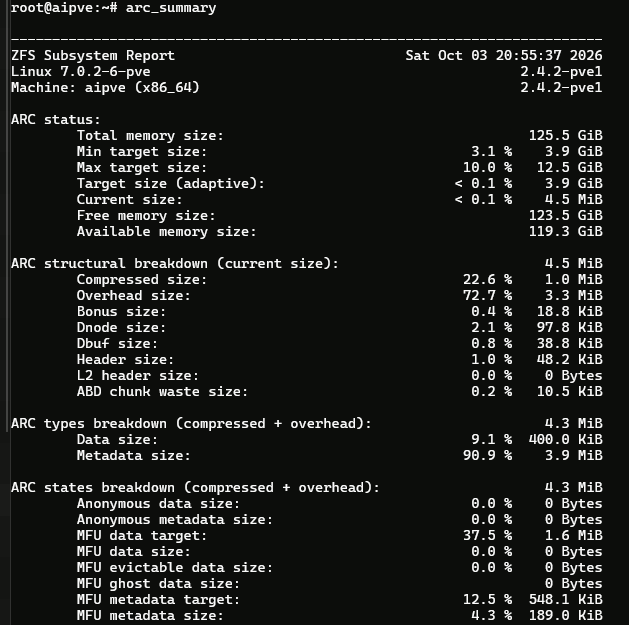
On hosts where the utility is installed, I also use the arcstat 1 command. Think of this like a real-time read on arc cache usage.
arcstat 1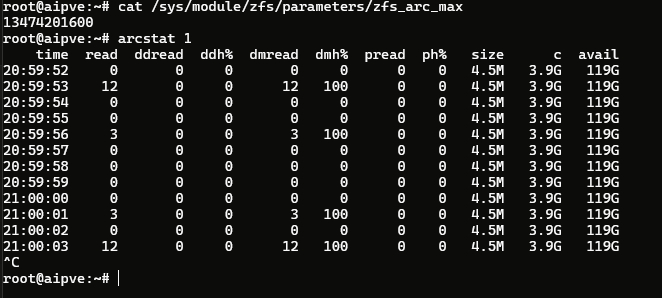
Keep in mind that you need to size ARC cache around the overall memory that the host has available to it. Look at the amount of physical RAM that you have installed in the host. Then subtract the memory running from your VMs and containers. Then you also want to leave overhead to account for things like Proxmox itself, QEMU, ZFS operations, and other host processes.
For instance, let’s say you had a host that has 128 GB of RAM and then you had VM RAM usage that totals around 120 GB. That leaves approximately 8 GB before the host overhead. So, if you allow ARC to grow to a configured max of around 12 GB as an example, that would be too aggressive and you would run into memory pressure and likely performance issues. ARC can shrink itself, but it is better to not have to leave it to have to do that.
| Memory consideration | What to account for |
|---|---|
| Physical RAM | Total memory in your host |
| VMs and containers | Usage and growth toward the limits |
| Proxmox and QEMU | Host services and overhead beyond your guest’s RAM |
| ZFS operations | Memory that you need that goes beyond ARC for storage operations |
| Other host processes | Monitoring, backup tools, and other things |
| Safety margin | Spikes and maintenance periods |
| ARC budget | A cache limit that fits within the memory that is left over |
6. Data isn’t automatically redistributed when you grow a zpool
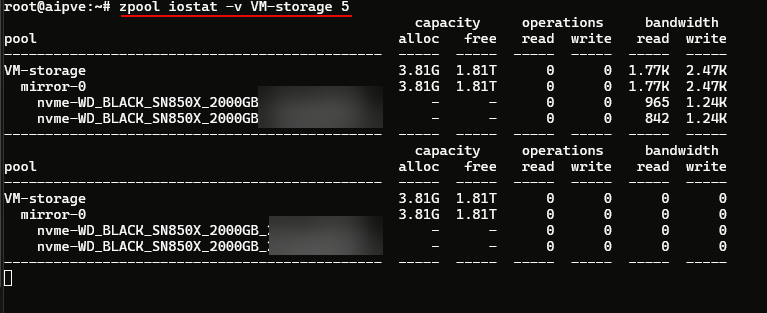
You can incrementally expand ZFS pools. For instance, you can start with a two-drive mirror and then add another mirrored configuration to the pool. But, don’t expect the new mirror to perform an automatic rebalance on the existing blocks to even out the distribution.
New writes will use the new capacity. But existing data will stay where it is at unless it is rewritten or you deliberately migrate it. You can inspect your layout and activity with the following command that is helpful:
zpool status VM-storage
zpool iostat -v VM-storage 5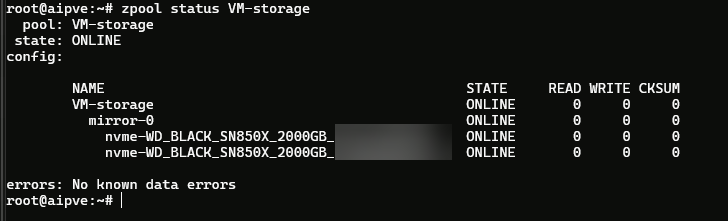
7. A healthy mirror still needs scrubs and alerting configured
Don’t assume that you don’t need scrubs on a healthy mirror or alerting that you can configure to proactively let you know about problems. A mirror gives ZFS redundant copies, but having a scrub process that checks your data is a proactive way to keep things healthy.
Scrubbing is a process that reads the allocated data and verifies the checksums match. If ZFS finds damage and has a redundant copy, it can repair the affected data. Resilvering is another process that is related that brings a replacement drive into sync with the redundant data.
Below, you can see on my Proxmox host, ZFS automatically has a scrub scheduled for the second Sunday of every month at 12:24 a.m. I didn’t configure this, so this is the default that Proxmox created for me.

This is a reasonable default that you may not need to tweak, but I would add verification and monitoring to this scrub process. Include these checks:
systemctl is-active cron
zpool status VM-storage
zpool status -x
Wrapping up
Hopefully, these 7 Proxmox ZFS settings will help others to have a better idea and understanding of ZFS. It is a powerful storage solution for virtualization. But, like everything, it has its quirks and things you need to be mindful of around thin provisioning, compression, disk space with snapshots, expansion, scrubbing, and other areas. How about you? Are you running ZFS in your home lab or production environment? Let me know any gotchas or wisdom you want to pass along to the community in the comments below.
More in this topic


Google is updating how articles are shown. Don’t miss our leading home lab and tech content, written by humans, by setting Virtualization Howto as a preferred source.
About The Author
