I have been talking a lot lately about how I centralize the configuration of my Linux servers in git and other content around infrastructure as code and making sure you have everything version controlled. Over the years have I built and rebuilt countless Linux servers in my home lab. Some have been traditional virtual machines and others have been container hosts, Kubernetes nodes, and other infrastructure like DNS servers. However, the installation is the easy part. The real work begins after the operating system boots for the first time. I have documented a few of the changes that I make to help improve security, reliability, observability, and keep things running smoothly. These tweaks help to prevent the kinds of issues that can crop up months later. Whether you are deploying Ubuntu, Rocky, Flatcar, or some other distro, the same principles apply.
Configure SSH properly
SSH is usually the first thing I touch after deploying a new server. After all, it is the means that most of us will use to manage and administer our Linux environments after installation and getting them into production. The first thing I do is verify key-based authentication and make sure it is working as expected. Then I use the key-based auth in my Termix application to connect and manage my home lab servers.
Password logins are convenient at first, but they are very risky from a security perspective. So, what do I recommend you configure? Make sure with SSH, you configure the following:
- SSH key authentication
- Root login restrictions
- Limited administrative accounts
- Strong authentication policies
If your server is exposed outside of your home lab, maybe even to the Internet, there is additional hardening you will want to do as well with SSH. Maybe adding fail2ban and other security mechanisms.
For servers that are exposed outside the home lab network, I am even more aggressive with hardening. Those systems tend to attract unwanted login attempts almost immediately. One thing to keep in mind is that locking yourself out is easy to do when you are experimenting with SSH hardening, so have a plan to get yourself back into your server if you accidentally lock yourself out.
Here are some of the configuration parameters that you might consider enabling and setting in your /etc/ssh/sshd_config file:
# Disable root SSH login
PermitRootLogin prohibit-password

# Disable password authentication
PasswordAuthentication no

# Disable empty passwords
PermitEmptyPasswords no

# Enable public key authentication
PubkeyAuthentication yes

# Disable challenge-response authentication
ChallengeResponseAuthentication no

# Disable keyboard-interactive auth
KbdInteractiveAuthentication no

# Limit authentication attempts
MaxAuthTries 3

# Disconnect idle sessions after 10 minutes
ClientAliveInterval 600
ClientAliveCountMax 0

# Only allow specific users
AllowUsers linuxadmin

# Use modern authentication methods
AuthenticationMethods publickey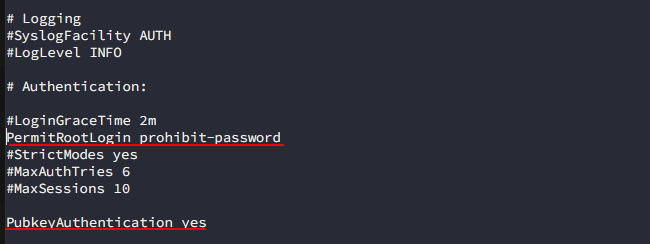
Setup timezone and time synchronization
There are a couple of things related to “time” that I like to make sure I have configured properly out of a new Linux server build. Time synchronization is one of those invisible services that nobody thinks about until something breaks or you are trying to figure out why your logs are in a different timezone.
One of the first things that I do is set the timezone for my local timezone. Across most distros, the following will work:
sudo timedatectl set-timezone America/ChicagoNext, once I have the timezone configured, I make sure that I have NTP server synchronization configured and working. Depending on the distribution, that may involve Chrony, systemd-timesyncd, or another service.
However, on most of the recent Linux distros, NTP server synchronization is already configured. But you can make sure by checking using the following:
That’s why a lot of the time all you need to do is verify:
timedatectl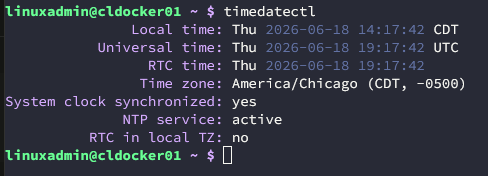
and make sure you see:
System clock synchronized: yes
NTP service: active
You can see which server is currently being used with:
timedatectl timesync-status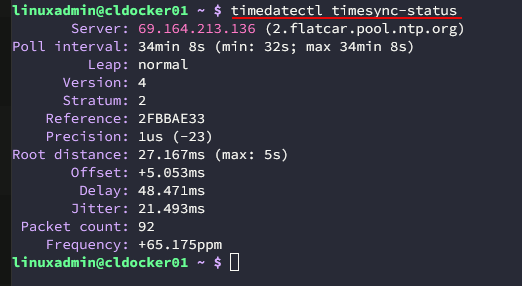
You can see all the servers that are configured in the time sync configuration using the following:
grep -E 'NTP=|FallbackNTP=' /etc/systemd/timesyncd.conf
Install guest integration tools for Proxmox
Most hypervisors have what are known as “guest integration tools” that allow the hypervisor to interact with the guest virtual machine in a more efficient way and allows it to see what is happening inside the guest operating system.
I am currently running Linux under Proxmox. But VMware, Hyper-V and others have their own version of the integration services. This is an installation that you should consider to be mandatory moving forward if you don’t already. For Proxmox, this is the QEMU Guest Agent.
You can install this with the command:
sudo apt install qemu-guest-agent -y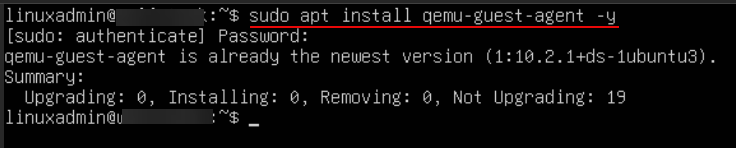
This provides valuable functionality such as the following:
- Accurate IP reporting
- Guest shutdown operations
- Better VM management integration
- Improved backup coordination

The installation takes only a few seconds to complete, but, the benefits are ongoing. Whenever I find a Linux VM without guest integration installed, it just feels incomplete.
Enable monitoring immediately
One mistake I made early in my home lab journey was waiting until something broke before implementing monitoring. Now I do the opposite. I want visibility from the beginning. Every new Linux server should provide answers to basic operational questions:
- Is it online?
- Is CPU usage normal?
- Is memory consumption increasing?
- Is storage filling up?
- Are services healthy?
Monitoring does not need to be overly complicated and I think this is a mistake that most of us still make. Even a simple monitoring stack can provide a lot of value. Over the years, I have used a combination of tools, a lot of which are open-source to effectively monitor. The important thing is getting observability in place before you need it.
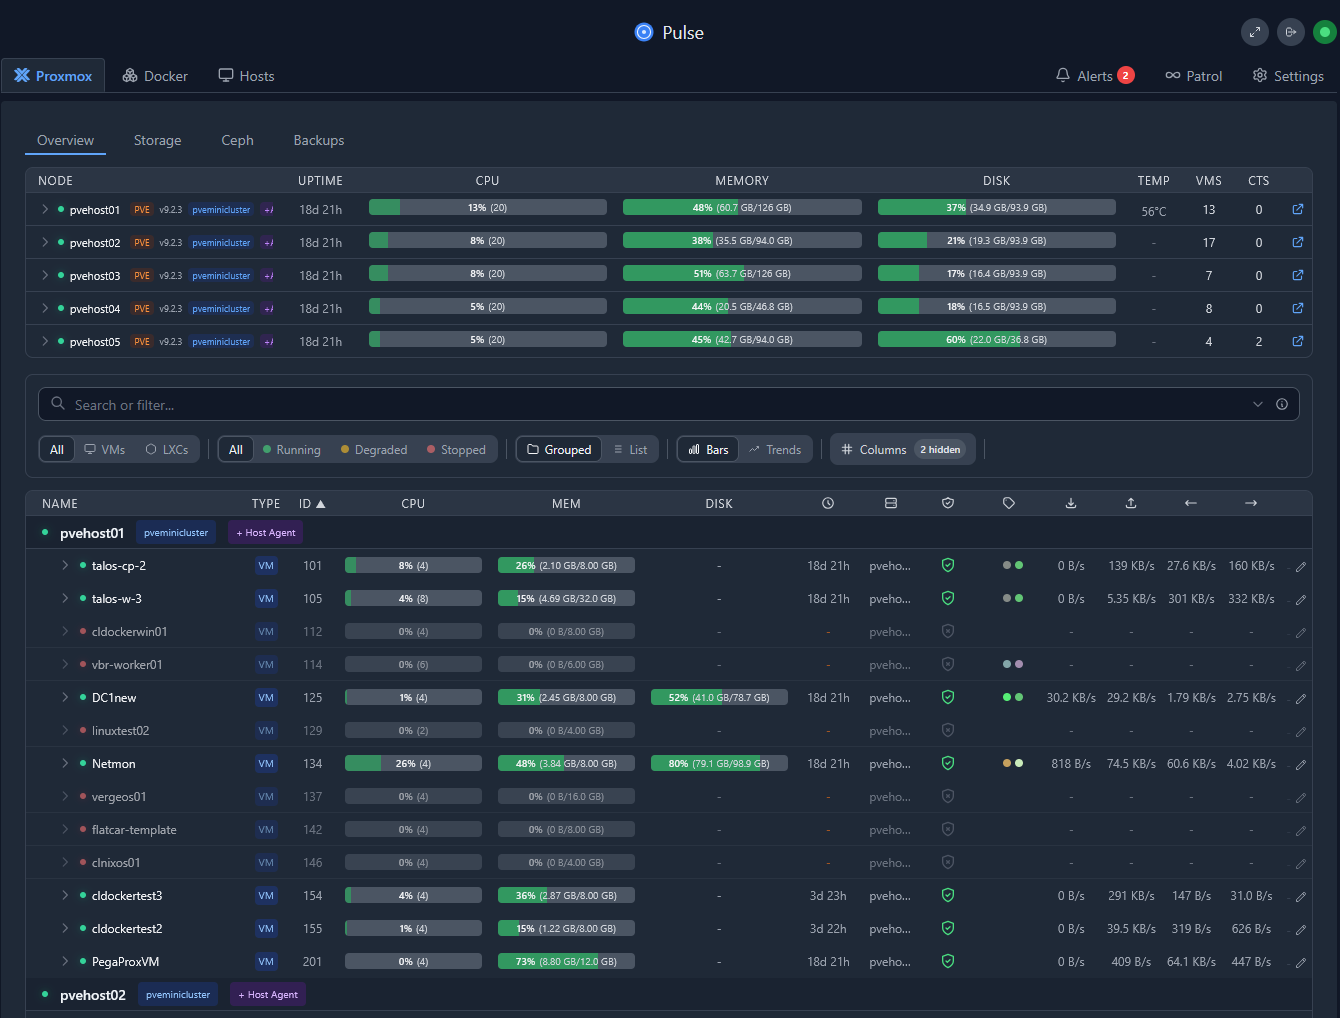
The good thing is a lot of tools like Pulse automatically scan your Proxmox hosts for new virtual machines and get those automatically added to your inventory for basic monitoring details. Docker hosts though you get the best visibility by installing the Pulse host agent.
Configure persistent logging
Logging is one of the non-cool things that is a necessary evil. We hate to go through the work to set it up, but you are glad you have them when you need them. Unfortunately, not every Linux distribution handles log retention the same way.
One of the first things I verify is whether logs will survive a reboot and whether it has the right retention configured. Having detailed historical logs can make the difference between solving a problem in minutes versus spending hours trying to figure out what happened.
I also pay attention to journal size and storage consumption. If you don’t have some configuration that limits this, logging can basically fill a modestly sized drive. So keep this in mind as part of your configuration and housekeeping.
Here are some really helpful commands:
# Verify logs survive reboots
journalctl --list-boots
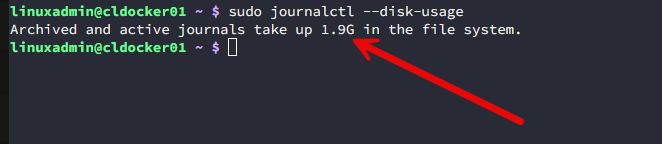
# Check current journal size
journalctl --disk-usage
# Limit journal growth to 1 GB
sudo journalctl --vacuum-size=1G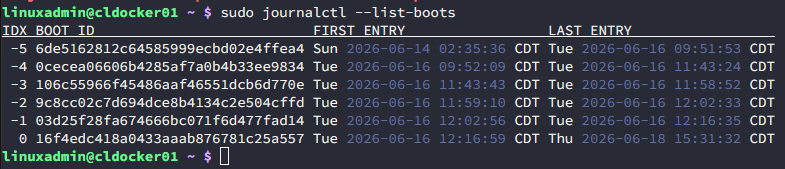
One of the first things I verify is that logs are surviving reboots. But, also, you want to make sure they aren’t growing uncontrollably. I usually use something like journalctl –list-boots to make sure historical logs are available and journalctl –disk-usage to check your storage consumption. If logs have growing fast, journalctl –vacuum-size=1G is a quick way to reclaim space and make sure you still have a good bit of retention.
Or if you want an actual persistent configuration instead of a one-time cleanup:
sudo nano /etc/systemd/journald.conf

##configure the below
SystemMaxUse=1G
Then:
sudo systemctl restart systemd-journaldSet up automatic filesystem trimming
I wrote about this not long ago, but if you are thin provisioning your storage, especially with modern SSDs and NVMe drives, you want to make sure you have the discard setting enabled and also have trim configured inside your guest operating system to make sure deleted space properly shows up as reclaimable.
Read my post here on the hidden storage settings you need to enable for this to work: Why Proxmox Wasn’t Reclaiming Storage Until I Fixed This Setting.
We can check to see if trim is enabled and scheduled and also run a manual trim job. Note the following:
To verify the fstrim timer is enabled:
systemctl status fstrim.timerOr you can run:
systemctl list-timers fstrim.timerIf the service shows to be there but not enabled (which I found to be the case in Flatcar), you can enable it with the following:
sudo systemctl enable --now fstrim.timer
If you want to run a trim job manually, you can do that with the following:
sudo fstrim -avExample output:
/ : 12.3 GiB trimmed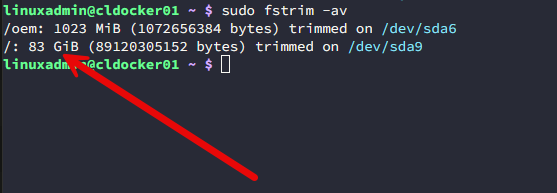
Create a standard administrative account
I avoid relying exclusively on root whenever possible. It is always better to create yourself a standard administrative account with appropriate sudo permissions. This gives you a lot of benefits, especially from a security perspective.
It creates accountability in environments with multiple administrators. It helps you to reduce accidental mistakes while operating as root. It also lines up with the way many enterprise environments are managed.

When alll of your Linux servers follow a similar account structure, administration becomes much simpler because it is consistent. One lesson I learned years ago is that naming conventions matter more than people initially realize. Consistent usernames, groups, and permissions make large environments easier to maintain.
Configure your automatic updates
This is a topic with a lot of strong opinions on what to do and what not to do. Some administrators disable automatic updates entirely and rely on an external tool to take care of them. Others enable full unattended upgrades. My approach falls somewhere in the middle.
Security updates are generally important enough that I want them applied quickly. However, I also understand that unexpected package updates can occasionally introduce instability. But, for me, I use an immutable Linux OS, Flatcar Linux. With these types of Linux OSes, you have less risk due to the way they update and apply new files, etc.
With Flatcar, I generally hook these into the stable update channel and let them update automatically while setting a time window for them to restart such as 4:00 a.m. in the morning. With something like Ubuntu Server, I typically use something like Patchmon to patch these servers.
Read my post on Patchmon V2 and why it is my new favorite tool for updates: PatchMon V2 Finally Lets You Patch Your Servers From One Dashboard.

Patchmon allows you to group servers into different update profiles so you can granularly control when certain servers or roles get updates.
Put important configuration under version control
Again, something I have written about a lot lately. Using Linux distros and other solutions that can be driven from configuration files, like Flatcar with its Ignition file configuration, you can then store these configurations in a git repo and have keep these for the next time you need to deploy your servers.
This way, the servers themselves just become like “cattle” and not “pets”. You don’t worry if they go down or are completely wiped away, you have everything you need to recreate them. This is probably one of the most valuable habits I have developed over the past couple of years especially. If a configuration file is important, I want it tracked somewhere.
When I make a configuration change, I want to know:
- What changed
- When it changed
- Why it changed
Version control with my self-hosted git repo helps to answer these kinds of questions in my home lab environment. This becomes even more valuable months later when troubleshooting an issue or rebuilding a system. This also serves as one of the best kinds of documentation as the entire configuration is there in the git source file.
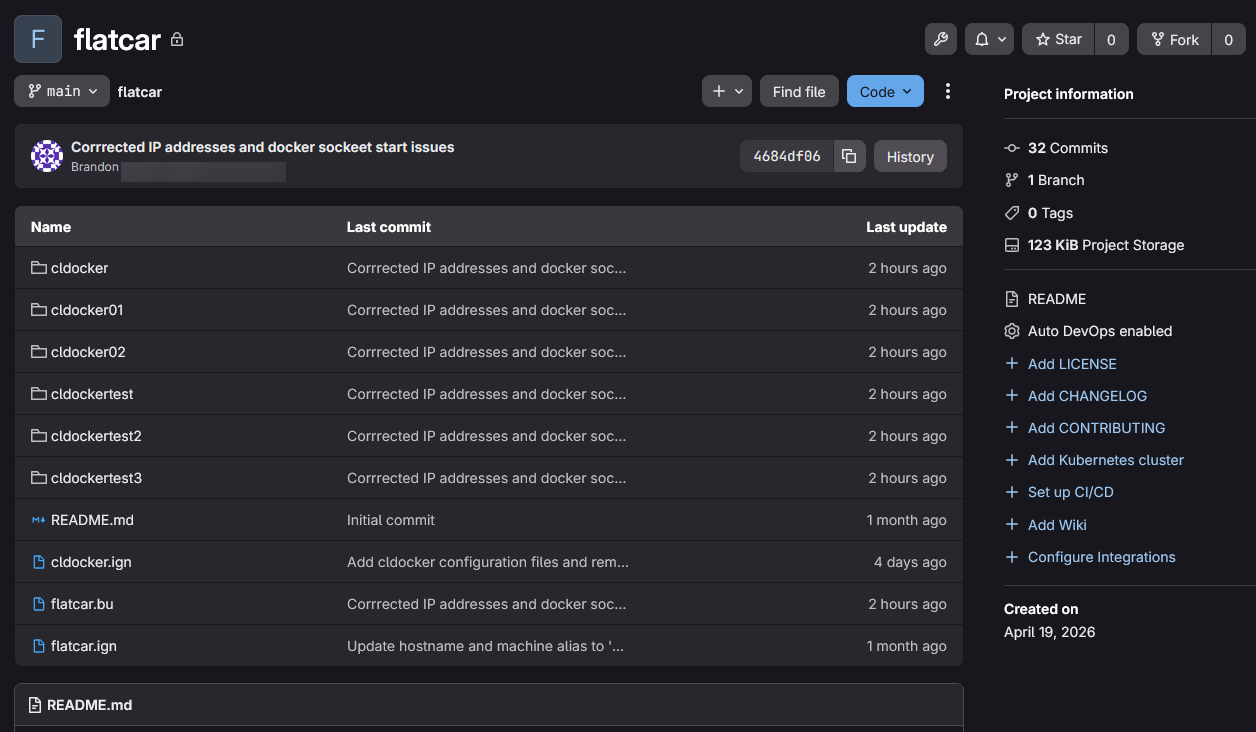
See how I store my DNS configuration in git here: I Now Manage My DNS Server from Git (and It Changed Everything). Below, is a picture of my flatcar configuration repo in my self-hosted GitLab instance.
Turn on the firewall early
Another configuration change I make immediately is reviewing firewall settings and making use of it early in the life of a server. Often we operate our home labs on a “trusted network” that we don’t necessarily care about locking down or using the host firewall on a Linux system.
However, this is a discipline that will not only help you in the home lab environment but also taking your skills into production environments. Even simple little firewall rules can significantly improve the security of your server. And, these allow you to microsegment your network.
At minimum, I want to understand:
- Which ports are exposed
- Which services are listening
- Which networks require access
The first thing I typically check is which ports are currently listening:
sudo ss -tulpn
I also verify whether a firewall service is running:
sudo systemctl status firewalldOr on Ubuntu-based systems:
sudo ufw statusFor servers that need to have SSH access, I generally make sure SSH is allowed before enabling any firewall rules:
sudo ufw allow ssh
sudo ufw enable
Or with firewalld:
sudo firewall-cmd --permanent --add-service=ssh
sudo firewall-cmd --reload
Wrapping up
Hopefully, these Linux configuration changes I make on every new home lab server will give you some ideas of things that I am looking at when I build a new server in my home lab environment. These types of configurations though translate not just in the home lab but also into production environments. How about you? What configurations are you setting and configuring in your home lab environment that are important to you? Let me know in the comments.
Google is updating how articles are shown. Don’t miss our leading home lab and tech content, written by humans, by setting Virtualization Howto as a preferred source.
About The Author