Maybe you have been in this situation where you know you are deleting data inside your virtual machines running in Proxmox. You see the disk usage drop inside the guest operating system. Everything looks normal from the guest VM perspective. But on your storage side in Proxmox, nothing changes. If you are coming from a VMware background where a lot of the underlying processes are abstracted from you, thin provisioning just works most of the time. You expect your storage to just reclaim when your data is deleted. In Proxmox, it turns out, this is not always automatic if not configured to be. Let me explain the Proxmox discard setting and why it is important.
Why this happens in Promox
The root of why you would see this comes down to how storage reclamation works across different layers of your storage. And, with Proxmox, you have to understand each layer to know that your storage is getting reclaimed as it should be. So, I like to think of this like jumbo frames. If you don’t have your storage reclamation configured correctly in one area, then it won’t function correctly.
Which storage layers need to be configured in Proxmox?
Note the following flow of how your storage layers need to be configured in Proxmox and how the storage reclamation process works together through these different layers:
Application deletes data inside the VM
        >
Guest operating system marks blocks as free
        >
Guest OS sends TRIM / UNMAP commands
        >
Proxmox VM disk must have discard enabled
        >
Hypervisor passes discard to the storage layer
        >
LVM / multipath / storage plugin must allow passdown
        >
Backend storage receives reclaim request
        >
SAN / Ceph / SSD storage frees unused blocks
If the above flow doesn’t happen (aka there is a storage layer that is misconfigured), the flow will look like this:
- VM deletes data
- Guest filesystem marks blocks as free
- Hypervisor does nothing with that information
- Storage backend still thinks those blocks are taken
The result is storage that slowly fills up over time even though your VMs look like they have plenty of free space. This applies across the board in Proxmox VE, including the following storage types
- iSCSI backed LVM
- SAN storage like Dell PowerVault
- Ceph RBD storage
- Even local LVM thin pools
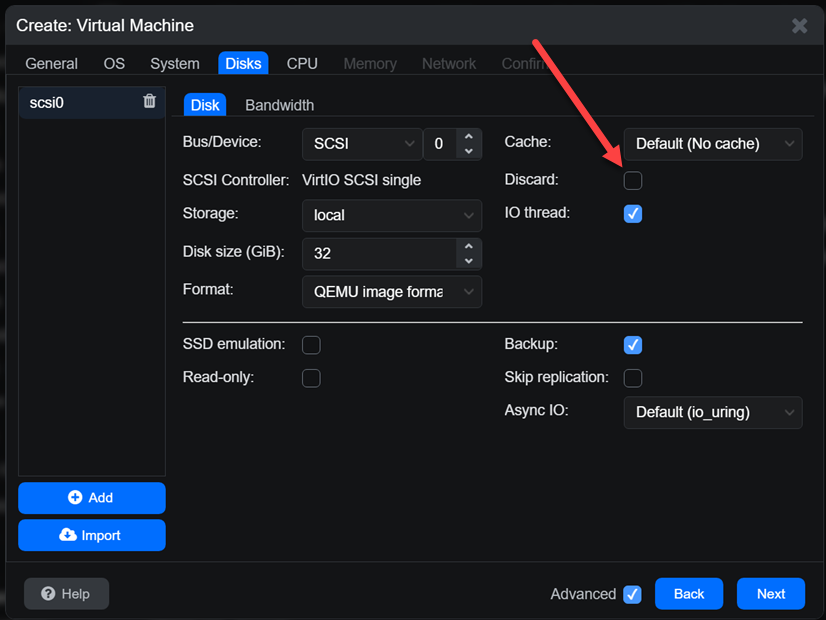
The common denominator is that nothing reclaims space unless discard is explicitly enabled and working end to end. The problem is, this flag is easy to miss when creating a new virtual machine in Proxmox. It would be nice to see Proxmox automatically detect you have thin provisioned storage and automatically set the flag. But, this is not the case as of the most recent 9.x release.
If you quickly blow past this on the Create Virtual Machine workflow, you will easily miss the discard flag. It is a checkbox as you can see on the Disks screen.
Checking your VM storage config for discard
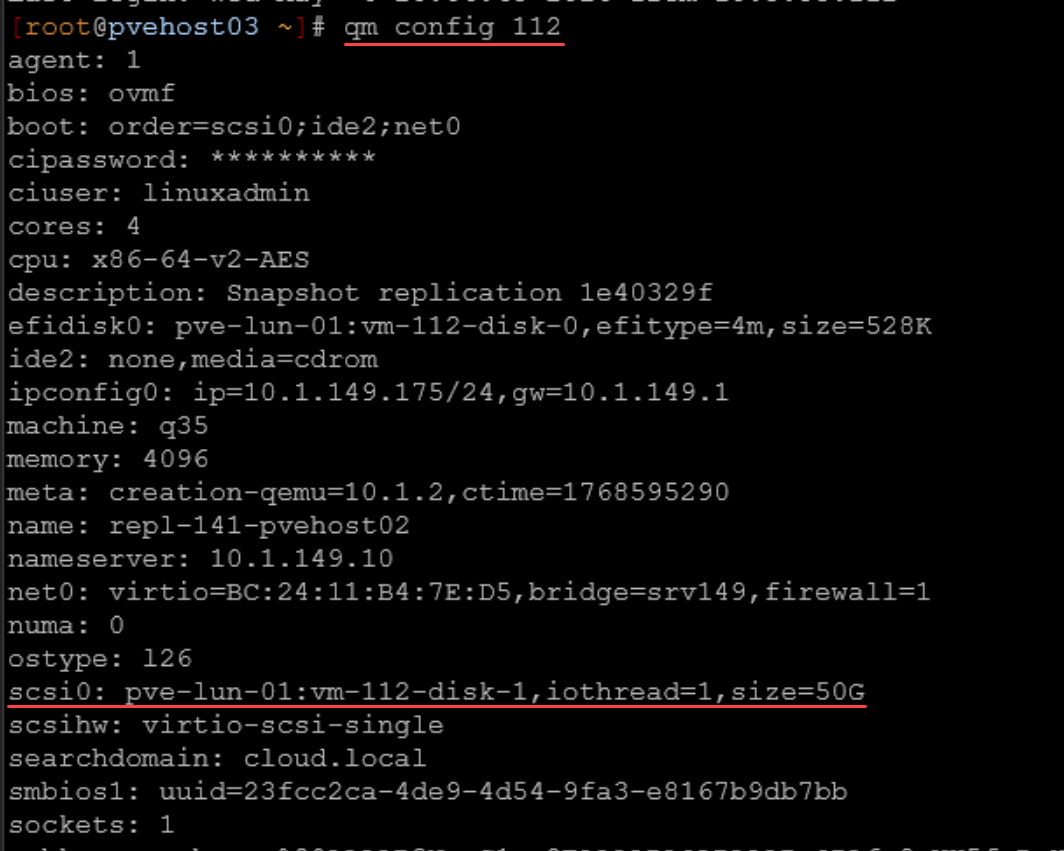
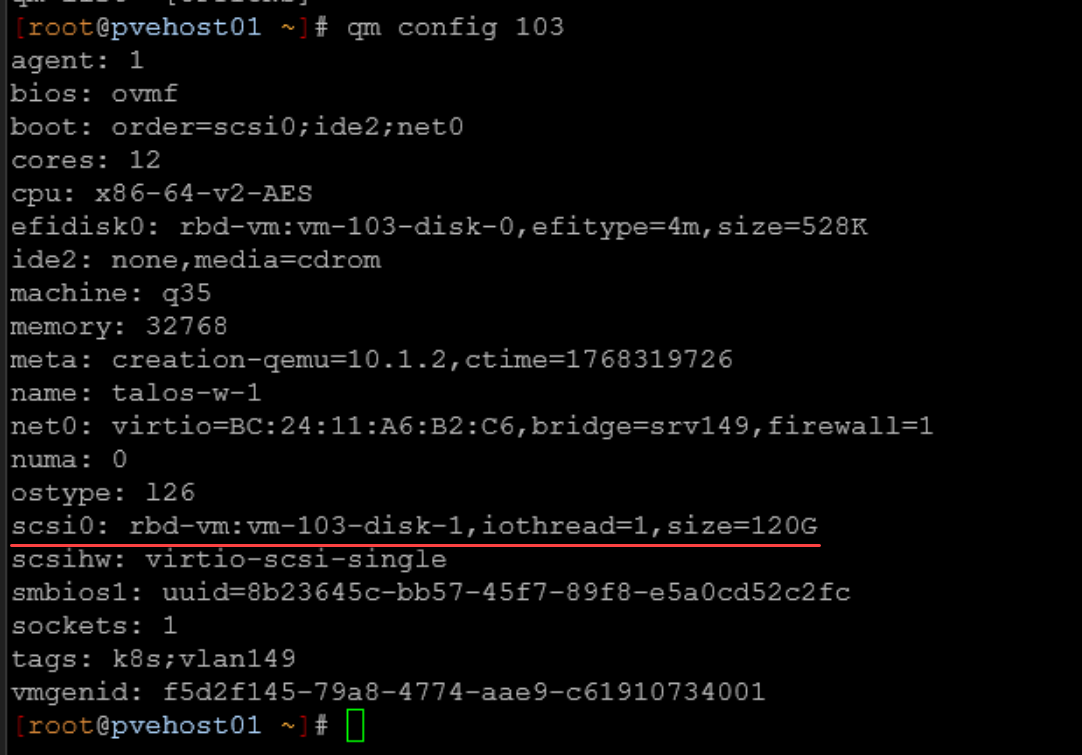
On each VM disk, you need to make sure that you enable discard. First, you can check to see if your VM already has discard enabled by using the following command:
qm config <vm id>Look for your disk configuration as I have underlined below. You should see the discard flag. As you can see below, the discard flag is missing:

As you can see from the above, we don’t see any discard configured on the VM disk. But, we can enable this setting using the following command::
qm set <vmid> --scsi0 <storage>:vm-<vmid>-disk-0,discard=on
We can also see the disk flags from the Proxmox web UI:
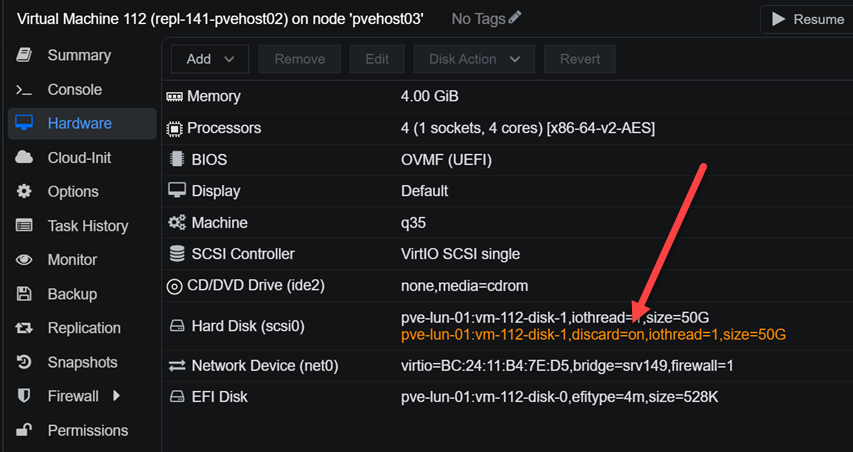
What happens underneath the hood if we don’t have this flag set? Without it, the hypervisor silently drops those commands. But, keep in mind that we need it so storage reclamation starts working the way we expect it to.
What else has to be configured?
This is where most people stop too early. Discard is not just one setting applied here and it is done. It is a set of enablement flags that has to work across multiple layers. If any one layer breaks, space will not be reclaimed.
Storage must support unmap
Even with the discard flag set on the virtual machine disk, we need to make sure the storage itself supports unmap. Most modern storage systems do. These include the following:
- Enterprise SANs
- All flash arrays
- Ceph
- Even many NAS platforms
To check whether your underlying storage, you can use the command:
lsblk -DIt should show a non zero DISC-MAX value on the multipath device.
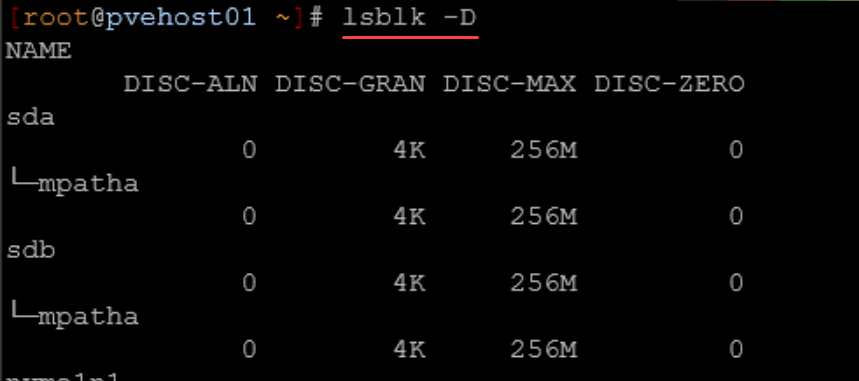
What do the above DISC-ALN, DISC-GRAN, DISC-MAX, and DISC-ZERO mean? Note the following:
Here’s what each one means for your setup:
| Field | Meaning | Your Value | What it means |
|---|---|---|---|
DISC-ALN | Discard alignment offset | 0 | Discard operations are properly aligned |
DISC-GRAN | Discard granularity | 4K | Smallest reclaimable block size is 4 KB |
DISC-MAX | Maximum discard size per request | 256M | Linux can send UNMAP/TRIM requests up to 256 MB at a time |
DISC-ZERO | Whether discarded blocks are guaranteed to read back as zeroes | 0 | Storage does NOT guarantee discarded blocks return zeros |
LVM must pass discard
If you are using LVM, you need to confirm that discard is set to passdown the flags. How do we check that? Use the following:
lvs -o+discardsYou want to see the following:
passdownWe can see below that we indeed see passdown listed:
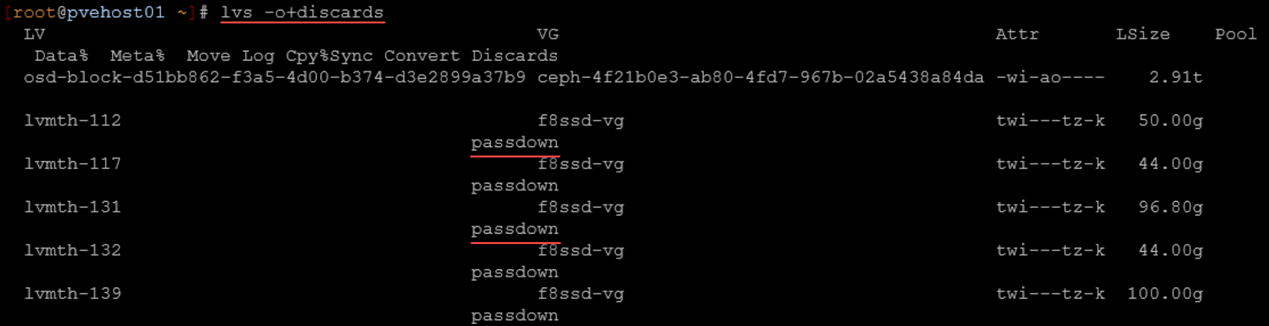
Here is what this means:
- VM issues TRIM
- Proxmox passes discard
- LVM thin pool (lvmth-112) forwards discard
- multipath forwards discard
- SAN receives UNMAP
Guest OS must issue trim commands
The final piece to the puzzle is the guest OS has to actually send TRIM commands. To make sure of this on Linux, you can make sure the fstrim.timer service is enabled and will start automatically:
systemctl enable fstrim.timer
systemctl start fstrim.timer
You can view the status of the systemctl timer using the following:
systemctl status fstrim.timer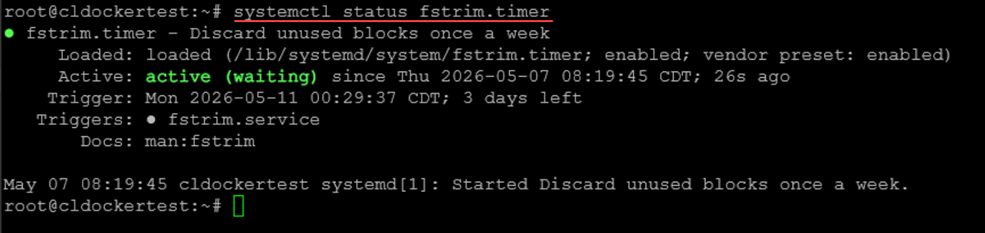
Or you can manually run the following command to test:
fstrim -av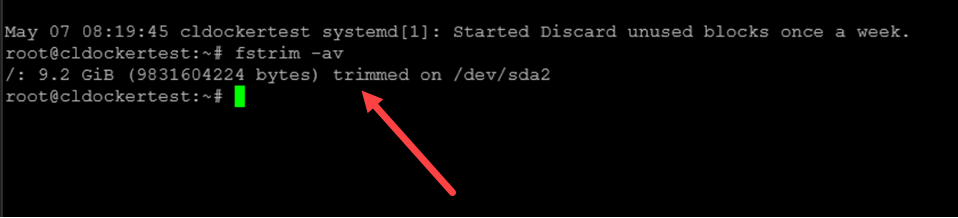
In Windows, TRIM is usually enabled automatically, but you can verify with:
fsutil behavior query DisableDeleteNotifyIf you want to force a TRIM operation in Windows that is similar to the fstrim -av command, you can do that with:
Optimize-Volume -DriveLetter C -ReTrim -VerboseDoes this matter for ceph too?
Yes, and this is where a lot of people get caught off guard if they are using Ceph storage in their cluster. Ceph already behaves like thin provisioned storage. It allocates storage objects dynamically as data is written. But it does not automatically reclaim space when data is deleted unless discard is enabled.
Without discard, all of the same things we have discussed so far in terms of the storage layers is true:
- Deleted data remains allocated in the pool
- Pool usage continues to grow
- You eventually run into capacity issues
But with discard enabled, Ceph removes unused objects and pool usage reflects actual data usage on disk. So even though Ceph feels different from SAN storage, the same rule applies in terms of discard. Always enable discard.
To prove this out, below is a screenshot of a VM that was created on Ceph storage, but didn’t have the discard option intentionally set. As you can see, it is missing the discard option:
Audit script to see which VMs are missing discard
You can definitely check each VM manually and its hard drive configuration. However, we can also audit this with a Bash script. You can run the following on each of your PVE nodes:
#!/bin/bash

# audit-discard.sh
# Lists VM disks that do not currently have discard=on

for vmid in $(qm list | awk 'NR>1 {print $1}'); do
  echo "VM $vmid"

  qm config "$vmid" | grep -E '^(scsi|virtio|sata)[0-9]+:' | while read -r line; do
    diskid=$(echo "$line" | cut -d: -f1)
    config=$(echo "$line" | cut -d' ' -f2-)

    if echo "$config" | grep -q "discard=on"; then
      echo "  $diskid already has discard=on"
    else
      echo "  $diskid missing discard=on: $config"
    fi
  done

  echo
done
Enable script (be sure to test in a lab environment first)
If you want to have a script that will go through and enable discard on VM disks that don’t have it set already, you can do something like the following. Be sure again to test this before using in your “production” home lab environment.
#!/bin/bash

# enable-discard.sh
# Adds discard=on to VM disks that do not already have it

for vmid in $(qm list | awk 'NR>1 {print $1}'); do
  qm config "$vmid" | grep -E '^(scsi|virtio|sata)[0-9]+:' | while read -r line; do
    diskid=$(echo "$line" | cut -d: -f1)
    config=$(echo "$line" | cut -d' ' -f2-)

    # Skip cloud-init, CD-ROM, or already-enabled disks
    if echo "$config" | grep -qE 'media=cdrom|cloudinit|discard=on'; then
      continue
    fi

    echo "Updating VM $vmid $diskid"
    echo "Old: $diskid: $config"

    qm set "$vmid" --"$diskid" "${config},discard=on"

    echo
  done
done
Wrapping up
The Proxmox discard setting is a small setting, but it has a huge impact when it comes to storage that is thin provisioned. Without the setting enabled, the VM will attempt to trim storage and will initiate the command, but it will not be passed through by the hypervisor. Also, we have given visibility to the fact that Proxmox doesn’t have the “discard” setting enabled by default when you create a new VM, even if the storage you select is thin provisioned storage. Also, we can use automation to both audit and enable discard on existing virtual machines that may not have been created with discard. How about you? Is this a new setting to you? Do you currently enable discard on your storage?
Google is updating how articles are shown. Don’t miss our leading home lab and tech content, written by humans, by setting Virtualization Howto as a preferred source.
About The Author