pfSense VLAN Cannot Access Internet – A Troubleshooting Guide

If you are new to setting up pfSense or setting up VLANs inside of pfSense, you may have issues getting traffic on your VLAN out to the Internet. Let’s see why your pfSense VLAN cannot access the Internet.
Table of contents
Understanding VLANs and pfSense
pfSense is a great open-source firewall that can do many things, including VLANS, but also filtering traffic, VPNs, web filtering, and more.
VLANs are a way to logically separate network traffic into segments so these can share a single “wire”. VLANs help with security and are considered best practice to have a VLAN tied to a subnet.
VLANs do add some complexity to the network but also make it more manageable. Your physical network switches also come into play when thinking about VLANs. You need to make sure your uplink ports are tagged with the VLANs you need them to pass.
This also applies to VLAN traffic coming from pfSense. Any new interface or VLAN configuration added to the pfSense firewall must be tagged on the switch.
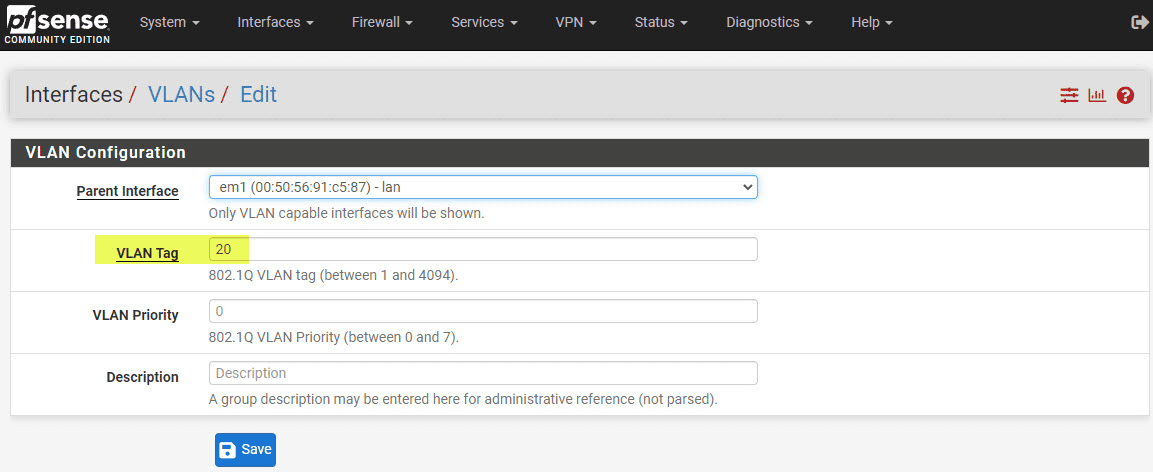
Below, we are creating the new VLAN interface in pfSense. First, you select the parent interface and assign the VLAN tag.
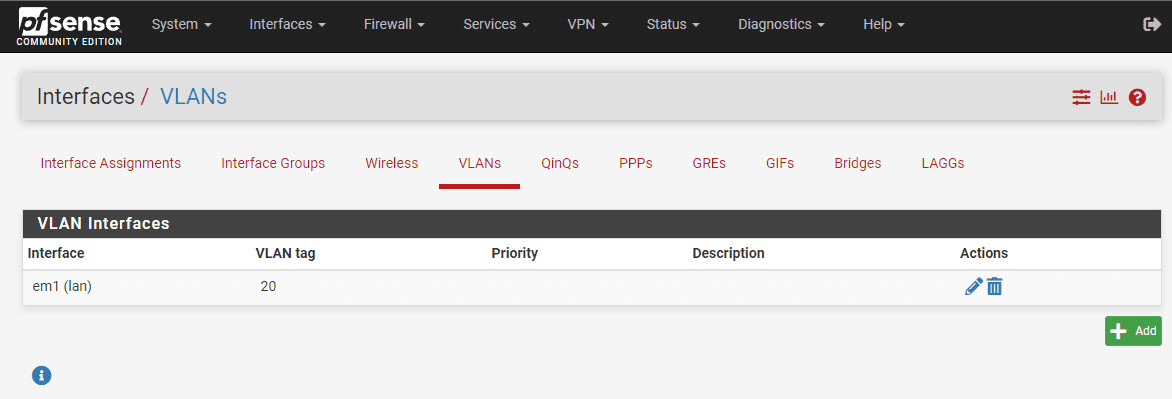
The new VLAN interface has been created.
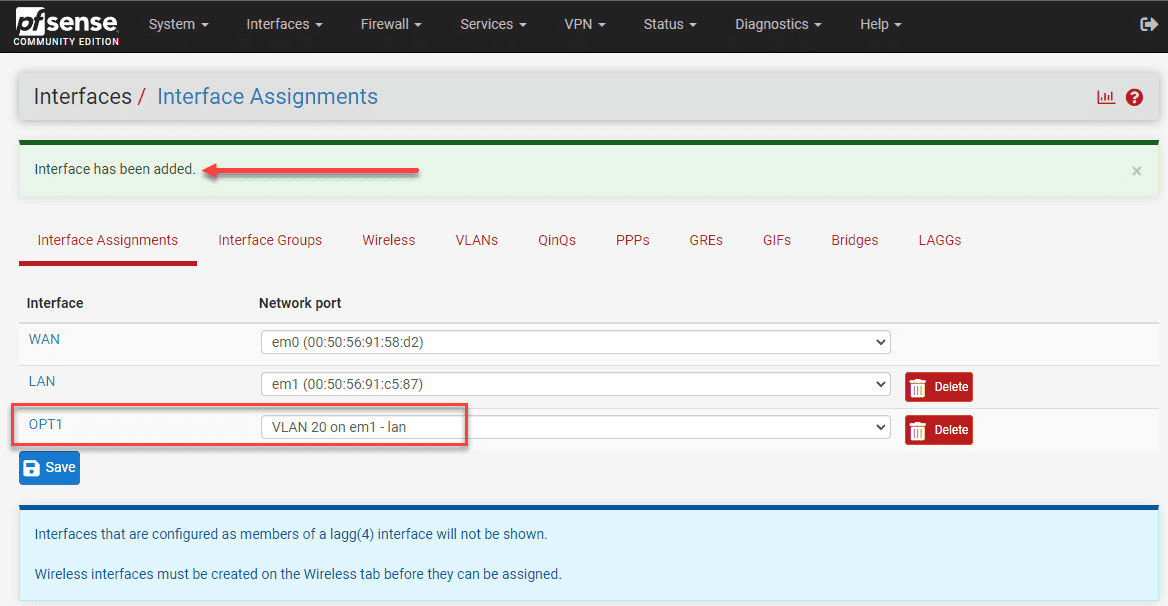
We need to add the new VLAN as an interface.
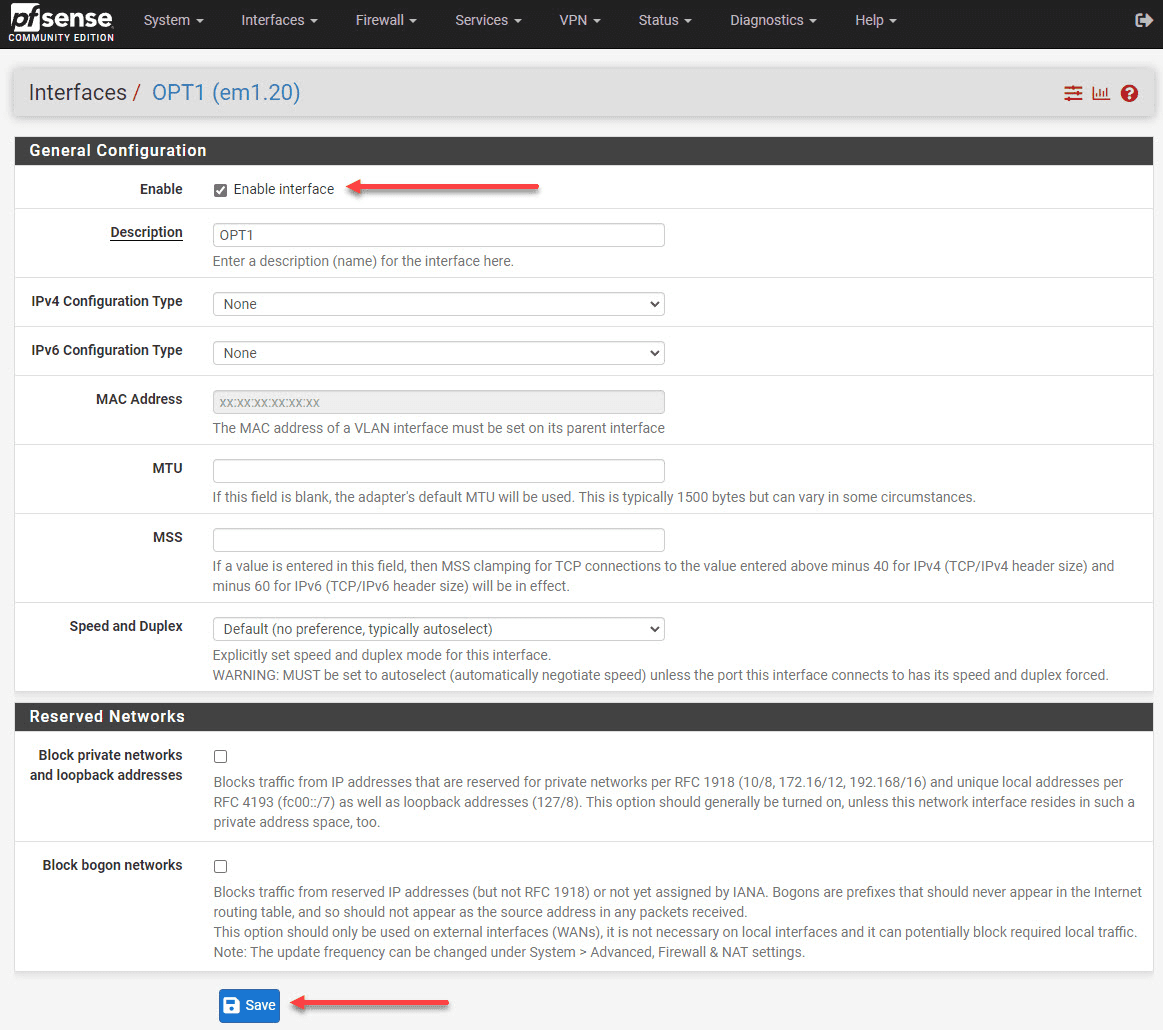
The interface also must be enabled.
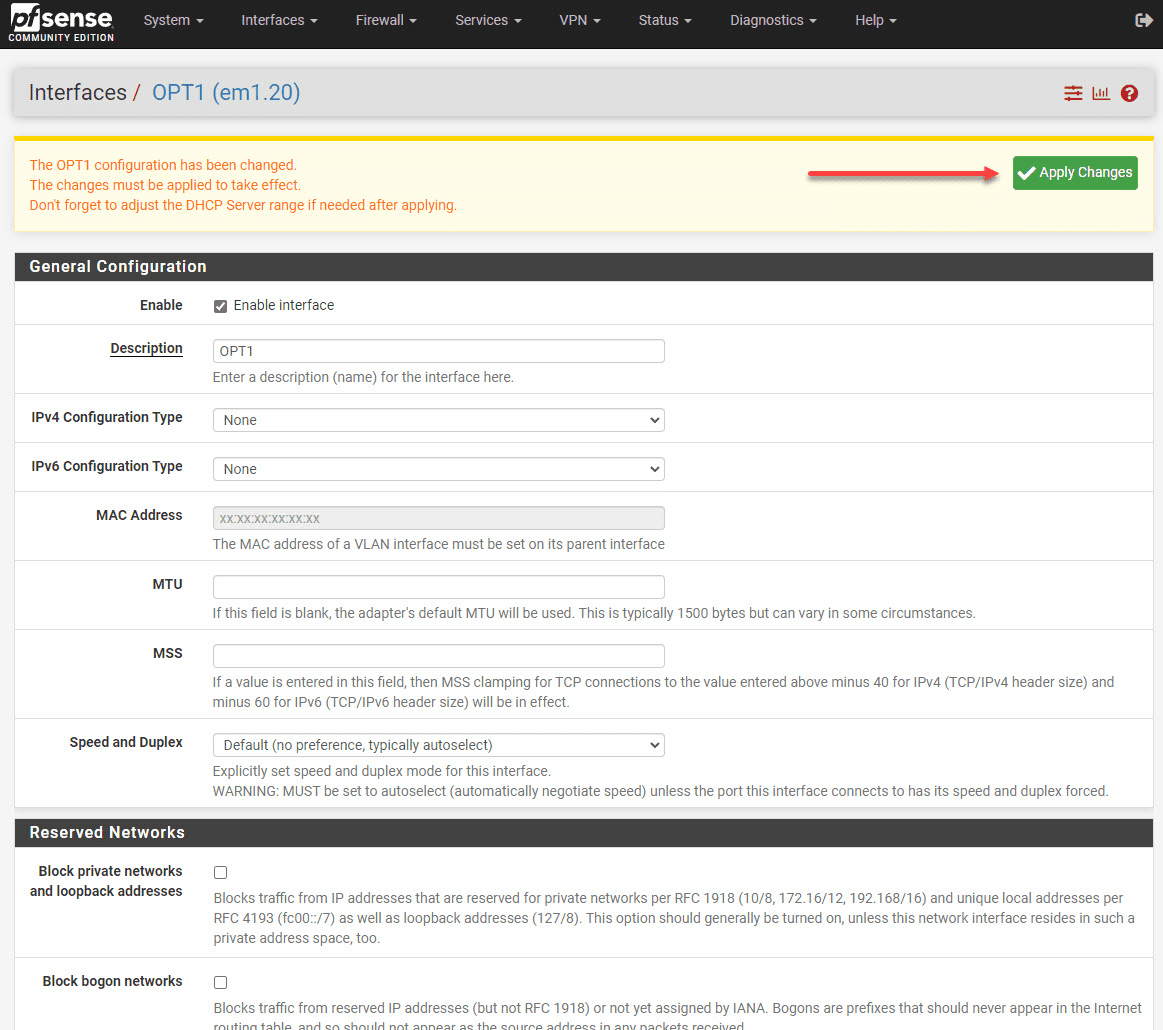
Apply changes that need to be applied to the pfSense installation.
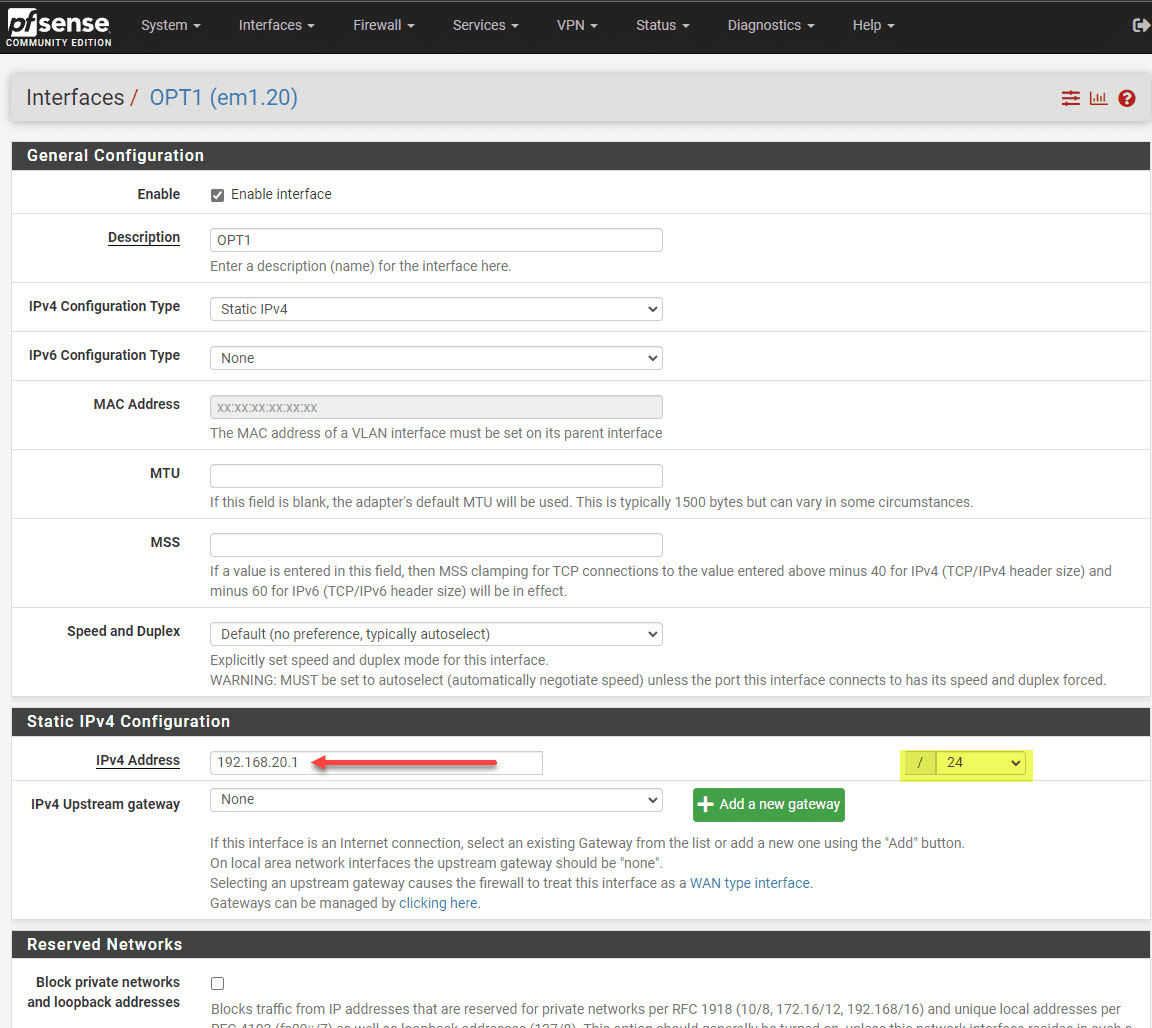
Assign an interface IP address and set the subnet mask to match the range of addresses you want to host on this network.
Make sure to change the subnet from a slash 32 network. If you don’t, you will not see the DHCP Server option appear for this new VLAN network.
However, it is not unique to pfSense as other firewalls have similar configuration requirements, as these are just basic networking considerations for the most part.
DHCP Server Configuration
Clients that are on a VLAN need an IP address configured that matches up with the subnet configured with the VLAN on your pfSense firewall. If you don’t, those devices won’t be able to communicate. Usually you configure a DHCP server to handle handing out IP addresses to clients on your network VLANs.
1. Log into your pfSense instance
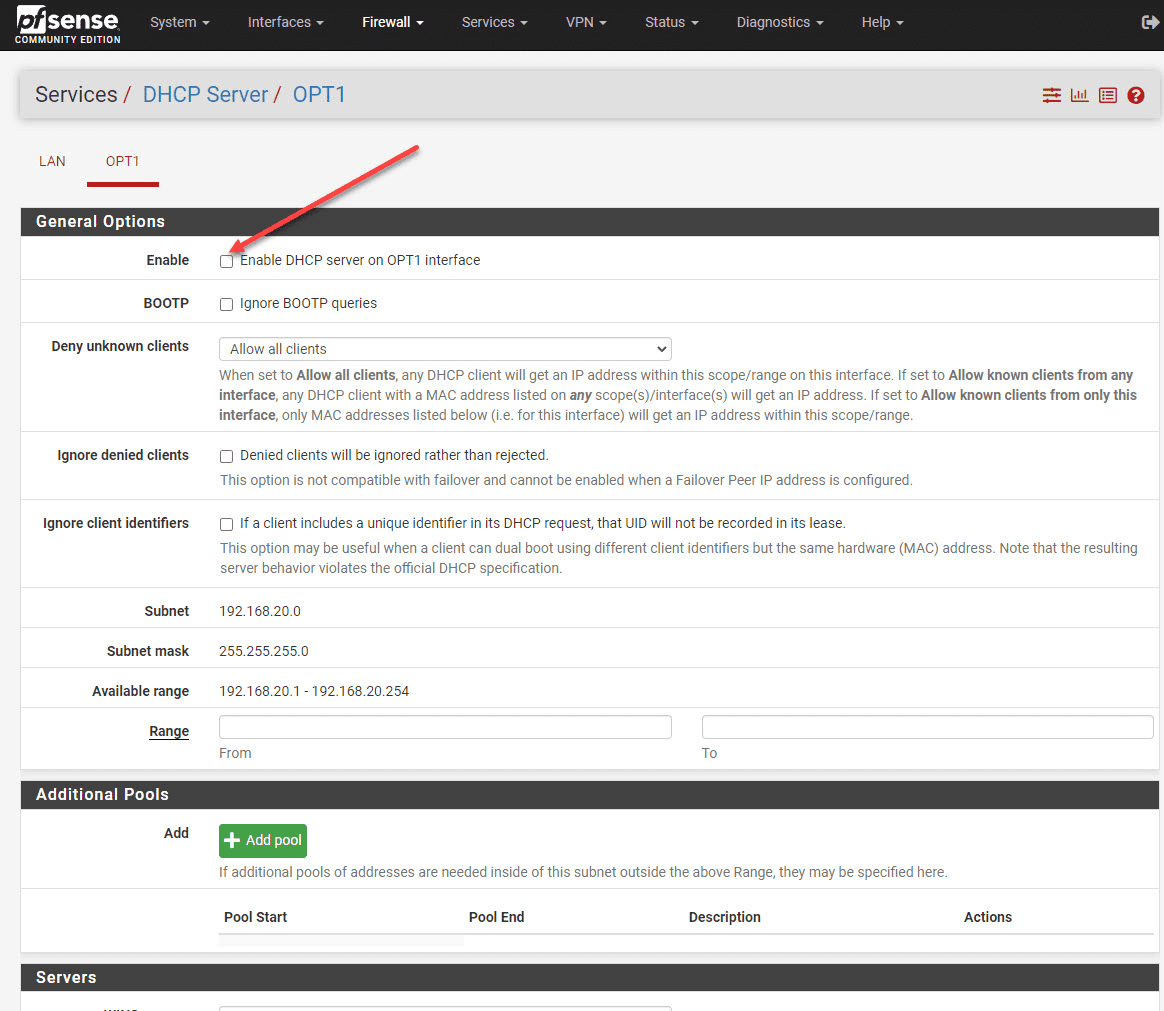
2. Click on “Services” and then “DHCP Server.”
3. Make sure your DHCP server is enabled for each VLAN and they have the correct subnet set up, range of IP addresses, and default gateway are configured.
Note the DHCP server settings in pfSense below.
Checking Firewall Rules
irewall rules that are not configured correctly to allow traffic out to the Internet can also cause problems. pfSense uses rules to determine how to handle incoming and outgoing network traffic.
1. Go to “Firewall” and then “Rules” in the pfSense web interface.
2. Select the VLAN interface from the list.
3. Check if existing rules allow outbound traffic to the WAN interface. If not, create a new firewall rule that allows traffic from the VLAN out to the Internet, ports 80 and 443.
Check your firewall rules to see if any traffic that you think should be getting passed such as Internet traffic is not getting blocked.
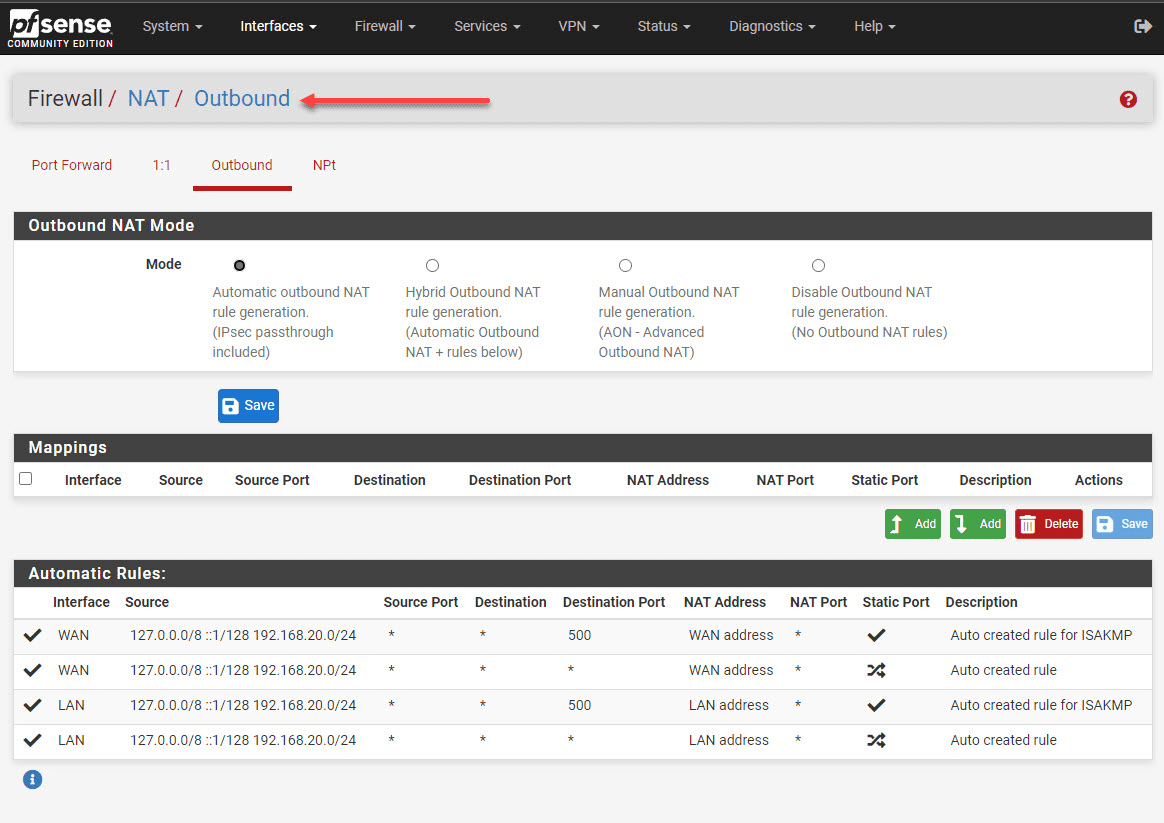
NAT Rules
With NAT rules, all traffic that is “behind” the pfSense firewall will be translated to the IP address of pfSense before it is sent.
Check NAT rules:
1. Navigate to “Firewall” and then “NAT” in the pfSense web interface.
2. Make sure each VLAN has NAT rules, allowing traffic from the VLAN subnet to the WAN interface.
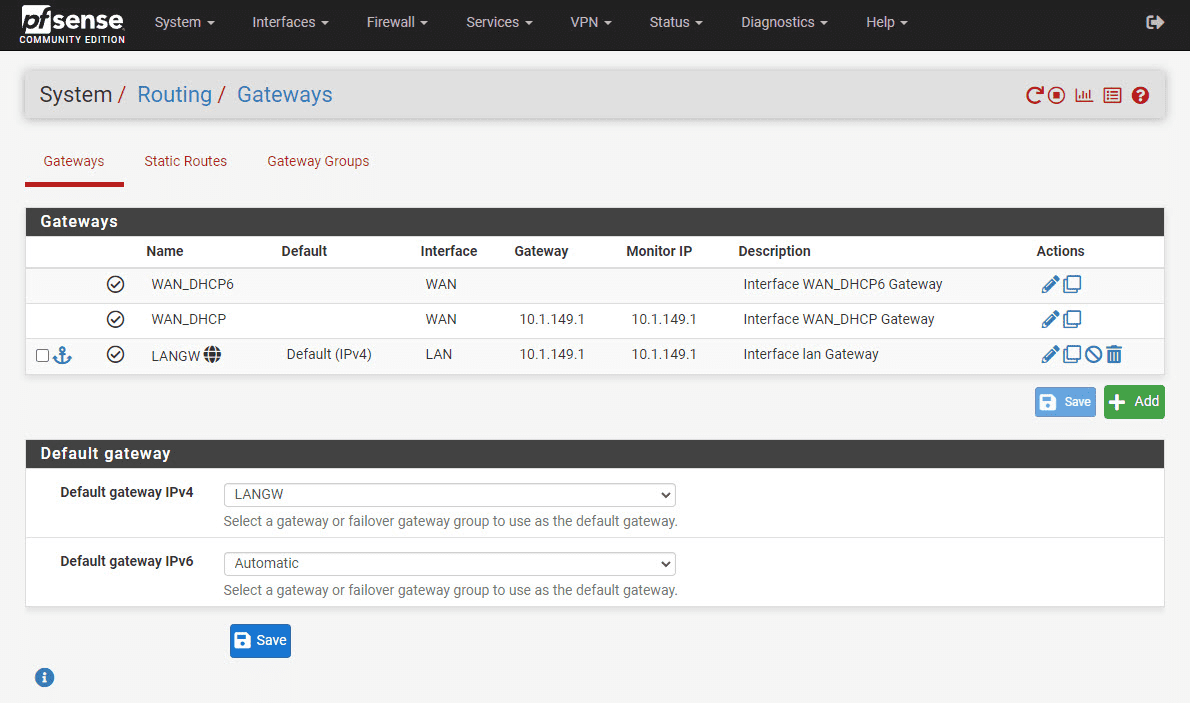
Default route and gateway
If gateway and routes are misconfigured you won’t be able to connect. Make sure your VLANs have the right default gateway configured and any static routes that you need to be in place have been configured.
1. Go to “System” and then “Routing” in the pfSense web interface.
2. Check if the default gateway for each VLAN is configured.
3. Review any static routes you may have set up
Internet access
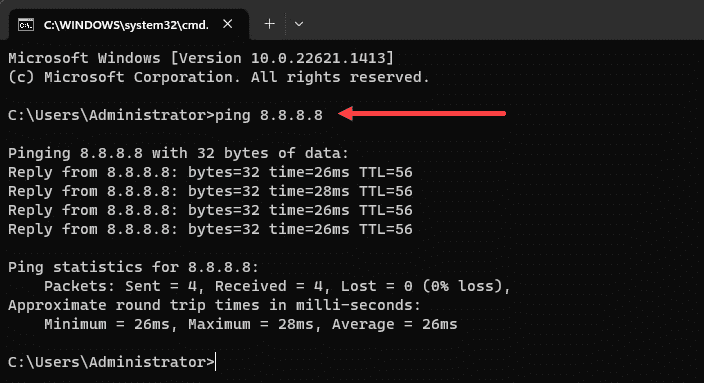
Once you’ve checked and adjusted your DHCP server, firewall rules, NAT rules, and routing settings test your VLANs’ internet connectivity.
You can use the ping command from a PC or other device connected to the VLAN to check if it can reach the internet.
If you still cannot access the internet, it is always a good idea to double-check check settings on your switch also to make sure you haven’t missed tagging a specific VLAN. You can even set the port to a trunk port for VLANs 2-4094 to cover everything so that you can initially test.
Advanced Troubleshooting
If you’ve followed the previous steps but your VLANs still cannot access the internet, you will need to look deeper into the logs.

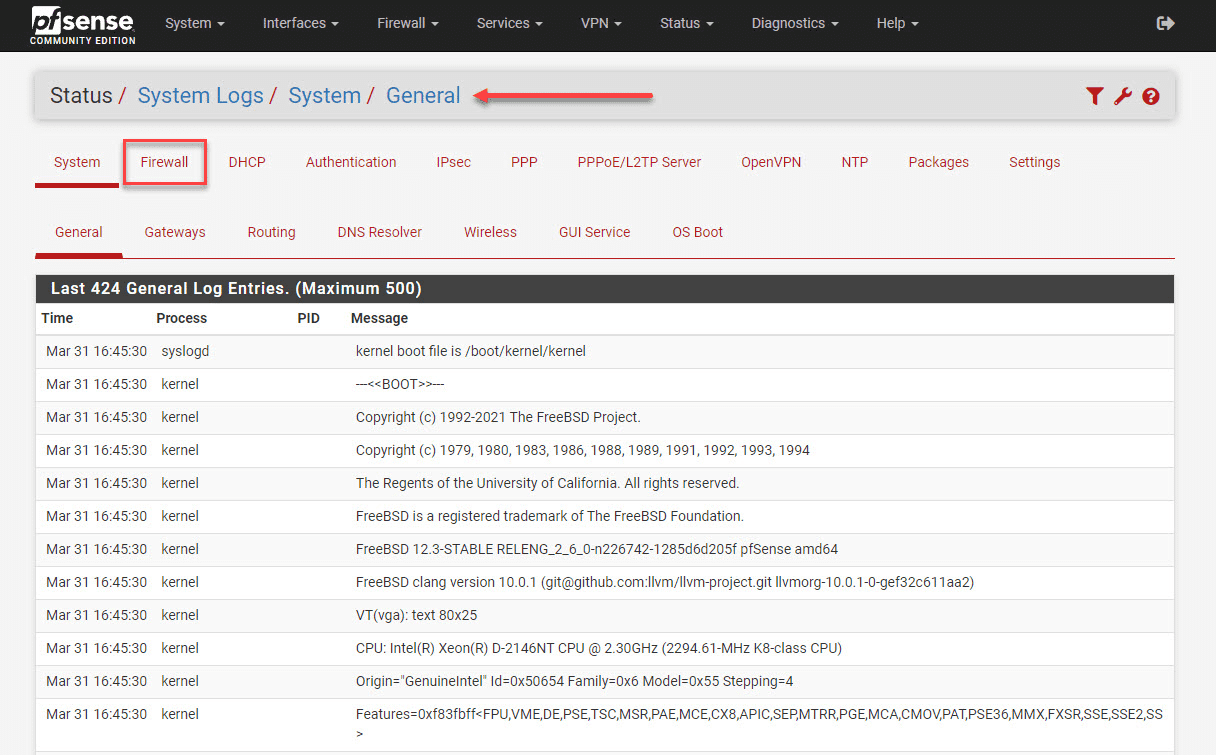
Firewall Logs
Firewall logs can provide valuable insights into blocked or allowed traffic.
1. Go to “Status” and “System Logs” in the pfSense web interface.
2. Click on the “Firewall” tab to view the firewall logs.
3. Look for any blocked or denied traffic from your VLANs
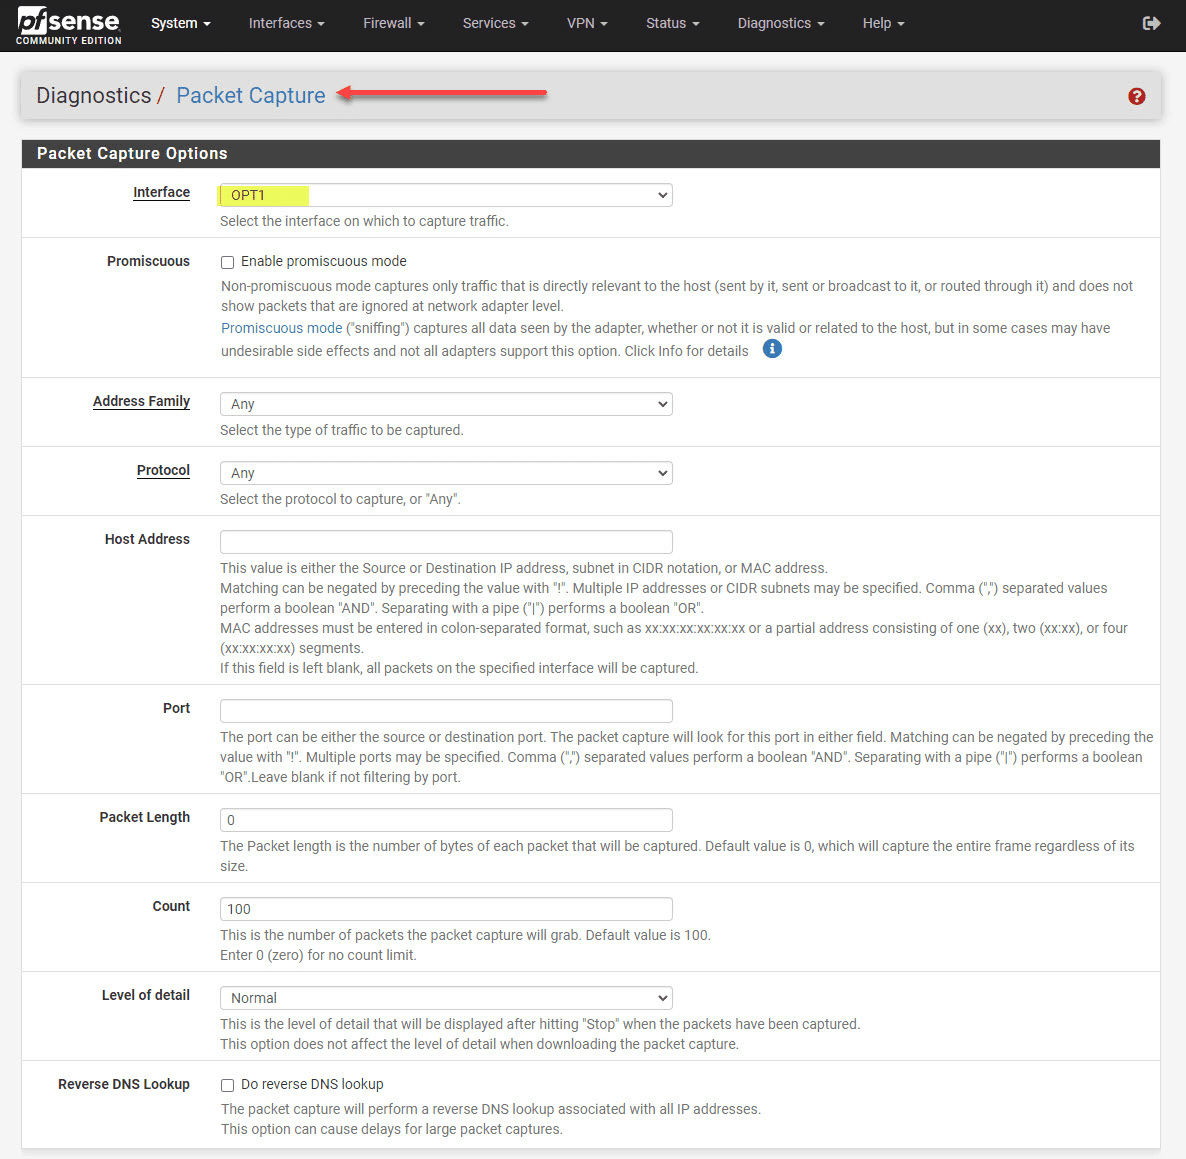
Packet Capture
You can also do a packet capture that allows you to capture your network traffic and then analyze it for any issues from a network standpoint, firewall rules, etc. To setup a packet capture:
1. Go to “Diagnostics” and then “Packet Capture” in the pfSense web interface.
2. Select the VLAN interface and configure the capture settings.
3. Start the packet capture and analyze the results
DNS Configuration
Your VLAN clients also need to be able to hit the DNS servers you want them to use for resolving hostnames on the Internet. If there is a firewall or host firewall in between the traffic from the VLAN and the DNS server, make sure that the DNS traffic is allowed (port 53)
LAN and WAN Interface Configuration
A misconfiguration of the LAN interface or WAN interface on your pfSense box could also result in VLANs being unable to access the internet. Check these settings:
1. Go to “Interfaces” and then “Assignments” in the pfSense web interface.
2. Verify that the LAN and WAN interfaces are correctly configured with the appropriate IP addresses, subnets, and gateways.
Related posts
Final Thoughts
The “pfSense VLAN cannot access Internet” issue can sometimes be challenging as VLANs can be a mind bender from time to time. However, by working your way through a methodical set of steps to troubleshoot and checking things like the DHCP server configuration, firewall rules, NAT rules config, routing settings, logs, and other configurations, you can get to the bottom of the issue for sure.


This was very helpful. Thanks! For whatever reason the Outbound NAT default setting got changed to Manual and so a new VLAN did not get the two outbound rules created. I set to auto and created the two rules manually and it’s all set.
Richard,
That is great to hear! Thanks for letting me know and glad this helped.
Brandon