
In enterprise networking, many are familiar with 802.1x authentication mechanisms that allow performing authentication at the port level on a supported switch. There are many cool things you can do with this port level authentication for physical devices that are connected to a supported switch. Extreme Networks has a really slick solution for applying policies at the port level that allow effectively microsegmenting devices at the physical port level and configuring an identity-based network that can exponentially increase security. In this post, we will take a look at what is required on the Windows 10 side of things to get up and running with 802.1x authentication to allow interacting with an 802.1x compatible switch to provide policy-based networking and identity-driven network control. Let’s take a how to configure Windows 10 for 802.1x user authentication.
An 802.1X Primer – How it Works
What is 802.1X authentication? This is an authentication based on the IEEE 802.1X protocol between the supplicant (client) and the authenticator (network access switch). It is based on the Extensible Authentication Protocol (EAP). Using 802.1X, the authenticator (switch) is a facilitator that carries information received from the supplicant in EAPOL (EAP over LANs) frames to the authentication servers such as a Remote Authentication Dial-In Server (RADIUS) server running on Microsoft Network Policy Server. The 802.1X authentication mechanism is a Layer 2 protocol since it only deals with frames and does not require DHCP services, etc.
As referred to above, there are three components or roles that are required in the chain of 802.1X authentication – the client, authenticator, and authentication server.
Client – The client is the end user workstation or device that requrests access to the LAN and it responds to requests from the switch. The client must run 802.1X compliant client software
Authenticator – The authenticator is what physically controls access to the network based on the authentication status of the client. It is an intermediary between the client and the authentication server such as a RADIUS server. When the switch receives the EAPOL frames, it relays them to the authentication server. The Ethernet header is stripped off on the way to the RADIUS server, and the EAP frame is encapsulated in RADIUS format. Once the authentication server replies and sends the frame back, the switch strips off the header once again and reencapsulates it back into the Ethernet format.
Authentication Server – The server that performs the actual authentication of the request. It sends a reply back to the switch as to whether or not the authentication request is valid and if the client is validated to access the network and other switch services.
Configure Windows 10 for 802.1X User Authentication
To properly interact with 802.1X infrastructure, the client or supplicant must have the software that allows interacting with the 802.1X infrastructure. Now that we have an idea of how in basic terms 802.1X works with the switch and then the RADIUS server, let’s see what is required to configure Windows 10 for 802.1X user authentication. ***Note*** as we are not going into the switch configuration of a particular vendor in this post, we are assuming here that you have a correctly configured RADIUS server for an authentication server and a correctly configured access switch serving as the authenticator.
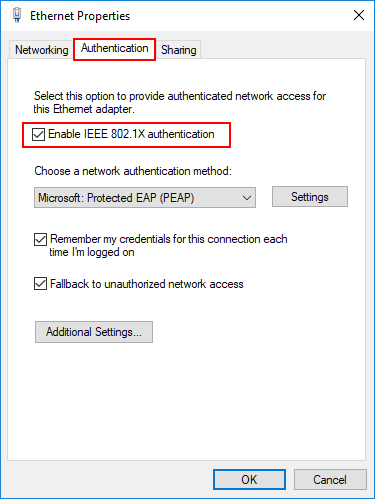
The configuring of 802.1X network authentication begins on a Windows 10 client as you would expect – in the properties of the network connection. Navigate to the Authentication tab and then make sure the Enable IEEE 802.1X authentication checkbox is enabled.
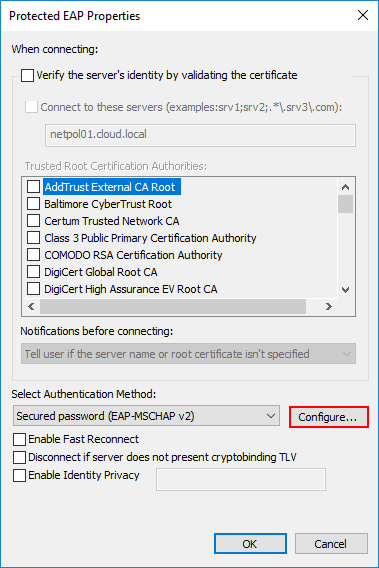
Next, let’s take a look at the Settings button on the Microsoft: Protected EAP (PEAP).

Here, there are several options for controlling how certificates, etc are handled. For my lab, I have unchecked Verify the server’s identity by validating the certificate as I am using a self-signed certificate on the RADIUS server. Also, click the Configure button for the Secured password (EAP-MSCHAP v2) configuration.
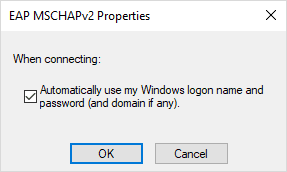
Here, we want to make sure it is selected to Automatically use my Windows logon name and password (and domain if any). This is selected by default, so there shouldn’t be a need to check this. This is good to know for troubleshooting purposes however, in case the identity isn’t passed on correctly.
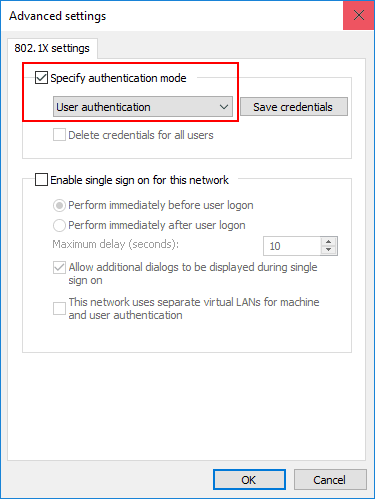
Next, let’s go back to the Authentication tab. Select the Additional Settings button.
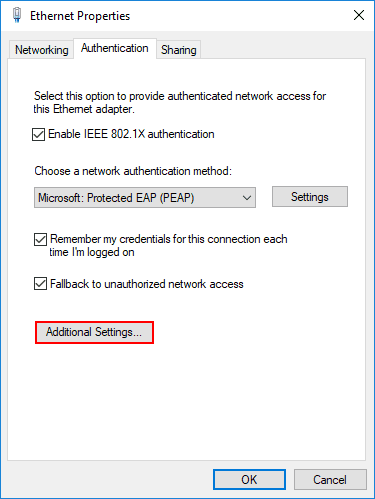
Under the Advanced settings you can specify whether or not you want user or computer authentication or both.
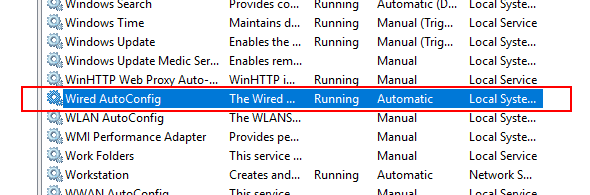
Now that the configuration for 802.1X is complete, the last thing we need to do is make sure the Wired AutoConfig service is started and setup for automatic startup. This is the service that allows Windows to interact with 802.1X.
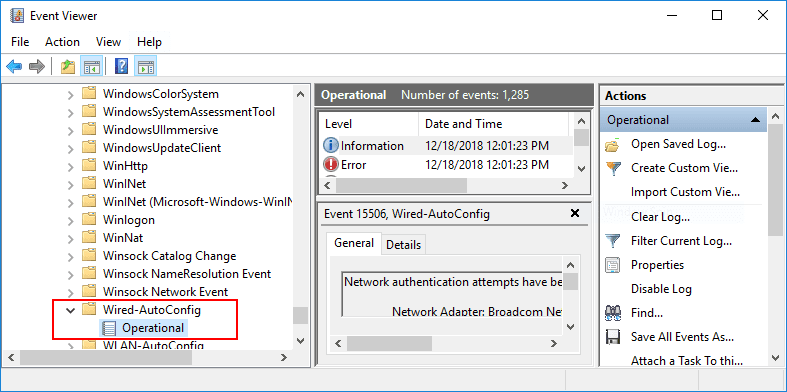
A quick note here about troubleshooting. There isn’t a lot of apparent information readily available when authentication fails. However, there is a special log location for the Wired Autoconfig that does give some information on why authentication may be failing.
802.1X Authentication and Remote Desktop
There is something to note in testing 802.1X authentication if you run into issues getting authentication to work, are you using Remote Desktop to access your test workstation? If so, this is the issue.
Microsoft has documented the issue of Remote Desktop and 802.1X in the following KB article:
This has been a known issue or limitation not with 802.1X, but with Remote Desktop and user authentication. Remote desktop connections do not correctly pass the user authentication token across for it to be verified by RADIUS. However, computer authentication works as expected and gets passed across. The error you will see in the event log for Wired AutoConfig is the following:
Reason: 0x50001
Reason Text: Unable to identify a user for 802.1X authentication
The 802.1X is simply not able to get the user credentials from a logon session. The only known workaround is to use computer authentication for reliable 802.1X results in an RDP session. Keep this in mind in testing any 802.1X configuration as using RDP for testing may give false results and skew the testing process.
In contrast, when you have a successful authentication request on a workstation, you will see the following in the Wired AutoConfig log:
Wired 802.1X Authentication succeeded.
Network Adapter: Broadcom NetLink (TM) Gigabit Ethernet
Interface GUID: {ff089e72-ccce-4f9e-ac76-1c1ef19c70e7}
Peer Address: 0004969B6F42
Local Address: 00E066894072
Connection ID: 0x2
Identity: CLOUDtestuser
User: testuser
Domain: CLOUD
Reason: 0x0
Reason Text: The operation was successful
Error Code: 0x0
Thoughts
The steps to configure Windows 10 for 802.1X user authentication are not that difficult on the client side. There is actually more work involved on the switch and RADIUS side than on the client configuration. However, as with any technology, any part of the process can be responsible for preventing it from working. If you are running a Windows 10 client and want to configure user authentication with 802.1X with an access switch and RADIUS, then hopefully this short walk through will help hit the high points of doing so. Additionally, keep in mind the troubleshooting tools such as the Wired AutoConfig log which can help at least start the troubleshooting process down the right path. Beware of RDP connections with 802.1X as well as this is still not a working configuration from a user authentication perspective with 802.1X.
Google is updating how articles are shown. Don’t miss our leading home lab and tech content, written by humans, by setting Virtualization Howto as a preferred source.
About The Author

Thanks, that was extremely useful.