
One of the many areas of VMware vSphere 6.7 that has seen fantastic improvements has been in the realm of security. VMware has shown they are diligently committed to continuing to strive for excellence when it comes to tomorrow’s security needs in the enterprise datacenter. There are really big security features with vSphere 6.7 – notably including – TPM 2.0 support for ESXi, Virtual TPM 2.0 for VMs, support for Microsoft Virtualization Based Security, and multiple syslog targets. One of the really cool security features that I have been anxious to try out is the support for Microsoft Virtualization Based Security. What is Microsoft Virtualization Based Security and what are its security benefits? How do we go about enabling Windows 10 Virtualization Based Security with vSphere 6.7 in a virtual machine?
What is Microsoft Virtualization Based Security?
Microsoft Virtualization Based Security or VBS by its definition from Microsoft uses hardware virtualization features to create and isolate a secure region of memory from the normal operating system. In essence, Microsoft is using its hypervisor, Hyper-V, to boot the operating system. Additionally this underlying hypervisor allows Microsoft to be able to protect certain extremely sensitive pieces of information that would normally reside in the operating system itself, such as cached credentials, but instead, with Virtualization Based Security enabled, Microsoft is using the hypervisor as a restricted memory space where sensitive information such as credentials can be stored instead of the operating system itself.
However, as probably stood out in the description above, Virtualization Based Security uses “hardware virtualization features…” to implement this new security layer. If you are running a virtual machine, we are not exposing the hardware virtualization features. However, that is where VMware vSphere 6.7 comes into play here and really shines. With VMware vSphere 6.7, VMware has worked very closely with Microsoft to virtualize these “hardware” features that VBS expects to be present, so that in a virtual machine, these features can be turned on without issue. The ESXi hypervisor presents these features to the underlying guest operating system such as Windows 10 so VBS can successfully run. How cool is that?!
The VBS features are able to run because VMware has enabled the following features in ESXi 6.7 to be presented to the guest operating system in the virtual machine:
- Nested virtualization
- IOMMU
- EFI firmware
- Secure Boot
Enabling Windows 10 Virtualization Based Security with vSphere 6.7
Below, I am creating a Windows 10 Pro virtual machine in a nested ESXi 6.7 vSphere environment. Here I am choosing the ESXi 6.7 and later compatibility level (which I believe is a requirement, however, will update the post if I find otherwise).

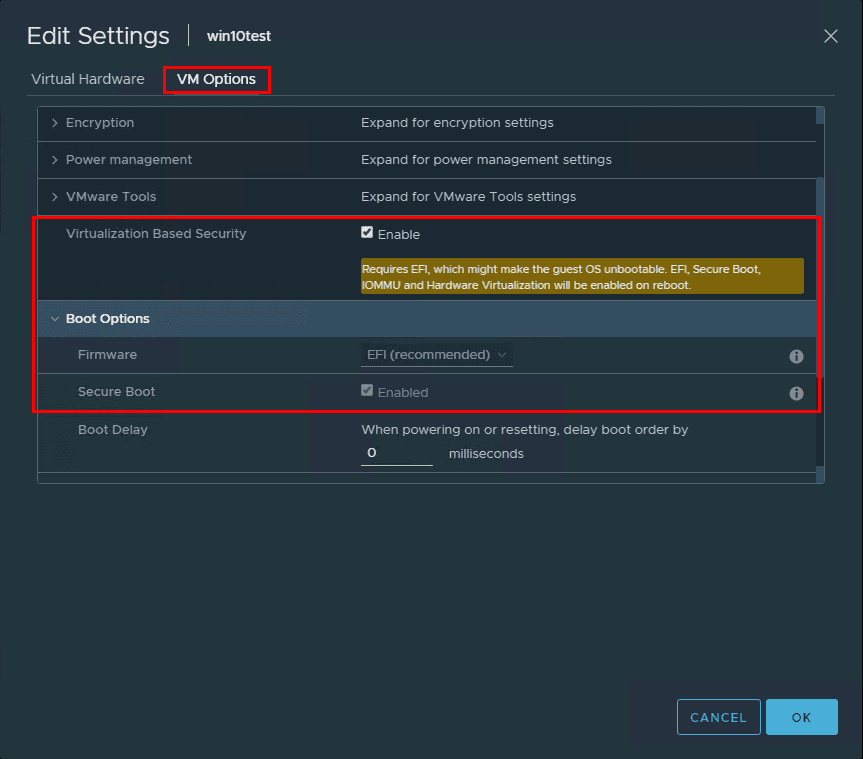
After creating the new Windows 10 VM and installing Windows, I powered off the virtual machine (powering off is required to enable the feature) and configured the VM for Virtualization Based Security. This is accomplished with a single checkbox! Right click a virtual machine choose Edit Settings >> VM Options. You will see the Virtualization Based Security option. Click the checkbox to Enable. Note the message that is displayed when the checkbox is enabled.
Requires EFI, which might make the guest OS unbootable. EFI, Secure Boot, IOMMU and Hardware Virtualization will be enabled on reboot.
Now, after booting the Windows 10 Pro 1803 VM back up, let’s go through the steps to enable Virtualization Based Security. The next two steps can be done in either order, however, I like to enable the group policy setting first for VBS and then enable Hyper-V in Windows 10 so that after the feature is enabled, the one reboot is all that needs to take place. In my testing, these appear to be able to be done in either order.
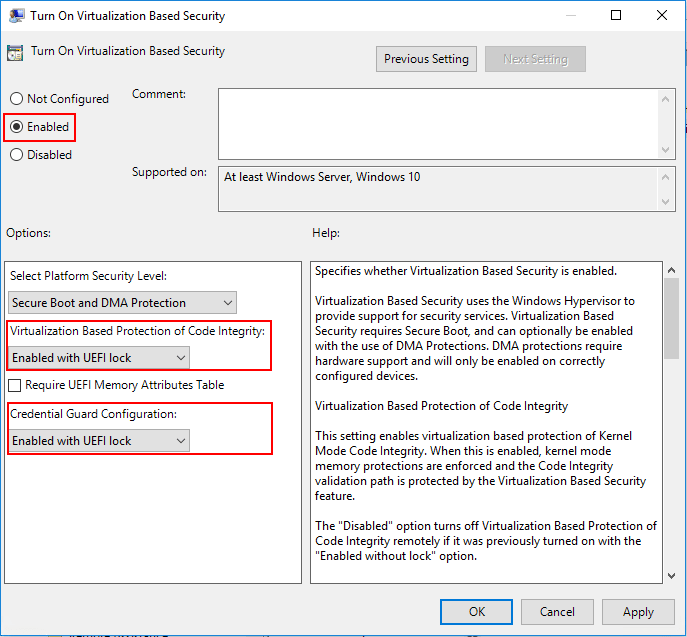
To navigate to the Group Policy setting that needs to be enabled, open up the local group policy editor by typing gpedit.msc in a run menu. Navigate to Computer Configuration >> Administrative Templates >> System > Device Guard >> Turn On Virtualization Based Security. Set the policy to Enabled. We will also set the following settings:
- Select Platform Security level: Secure Boot and DMA Protection
- Virtualization Based Protection of Code Integrity: Enabled with UEFI lock
- Credential Guard Configuration: Enabled with UEFI lock
If you want to be able to enable or disable this setting remotely choose the Enabled without UEFI lock option.
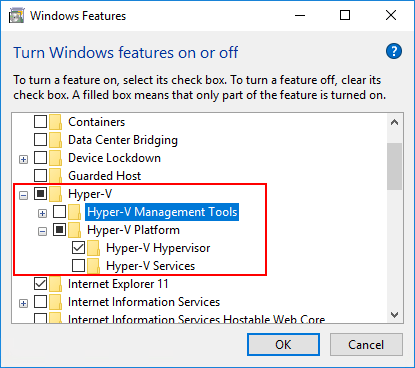
Now that we have the option turned on in vSphere 6.7 and the group policy entry set for the Windows 10 Pro 1803 virtual machine, we enable the Hyper-V hypervisor in Windows. An easy way to get to the Turn Windows features on or off is the appwiz.cpl command. Choose the Hyper-V checkbox then select only the Hyper-V Platform and Hyper-V Hypervisor options. You can enable the Hyper-V Management Tools if you want, however, they are not needed for VBS.
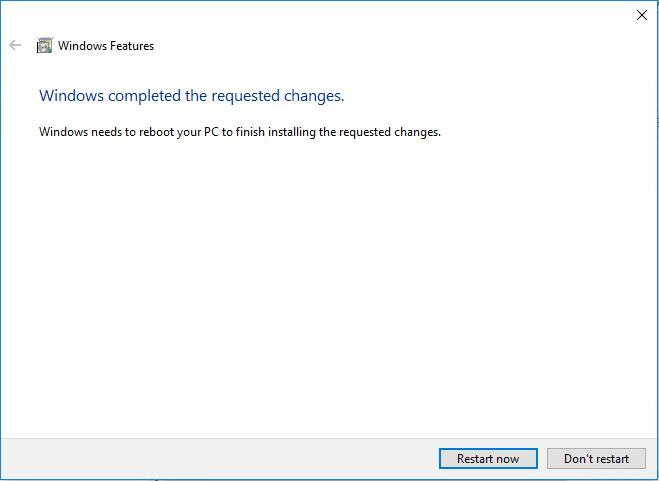
After enabling the Hyper-V feature, you will be asked to restart Windows.
Verifying Virtualization Based Security Is Enabled in Windows 10
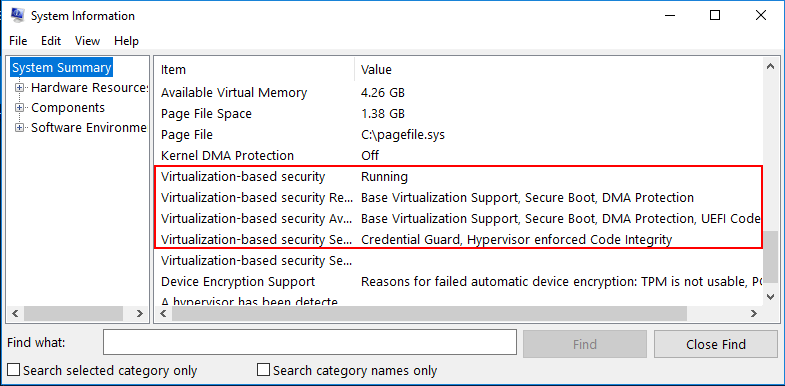
To verify that Virtualization Based Security is enabled in our Windows 10 Pro 1803 workstation, we can use the msinfo32.exe command. Simply type it at a run or search menu and we will take a look at the entries presented. Notice under the System Summary node, if you scroll down, you will see the entries highlighted below. Notably, we want to see the following:
- Virtualization-based security is Running
- Virtualization-based security services configured – Credential Guard, Hypervisor enforced Code Integrity
Takeaways
Enabling Windows 10 Virtualization Based Security with vSphere 6.7 is a great way to make sure that running Windows 10 or Windows Server 2016 virtual machines are even further protected with secure memory areas being restricted. This makes attacks such as “pass the hash” exponentially more difficult to exploit. VMware has made turning this feature on extremely easy with vSphere 6.7. Literally a single checkbox enables all the needed hardware emulated features to allow Windows 10/Server 2016 to be able to setup in VBS mode using Hyper-V in a nested configuration within vSphere 6.7. Check out these and other great security enhancements with vSphere 6.7. A great resource is the VMware security blog with Mike Foley. Check that out here: https://blogs.vmware.com/vsphere/2018/04/introducing-vsphere-6-7-security.html
More in this topic

Discuss this in the Community
Google is updating how articles are shown. Don’t miss our leading home lab and tech content, written by humans, by setting Virtualization Howto as a preferred source.
About The Author
