One of the basic and core functionalities that you will want to do with a physical or virtual firewall/router is route packets in your network or virtual environment. One of the areas that trip people up is pfSense VLAN to VLAN routing. What is needed for that? Also, when you run pfSense inside a virtual machine, there is an extra layer of abstraction and networking to wrap your head around. Let’s take a look at pfSense VLAN to VLAN routing in VMware ESXi and see how this can be configured correctly.
VLAN Trunking or Untagged VLANs?
There are a couple of ways to configure the networking for your pfSense box. Additionally, in VMware ESXi, you need to configure your networking accordingly to how you are setting up your VLANs in pfSense. There are three options here in general:
- Untagged VLANs across physical switch ports and ESXi hosts – I dare say most are not going to use this option, as it would mean that you have a single physical NIC in the ESXi host matched to an untagged physical switch port. Then you would assign a port group to a single vSwitch that is plumbed out the physical connection. There may be a use case for this due to compliance or some other reason to need a single physical uplink for a specific type of traffic. However, it is not a very efficient use of physical resources.
- Trunked physical switch ports and tagged ESXi port groups, assigning one port group per pfSense interface – This is a more common implementation where you have trunked physical switch ports with physical ESXi host NICs bundled together on a vSphere Standard or Distributed switch. Then you tag separate ESXi port groups to carry traffic for a specific VLAN. To a virtual machine like pfSense, it doesn’t know that it is plugged into a tagged port group. It just assumes it is plugged into separate physical uplinks that are untagged. So the vSphere port group tags the traffic.
- Trunked physical switch ports and trunked ESXi port group with tagged VLANs from the pfSense side – When you would want to use this approach with pfSense? Since you can only add (10) vNICs per VM, including your pfSense VM running in VMware ESXi, if you have more than 10 VLANs to route traffic between, you will need to use this approach. Essentially you will create a “trunked” vSphere virtual switch and tag the VLANs coming from pfSense. It will allow the creation of numerous VLAN interfaces that other firewall vendors call a sub-interface.
In the below walkthrough, I will cover option 3 since it is the more involved of the three scenarios. Also, you can see an example of option 2 in my post covering how to segment your VMware network with pfSense:
pfSense VLAN to VLAN Routing in VMware ESXi
To allow pfSense VLAN to VLAN routing, this is fairly simple in the fact that once you have your interfaces configured in pfSense, as long as you have the VLANs configured on the switch side and in VMware ESXi, the routing engine built into pfSense takes care of the rest. There isn’t really anything special you need to do to cause pfSense to route between the VLANs it “knows” about.
With the configuration I will walk you through in this post, I have created a new vSphere Distributed Switch port group that is trunking all VLANs. With this configuration, we can attach our pfSense virtual machine to the port group and tag VLANs on the interfaces we create with the VLAN interfaces. The process steps look like the following:
- Create the VLAN trunking port group
- Create the VLANs in pfSense and add the VLAN interface
- Create the appropriate firewall rules
1. Create the VLAN trunking port group
The following steps need to be performed in VMware vSphere and not pfSense. What does the virtual switch port group need to look like? Below is the new vSphere Distributed Switch port group created for the pfSense virtual machine:
- The VLAN type is set to VLAN trunking
- VLAN trunk range defaults to 0-4094 which is fine
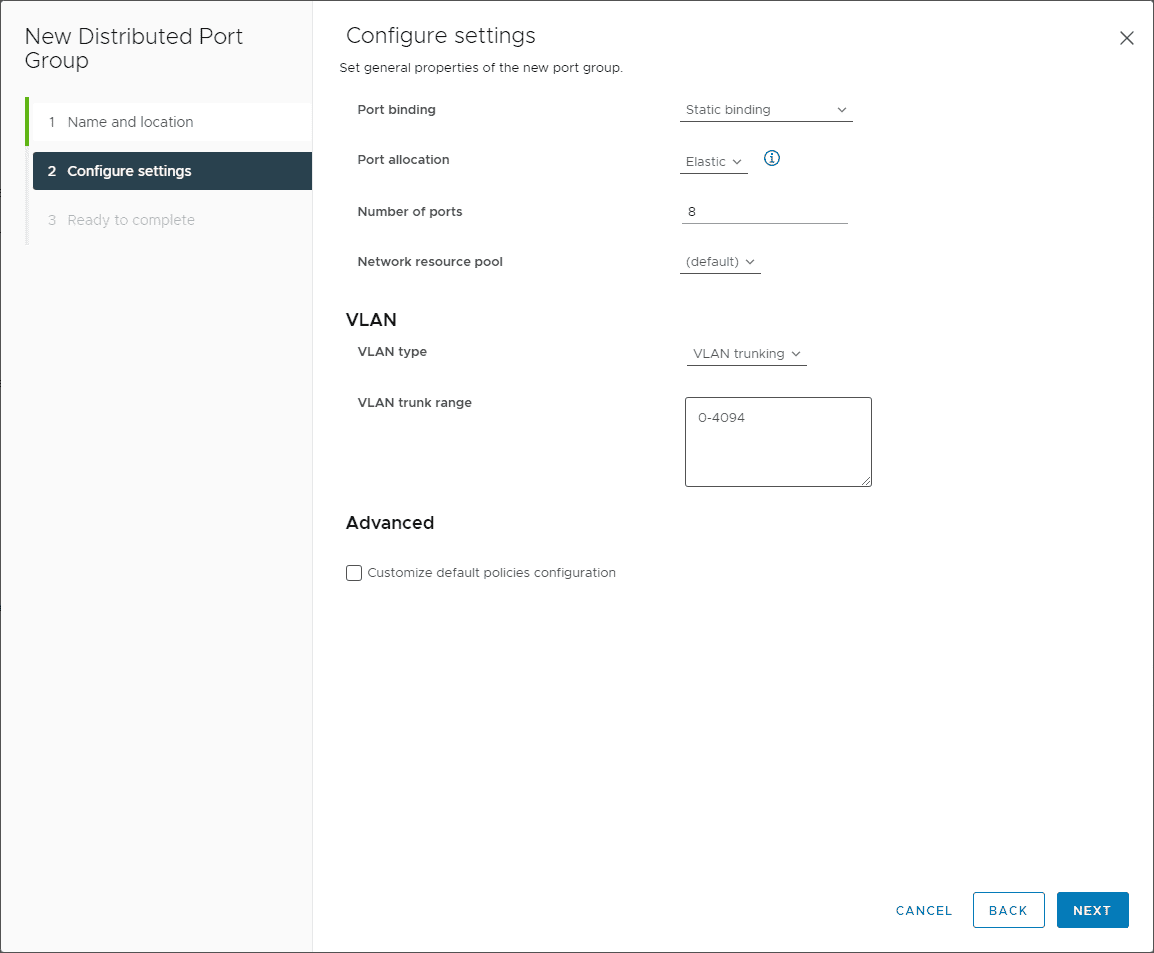
You can think of this step as the same type of process if you are plugging a physical pfSense box into a physical network switch. If you are passing multiple VLANs on a physical uplink, you need to have the uplink tagged with all the appropriate VLANs or set it to trunking mode which usually defaults to allow all VLANs.
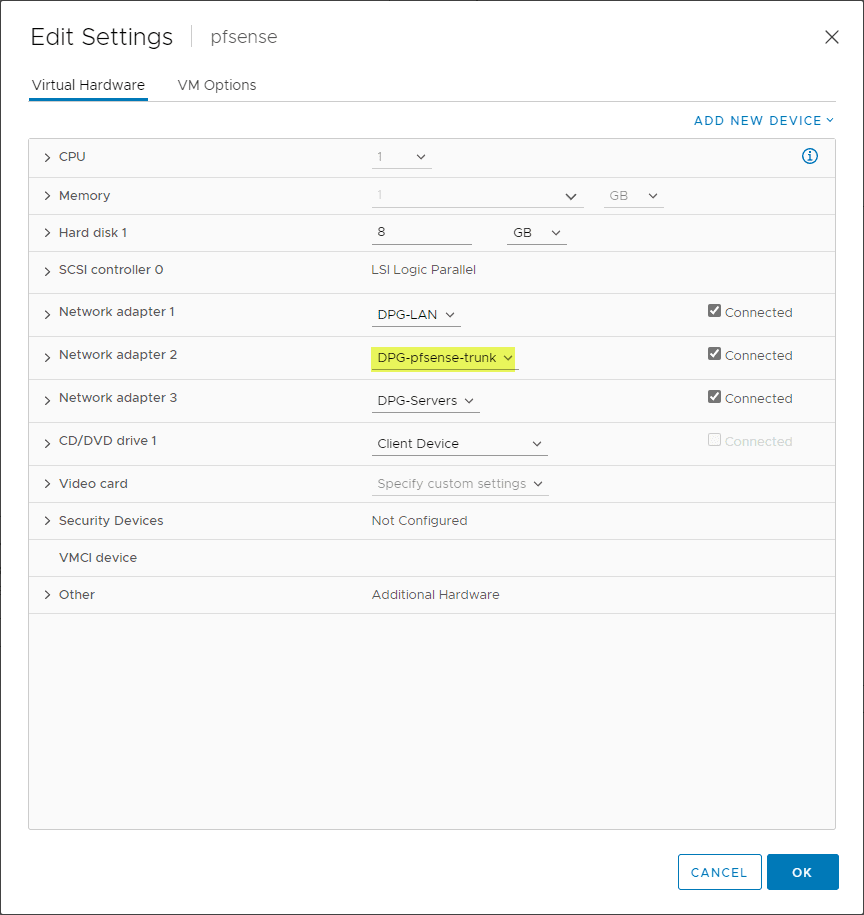
I definitely suggest naming your vSphere port groups something intuitive so you know its intended use case. Below, as you can see, I know the second network adapter should be able to trunk tagged VLANs originating from pfSense.
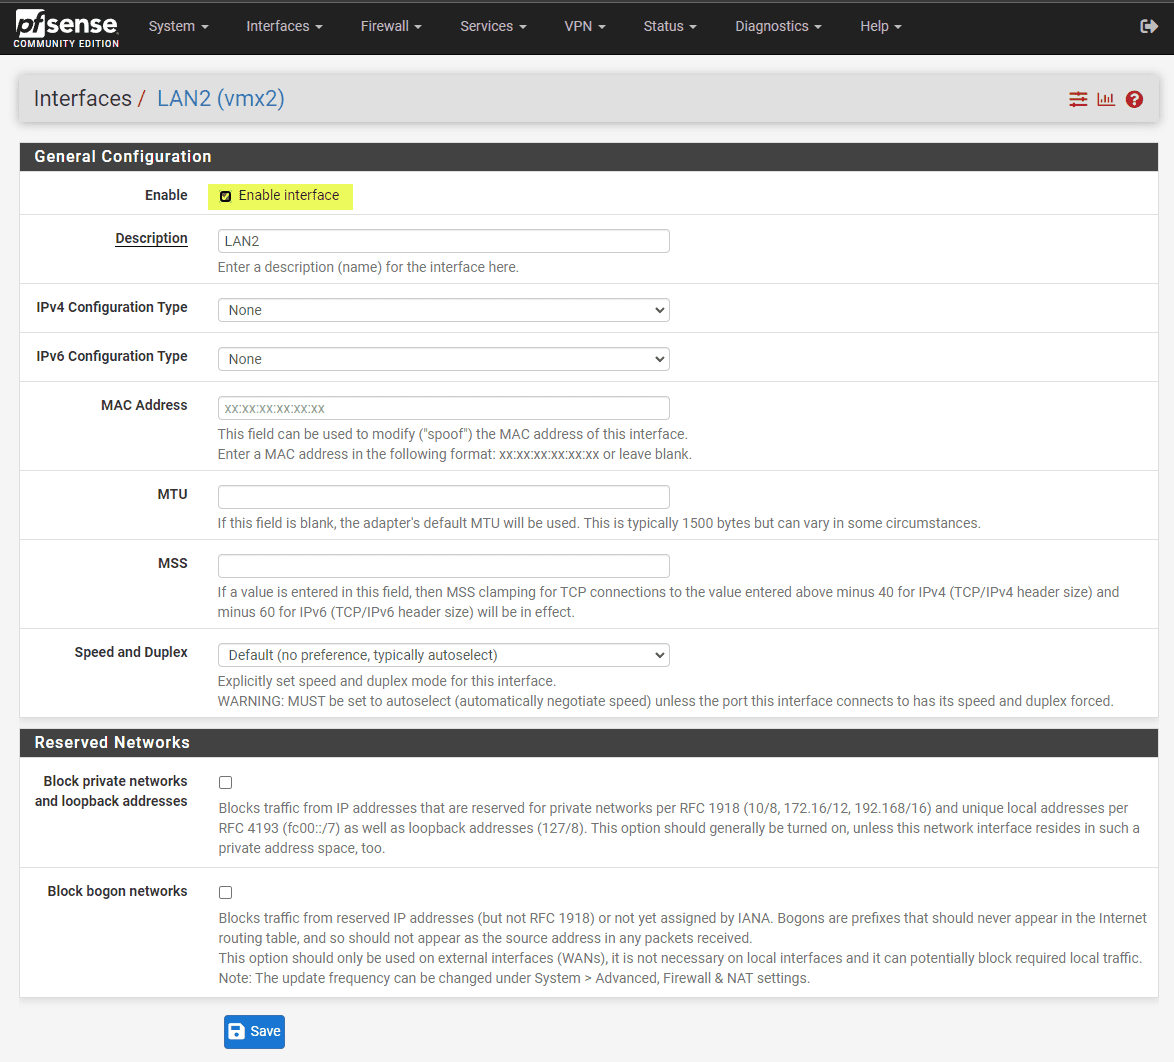
2. Create the VLANs in pfSense
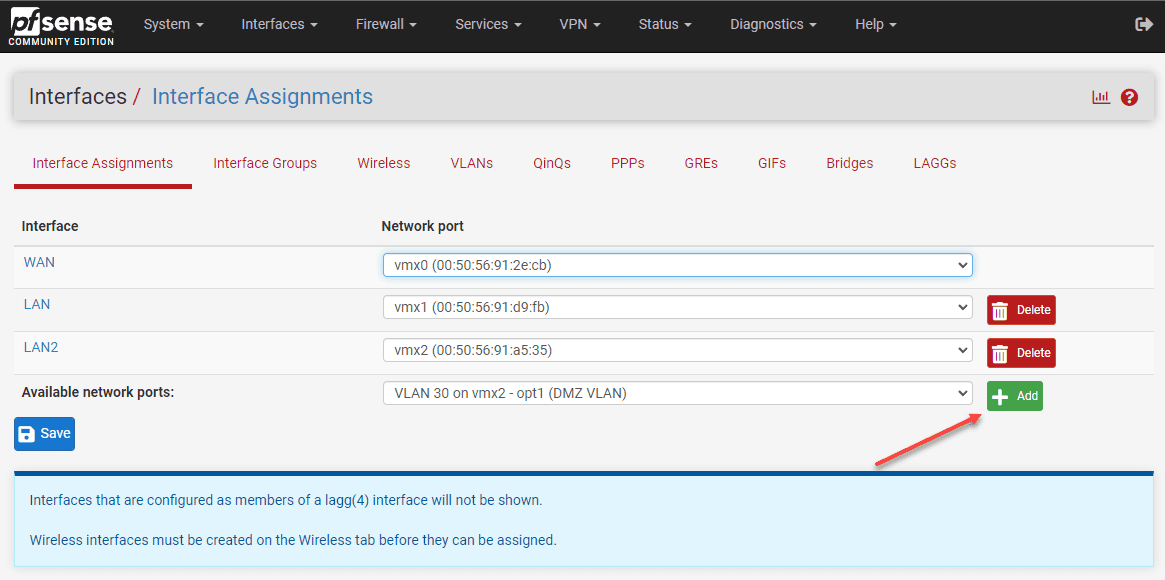
The next step is to add the VLANs in pfSense. To do that, navigate to the Interfaces > Assignments > VLANs area in pfSense.
Below you see the required information:
- Parent interface – You select the “physical” interface that will be the parent container for the sub-interfaces you are creating with the new VLAN interfaces.
- VLAN Tag – The 802.1Q VLAN tag
- VLAN Priority – the priority of the VLAN for QoS
- Description – Description of the VLAN interface

Once you save on the above screen, there is one more step to actually make the interface live. You need to click the green Add button to make the interface an active interface and then save your changes.
Below, the interface has been saved and added to the pfSense box.
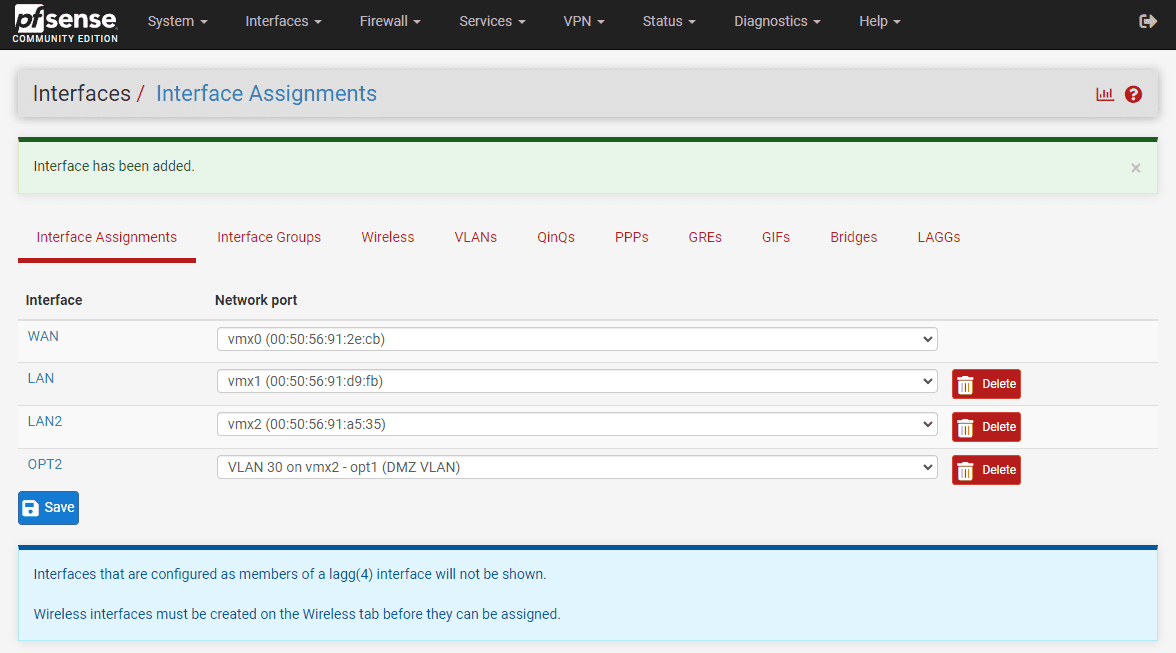
As a note, pfSense will allow you to create a child VLAN sub-interface of one of the physical interfaces for the VM, and also have the parent interface disabled. It will let you save that config, even though it means none of the sub-interfaces will work. To have the VLAN sub-interfaces work, you must enable the interface.
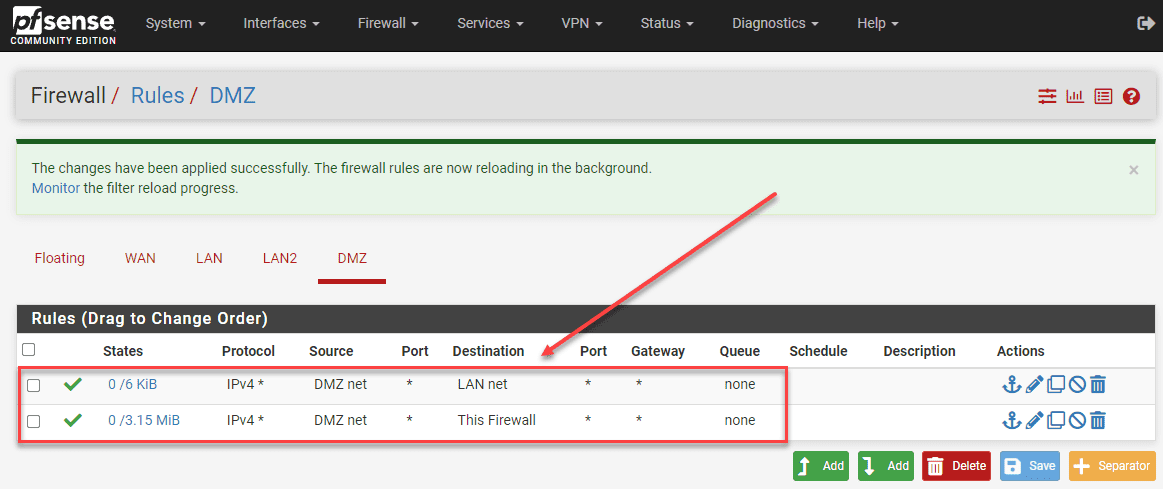
3. Create the appropriate firewall rules
The final step that can trip many up is the firewall rules. The first thing most try to do (myself included) is ping between your interfaces. By default, when you create a new VLAN interface and add it to pfSense, it doesn’t automatically create ALLOW rules to allow traffic out the new VLAN interfaces. You have to explicitly define firewall rules to allow traffic to flow between interfaces.
One thing I recommend doing is starting out on new interfaces with an ALLOW ANY to ANY type rule. This is just to make sure the packets are flowing and you can verify connectivity. Once you have verified connectivity, you can then start scoping things down.
Below are just a couple of rules along these lines. I have allowed the DMZ net to be able to see “this firewall” to ping the firewall address on the VLAN and then also allow the DMZ net to talk to the LAN net.
pfSense VLAN to VLAN Routing in VMware ESXi FAQs
- What is vlan to vlan routing? VLAN to VLAN routing is where you want traffic that is contained in your Layer 2 VLANs to be able to “talk” to machines that exist in another Layer 2 VLAN and vice versa.
- Is pfSense free? Yes, pfSense Community Edition is a free product and is freely available for download from pfSense.org.
- What is VLAN trunking? VLAN trunking is where you configure a network switch port or virtual port group to allow multiple VLANs to traverse the uplink. It is generally used when you want to tag traffic coming from your device or virtual machine and allow that traffic to uplink to the rest of the network.
- How can you setup pfSense to route between VLANs? As shown, it is a combination of configuring your physical network switch, virtual port groups (if using a pfSense VM), and setting up the VLAN interfaces within pfSense.
Final Notes
Hopefully, this primer on pfSense VLAN to VLAN Routing in VMware ESXi will help any who might be struggling to configure basic routing between their VLANs. Adding in the virtual networks of VMware ESXi is additional abstraction and complexity, but using the VLAN trunking type allows tagging your VLANs from the pfSense side and providing connectivity to your various networks. It is also THE way to do it if you have more than 10 VLANs, since you won’t be able to add more than 10 vNICs to the pfSense virtual machine.
Google is updating how articles are shown. Don’t miss our leading home lab and tech content, written by humans, by setting Virtualization Howto as a preferred source.
About The Author


Hi Brandon,
Thank you for your article!
I followed your guide and set up a VLAN on my PfSense 2.7.2 + ESXi 7.0.2. I then created a Windows 11 machine, but initially, I couldn’t get the network to work.
I realized I made two mistakes: I had used E1000 network adapters instead of VMXNET3 in ESXi—both on PfSense and Windows—and I hadn’t tagged the packets with my VLAN ID in the operating system (in the advanced network adapter settings in the Control Panel).
Now I’m running some tests with an Ubuntu Server 22 system, but I can’t get the network to work no matter what I try. I can’t figure out what I might be doing wrong in the configuration.
Have you tested this setup? Do you have any advice?
Thank you so much!
Jack
Jack, thanks so much for the comment! Do you mind creating a VHT forum topic under the Proxmox help community as I can better help you troubleshoot there. Something like “proxmox vlan vm can’t ping host on different subnet”.
Thanks again,
Brandon