Installing Azure Stack HCI in VMware vSphere
Microsoft has released the preview release of Azure Stack HCI. Azure Stack HCI is Microsoft’s hyper-converged cluster solution that allows running virtualized Windows and Linux workloads running in a hybrid environment. With Azure Stack HCI, Microsoft has provided a solution that allows for a hybrid approach integrated with native Azure capabilities such as cloud-based monitoring, site recovery, and backup. Additionally, organizations have visibility to their Azure Stack HCI deployments in the Azure portal. With the Azure Stack HCI Preview, you can perform Azure Stack HCI evaluation using nested virtualization which is what I am doing in the home lab. In this post, we will take a look at Installing Azure Stack HCI in VMware vSphere and the steps to do this.
Difference between Azure Stack and Azure Stack HCI
Many were a bit confused on where Azure Stack HCI was positioned and what is was exactly when compared to Azure Stack. Microsoft dedicated a blog to this topic to discuss the differeces. However, I will boil this down in a nutshell for you.
- Azure Stack – This is the hardware appliance that can be purchased from your vendor of choice. It essentially creates an Azure cloud environment on-premises with an experience consistent with native Azure. Microsoft manages the software, the hardware vendor manages the hardware for you, and you get to consume the services, much the same as you would with the Azure IaaS environment.
- Azure Stack HCI – This is the evolution of what was the Windows Server Software-Defined (WSSD) program. This program certified hardware to run Hyper-V and Storage Spaces Direct (S2D). Microsoft chose the rebranding of the solution since it uses a hybrid mix of on-premises and connected Azure management services. With Azure Stack HCI, you are the domain admin but don’t have the Azure portal as you do in Azure Stack.
Microsoft has positioned Azure Stack HCI as a hybrid cloud that extends very well to Microsoft Azure. It includes integrations with the following Azure services:
- Azure Backup
- Azure Site Recovery
- Azure Monitor
- Azure Update Management
- Azure Security Center
- Azure Network Adapter
- Azure Cloud Witness
Azure Stack HCI using Nested Virtualization
For preview purposes, Microsoft is actually listing nested virtualization to create a sandboxed, isolated Azure Stack HCI environment. This can be ran on a single physical system. Just about any type of hardware you can think of can be used such as a workstation, laptop, or a home lab server can be used for running the whole configuration.
The official Azure Stack HCI Github page provides detailed information on how to get up and running with Azure Stack HCI in a nested virtualization environment. All of the scripts and examples use Hyper-V hosts to demonstrate how to get up and running in a nested environment. However, the environment can be provisioned equally (or better IMHO) with a VMware vSphere environment.
The various “layers”
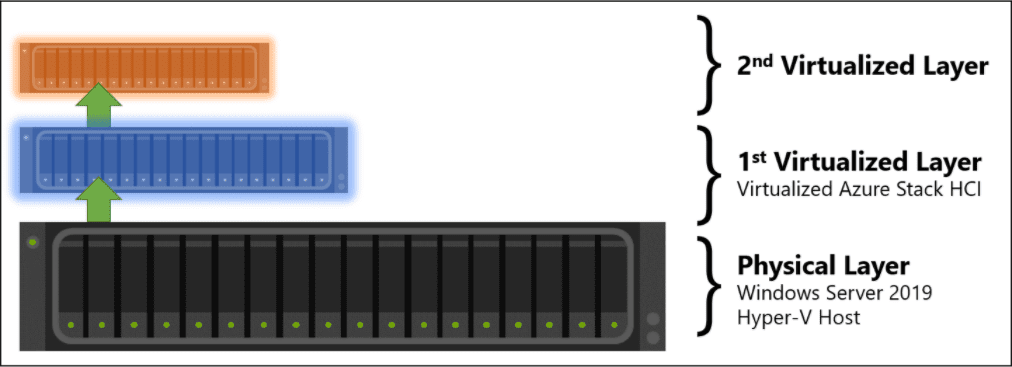
There is not really anything new here compared to normal nested virtualization environments. Microsoft breaks down the different “layers” in this way in the Azure Stack HCI documentation:
- L0 – This is the bare-metal physical server that has the Type1 hypervisor installed
- L1 – This is the VM running the Azure Stack HCI operating system that has the Hyper-V role installed as well as Storage Spaces Direct (S2D).
- L2 – These are the nested VMs that are running on top of the nested hypervisor
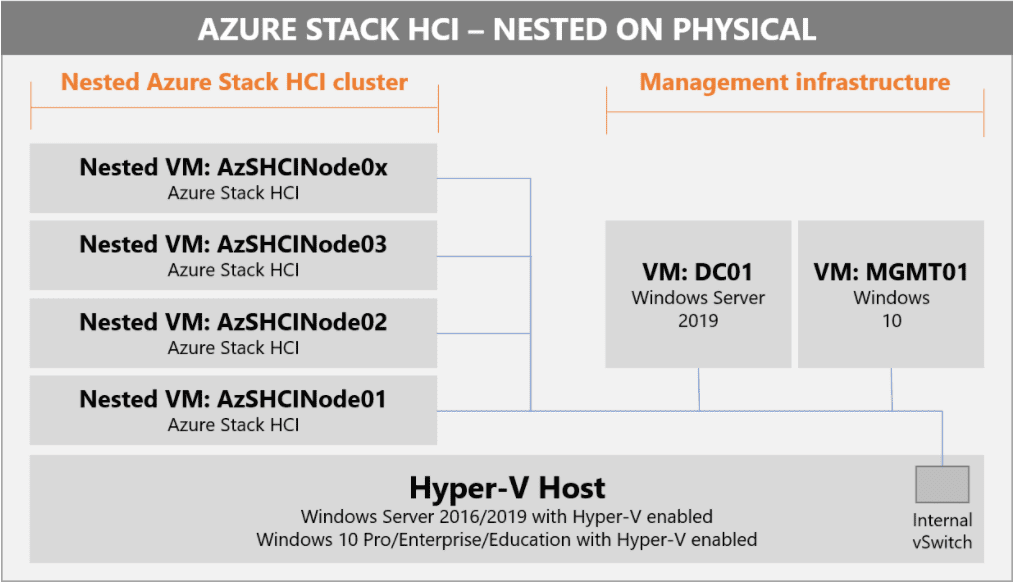
Microsoft also makes mention for those without the physical hardware on hand can make use of Microsoft Azure to run the nested VMs required to test out the preview of Azure Stack HCI.
As you see above, there is a single domain controller as well as a management Windows 10 workstation. If you are like me, you already have a domain environment running in the lab and plenty of management workstations. I am going to forgo creating the DC and the management workstation. Just keep in mind if you don’t have these, you will need to create them as part of the Azure Stack HCI environment.
The virtual machines required include:
- Windows 10 management workstation
- Domain Controller
- At least (2) Azure Stack HCI machines
Installing Azure Stack HCI in VMware vSphere
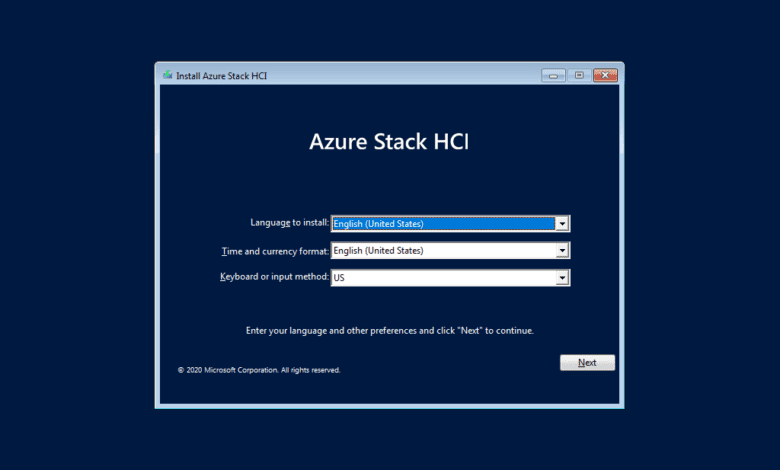
The first thing you will need to do is grab the Azure Stack HCI preview ISO file. You can do that by going to the link here:
- Azure Stack HCI | Microsoft Azure
- Click the link to Evaluate the Preview
Once you have the Azure Stack Preview ISO file, you will need to create your virtual machine in VMware vSphere. You will notice below when creating the virtual machine, since we will be running nested virtualization, you will need to enable the Expose hardware assisted virtualization to the guest OS.
Also, according to Microsoft documentation for the Azure Stack HCI VMs, you need to add:
- 4 hard drives
- 4 Network adapters

The Azure Stack HCI is a Windows Server 2019-based customized installation that is actually branded, “Azure Stack HCI” during installation a new special-purpose HCI operating system that is heavily integrated with Microsoft Azure. It has the look and feel of Windows Server 2019 Core edition.
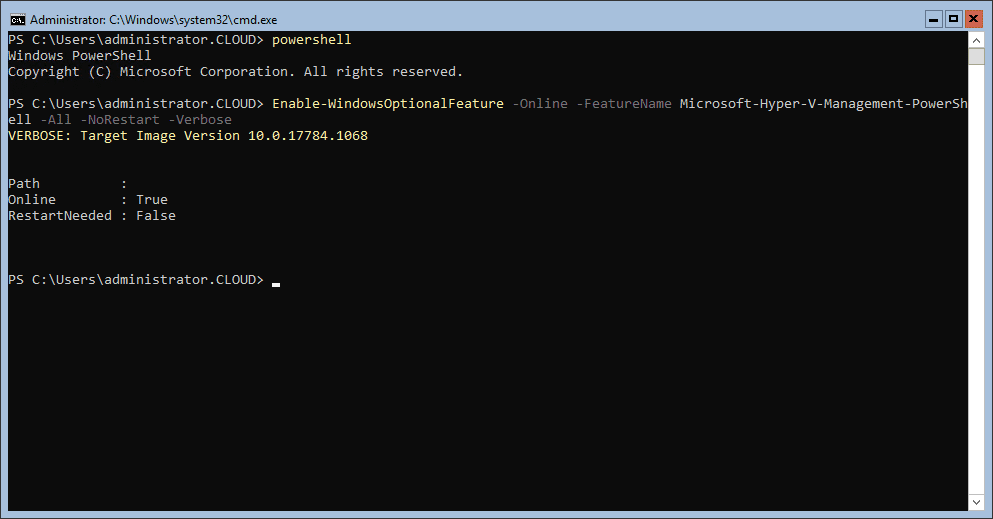
For my environment, I provisioned two virtual machines for Azure Stack HCI which is the minimum. After getting the initial load of the VMs finished, I renamed both and joined the domain. After getting the virtual machines up and running and the basic configuration set, I installed the Hyper-V Role on both using the following PowerShell cmdlet snippet.
Enable-WindowsOptionalFeature -Online -FeatureName Microsoft-Hyper-V-Management-PowerShell -All -NoRestart -Verbose
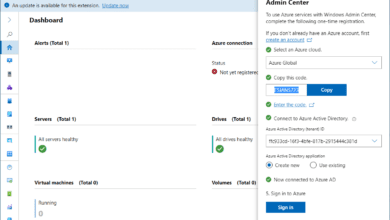
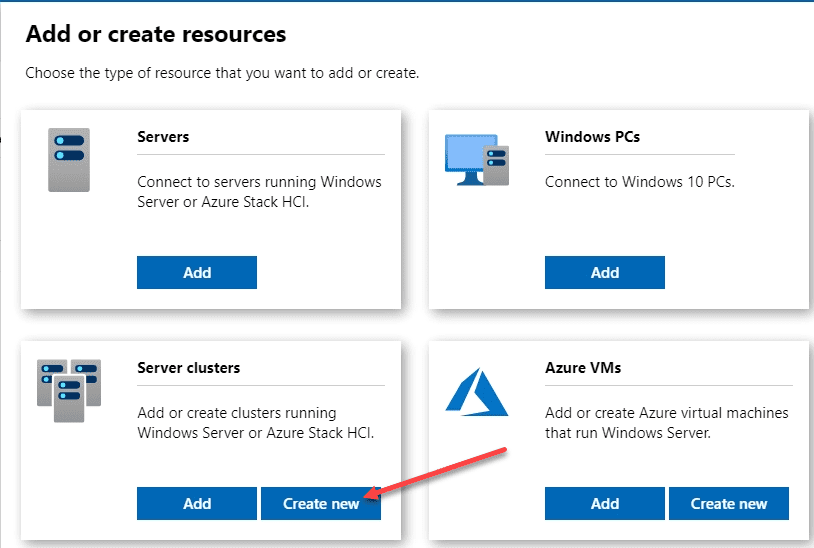
Now, we come to the part where we create the Azure Stack HCI cluster using Windows Admin Center. This is where your management workstation comes into play. Here as you can see, I am choosing the Server clusters > Create new.
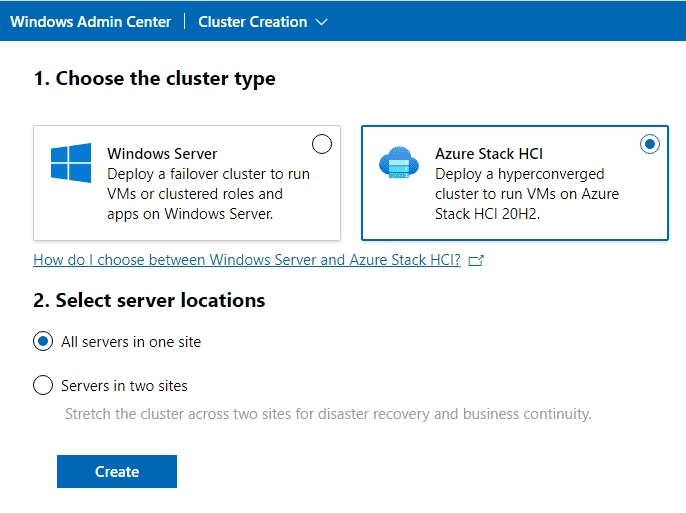
On the cluster type, you choose Azure Stack HCI to get started configuring the Azure Stack HCI cluster.
Final Thoughts
The process of Installing Azure Stack HCI in VMware vSphere is straight forward. The workflow is simple. Download the Azure Stack HCI ISO, install your VMs, and use the Windows Admin Center installation to create your Azure Stack HCI cluster and the remaining configuration. Stay tuned for the next part where I step you through using Windows Admin Center to create an Azure Stack HCI cluster.