As detailed in the previous post yesterday, Windows Server 2019 Core edition is gaining momentum among customers as the go to Windows edition for installation in their environments. Due to great new tools and extensions such as Windows Admin Center and Feature on Demand (FoD), the Core edition has much better support for admin interaction than previous Core releases. You will no doubt want to start automating your deployment of Windows Server 2019 Core edition. This can easily be done with a few tools such as Hashicorp packer and customization specifications. In this post, we will take a look at a few key concepts in automate Windows Server 2019 Core installation and deployment in a VMware vSphere environment for quick provisioning of Windows Server 2019 servers.
Getting Started with Hashicorp Packer
I have written a few posts already regarding Hashicorp Packer. Below are the links to those posts for your reference.
- Automated Windows 10 Installation with AutoUnattend and Packer
- Create Unattend Answer File for Windows Server 2019 Automated Packer Installation
- Getting Started with Packer and VMware vSphere
Packer is a great tool to use for an automated solution that is easy automate the creation of any type of machine image. It works with configuration management solutions and helps to facilitate automation with scripting to install and configure software within Packer provisioned images. The great thing about Packer provisioned images is that it allows you to have an automated solution for keeping ready to provision images that are up-to-date with the latest software and other configurations that are introduced in your configuration pipeline.
It works out of the box and comes with support to build images for Amazon, EC2, CloudStack, DigitalOcean, Docker, Google Compute Engine, Microsoft Azure, QEMU, VirtualBox, VMware, and more platforms are in the works with Packer.
The entire Hashicorp ecosystem is becoming (may already be) the gold standard for many enterprise environments and their automation initiatives. From an image building perspective, Packer is a great tool for use with provisioning and getting started with automation initiatives.
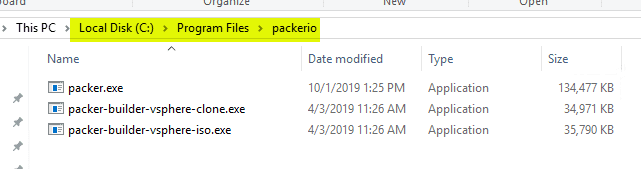
Packer itself is a simple executable written in GO that is self contained and ready to use. There are only a few components that you need to have in place for using Packer to build images in a VMware vSphere environment. For my vSphere environment in the lab I have the following:
Setting Up Files and Resources
I have my packer resource JSON files setup in a Git repository. This is not required but allows a great way to keep up with file versioning, etc. You will need four additional files for successfully automating a basic Windows Server 2019 Core VM image.
- Windows Server 2019 ISO
- VARs JSON file
- Builder manifest file
- Unattended Answer File (XML)
Make sure under the floppy files section to change the path to your Unattended installation file to line up with your directory structure.
Packer Builder Manifest File
{
  "variables": {
    "vsphere_server": "",
    "vsphere_user": "",
    "vsphere_password": "",
    "vsphere_template_name": "",
    "vsphere_folder": "",
    "vsphere_dc_name": "",
    "vsphere_compute_cluster": "",
    "vsphere_host": "",
    "vsphere_portgroup_name": "",
    "vsphere_datastore": "",
    "winadmin_password": "",
    "cpu_num": "",
    "mem_size": "",
    "disk_size": "",
    "os_iso_path": "",
    "vmtools_iso_path":""
  },
  "sensitive-variables": ["vsphere_password", "winadmin_password"],
  "builders": [
    {
      "type": "vsphere-iso",

      "vcenter_server":      "{{user `vsphere_server`}}",
      "username":            "{{user `vsphere_user`}}",
      "password":            "{{user `vsphere_password`}}",
      "insecure_connection": "true",

      "vm_name": "{{user `vsphere_template_name`}}",
      "folder" : "{{user `vsphere_folder`}}",
      "datacenter": "{{user `vsphere_dc_name`}}",
      "cluster":     "{{user `vsphere_compute_cluster`}}",
      "host": "{{user `vsphere_host`}}",
      "network": "{{user `vsphere_portgroup_name`}}",
      "datastore": "{{user `vsphere_datastore`}}",
      "convert_to_template": "true",

      "guest_os_type": "windows9Server64Guest",

      "communicator": "winrm",
      "winrm_username": "Administrator",
      "winrm_password": "{{user `winadmin_password`}}",

      "CPUs":             "{{user `cpu_num`}}",
      "RAM":              "{{user `mem_size`}}",
      "RAM_reserve_all": true,
      "firmware": "bios",

      "disk_controller_type":  "lsilogic-sas",
      "disk_size":        "{{user `disk_size`}}",
      "disk_thin_provisioned": true,

      "network_card": "vmxnet3",

      "iso_paths": [
        "{{user `os_iso_path`}}",
        "{{user `vmtools_iso_path`}}"
      ],
      "floppy_files": [
        "setup/win19core/autounattend.xml",
        "setup/setup.ps1",
        "setup/vmtools.cmd"
      ]
    }
  ],

  "provisioners": [
    {
      "type": "windows-shell",
      "inline": ["dir c:\"]
    }
  ]
}
Packer Variables File
In your variables file, this is where you customize for your environment. This will include specific information regarding your vSphere infrastructure including vCenter Server address, logins, datastore, Datacenter, cluster, and other information. Notice also, you will need to copy your VMware Tools Windows ISO to your datastore as well where the ISO can be accessed with the Packer build process to install VMware Tools in your installation of Windows Server 2019 Core.
Checklist:
- Replace vSphere specific information in the variables file
- Create the Templates folder being referenced
- Upload the Windows Server 2019 installation media to the folder you reference
- Upload the VMware Tools Windows ISO
- Change name of installation media in os_iso_path variable
Also, replace the name of the Windows ISO with the file name of the current download you use for the installation media.
{
    "vsphere_server": "<your vCenter FQDN>",
    "vsphere_user": "[email protected]",
    "vsphere_password": "<vCenter password>",
    "vsphere_template_name": "Win2019Coreclone",
    "vsphere_folder": "Templates",
    "vsphere_dc_name": "<Your DC Name>",
    "vsphere_compute_cluster": "<Your Cluster name>"
    "vsphere_portgroup_name": "<Your vSwitch portgroup label>",
    "vsphere_datastore": "<Your datastore>",
    "winadmin_password": "<your Windows password>",
    "cpu_num": "4",
    "mem_size": "4096",
    "disk_size": "102400",
    "os_iso_path": "[<your datastore>] ISO/en_windows_server_2019_updated_march_2019_x64_dvd_2ae967ab.iso",
    "vmtools_iso_path":"[Your Datastore] ISO/windows.iso"
}
Windows Server 2019 Core Edition Unattended Installation Answer File
To install the Windows Server 2019 Core edition, you need to make sure you have the OSImage value set to:
- Windows Server 2019 SERVERSTANDARDCORE
Make sure you customize the answer file for your environment, including the ProductKey, Autologon, UserAccounts, and other configuration.
<?xml version="1.0" encoding="utf-8"?>
<unattend xmlns="urn:schemas-microsoft-com:unattend">
    <settings pass="windowsPE">
        <component name="Microsoft-Windows-International-Core-WinPE" processorArchitecture="amd64" publicKeyToken="31bf3856ad364e35" language="neutral" versionScope="nonSxS" xmlns:wcm="http://schemas.microsoft.com/WMIConfig/2002/State" xmlns:xsi="http://www.w3.org/2001/XMLSchema-instance">
            <SetupUILanguage>
                <UILanguage>en-US</UILanguage>
            </SetupUILanguage>
            <InputLocale>en-US</InputLocale>
            <SystemLocale>en-US</SystemLocale>
            <UILanguage>en-US</UILanguage>
            <UserLocale>en-US</UserLocale>
        </component>
        <component name="Microsoft-Windows-Setup" processorArchitecture="amd64" publicKeyToken="31bf3856ad364e35" language="neutral" versionScope="nonSxS" xmlns:wcm="http://schemas.microsoft.com/WMIConfig/2002/State" xmlns:xsi="http://www.w3.org/2001/XMLSchema-instance">
            <DiskConfiguration>
                <Disk wcm:action="add">
                    <CreatePartitions>
                        <CreatePartition wcm:action="add">
                            <Order>1</Order>
                            <Size>500</Size>
                            <Type>Primary</Type>
                        </CreatePartition>
                        <CreatePartition wcm:action="add">
                            <Order>2</Order>
                            <Extend>true</Extend>
                            <Type>Primary</Type>
                        </CreatePartition>
                    </CreatePartitions>
                    <ModifyPartitions>
                        <ModifyPartition wcm:action="add">
                            <Order>1</Order>
                            <PartitionID>1</PartitionID>
                            <Format>NTFS</Format>
                            <Label>Boot</Label>
                            <Active>true</Active>
                        </ModifyPartition>
                        <ModifyPartition wcm:action="add">
                            <Order>2</Order>
                            <PartitionID>2</PartitionID>
                            <Format>NTFS</Format>
                            <Label>System</Label>
                        </ModifyPartition>
                    </ModifyPartitions>
                    <DiskID>0</DiskID>
                    <WillWipeDisk>true</WillWipeDisk>
                </Disk>
            </DiskConfiguration>
            <ImageInstall>
                <OSImage>
                    <InstallFrom>
                        <MetaData wcm:action="add">
                            <Key>/IMAGE/NAME</Key>
                            <Value>Windows Server 2019 SERVERSTANDARDCORE</Value>
                        </MetaData>
                    </InstallFrom>
                    <InstallTo>
                        <DiskID>0</DiskID>
                        <PartitionID>2</PartitionID>
                    </InstallTo>
                    <WillShowUI>OnError</WillShowUI>
                    <InstallToAvailablePartition>false</InstallToAvailablePartition>
                </OSImage>
            </ImageInstall>
            <UserData>
                <AcceptEula>true</AcceptEula>
				<ProductKey>
                  <Key>11111-22222-33333-44444-55555</Key>
                  <WillShowUI>Never</WillShowUI>
               </ProductKey>
            </UserData>
        </component>
    </settings>
    <settings pass="specialize">
        <component name="Microsoft-Windows-Shell-Setup" processorArchitecture="amd64" publicKeyToken="31bf3856ad364e35" language="neutral" versionScope="nonSxS" xmlns:wcm="http://schemas.microsoft.com/WMIConfig/2002/State" xmlns:xsi="http://www.w3.org/2001/XMLSchema-instance">
            <TimeZone>Central Standard Time</TimeZone>
        </component>
        <component name="Microsoft-Windows-Deployment" processorArchitecture="amd64" publicKeyToken="31bf3856ad364e35" language="neutral" versionScope="nonSxS" xmlns:wcm="http://schemas.microsoft.com/WMIConfig/2002/State" xmlns:xsi="http://www.w3.org/2001/XMLSchema-instance">
            <RunSynchronous>
                <RunSynchronousCommand wcm:action="add">
                    <Path>a:vmtools.cmd</Path>
                    <Order>1</Order>
                    <WillReboot>Always</WillReboot>
                </RunSynchronousCommand>
            </RunSynchronous>
        </component>
		 <component name="Microsoft-Windows-TerminalServices-LocalSessionManager" processorArchitecture="amd64" publicKeyToken="31bf3856ad364e35" language="neutral" versionScope="nonSxS" xmlns:wcm="http://schemas.microsoft.com/WMIConfig/2002/State" xmlns:xsi="http://www.w3.org/2001/XMLSchema-instance">
            <fDenyTSConnections>false</fDenyTSConnections>
        </component>
        <component name="Networking-MPSSVC-Svc" processorArchitecture="amd64" publicKeyToken="31bf3856ad364e35" language="neutral" versionScope="nonSxS" xmlns:wcm="http://schemas.microsoft.com/WMIConfig/2002/State" xmlns:xsi="http://www.w3.org/2001/XMLSchema-instance">
            <FirewallGroups>
                <FirewallGroup wcm:action="add" wcm:keyValue="RemoteDesktop">
                    <Active>true</Active>
                    <Group>Remote Desktop</Group>
                    <Profile>all</Profile>
                </FirewallGroup>
            </FirewallGroups>
        </component>
        <component name="Microsoft-Windows-TerminalServices-RDP-WinStationExtensions" processorArchitecture="amd64" publicKeyToken="31bf3856ad364e35" language="neutral" versionScope="nonSxS" xmlns:wcm="http://schemas.microsoft.com/WMIConfig/2002/State" xmlns:xsi="http://www.w3.org/2001/XMLSchema-instance">
            <SecurityLayer>2</SecurityLayer>
            <UserAuthentication>1</UserAuthentication>
        </component>
		<component name="Microsoft-Windows-ServerManager-SvrMgrNc" processorArchitecture="amd64" publicKeyToken="31bf3856ad364e35" language="neutral" versionScope="nonSxS" xmlns:wcm="http://schemas.microsoft.com/WMIConfig/2002/State" xmlns:xsi="http://www.w3.org/2001/XMLSchema-instance">
            <DoNotOpenServerManagerAtLogon>true</DoNotOpenServerManagerAtLogon>
        </component>
    </settings>
    <settings pass="oobeSystem">
        <component name="Microsoft-Windows-Shell-Setup" processorArchitecture="amd64" publicKeyToken="31bf3856ad364e35" language="neutral" versionScope="nonSxS" xmlns:wcm="http://schemas.microsoft.com/WMIConfig/2002/State" xmlns:xsi="http://www.w3.org/2001/XMLSchema-instance">
            <AutoLogon>
                <Password>
                    <Value>Yourpassword</Value>
                    <PlainText>true</PlainText>
                </Password>
                <LogonCount>3</LogonCount>
                <Username>Administrator</Username>
                <Enabled>true</Enabled>
            </AutoLogon>
            <FirstLogonCommands>
                <SynchronousCommand wcm:action="add">
                    <Order>1</Order>
                    <!-- Enable WinRM service -->
                    <CommandLine>powershell -ExecutionPolicy Bypass -File a:setup.ps1</CommandLine>
                    <RequiresUserInput>true</RequiresUserInput>
                </SynchronousCommand>
				<SynchronousCommand wcm:action="add">
                    <CommandLine>DoNotOpenServerManagerAtLogon = true</CommandLine>
                    <Order>10</Order>
                </SynchronousCommand>
            </FirstLogonCommands>
            <UserAccounts>
                <AdministratorPassword>
                    <Value>Yourpassword</Value>
                    <PlainText>true</PlainText>
                </AdministratorPassword>
            </UserAccounts>
        </component>
    </settings>
    <cpi:offlineImage cpi:source="wim:c:/users/administrator/desktop/win2016/install.wim#Windows Server 2019 SERVERSTANDARDCORE" xmlns:cpi="urn:schemas-microsoft-com:cpi" />
</unattend>
Automate Windows Server 2019 Core Installation and Deployment
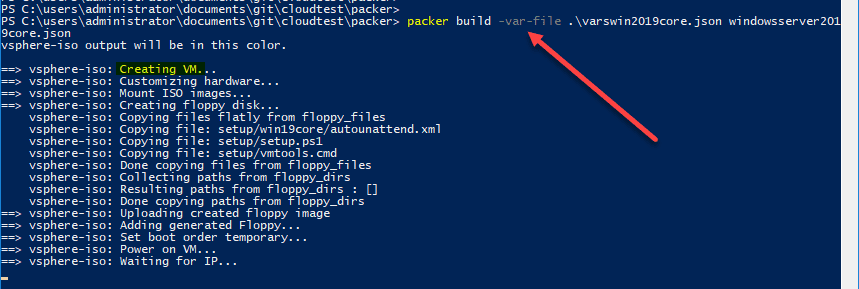
Let’s put it altogether and see what the build of Windows Server 2019 Core looks like using Packer. Here, we simply call the files that we have built above:
- packer build -var-file <your var file> <your manifest file>
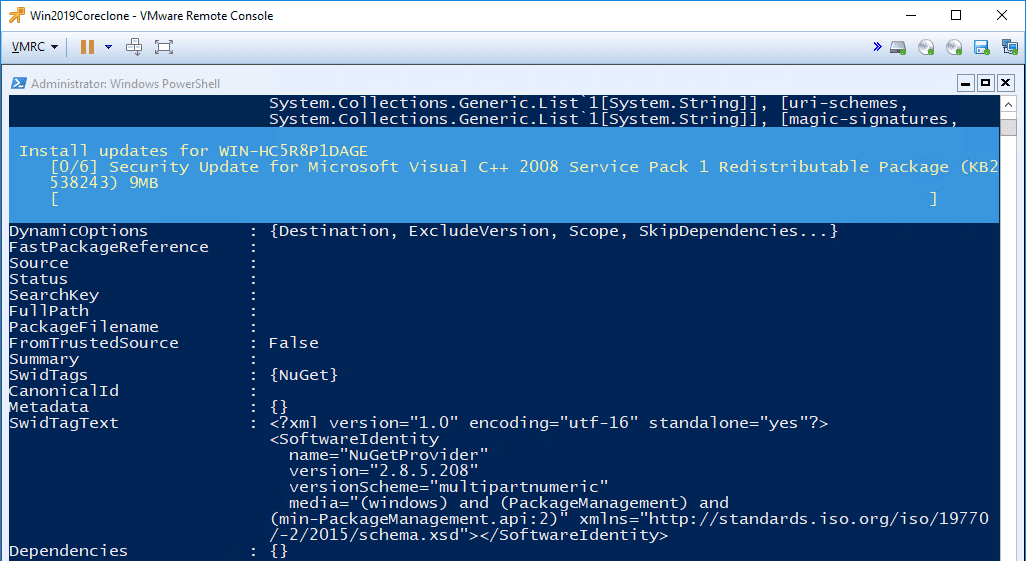
The great thing about the Packer builds is you can have custom scripts that run during installation that install or configure various aspects of your Windows Server 2019 core installation. For instance, below, I have a script to install Windows Updates inside of the Windows Server 2019 Core installation.
Get more details on how to perform automated installation of Windows Updates in Windows Server 2019 here:
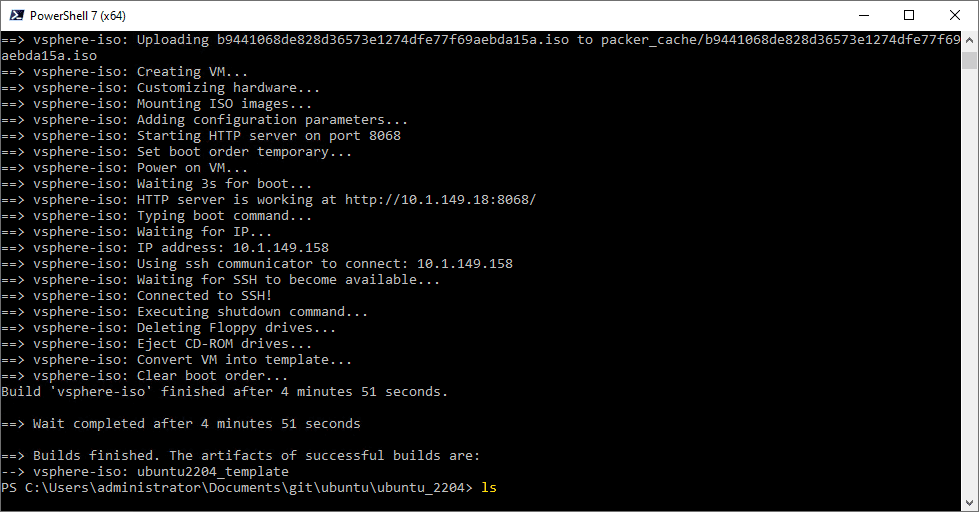
After a short while, you should see your Windows Server 2019 Core installation complete and be converted to a VMware template by Packer.
After you have your template in place, you can now clone from the template and make use of any customization specifications you may have for further customizing of the deployed template.
Wrapping Up
Packer is a great tool to Automate Windows Server 2019 Core Installation and Deployment. It makes the process to build Windows images extremely easy in VMware vSphere and many other provider environments, including the cloud.
The great thing about the Packer utility is you can schedule it to run periodically so that you can always have an up-to-date Windows Server 2019 Core image available for deployment when you need it.
Google is updating how articles are shown. Don’t miss our leading home lab and tech content, written by humans, by setting Virtualization Howto as a preferred source.
About The Author