Managing and maintaining secrets in an environment can be challenging. This is especially when using secrets in configuration files, variable files, and other information that can be dangerous to house in plain-text in a flat-file. Hashicorp Vault is a solution that allows managing secrets in your environment in a way that stays protected and secure. Instead of hard coding values in files, these can be dynamically referenced by your code. However, the first challenge can be getting Hashicorp Vault up and running. This post will look at how to install Hashicorp Vault on Ubuntu 20.04 and see how this is done step-by-step.
How To Install Hashicorp Vault on Ubuntu 20.04
I recently installed Hashicorp Vault in the home lab and used Ubuntu 20.04 distribution as the distro for installation. Let’s take a look and see what steps are involved with Ubuntu 20.04 for installation of Hashicorp Vault 20.04.
Getting Ready – Update Ubuntu 20.04
Let’s start at the beginning and run through a few things that you want to make sure to do. After you get Ubuntu 20.04 up and running, you will want to install all updates.
Install updates in Ubuntu 20.04:
sudo apt-get update && sudo apt-get upgrade -y
Make sure you have applied a static IP address to your Ubuntu 20.04 installation. While this is not absolutely required, this will cause headaches later on if you use DHCP and your Vault server grabs a new IP address. If you are like me, when you have intentions of creating a reservation for a DHCP address, it is easy to forget to do this. Assigning a static IP address is a best practice here.
To do this, just edit your /etc/netplan/netcfg.yaml file.
network:
   version: 2
   renderer: networkd
   ethernets:
     ens3:
     dhcp4: no
     addresses:
       - 192.168.121.199/24
     gateway4: 192.168.121.1
     nameservers:
         addresses: [8.8.8.8, 1.1.1.1]
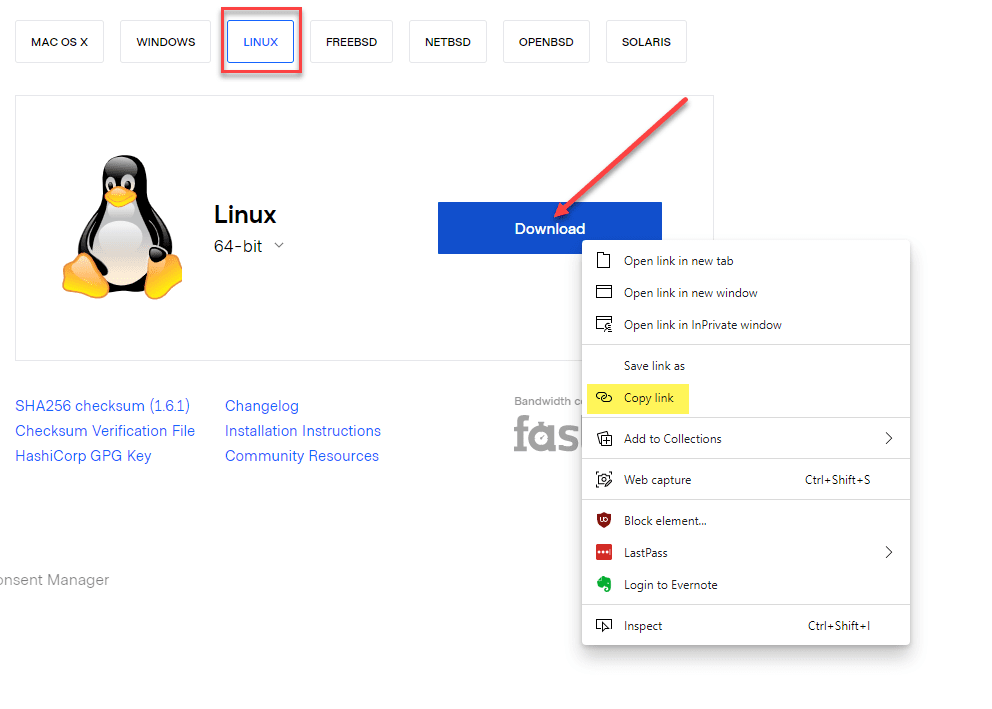
Step 1 – Download latest version of Hashicorp Vault for Linux
To get the latest version of the download link, visit the Hashicorp Vault download page and get the link from there. This page is found here:
- Downloads | Vault by Hashicorp (vaultproject.io)
- Click the Linux button and then right-click the Download button
- Choose Copy Link
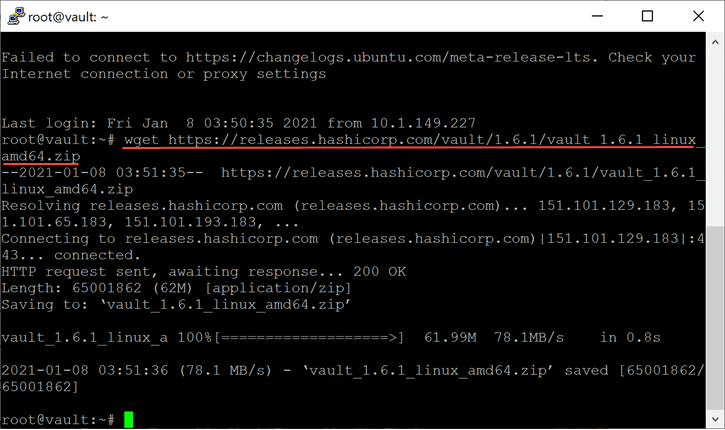
Now that you have the link copied, you can pull the download down using wget. At the time fo this writing, I used the following:
wget https://releases.hashicorp.com/vault/1.6.1/vault_1.6.1_linux_amd64.zip
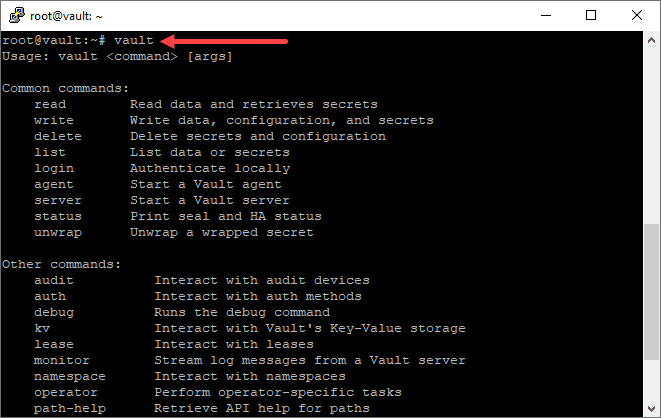
Now, unzip the .zip archive file you downloaded. Then move the file to /usr/bin like so.
unzip vault_1.6.1_linux_amd64.zip
mv vault /usr/bin

You should be able to type vault and it will display the common vault commands.
Step – 3 Create the Hashicorp Vault Configuration File
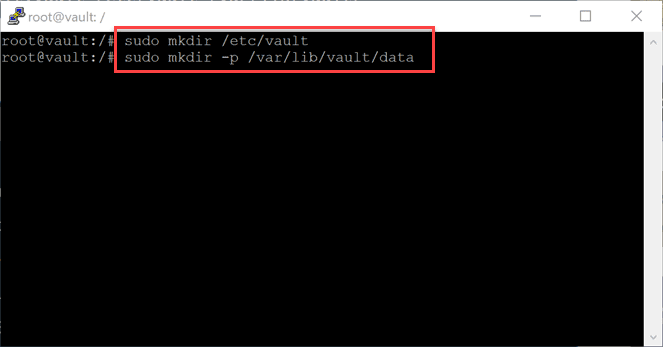
Next, let’s make some directories needed for the vault configuration and service. We will store the HCL configuration file in the /etc/vault directory and the vault data in the /var/lib/vault/data directory. The -p switch makes all the directories in the chain that are needed.
Now, let’s make the Hashicorp Vault configuration file in the /etc/vault directory. Name this config.hcl
disable_cache = true
disable_mlock = true
ui = true
listener "tcp" {
   address          = "0.0.0.0:8200"
   tls_disable      = 1

}
storage "file" {
   path  = "/var/lib/vault/data"
 }
api_addr         = "http://0.0.0.0:8200"
max_lease_ttl         = "10h"
default_lease_ttl    = "10h"
cluster_name         = "vault"
raw_storage_endpoint     = true
disable_sealwrap     = true
disable_printable_check = true
Step 4 – Create the Hashicorp Vault Service File
Now, let’s create the vault service file.
[Unit]
Description="HashiCorp Vault - A tool for managing secrets"
Documentation=https://www.vaultproject.io/docs/
Requires=network-online.target
After=network-online.target
ConditionFileNotEmpty=/etc/vault/config.hcl

[Service]
ProtectSystem=full
ProtectHome=read-only
PrivateTmp=yes
PrivateDevices=yes
SecureBits=keep-caps
AmbientCapabilities=CAP_IPC_LOCK
NoNewPrivileges=yes
ExecStart=/usr/bin/vault server -config=/etc/vault/config.hcl
ExecReload=/bin/kill --signal HUP
KillMode=process
KillSignal=SIGINT
Restart=on-failure
RestartSec=5
TimeoutStopSec=30
StartLimitBurst=3
LimitNOFILE=6553

[Install]
WantedBy=multi-user.target
Step 5 – Enable and Start and Vault Service
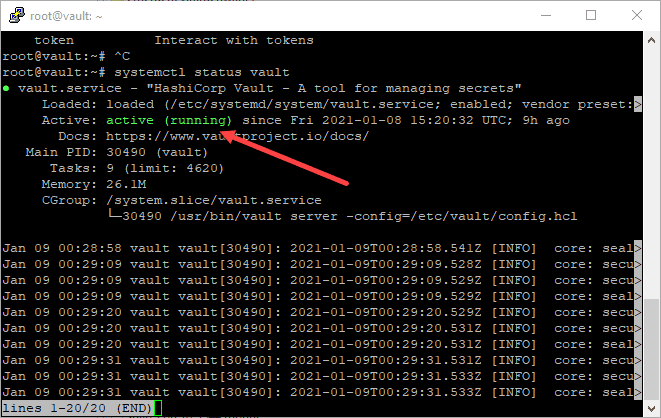
There are a few commands to run to enable and start the Vault Service. These include the following:
systemctl daemon-reloadsystemctl start vaultsystemctl enable vaultsystemctl status vault
As you can see below, the vault service is running and no errors are displayed.
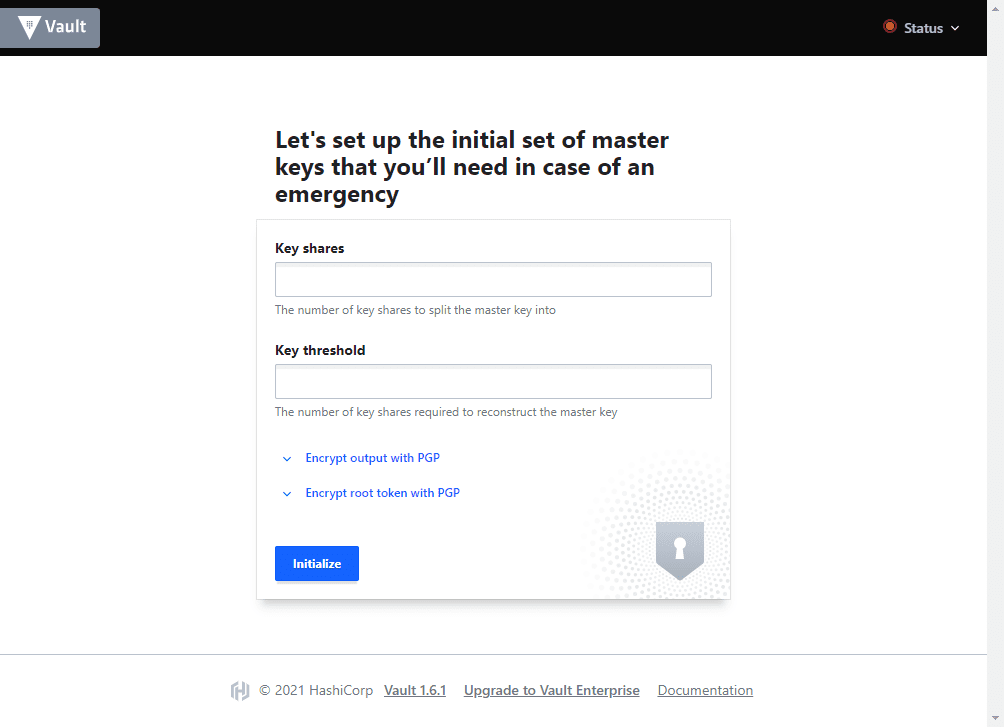
At this point, you should be able to browse to the Vault UI. Keep in mind to add the port you configure in the config.hcl file. Here I have browsed out to:
http://vault.cloud.local:8200
Step 6 (Optional) – Enable SSL for Vault UI and API
I am calling this optional, however, in production, you will always want to make sure you have your Vault installation, including the UI and API endpoint, secured with a proper SSL certificate. Here, I am going to show how to use a simple self-signed certificate to enable SSL in Vault. However, the process to change your configuration will be the same with a proper CA certificate as well.
First of all, you will need to create a self-signed certificate for use with Vault. To do this, we can use openssl.
sudo openssl req -x509 -nodes -days 365 -newkey rsa:2048 -keyout /etc/ssl/private/selfsigned.key -out /etc/ssl/certs/selfsigned.crt
After you have the certificate and key file in place, you can edit your Vault config file to add the configuration for TLS, certificate, and key.
Notice below, the tls_disable is now set to 0. Also, we have added the tls_cert_file and tls_key_file pointing to the path where we created the self-signed certificate.
disable_cache = true
 disable_mlock = true
 ui = true
 listener "tcp" {
    address          = "0.0.0.0:8200"
    tls_disable      = 0
    tls_cert_file = "/etc/ssl/certs/selfsigned.cr"
    tls_key_file = "/etc/ssl/private/selfsigned.key"
 }
 storage "file" {
    path  = "/var/lib/vault/data"
  }
 api_addr         = "https://0.0.0.0:8200"
 max_lease_ttl         = "10h"
 default_lease_ttl    = "10h"
 cluster_name         = "vault"
 raw_storage_endpoint     = true
 disable_sealwrap     = true
 disable_printable_check = true
After reconfiguring your Vault configuration file, restart the Vault service:
systemctl restart vault
Your Vault server should now be up and running on HTTPS.
Wrapping Up
This walkthrough of how to install Hashicorp Vault on Ubuntu 20.04 shows the process to be straightforward. With just a couple of configuration files for Vault and the Vault service, the Vault server along with the UI is up and running in no time. Stay tuned as we look at the initial configuration of keys, sealing, etc.
Google is updating how articles are shown. Don’t miss our leading home lab and tech content, written by humans, by setting Virtualization Howto as a preferred source.
About The Author