One of the great tools in automation and DevOps today is Hashicorp’s Terraform. Terraform is a great way to provide powerful automation in most any environment spanning on-premise infrastructure to public cloud environments. One of the many advantages of utilizing Terraform for automation is the simplicity in which you can get up and running with Terraform automating your environments. I had made it my goal this year to get my hands dirty with various automation tools and Hashicorp’s Terraform is next on my list of tools to get familiar with. I can tell you, coming from an infrastructure background that viewing infrastructure as code is a mind shift that allows great possibilities in how infrastructure is created and maintained. Terraform provides a great way to easily get your feet wet with infrastructure automation. Getting a start with automation using Terraform is extremely easy and simple to setup and we can also begin automating providers such as VMware vSphere in no time. Let’s take a look at basic Terraform installation and VMware vSphere Automation.
Hashicorp Terraform Overview and Terminology
Let’s take a step back for a moment and discuss what Hashicorp Terraform really is. Hashicorp Terraform allows creating, changing, and improving upon infrastructure that allows teams to treat infrastructure creation and changes as code that can be reviewed and versioned as such.
Terraform is a declarative language that allows you to tell the system what you want the end infrastructure to look like and Terraform will create or change it to fit that declared state. In Terraform terminology, it describes different types of infrastructure platforms as providers. It can interact with platforms housed in AWS, Azure, Google Cloud, VMware, and many others. The language that Terraform is written in is called Hashicorp Configuration Language or HCL. The files that it understands are created with the extension .tf on the end.
Terraform has the concept of the following:
- Provider – The platform you are going to manage
- Resource – The type of object you want to create, manage, etc (servers, databases, and load balancers.
- Plan – Let’s Terraform know what you are doing before making any changes and also is a great sanity check to actually performing an action
- Apply – Actually applies the creation or changes to an environment.
Basic Terraform Installation and VMware vSphere Automation
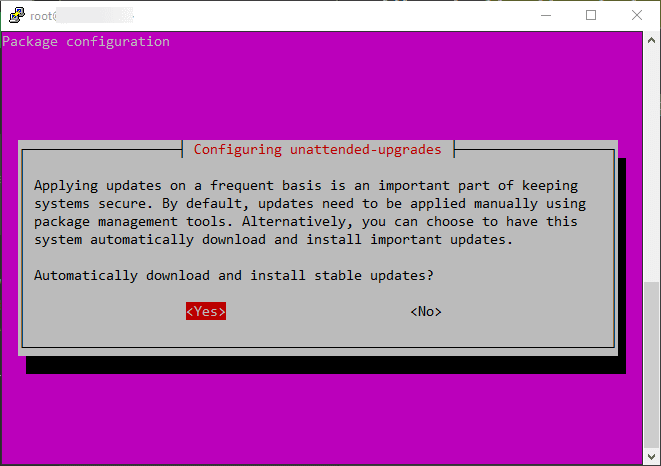
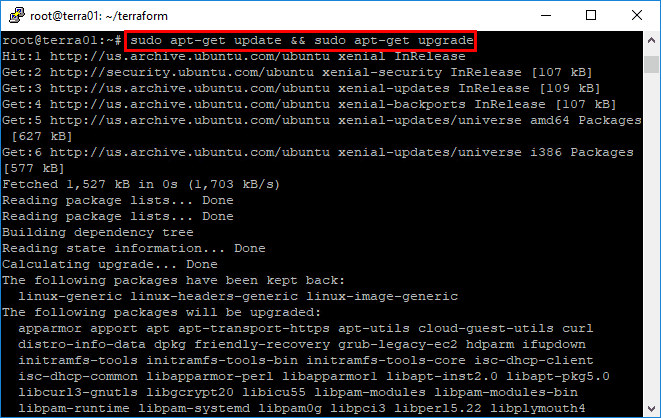
For the purposes of this walkthrough, I simply have an Ubuntu 16.04 LTS server that I have quickly imaged up in the home lab environment. To level set, be sure to run all the latest updates on the server before getting started running any applications, etc.
To install Terraform, we have to think of the word “install” very loosely in this context here. There isn’t really an “installation” process with Terraform. You simply download the terraform executable from Hashicorp to your Linux installation and you are good to go! It is that simple. I think that is part of the huge success of Terraform as an automation tool.
To obtain the Terraform executable, simply visit the Hashicorp site and grab the executable for your specific platform:
As of the time of this writing, Terraform can currently be downloaded for the following platforms:
- macOS
- FreeBSD
- Linux
- OpenBSD
- Solaris
- Windows

Setting up Terraform Files for VMware vSphere Virtual Machine Creation
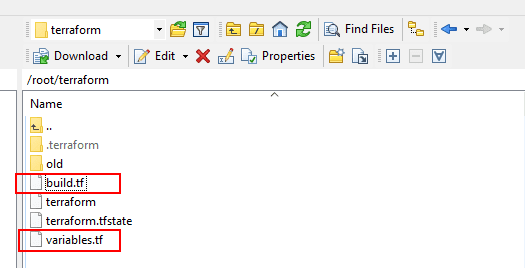
In the following VMware vSphere example, I will be creating a single virtual machine by cloning an existing VMware vSphere virtual machine template. Let’s walkthrough the files created for a quick VMware vSphere automation demo. Disregard the “old” folder as I had used this to copy files before creating new files for labbing. The files below:
- build.tf – This is a file that I created to house the actual provider information and the declarative state for Terraform to perform the actual build.
- terraform – This is the terraform executable
- variables.tf – This file contains our variables specific to the VMware vCenter environment.
The provider information is configured like the following to connect to a VMware vSphere environment:
provider "vsphere" {
  user           = "${var.vsphere_user}"
  password       = "${var.vsphere_password}"
  vsphere_server = "${var.vsphere_server}"

  # if you have a self-signed cert
  allow_unverified_ssl = true
}
Inside the variables.tf file, our variables look like this:
variable "vsphere_server" {
    description = "vsphere server for the environment - EXAMPLE: vcenter01.hosted.local"
    default = "vcsa65.cloud.local"
}

variable "vsphere_user" {
    description = "vsphere server for the environment - EXAMPLE: vsphereuser"
    default = "[email protected]"
}

variable "vsphere_password" {
    description = "vsphere server password for the environment"
    default = "password"
}

variable "virtual_machine_dns_servers" {
  type    = "list"
  default = ["10.1.149.10", "9.9.9.9"]
}
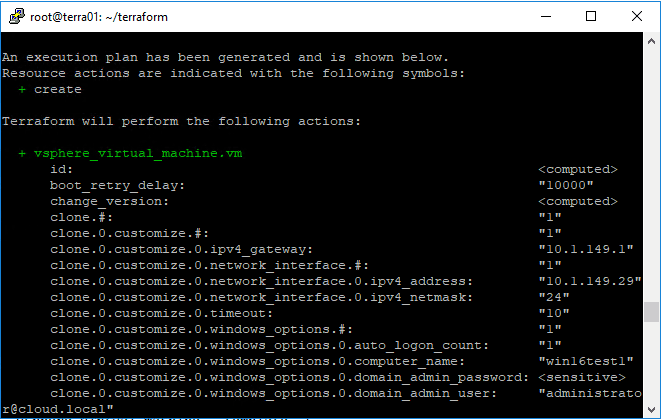
Now the rest of the build.tf file contains the following after the provider information. Most of the code blocks are pretty self explanatory. We are feeding Terraform most of the pertinent vSphere information from vCenter. This includes datacenter name, virtual machine network, the source virtual machine template, the name of the virtual machine clone. Also in the customization spec, we can tell it what the computer name is going to be for Windows as well as the domain name to join, along with credentials to make that happen. As you see below, we can also assign the IP address, gateway, etc.
data "vsphere_datacenter" "dc" {
  name = "Cloud"
}

data "vsphere_datastore" "datastore" {
  name          = "vsanDatastore"
  datacenter_id = "${data.vsphere_datacenter.dc.id}"
}

data "vsphere_compute_cluster" "cluster" {
  name          = "cluster1"
  datacenter_id = "${data.vsphere_datacenter.dc.id}"
}

data "vsphere_network" "network" {
  name          = "VSS-Servers"
  datacenter_id = "${data.vsphere_datacenter.dc.id}"
}

data "vsphere_virtual_machine" "template" {
  name          = "win16clonetemplate"
  datacenter_id = "${data.vsphere_datacenter.dc.id}"
}

resource "vsphere_virtual_machine" "vm" {
  name             = "win16test1"
  resource_pool_id = "${data.vsphere_compute_cluster.cluster.resource_pool_id}"
  datastore_id     = "${data.vsphere_datastore.datastore.id}"

  num_cpus = 2
  memory   = 1024
  guest_id = "${data.vsphere_virtual_machine.template.guest_id}"

  scsi_type = "${data.vsphere_virtual_machine.template.scsi_type}"

  network_interface {
    network_id   = "${data.vsphere_network.network.id}"
    adapter_type = "${data.vsphere_virtual_machine.template.network_interface_types[0]}"
  }

  disk {
    label            = "disk0"
    size             = "${data.vsphere_virtual_machine.template.disks.0.size}"
    eagerly_scrub    = "${data.vsphere_virtual_machine.template.disks.0.eagerly_scrub}"
    thin_provisioned = "${data.vsphere_virtual_machine.template.disks.0.thin_provisioned}"
  }

  clone {
    template_uuid = "${data.vsphere_virtual_machine.template.id}"

    customize {
      windows_options {
        computer_name = "win16test1"
        join_domain = "cloud.local"
    domain_admin_user = "[email protected]"
    domain_admin_password = "password"
      }

      network_interface {
        ipv4_address = "10.1.149.29"
        ipv4_netmask = 24
      }

      ipv4_gateway = "10.1.149.1"
    }
  }
Just to set the stage, after we have the files in place, we will want to do the following:
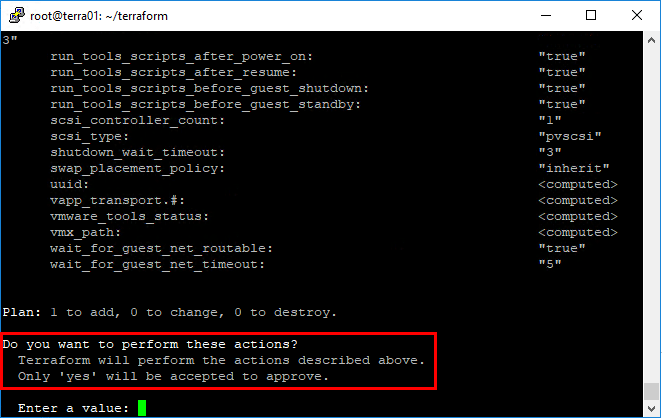
- Run terraform plan – This tests the settings and is basically like running a “whatif” command. This is very handy as it helps to identify errors before applying the declared state.
- Run terraform apply – This actually runs the actions against the provider and resources.
Running Terraform VMware vSphere Virtual Machine Automation
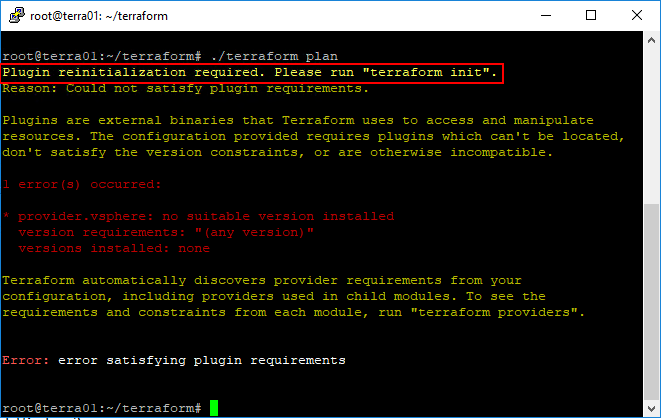
There are a few things that you may run into if you are like me the first go around. Terraform needs to initialize the needed plugins for vSphere, etc. As you can see, after I had my files in place, I simply tried to run the terraform plan command and saw the following error of sorts.
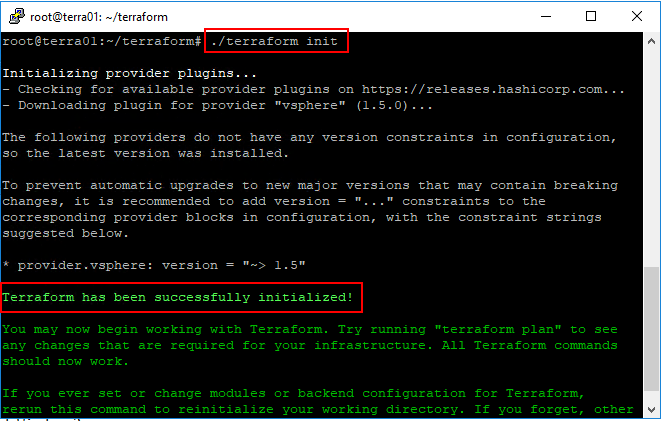
As directed, I simply ran the terraform init command which pulls down the needed provider plugins.
Now, a second try of the terraform plan command is successful. Terraform will spit out the mock results of the intended creation or configuration.
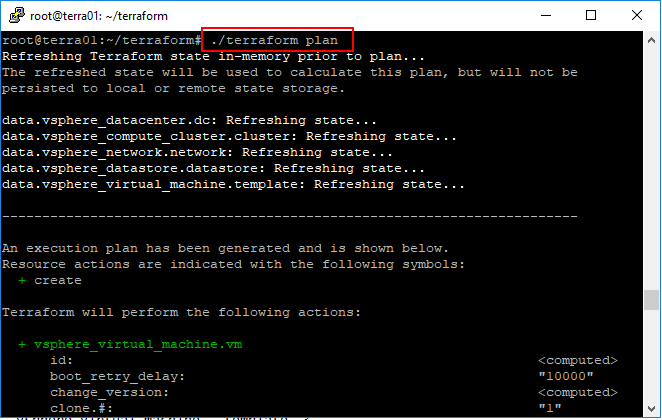
Below is the rest of the output of the terraform plan command.
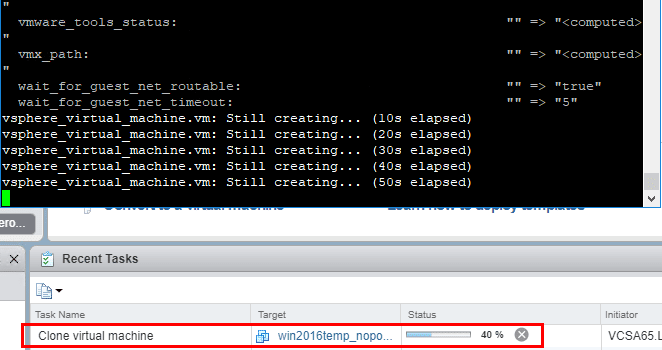
Now, let’s actually run this. Below, I am running the terraform apply command. You will have to type yes to answer the “Do you want to perform these actions?” question.
It now looks like we have actions happening. As you can see, I have the terraform window overlaid on top of the vCenter web client. We can see terraform working/waiting on the resulting actions in vCenter.
An error – In my first attempt, the clone was successful, but the customization was not. In my case this was an issue with VMware Tools.

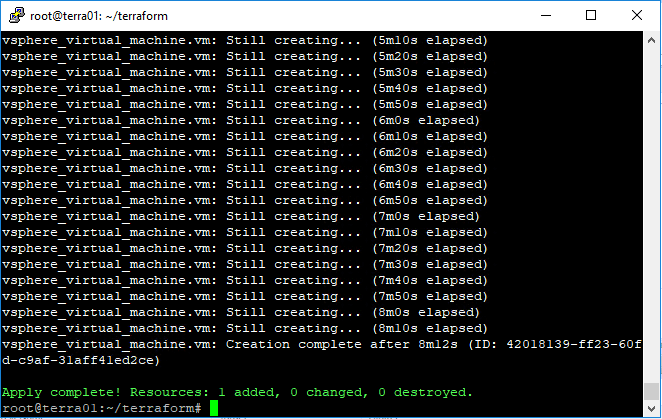
After correcting the VMware Tools issue, the operation completed successfully. The virtual machine was created as expected and the customization was ran successfully also.
Takeaways
Hopefully this Basic Terraform Installation and VMware vSphere Automation demo shows just how easy it is to setup a simple automation test of cloning a VMware vSphere virtual machine template and then customizing the resulting virtual machine. Terraform is extremely efficient, lightweight, easy to stand up, and versatile. Stay tuned for more in depth posts covering this powerful automation tool. More to come!
Google is updating how articles are shown. Don’t miss our leading home lab and tech content, written by humans, by setting Virtualization Howto as a preferred source.
About The Author