When configuring storage for Windows Server Hyper-V clusters with SAN storage, you always want to make sure you have multiple paths to your storage for redundancy and performance. With SAN storage and iSCSI you won’t want to utilize link aggregation technologies such as LACP switch LAGs or Switch Embedded Teaming. Instead you want to use something called Multipath I/O or MPIO in Microsoft terms for connecting your Hyper-V hosts using multiple paths to your storage. First, let’s see why you want to use MPIO instead of LACP or other link aggregation technologies and the Windows components that need to be installed in Windows Server to allow utilizing MPIO connections. This will allow Hyper-V hosts to make use of multiple paths connected to iSCSI storage. Let’s look at Hyper-V Cluster MPIO iSCSI installation and configuration and why this is important.
Why Use MPIO instead of Link Aggregation?
Why do you use MPIO instead of link aggregation technolgies like NIC teaming or LACP? The link aggregation technologies certainly have their place and would serve to solve the redundancy problem but would not improve performance. This is due to the fact that Link Aggregation technologies improve throughput when there are unique I/O flows that originate with different sources. The iSCSI flows do not appear to be unique to the aggregation technologies and so do not benefit from any performance boost with link aggregation. MPIO on the other hand deals with multi-pathing by looking at the initiator and the target, or client and server level. So multiple initiators can connect to the same or different targets and benefit from the multipathing capabilities that MPIO brings to the mix.
With the above state reason, Hyper-V benefits from the use of MPIO and is the way you want to configure your iSCSI connections when connecting the individual Hyper-V hosts to the iSCSI SAN shared storage. What is involved with configuring MPIO in Hyper-V? Let’s look at what is required from the Windows Server side of things.
Hyper-V Cluster MPIO Installation and Configuration
Configuring MPIO in Windows Server requires just a few steps. They include:
- Adding the MPIO Windows Feature
- Reboot
- Configuring the Add support for iSCSI devices for your particular SAN device
- Reboot
- Configure iSCSI connections with Enable multi-path
- Add all the connections for each target, enabling multi-path
- Check multi-path MPIO connections
Configuring MPIO Windows Feature
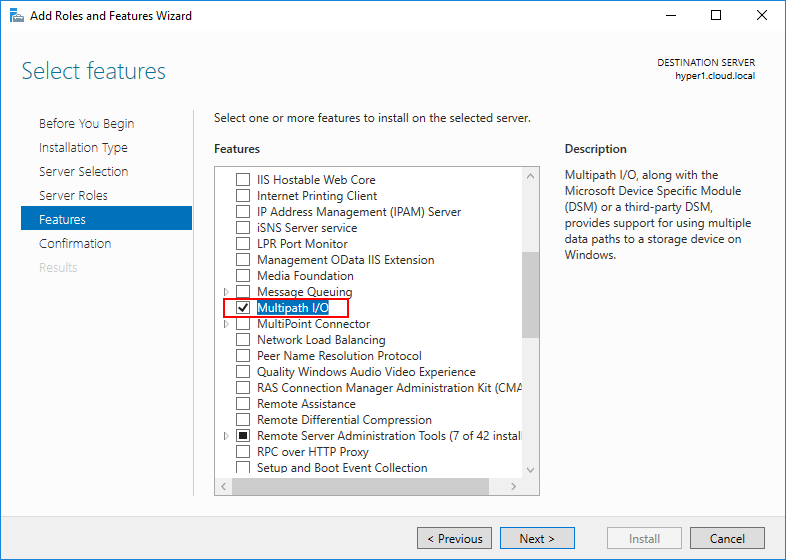
The first thing you need to do in a Windows Server installation is add the Multipath I/O Windows Feature. To do that, simply add the Feature in Server Manager or PowerShell with the Add-WindowsFeature cmdlet.
After the installation of Multipath I/O, you will be prompted to restart Windows to finalize the installation. After restarting Windows, you are ready to enable the add support for iSCSI devices feature for your selected SAN device. To do this, after the server reboot, launch the MPIO configuration utility by typing mpiocpl at a run menu or cmd line.
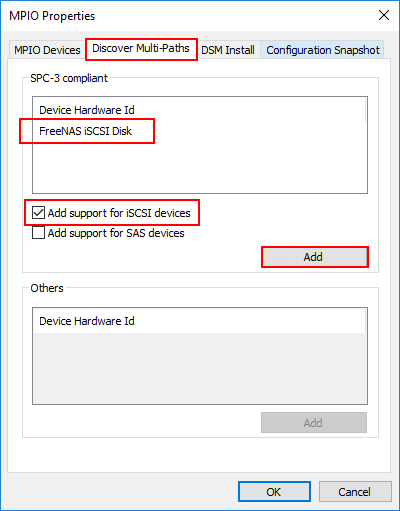
After launching the utility, navigate to the Discover Multi-Paths tab, select your SPC-3 compliant device, and check the box Add support for iSCSI devices. Afterwards, click the Add button. You will be prompted for a reboot.
After this reboot, you are ready to start adding your iSCSI connections with multi-path enabled.
Adding Hyper-V iSCSI Connections with MPIO Multi-path
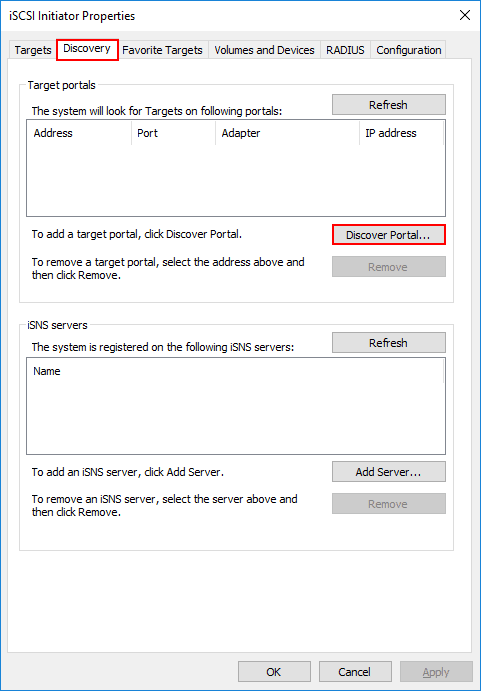
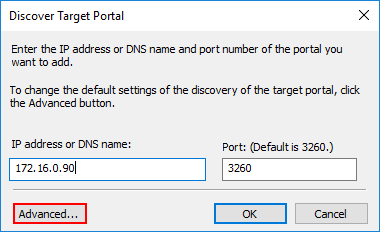
To begin adding target portals and then the targets themselves, launch the iSCSI Initiator Properties configuration utility. This can be done by typing iscsicpl at a run or cmd prompt. Navigate to the Discovery tab and then click the Discover Portal button.
Enter your first iSCSI portal address, then click the Advanced button.
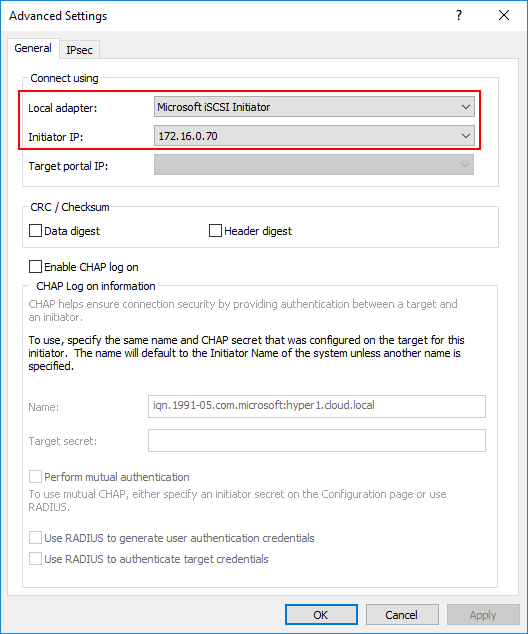
Under the Advanced Settings, you can set a specific Local adapter and Initiator IP.
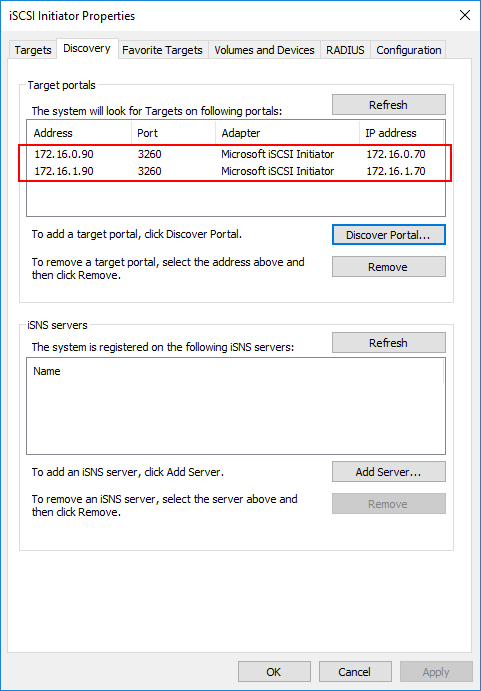
Do this for your multiple target portals. As you can see below, I have different target portal IPs that have been added using the specific network adapter that aligns with the target portal network address/subnet.
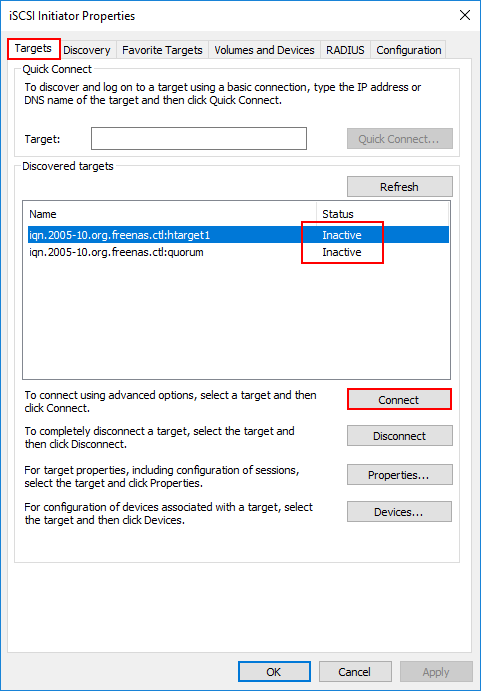
After adding the portals, click on the Targets tab. You will see the Discovered targets and they will most likely be in the Inactive status. Click the Connect button.
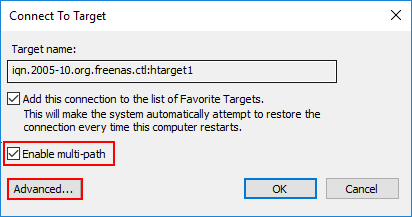
On the Connect to Target dialog box, click the Enable multi-path checkbox and then click the Advanced button.
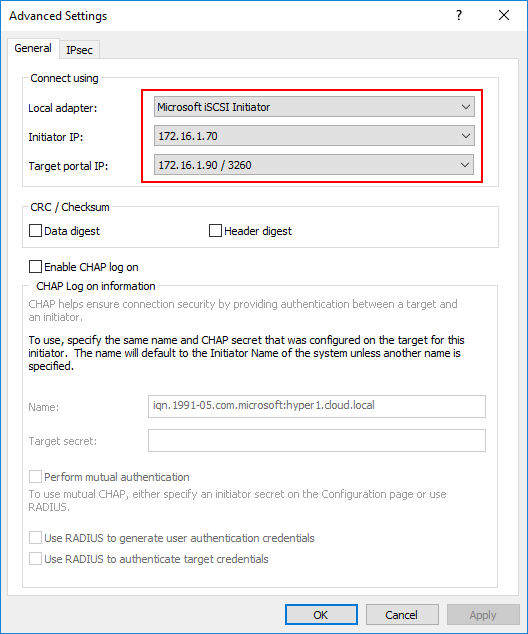
Here is where the actual magic of the MPIO connections comes into play. Below, I am setting the Local adapter, then the Initiator IP and Target portal IP. So our end goal here is to setup the connections using each portal adapter IP.

Click the Connect button again on the same discovered target. Now, I use the second Initiator IP and Target portal IP for the second connection to the same target.
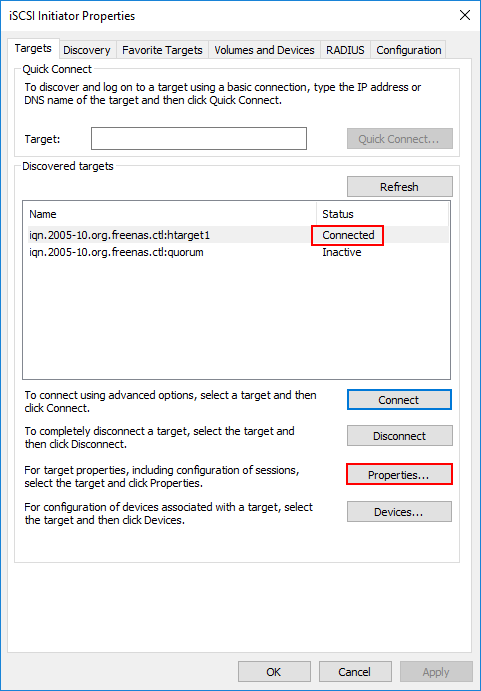
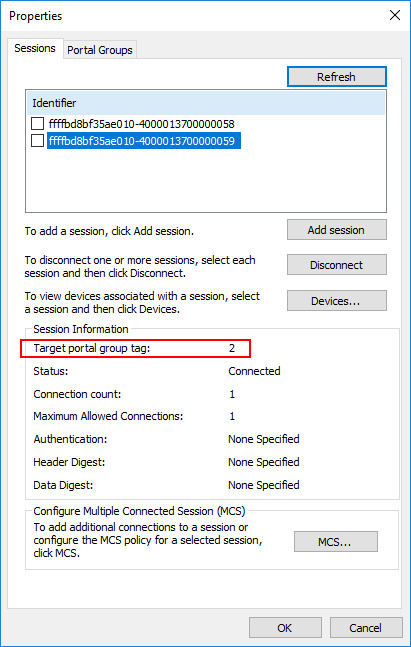
Now we see the Connected status. Click the Properties button so you can verify the MPIO status.
Notice you have two identifiers. Click each one and you will see the respective Target portal group tag.
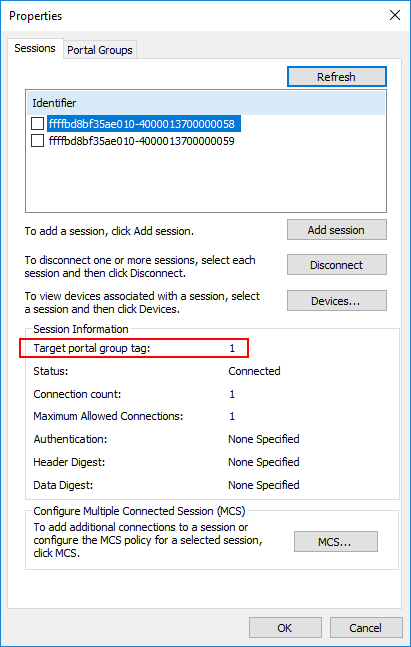
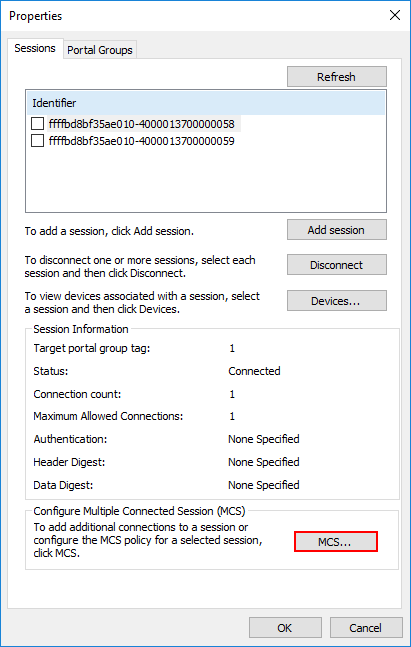
Clicking on the second Identifier and notice the Target portal group tag is the second group tag.
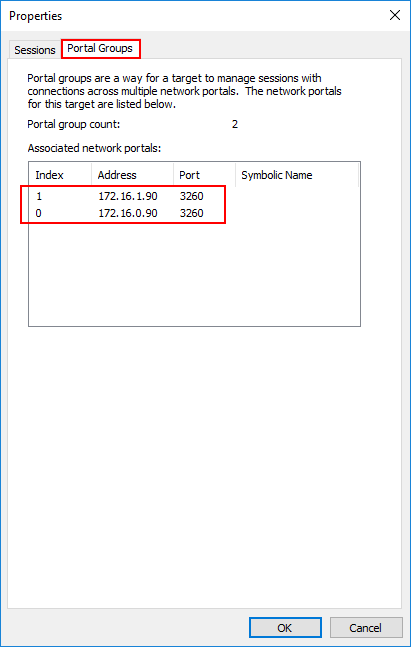
Click the Portal Groups tab and you should see both Associated network portals.
For each Identifier, you can Configurer Multiple Connected Session settings by clicking the MCS button.
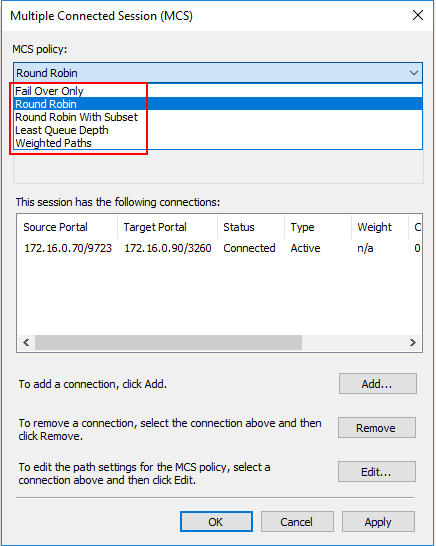
Note the MCS policy options that control the multi-pathing behavior. Options are:
- Fail Over Only
- Round Robin
- Round Robin With Subset
- Least Queue Depth
- Weighted Paths
You will want to complete the above configuration for every Hyper-V host that you have in the Windows Server Hyper-V Failover Cluster to ensure you have multi-path connections to shared storage.
Verifying Hyper-V iSCSI MPIO Multi-path Connections
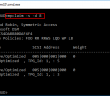
There is a powerful little built-in cmd line utility that allows easily seeing the state of your MPIO connections in Hyper-V. The utility is mpclaim. Below, you can see your MPIO enabled devices with the command:
- mpclaim -s -d
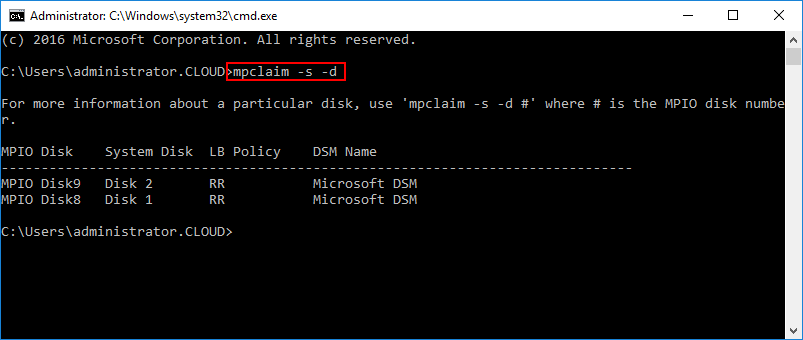
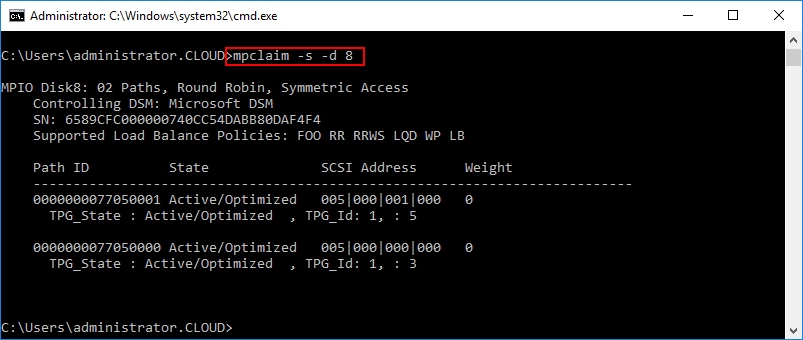
To look at the multipath information for a specific device use:
- mpclaim -s -d <device ID>
You can see below, I have two active paths to the specific device ID queried. State is Active/Optimized.
Takeaways
Hyper-V Cluster MPIO iSCSI Installation and Configuration involves a few steps as shown above but is relatively easy to configure. After adding the Multipath I/O Windows Feature and enabling the iSCSI multi-path plugin for your specific storage array, you can then add your iSCSI targets and connect to them using the multiple portal IP addresses, thus enabling multi-path connectivity to your storage. This allows for not only having a redundant connection to your storage devices but also allows for optimum performance for iSCSI traffic to the SAN storage.
Google is updating how articles are shown. Don’t miss our leading home lab and tech content, written by humans, by setting Virtualization Howto as a preferred source.
About The Author


The MCS (multiple connected sessions) area is not actually used in this setup at all. Changing the MPIO policy there will have no impact. There are no Multiple Connected Sessions per portal. In your setup you are using MPIO between multiple portals.
You can set the policy per device by clicking on Devices rather than MCS.
You can also set the global policy by using the powershell cmdlet (for example):
Set-MSDSMGlobalDefaultLoadBalancePolicy -Policy FOO
See: https://learn.microsoft.com/en-us/powershell/module/mpio/set-msdsmglobaldefaultloadbalancepolicy?view=windowsserver2016-ps
Note that the commands are different between 2016 and 2022 so be sure to select the correct version of windows on the microsoft page above.
I hope this helps,
Will