


When it comes to free and open source firewalls in the home lab, there are a few choices, but many home labbers tend to settle on OPNsense for its wide range of features and it is, as we mentioned, free. You can do a lot with it and it feels like the platform continues to grow and get better. You can definitely just install the OPNsense firewall platform, assign a WAN and LAN interface, give them IP addresses and you are up and running. But when it comes down to it, this is generally not where I leave it. There are a few settings and configs that I setup after installation that makes troubleshooting easier, DNS better and your firewall policies cleaner and easier to operate. Let’s take a look at the 10 OPNsense settings and configuration changes I generally make on a new home lab firewall.
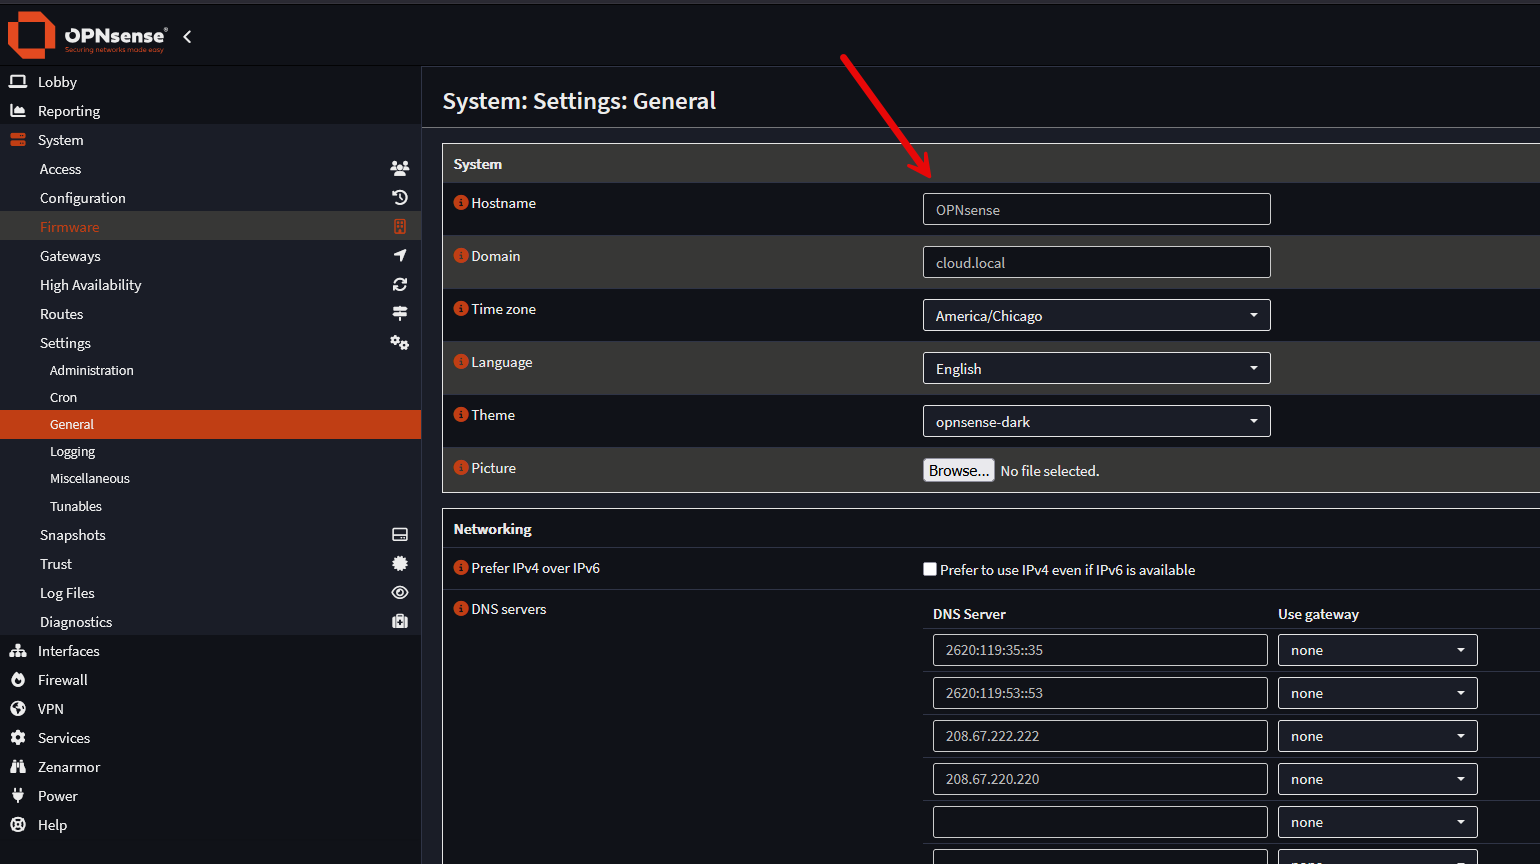
1. Set your hostname and local domain configuration
This is an easy one to overlook, but it is one that I change pretty quickly. Under the OPNsense config, I make sure the firewall has a good, meaningful hostname and domain configured. So, instead of generic or non-intuitive names from Star Trek or Star Wars (I love these, but they are not helpful), I use names like the easy names below:
fw01.home.arpa
fwdr.home.arpa
opnsense01.lab.example.com
The names are not as much important as keeping things consistent. OPNsense warns against using .local as a DNS domain for your lab since it is used with certain multicast traffic and can lead to issues. I personally have been running a .local in my lab for years now and have had no issues. But do note that as a best practice to not use it.
System > Settings > General:
I have seen for completely private home lab domains using something like home.arpa as a good choice as well. In environments where I own a public domain, you can create a subdomain for your internal resources. For example, you could use something like:
lab.example.comThis gives me names like:
pve01.lab.example.com
nas01.lab.example.com
dns01.lab.example.com
This might seem like it is making things tedious. While it does add an extra step to think about your naming convention, when you have certificates and other automation along with your certificate renewals come into the picture, you will thank yourself for having a well-designed scheme for your naming conventions. It just makes things so much easier to work with.
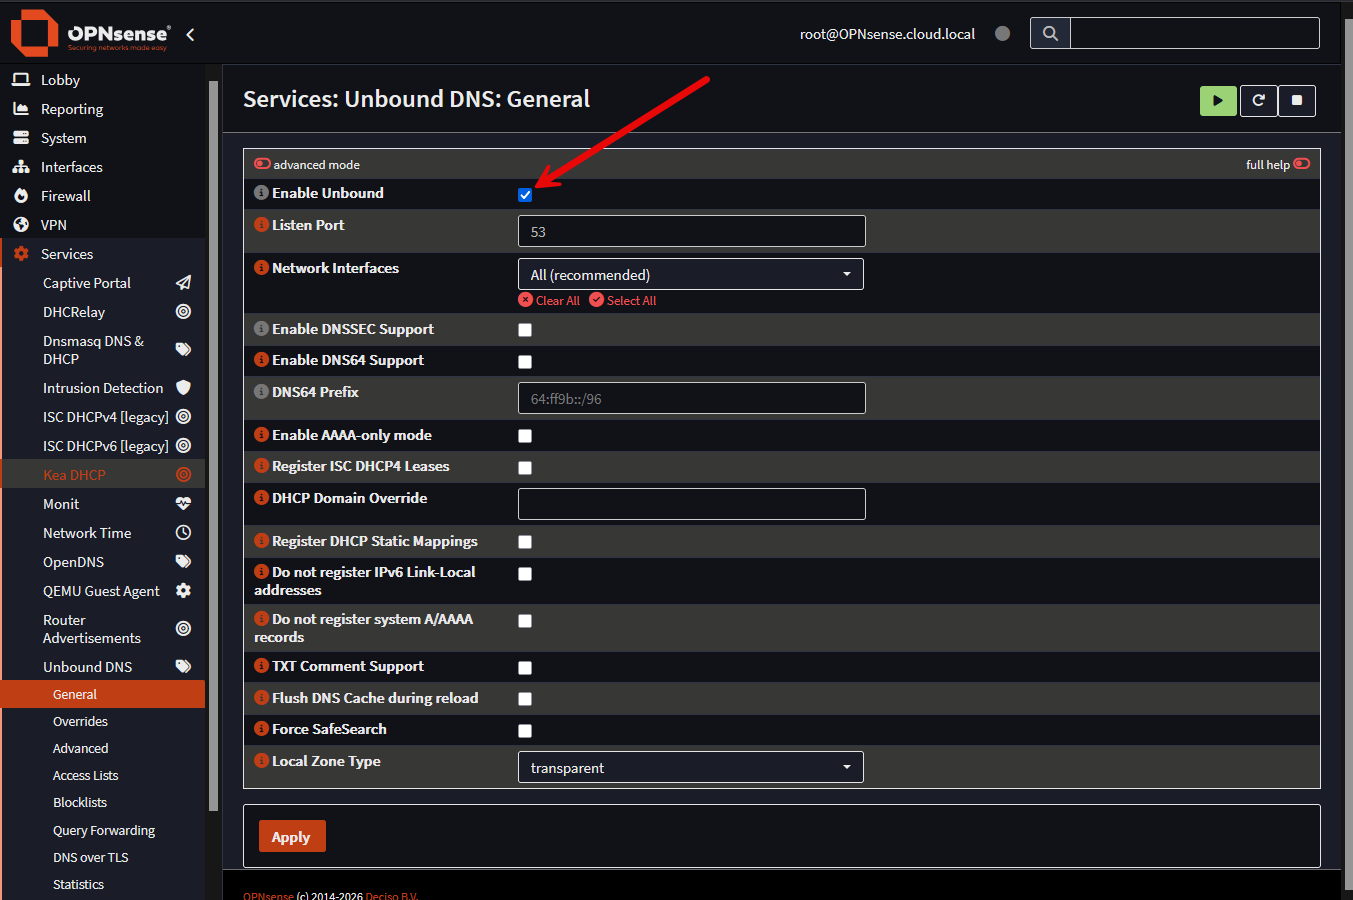
2. I configure DNS in OPNsense to work as I want it to with Unbound
DNS is one of the first things you want to make sure you have configured correctly and in a way that you want for your home lab environment. OPNsense includes Unbound. Unbound is a great full recursive DNS resolver and is one that I have written about many times on this blog. It can also forward your queries using DNS over TLS if that is how you want to configure your upstream network resolution.
Services > Unbound DNS > General:
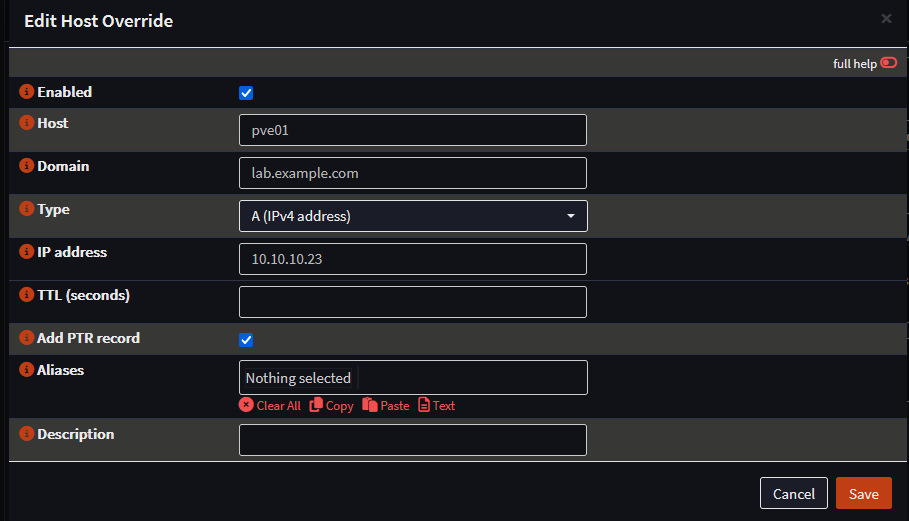
For single environments, using OPNsense as the DNS resolver can work very well. I also may have local host overrides for infrastructure like the following. This is where you would have your local servers answer to a specific IP address for your domain. Examples might look like this:
pve01.lab.example.com
192.168.20.11

pve02.lab.example.com
192.168.20.12

nas01.lab.example.com
192.168.30.10
Services > Unbound DNS > Overrides:
Having your own DNS infrastructure is something that I highly recommend you do as it gives you total control over how IP addresses are resolved from friendly names and which addresses are returned to clients.
You can do really cool things like split horizon DNS configurations where hosts resolve one way outside of your network but resolve another way inside.
3. I create aliases that helps to simplify the firewall rules
Firewall aliases are one of my favorite things to setup inside of OPNsense and it makes management a lot easier than it is otherwise. An alias is a named object you create that contains hosts, networks, ports, or other things. This is akin to enterprise firewall solutions where we have things like address objects and address groups.
OPNsense describes aliases as a way to help you condense and simplify firewall rules. It also helps you to lower the number of changes you need to make if values need to change later on. So, instead of creating a firewall rule containing:
192.168.20.11
192.168.20.12
192.168.20.13
You can create something friendly like this:
PROXMOX_HOSTSFirewall > Aliases:
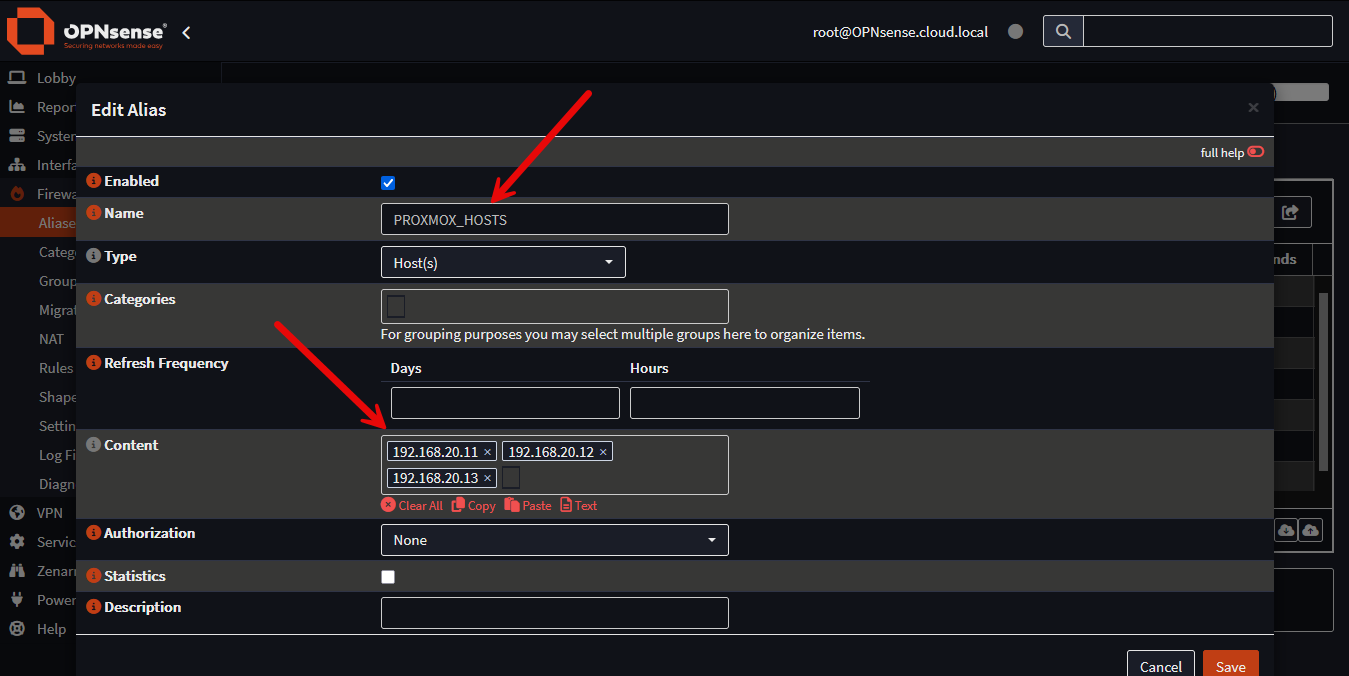
In the home lab, I think it makes a lot of sense to have ALIASES that include the following:
- DNS servers
- Management hosts
- Docker hosts
- Kubernetes nodes
- Trusted clients
Ports can be grouped as well in OPNsense, so it gives you a lot of flexibility in what can be included in the alias. This to me feels a lot like “service objects” or other enterprise firewall vendor nomenclature.
WEB_PORTSMight have something in it like:
80
443
Now, let’s think about how this makes your life as a network admin in your home lab so much easier. Imagine that you add another Proxmox host to your network. Now, since we have the PROXMOX_HOSTS alias, we can just add the new Proxmox host there, instead of having to find each firewall rule that references specific IP addresses. You add it once, and you are done.
4. Don’t treat your entire home lab as a single trusted LAN
This isn’t just a checkbox in OPNsense, but it is an important change that I make in a home lab network when I am designing and setting things up. First, I segment the network. I like to just get a notebook and pencil/pen and start listing out the VLANs that I want to create inside the network, how I want traffic to flow, and the address spaces that I want each VLAN to have.
A common home lab might have some or all of the following different VLANs configured:
| VLAN | Purpose |
|---|---|
| Management VLAN | Hypervisors, switches, and management interfaces. |
| Server VLAN | Keeps servers, VMs, and containers together |
| Client VLAN | Place for your laptops, desktops, and phones |
| IoT VLAN | Smart devices and other less-trusted gear |
| Guest VLAN | Gives Internet access without internal network access |
| Storage VLAN | Storage traffic for things like NAS, iSCSI, and NFS |
| Lab VLAN | Isolated network for testing and experimenting |
Interfaces > Devices > VLAN:
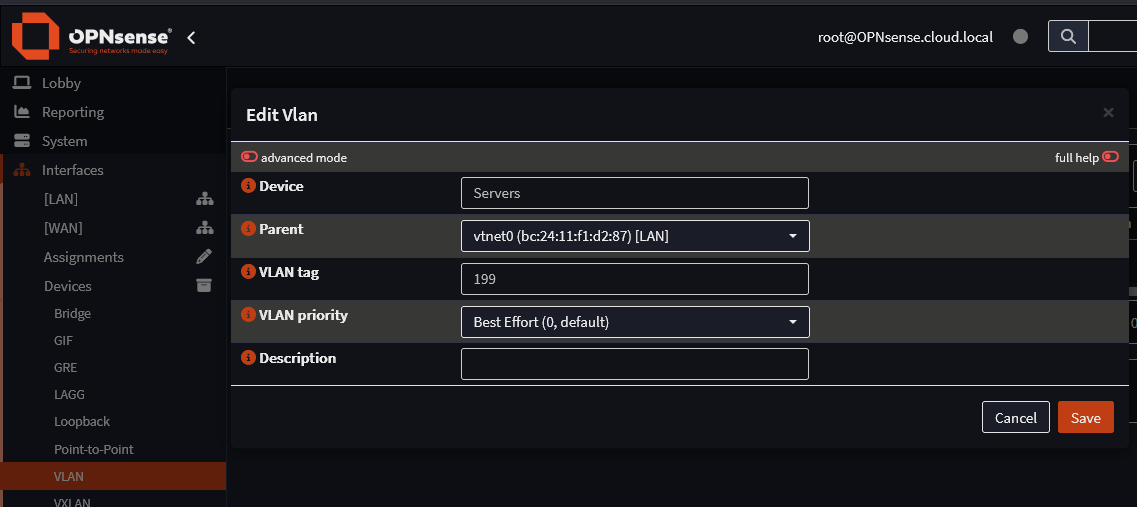
You may not have all of these created on day one of your home lab journey. But don’t create things in such a way that it makes it difficult to segment things later. For instance, my IoT devices do not need access to my Proxmox management interfaces. Guest Wi-Fi definitely doesn’t need to see my servers and other home lab resources. Containers don’t need to see things like IPMI server management out of band interfaces.
I like to think about the traffic types and how they criss cross the internal trust zones. This is also one of the best ways to learn practical networking and security in a home lab. You can start with understanding exactly which systems you want to be able to communicate and which ones you don’t want to.
5. Scope down your inter-VLAN rules so they are very specific
When you stand up a new OPNsense installation in the home lab, it will default to something that looks like the following from a rule perspective. This makes it really easy to have everything just work out of the box, but it probably isn’t the best for security.
LAN net -> anyOnce I create VLANs or additional interfaces, I usually start to think about what each network actually needs, resource-wise. For example, in my mind, a client network might need access to DNS and general Internet browsing:
CLIENT_NET -> DNS_SERVERS -> TCP/UDP 53CLIENT_NET -> Internet -> 80/443My management network may be allowed to reach certain resources on my home lab side:
- Proxmox hosts
- Switch management
- Storage managment
But the IoT network may be prevented from reaching any of these that we have already mentioned. OPNsense is a stateful firewall that tracks sessions. Once a session is allowed and established, the firewall tracks the state. So this means for the most part you don’t have to create reverse rules for normal return traffic.
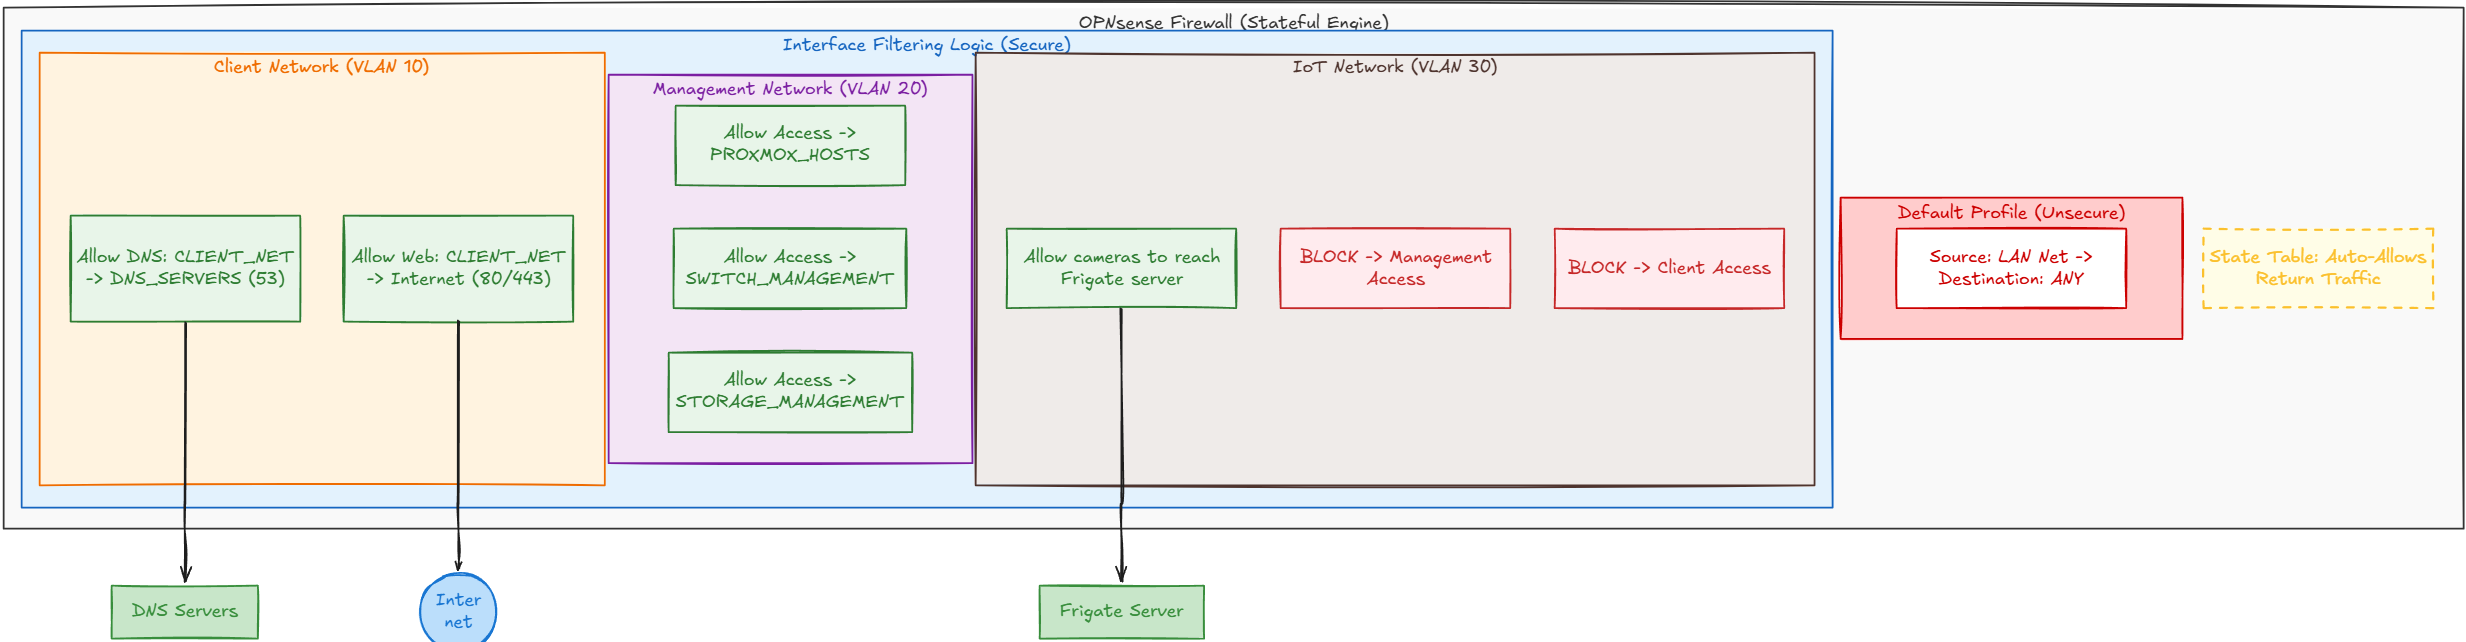
It can be helpful to think about the interface where traffic enters into the firewall. So, if traffic enters in on my IoT VLAN and is trying to reach my server VLAN, I usually looking at the rules for the IoT interface. Another habit that helps out quite a bit is adding descriptions to your rules.
You can use something vague like this:
Pass TCP IoT -> 192.168.20.50Or you can populate something helpful like this:
Allow cameras to reach Frigate serverI would rather have the last one when it comes to trying to remember what the purpose of the rule is and keeping me from doing something bad like deleting a rule if I don’t think it is important.
6. Enable specific firewall logging
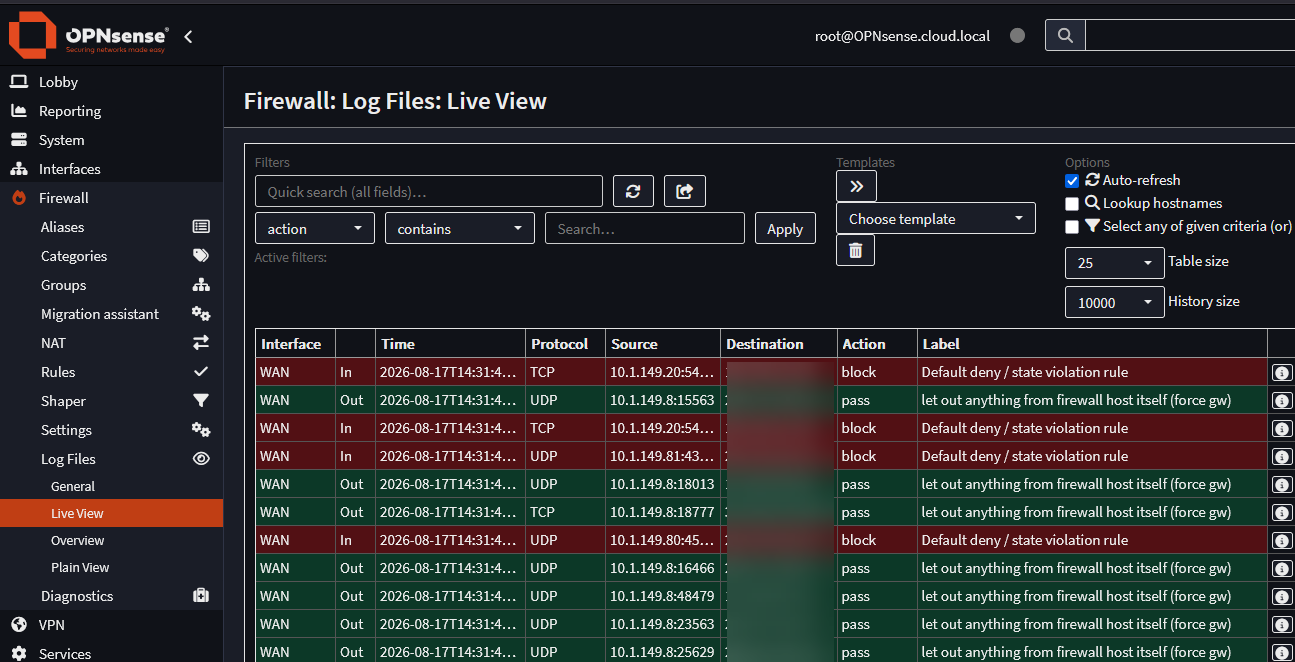
Firewall logging is really useful. Just like logs from any other system, they can give you clues on certain types of activity. But if you have too much logging enabled, it can turn into unneeded noise in the environment. For me, this means that I don’t enable logging on every pass rule. To me deny rules are more interesting when it comes to logging. But, pass or deny, enable logging where it helps you to answer questions you need to answer in the home lab. like:
- Why can’t this VLAN reach my DNS server?
- Why isn’t this app connecting to the DB server?
- What addresses is the IoT device trying to access?
- What traffic is blocked between these two networks?
Firewall > Rules:
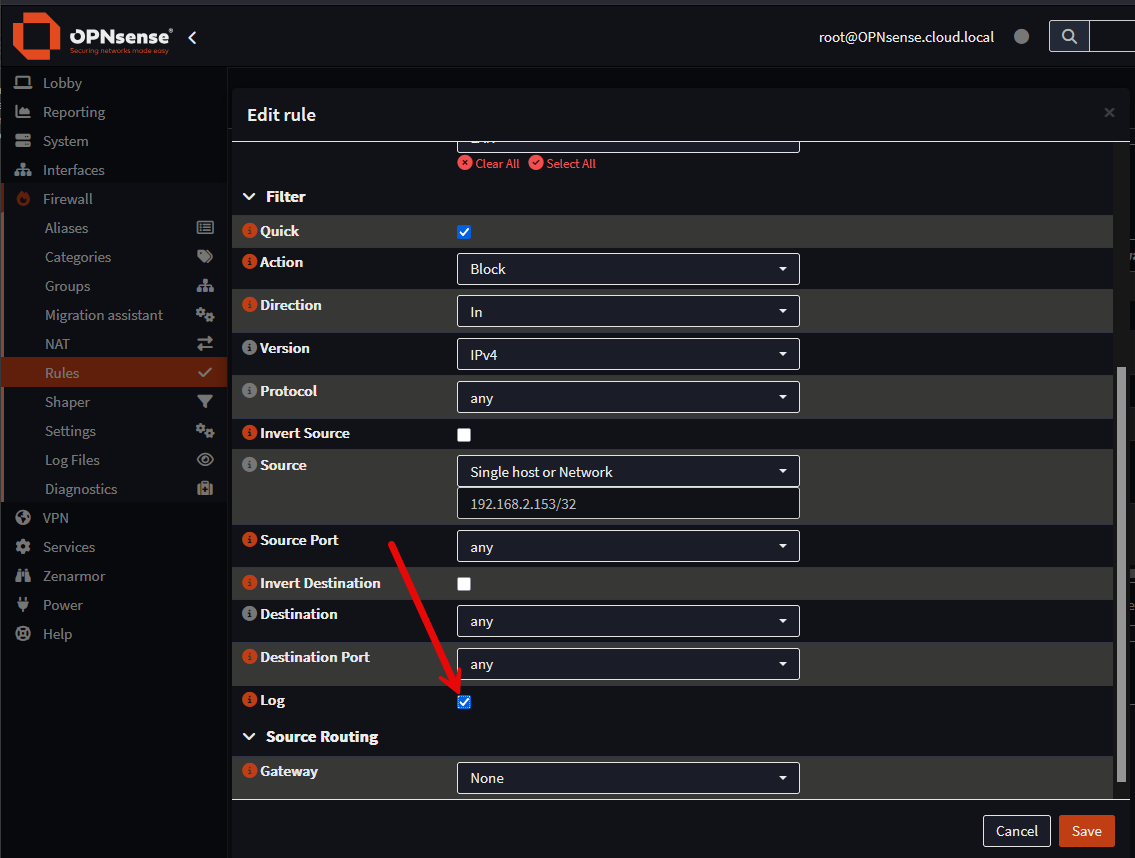
Open the firewall live log and it will show you traffic that is permitted or denied. Firewall > Log Files > Live View:
7. I configure gateway monitoring
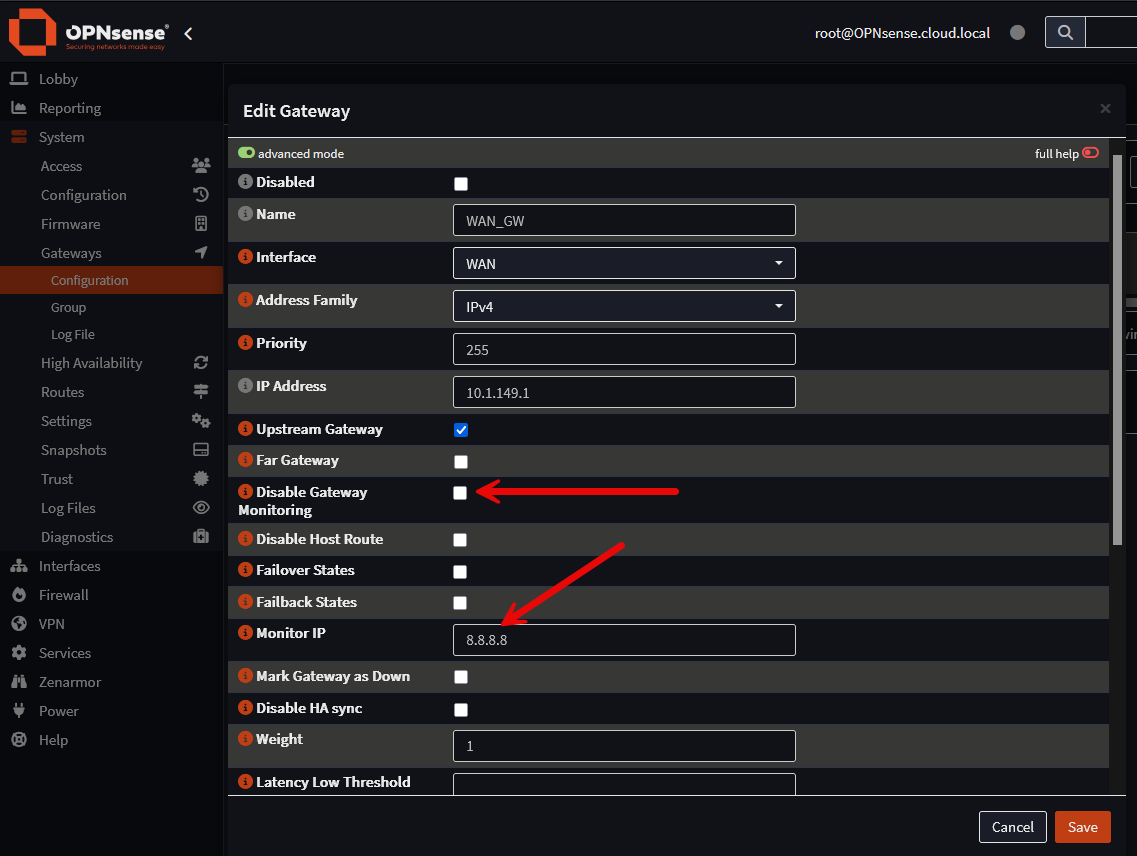
OPNsense has gateway monitoring built into the solution. This is an important feature when you have multiple WAN connections, which many have sprung for in the home lab. Especially when self-hosting is super important for certain resources that we don’t want to be disconnected from.
With Gateway monitoring and multi-WAN configs you can use monitor addresses and gateway groups. Just understand the device OPNsense uses as the gateway isn’t necessarily the best thing to use as the health-monitoring target.
Your ISP gateway might respond even when there is an issue upstream from the ISP that has broken connectivity. Sometimes too, the IP you have chosen for monitoring might block or rate-limit ICMP and cause the gateway to act like it is unhealthy when the connection is actually good.
System > Gateways:
8. I check hardware offloading settings on virtual OPNsense firewalls
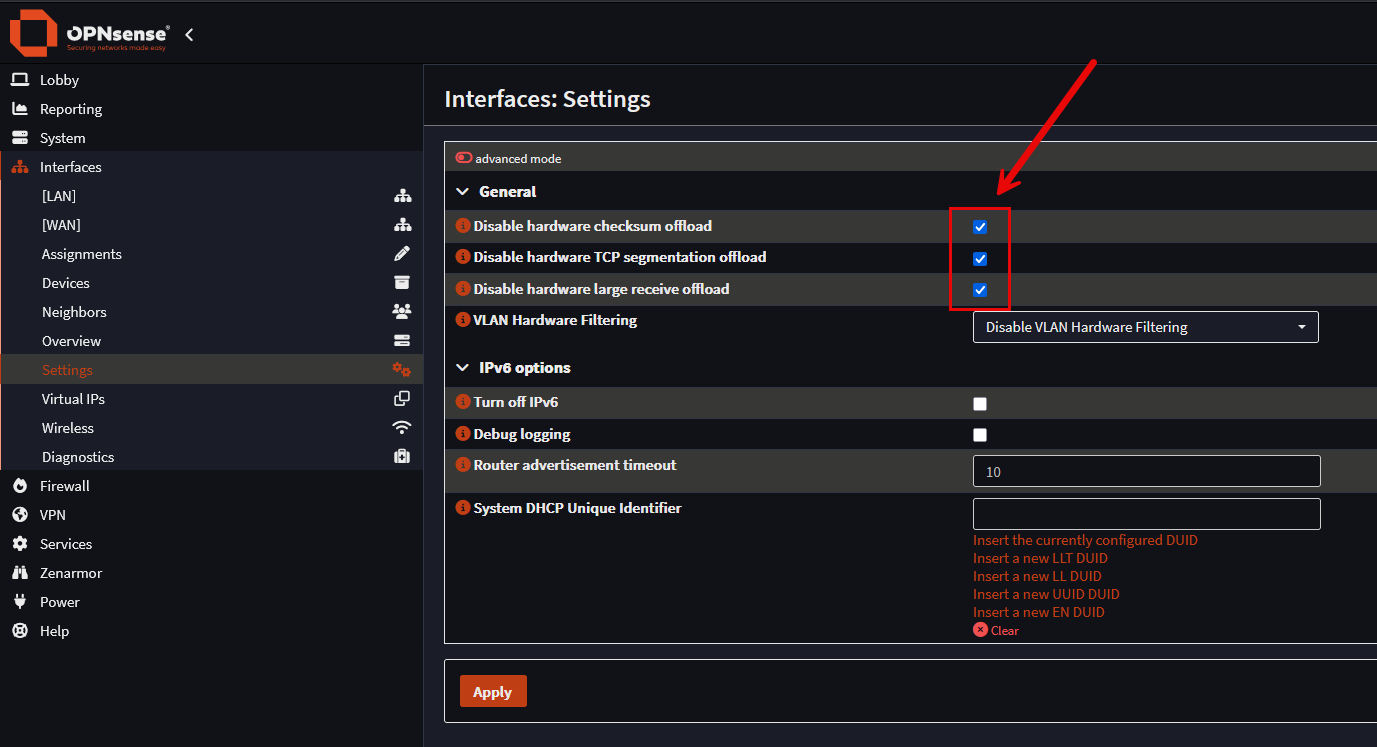
Definitely an are that you should pay attention to when virtualizing OPNsense or any other virtual firewall is hardware offloading. This one can be counterintuitive. When we think of “hardware” we may think of more powerful configurations, NVMe drives, RAM, etc and think this is better. Under the networking settings of your OPNsense appliance, you will find the options that can be configured for hardware offloading.
You will find the offload settings in the web GUI for OPNsense. Under the interface settings, you will see the settings:
- Disable hardware checksum offload
- Disable hardware TCP segmentation offload
- Disable hardware large receive offline
Interfaces > Settings:
9. Setting up automatic updates for OPNsense
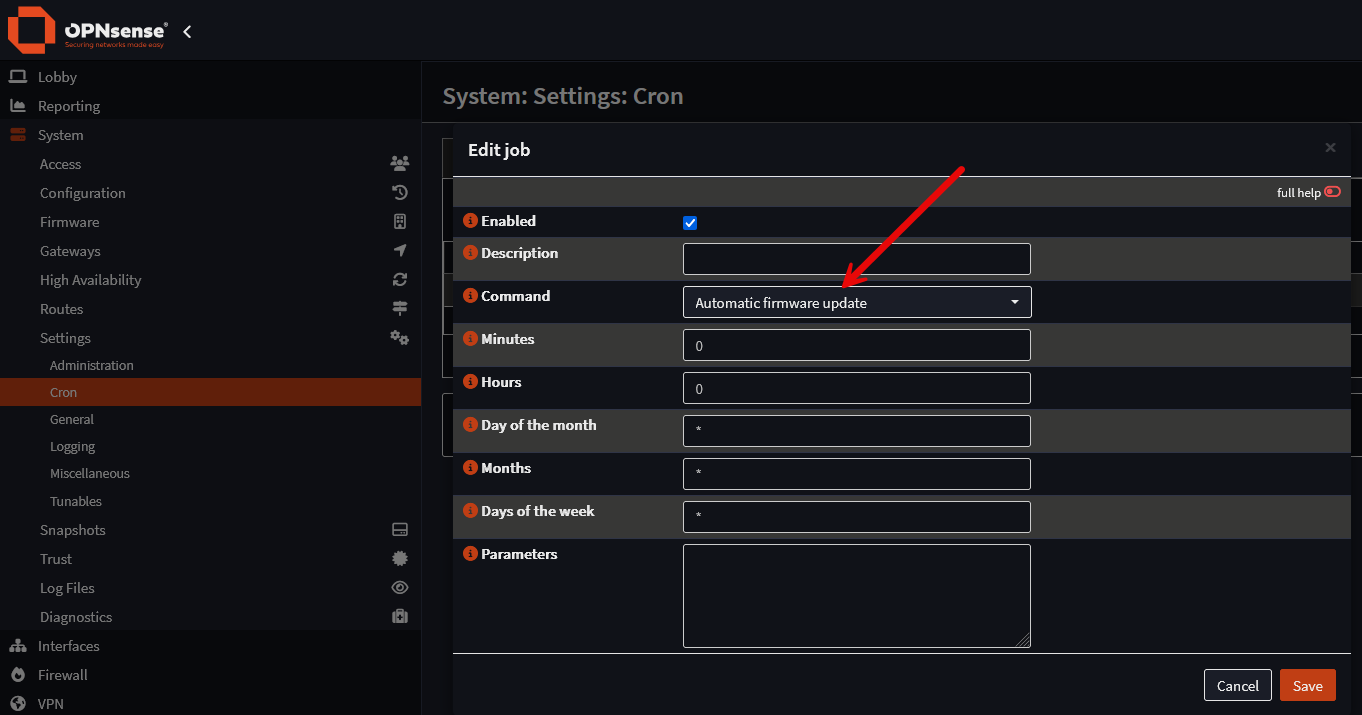
This is one of those quality of life settings that I think makes life much easier managing and configuring your OPNsense appliances. You can setup your OPNsense appliance to schedule installing updates for your system.
You can find this under the System Cron section of the configuration. Click the + to create a new CRON job. Under the Command dialog box, just select the Automatic firmware update. Do yourself a favor in the home lab and set this up and it will keep you current. Before, I have not set this and found myself after a while with an unsupported old installation that doesn’t really work with newer plugins, etc.
System > Settings > Cron:
Wrapping up
OPNsense is a great firewall solution that works really well in the home lab. It has many features and capabilities that you would expect to only find in an enterprise grade firewall. Hopefully these recommended settings that I have found for my home lab will help any who might be struggling to understand some of the basic concepts and areas to look in the web UI to go beyond what you get out of the box. How about you? Do you set up anything outside of what is shown here? I would love to hear what you do in the comments.
More in this topic

Google is updating how articles are shown. Don’t miss our leading home lab and tech content, written by humans, by setting Virtualization Howto as a preferred source.
About The Author
