Sophos UTM has plenty of features to protect your network, home network, or lab. Most likely if you are like me you are running multiple VLANs in your environment. If you want these VLANs/subnets to also have Internet access, there are a few things that you need to do besides simply creating the VLAN in Sophos (if using subinterfaces) and routes. These additional steps include the following:
- Create a network definition for the new VLAN network
- Allowing DNS
- Creating a masquerade rule for the new VLAN network
- Creating a firewall rule to allow port 80/443 for the new VLAN network
Let’s take these steps one by one.
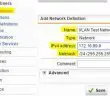
Create a Network Definition
The first one – create a network definition for the new VLAN network – is not required for any of the other steps to work, however, I find that if I go ahead and create a network definition, it keeps things uniform and more organized. Just a side point here, if you do anything in Sophos – create a firewall rule, DNS rule, or whatever – it will add your name and network that you define as a network definition. So you could potentially have multiple names that refer to the same thing. Once you create a network definition, you can then just pick that definition for anything else you do.
Navigate to Definitions & Users and then select Network Definitions

Now we have the network named and defined for easy usage anywhere in the system.
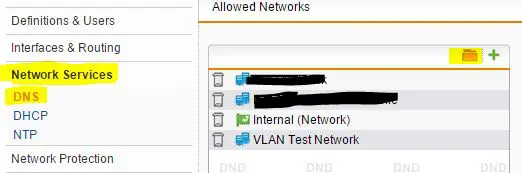
Allow DNS access
Next, we need to allow DNS access to our new VLAN network that we have defined. To do this we navigate to Network Services >> DNS. Hit the little folder icon to select your network you defined in the step above. In my case – VLAN Test Network.
Create a Masquerade Rule
To create a masquerade rule, you navigate to Network Protection >> NAT and hit the button “+ New Masquerading Rule…” which will allow you to plug in the network details.
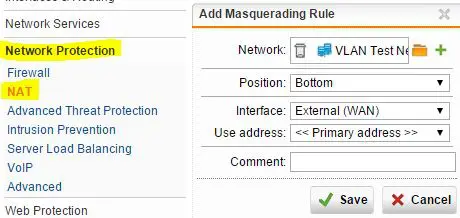
Make sure to move the little green slider button to the “on” position once you create the masquerade rule as this activates the rule.
Add a Firewall rule to allow 80/443 traffic
The last thing that we need to do is allow the new network access to TCP ports 80 and 443 for web browsing. In Sophos there is a builtin network service definition called Web Surfing that allows these ports so we don’t have to reinvent the wheel here. Navigate to Network Protection >> Firewall and then choose “+ New Rule…” button.
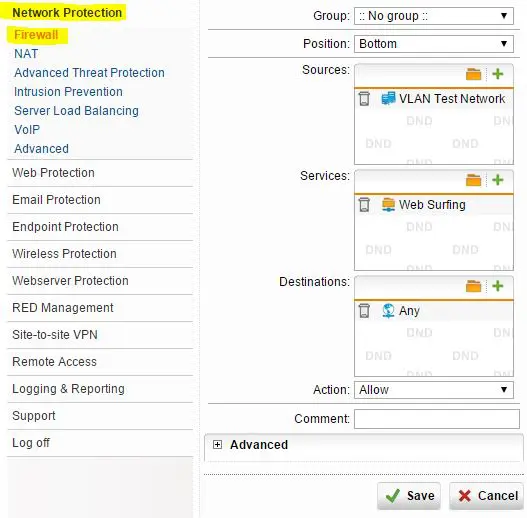
Choose the Sources as your newly defined VLAN network, services as Web Surfing and finally the destinations as Any. Again, make sure the rule is activated with the green slider button.
Inter vlan routing – Add route back to your VLAN network
If you are not using subinterfaces in your Sophos UTM and you are using inter vlan routing on a downstream switch, you need to add a route back to your switch that is handling the routing for your VLANs.
To do that you need to add a static route under Interfaces & Routing >> Static Routing
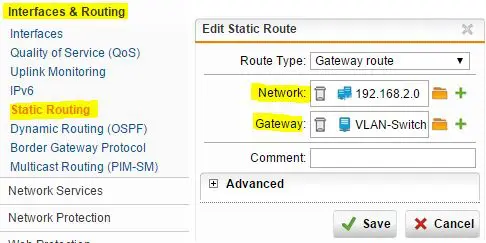
Note above – a network object has been added for the VLAN network. The Gateway object is named VLAN-Switch in this case and is simply the IP address of the switch handling inter vlan routing. Also of importance, the Gateway address defined here is the address that is on the same network as the Sophos UTM box, not the IP assigned to the VLAN you are routing on the switch. If you use the IP Address of the VLAN Gateway on the switch, Sophos won’t be able to deliver traffic as it doesn’t know how to get there.
Final Thoughts
Once you have performed these 4 steps, you will have allowed Internet connectivity to your newly defined VLAN network. If you still find that you don’t have Internet connectivity, make sure that you have properly defined a route back to your VLAN network if you are doing inter vlan routing at a switch level and not handling it at the Sophos box. Also, extremely valuable in troubleshooting are the live log views found in the network protection modules and elsewhere to make sure your firewall isn’t denying traffic or to make sure you didn’t miss a step.
Google is updating how articles are shown. Don’t miss our leading home lab and tech content, written by humans, by setting Virtualization Howto as a preferred source.
About The Author


Thanks for this how-to, very useful. How do you create the route back to the VLAN, which you mention in the final thoughts?
Michael,
I have updated the blog post with additional steps. Keep in mind, this step is only necessary if you ARE NOT using subinterfaces in Sophos UTM. If you are using subinterfaces, the routes are “in the box” already so to speak and do not need to be defined. If you are using a switch underneath Sophos to perform inter vlan routing, then you do need to add a route back to the network on the switch per the steps I have outlined in the post addition. Let me know if you have any other questions. Thanks Michael!
Awesome Brandon, thanks for the update. I’ll be using a layer 3 switch for the inter plan routing, beneath the UTM, so the static routes will be the way to go.
Thanks again,
Michael