Proxmox VE is becoming a favorite among home lab enthusiasts or those who want to easily stand up a hypervisor host at home to play around with different types of technology. After you install Proxmox VE, what are the basic steps to get up and running so you can start playing around with VMs and containers? This post will cover the first 5 basic steps you will want to consider.
First 5 Proxmox homelab configuration steps
Note the following first 5 steps for building your Proxmox home lab:
Update the subscription repository configuration
Add VLAN tagging
Add additional storage
Pull down container images and create VM templates
Setup a cluster
1. Update the subscription repository configuration
Starting your journey with Proxmox in your homelab, the first important step is updating the subscription repository configuration. Most who run Proxmox in their home lab will not have an enterprise subscription. Rather you will want to take advantage of the community repositories.
It is important to update your “update repository configuration” in Proxmox since it comes pointed to the enterprise repositories out of the box. Updates are extremely important from a security perspective and make sure you have the latest patches for known vulnerabilities and stability updates.
Steps Overview
Install Proxmox: Begin by installing Proxmox VE on your server.
Update Repository Configuration: You can change the repository configuration within the web interface or the command line. The repository configuration sets the source of updates for the correct subscription repository, for either a paid support subscription or running the free version of Proxmox.
You can read my full write up in more detail on how to do this step here: Proxmox Update No Subscription Repository Configuration. However, for the quick notes, the files listed in comments below and the changes you need to make. This is both for Proxmox itself and Ceph, which changed a bit in Proxmox 8. Before you didn’t have to update the Ceph repository.
#/etc/apt/sources.list.d/pve-enterprise.list

From: deb https://enterprise.proxmox.com/debian/pve bookworm enterprise
To: deb http://download.proxmox.com/debian/pve bookworm pve-no-subscription

#/etc/apt/sources.list.d/ceph.list
From: deb https://enterprise.proxmox.com/debian/ceph-quincy bookworm enterprise
To: deb http://download.proxmox.com/debian/ceph-quincy bookworm no-subscription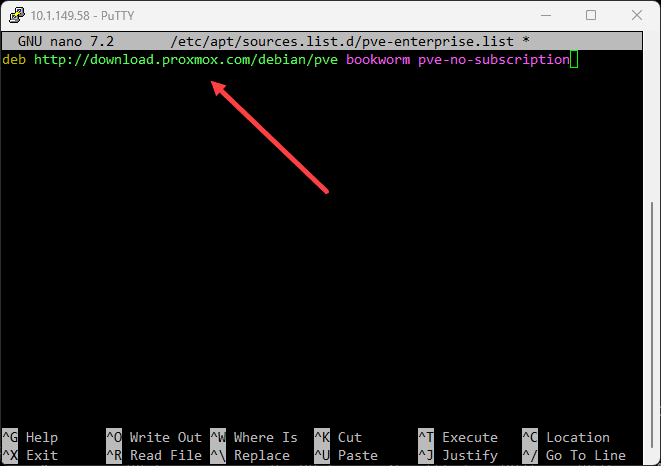
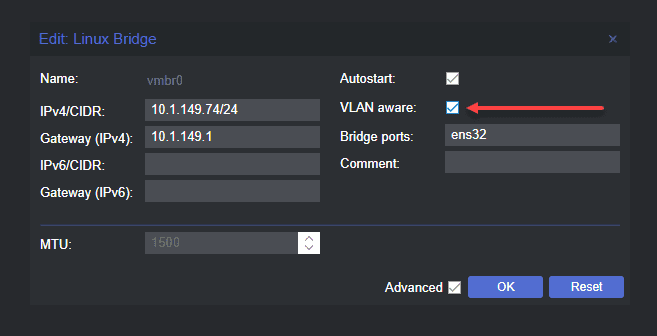
2. Add VLAN tagging
Adding VLAN tagging is important for creating a segmented and secure home network. It allows for the isolation of network traffic, which enhances security and allows carving up traffic for virtual machines and managing your Proxmox server.
For instance, creating VLAN tagging in Proxmox allows you to run VMs in a DMZ, LAN, Servers, or other VLANs as you see fit.
Steps Overview
Configure Network Interface: Use the Proxmox web interface or command line to configure the network interface and add VLAN tagging. Define the VLAN ID and assign it to your setup’s respective virtual machines or docker containers.
Test Configuration: After configuring, it’s important to test and ensure that the VLAN tagging is working as expected, with traffic being isolated and routed appropriately.
Read the full detailed post on how to configure Proxmox VLANs here: Proxmox Management Interface VLAN tagging configuration. Below are a couple of the steps.
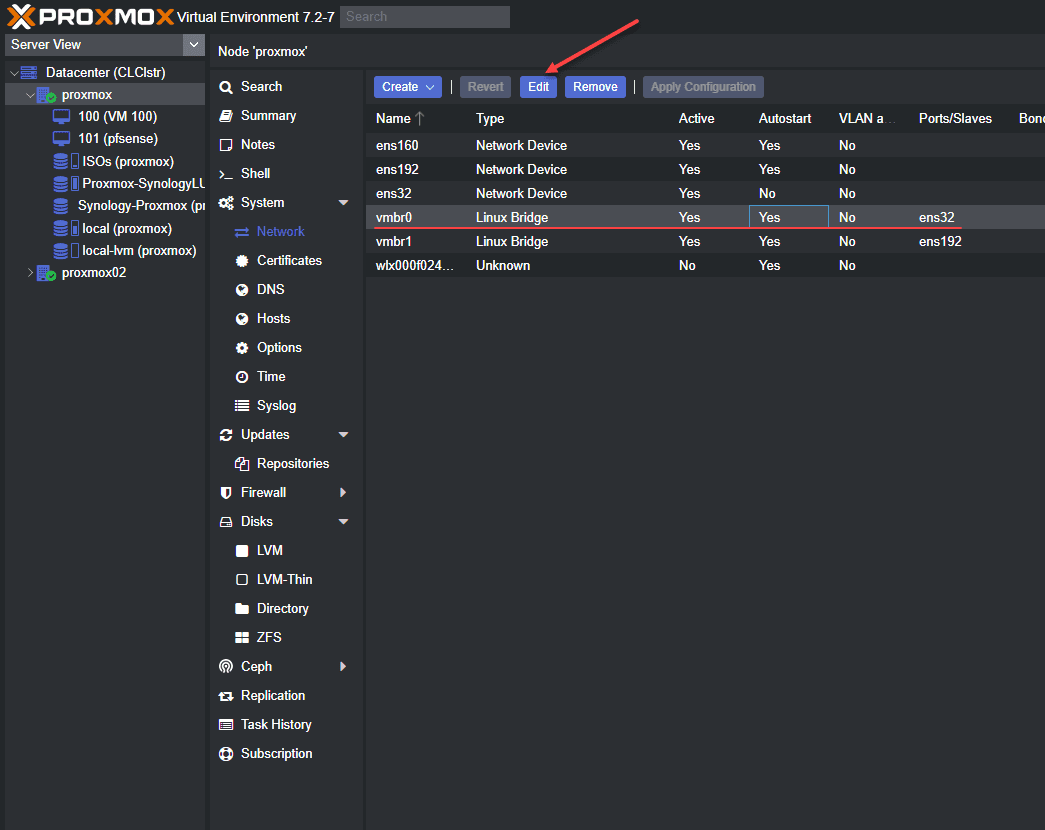
Checking the box for VLAN aware on your Linux Bridge.
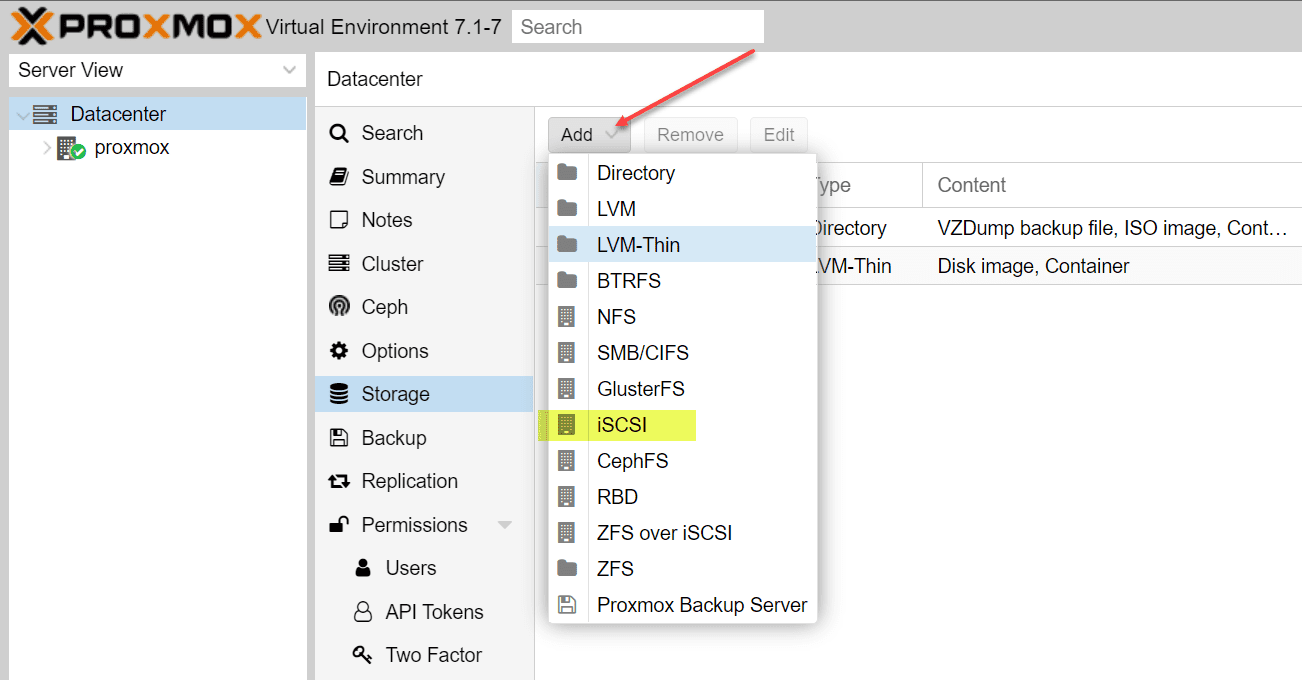
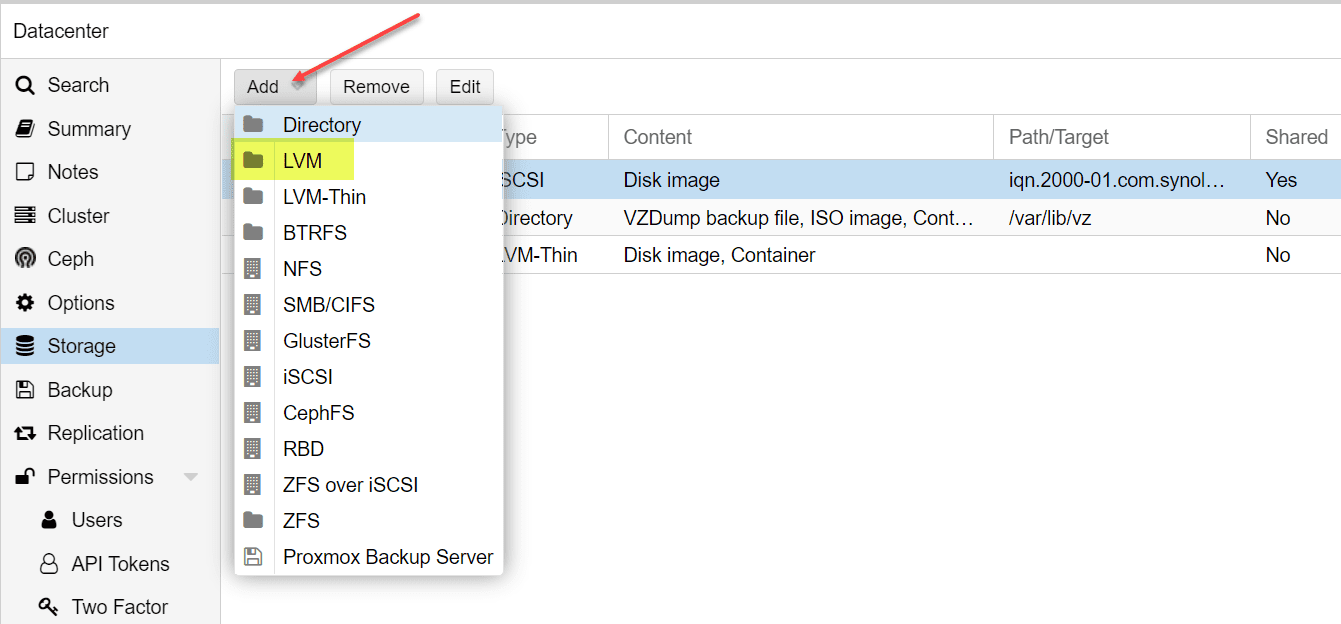
3. Add Additional Storage
Storage is the backbone of your Proxmox homelab. With many storage options available for Proxmox like local, shared, and HCI with Ceph, and ZFS pool configurations, you can have plenty of space, flexibility, and redundancy.
Generally speaking, you will want to create some type of bulk storage aside from the Proxmox installation for your virtualization host, to keep these separated.
Local storage is fast, shared storage offers accessibility and supports clustering, which we will talk about below.
Read my post on how to configure an additional local NVMe drive for virtual machine storage: Proxmox add disk storage space – NVMe drive.
HCI with Ceph provides scalability and redundancy, making your homelab resilient and versatile. So, it depends on your preferred storage technology.
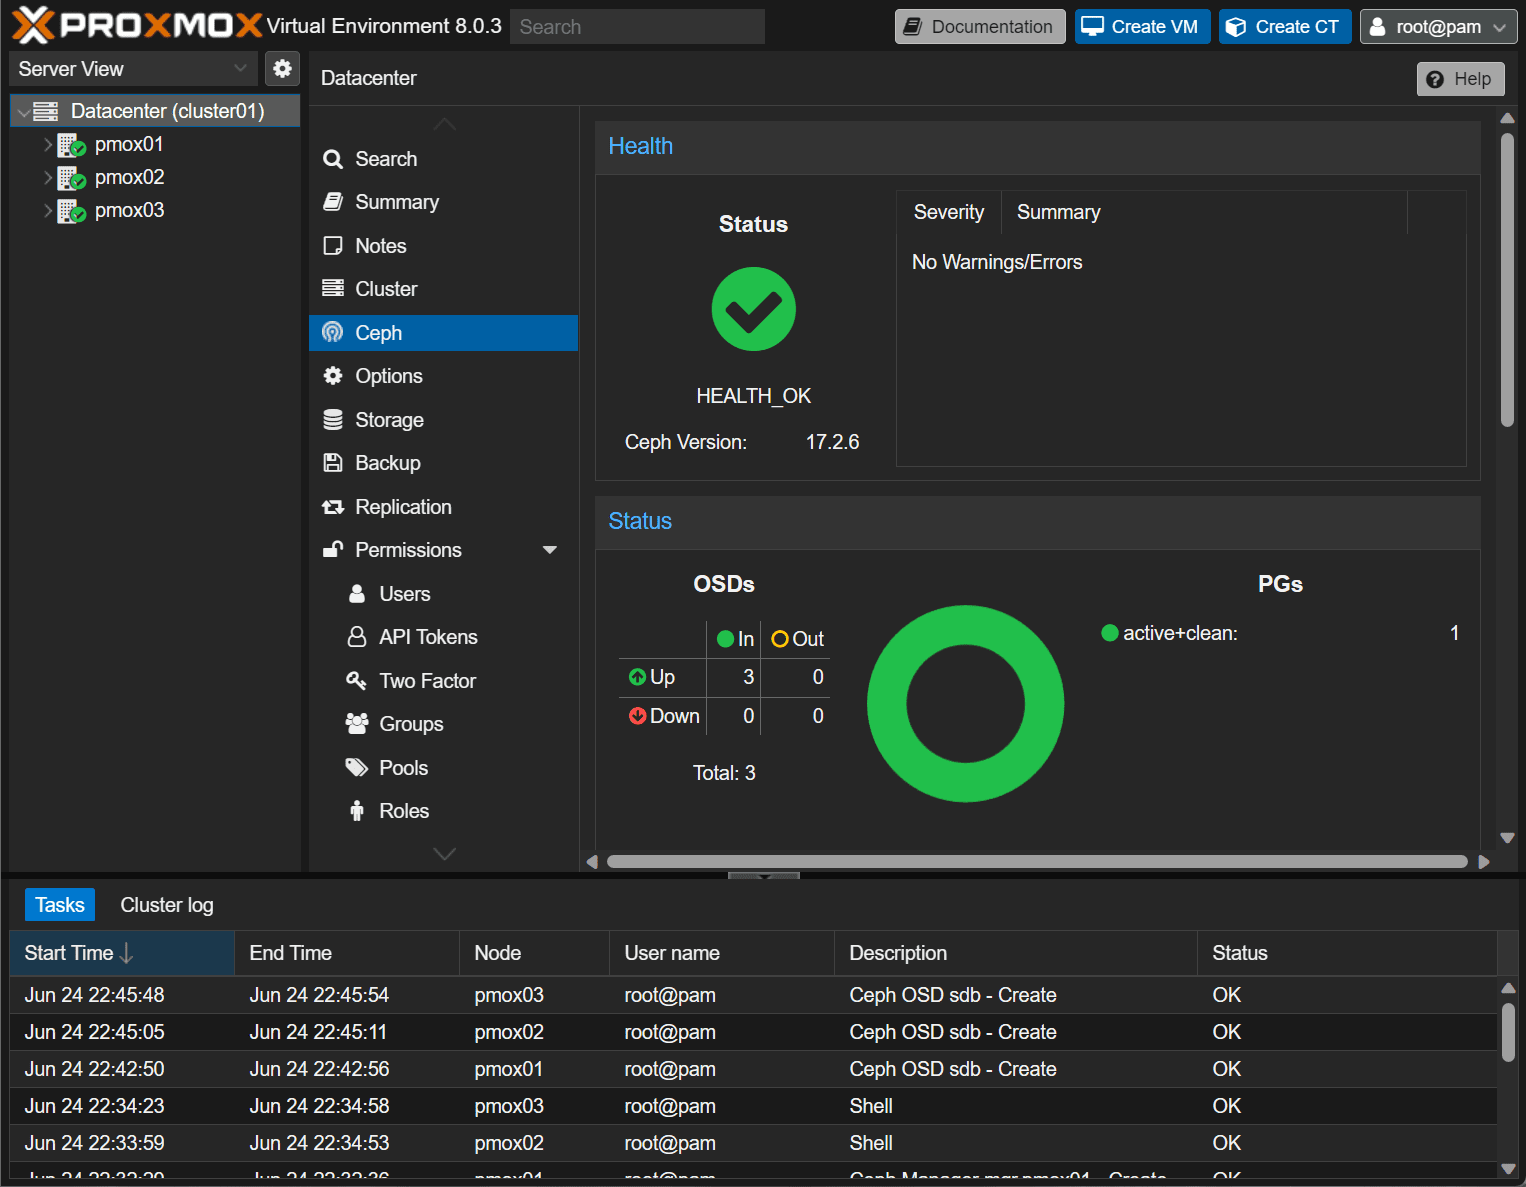
Read my write up of configuring HCI storage with Ceph here: Mastering Ceph Storage Configuration in Proxmox 8 Cluster.
Watch my video on Proxmox Ceph here:
Overview of steps
Identify Storage Needs: Evaluate your storage requirements based on the virtual machines and data you plan to handle. Do you need fast and redundant storage? What resiliency level do you need?
Add Local and Shared Storage: Integrate additional local and shared storage units to the Proxmox server. Configure the added storage through the web interface, making it accessible for VM creation and data storage.
Implement HCI with Ceph: For those requiring advanced solutions, implement Hyper-Converged Infrastructure (HCI) with Ceph, enhancing your lab’s storage capabilities with scalability and redundancy.
Provision an iSCSI LUN or ZFS mirror configuration: Provision an iSCSI LUN to your Proxmox server and add storage that you may already have configured via a Synology NAS or TrueNAS configuration.
Learn how to configure a Proxmox iSCSI LUN here: Proxmox iSCSI target to Synology NAS. Below are a couple of screenshots of adding an iSCSI LUN on a Synology NAS.
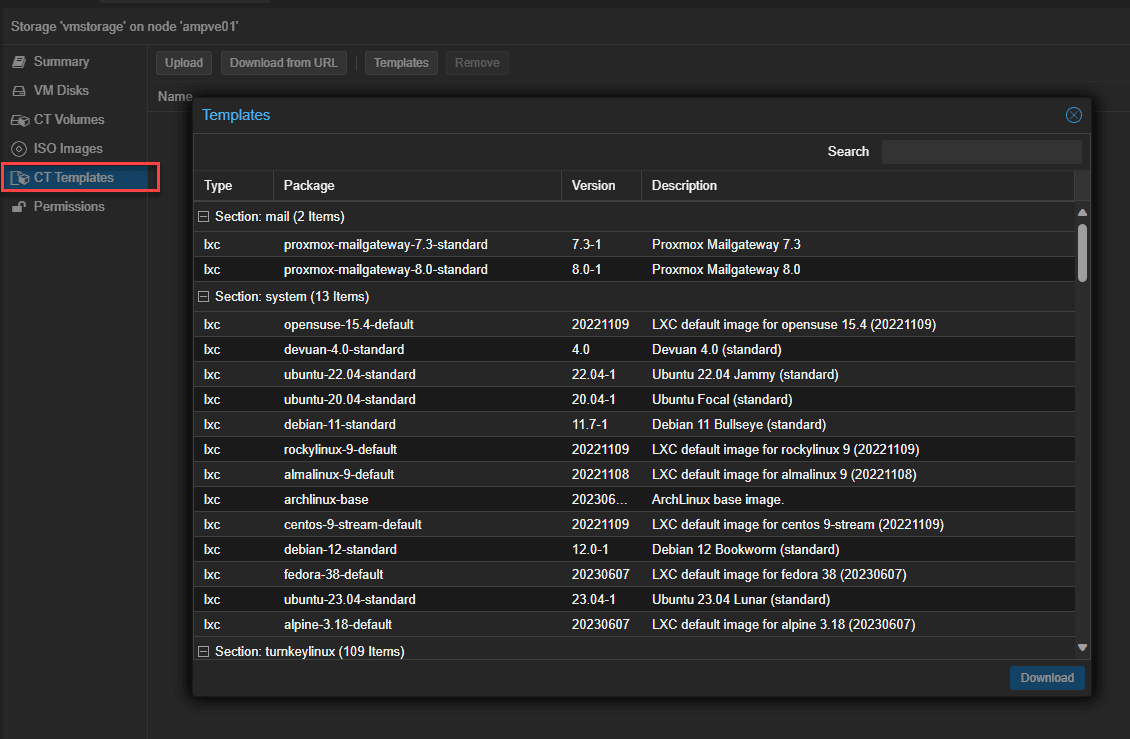
4. Pull down container images and create VM templates
Having a repository of container images and VM templates drastically cuts down on the time for deployment of virtual environments, whether these are running Ubuntu Server or Windows Server VMs. This approach is time-efficient, reducing the redundancy of configuring virtual machines and docker containers from scratch every time.
Steps Overview
Pull Container Images: Using the Proxmox interface, you can pull down container images from public or private registries.
- Create VM Templates: You can build virtual machines with designated memory, CPU, and storage configurations. Templates are like blueprints for rapid deployment of VMs in your Proxmox environment. They save all the work that you have performed on a single VM and carry this work forward into the template so you don’t have to “reinvent the wheel” so to speak.
Navigate to your Proxmox storage that is configured for storing CT templates. Click Templates. It will launch a dialog box displaying the available LXC containers you can pull down. Click the template you want and then click Download.
Creating a virtual machine template is easy. Power off an existing virtual machine that you want to use as your VM template. Then right-click and select Convert to template.
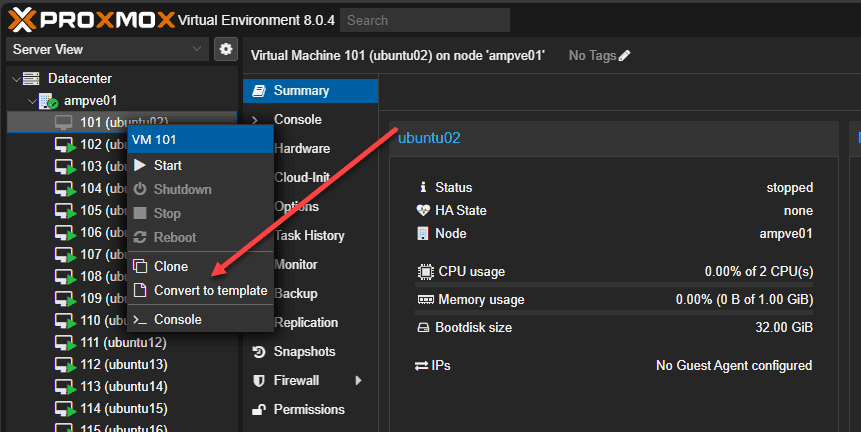
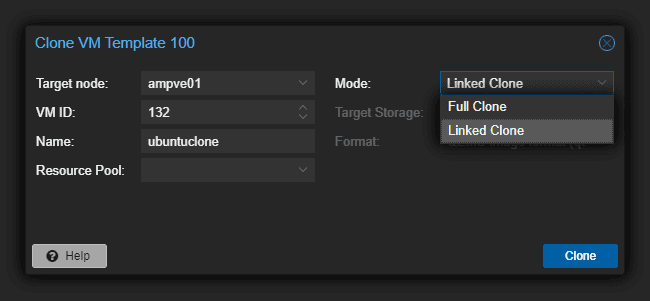
What can you do with a virtual machine template? You can clone new VMs. After you have created a VM template, right-click the VM template and select Clone. It will launch the dialog box below. You can create either a Linked Clone or a Full Clone:
- Linked Clone – The linked clone is faster to create since it uses the base disk of the parent VM template.
- Full Clone – It creates a completely standalone virtual machine in Proxmox from the VM Template.
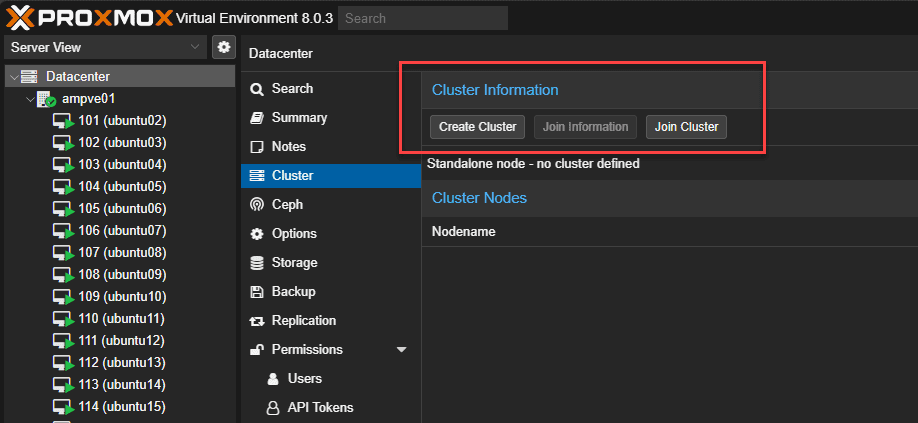
5. Setup a cluster
Setting up a cluster brings high availability to your home lab environment built on Proxmox. A Proxmox cluster creates a “pool” of Proxmox servers that function as a single logical entity, allowing your VMs to move back and forth between them and providing redundancy in case of failures of a single Proxmox homelab datacenter node.
It also provides for a measure of load balancing, improved performance, and high availability of resources and services.
Steps Overview
Planning: Figure out how many nodes will be in the cluster. What are their roles?
Cluster Configuration: Through the Proxmox VE interface, initiate the cluster creation process. Add nodes to the cluster, ensuring they communicate and operate together as a single unit.
Verification & Testing: After setup, verify the cluster’s functionality. Conduct tests to move resources between your cluster hosts and ensure data and resources are efficiently distributed and accessible across the cluster. The step of testing helps make sure the cluster meets your homelab needs.
Read my full write up on how to create a Proxmox cluster here: Proxmox cluster installation and configuration.
Wrapping up
Proxmox is an excellent hypervisor for hosting your homelab environment. It has many features and capabilities and you can install it for free. As shown in the post, there are certain steps you will want to go through when you first install Proxmox and get it ready for hosting your home lab services. These include configuring your update settings, enabling the VLAN configuration on the bridge interface, adding local, shared, or HCI storage, creating VM templates, and finally, setting up a Proxmox cluster.
Are these the only tasks you will want to complete? No, there are certainly other things you may want to do, but these are the basics and will allow getting a general configuration on your Proxmox host up and running.
More in this topic


Discuss this in the Community
Google is updating how articles are shown. Don’t miss our leading home lab and tech content, written by humans, by setting Virtualization Howto as a preferred source.
About The Author

Good work
ggawp,
Thank you for your comment!
Brandon
Thank you for the article! But why go into the file to change the package server, if in the web gui you can immediately select the pve-no-subscription server?
ShoFFe,
Thank you for the comment! I have always been a command line person. However, I am also wondering if this gets the Ceph component in Proxmox 8.
Brandon