PhpIPAM is a well-known solution for working with IP address management. It is free and open-source, and it is also easy to configure using Docker or Docker Compose. I like these type of solutions that are easily spun up in a container as it allows getting up and running quickly. Let’s look at mastering phpIPAM docker installation and see how you can have an excellent IP address management and network optimization tool.
Table of contents
- What is IP Address Management (IPAM)?
- What is phpIPAM?
- Setting Up phpIPAM with Docker
- phpIPAM setup using Docker Compose
- Configuring phpIPAM
- Advanced Configuration and Customization
- Securing phpIPAM with Docker Secrets
- phpIPAM Multi-Host Containers and Reverse Proxy Configuration
- Device-Specific Integration and Customization
- phpIPAM FAQs
- Posts you may also like
- Wrapping up
What is IP Address Management (IPAM)?
First of all, what is IP address management and do you need it? IP address management (IPAM) is a tool that allows planning and tracking your IP address space, and other resources across your network, like subnets and VLANs. Administrators such as sysadmins and network admins can use it to allocate and manage address space and keep track of what is where. Avoiding IP address conflicts is key.
Also, managing VLANs can be a nightmare once you get dozens or even hundreds spread out across your network. With IPAM you can have better visibility into network resources. Also, it makes things like troubleshooting and planning of network changes and configs much easier. By using IPAM tools like phpIPAM, you can automate and streamline IP address management processes.
What is phpIPAM?
It is an open-source and freely available IP address management tool that allows managing IP addresses and subnets as well as other resources much easier. It has a really nice looking web UI, also has API integration for automation and other advanced config options.
The solution feels snappy and is based on Ajax using jQuery libraries, PHP scripts and javascript and some HTML5/CSS3 features. Modern browsers have no trouble displaying javascript quickly and correctly.
Setting Up phpIPAM with Docker
Docker simplifies the installation process of phpIPAM. The first step is to pull the Docker image for MySQL and create a MySQL instance. This MySQL DB will serve as the MySQL database backend for your phpIPAM installation.
Docker Image MySQL Run
Pull the MySQL image and run the Docker image MySQL by entering the following command in your terminal:
docker pull mysqlAfter pulling the MySQL image, create a MySQL instance by running the following command. This sets the password for the instance.
docker run -e MYSQL_ROOT_PASSWORD=your_password -d mysqlBe sure to replace “your_password” with a specific root password of your choice. This will create a MySQL instance with the environment variable default for the MySQL password.
Deploying the phpIPAM Container
Now we can pull the phpIPAM Docker image. Then, we can deploy the phpIPAM container. Run the following command to pull the image:
docker pull phpipam/phpipam-wwwNow, it’s time to deploy the phpIPAM container. Use the following command, making sure to replace “your_password” with the same MySQL password you used earlier:
docker run -d -p 80:80 -e MYSQL_ENV_MYSQL_PASSWORD=your_password --link your_mysql_container:mysql phpipam/phpipam-wwwThis command will link your phpIPAM container to the MySQL DB instance you created earlier for automatic database installation. The container will expose ports on the host system for HTTP traffic on port 80.
phpIPAM setup using Docker Compose
Using Docker Compose, you can use the following example code to configure phpIPAM and the required MySQL container.
version: '3'

services:
  phpipam-web:
    image: phpipam/phpipam-www:latest
    ports:
      - "80:80"
    environment:
      - TZ=America/Chicago
      - IPAM_DATABASE_HOST=phpipam-mariadb
      - IPAM_DATABASE_PASS=password
      - IPAM_DATABASE_WEBHOST=%
    restart: always
    volumes:
      - phpipam-logo:/phpipam/css/images/logo
      - phpipam-ca:/usr/local/share/ca-certificates:ro
    depends_on:
      - phpipam-mariadb

  phpipam-cron:
    image: phpipam/phpipam-cron:latest
    environment:
      - TZ=Europe/London
      - IPAM_DATABASE_HOST=phpipam-mariadb
      - IPAM_DATABASE_PASS=password
      - SCAN_INTERVAL=1h
    restart: always
    volumes:
      - phpipam-ca:/usr/local/share/ca-certificates:ro
    depends_on:
      - phpipam-mariadb

  phpipam-mariadb:
    image: mariadb:latest
    environment:
      - MYSQL_ROOT_PASSWORD=password
    restart: always
    volumes:
      - phpipam-db-data:/var/lib/mysql

volumes:
  phpipam-db-data:
  phpipam-logo:
  phpipam-ca:
Replace your_root_password and your_phpipam_password with your desired passwords for the MySQL root user and the phpIPAM user, respectively.
Save this YAML code as docker-compose.yml in a directory of your choice. To spin up the containers, open a terminal, navigate to the directory containing the docker-compose.yml file, and run the following command:
docker-compose up -dThis command will create and start both the MySQL and phpIPAM containers, linking them as specified in the docker-compose.yml file.
Configuring phpIPAM
Once you have deployed the phpIPAM container, you can start configuring the IP address management application through the web UI.
Setting Up the MySQL Database
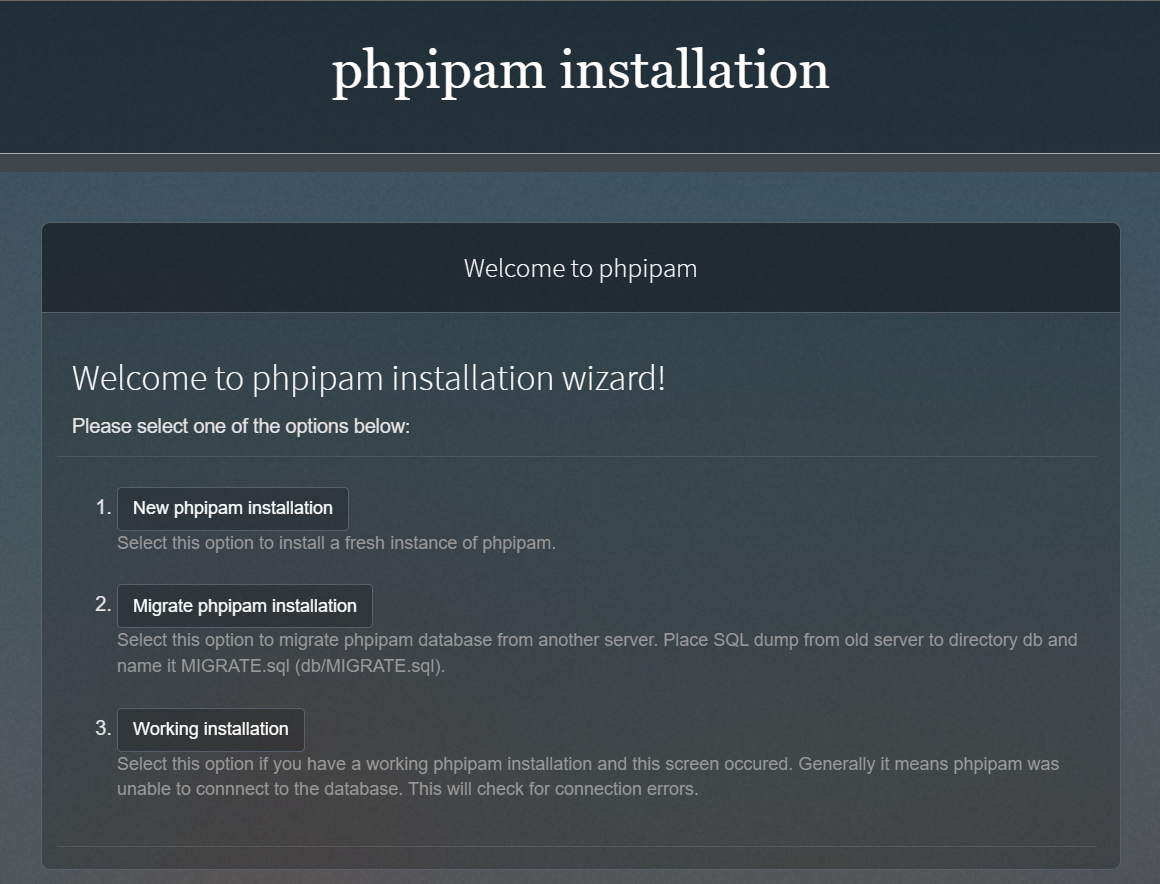
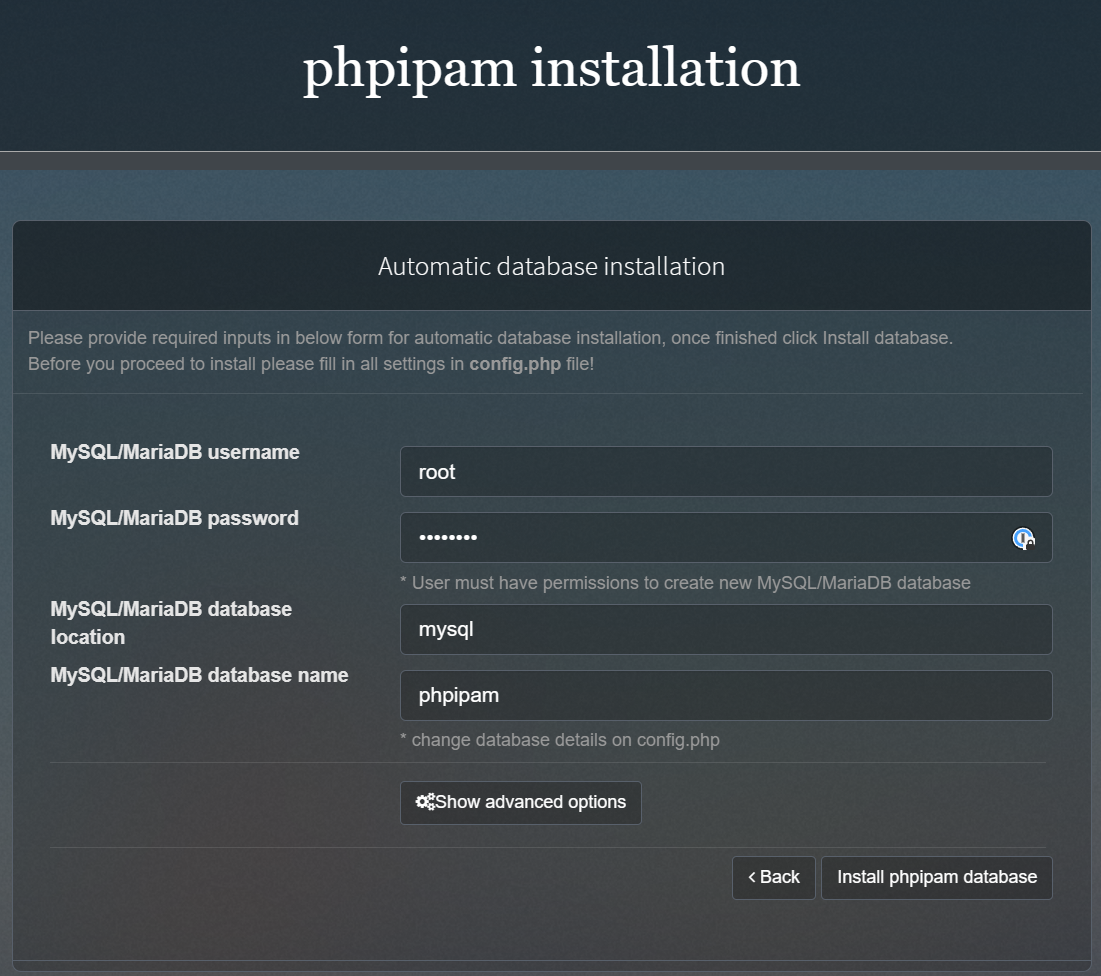
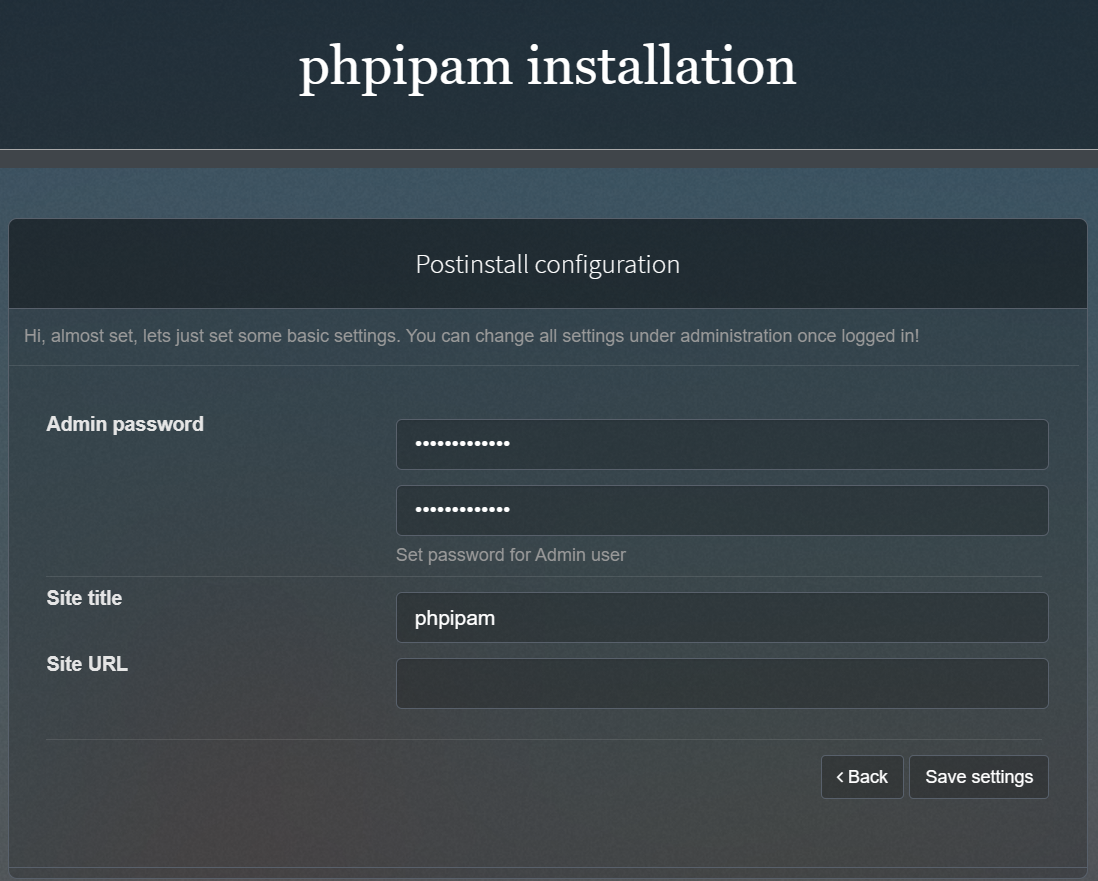
Access the phpIPAM web UI and enter your connection information. Note that the MySQL database, MySQL user, and MySQL password should match the ones you used when creating the MySQL instance. Next, provide the admin user password for the phpIPAM application. Note the following screens during the web-based setup process.
Here we are setting the username and password, DB name, and other details. Then click Install phpipam database.
Now the DB is installed, so we can click Continue.

Set your admin password and site title and URL. Then click Save settings.
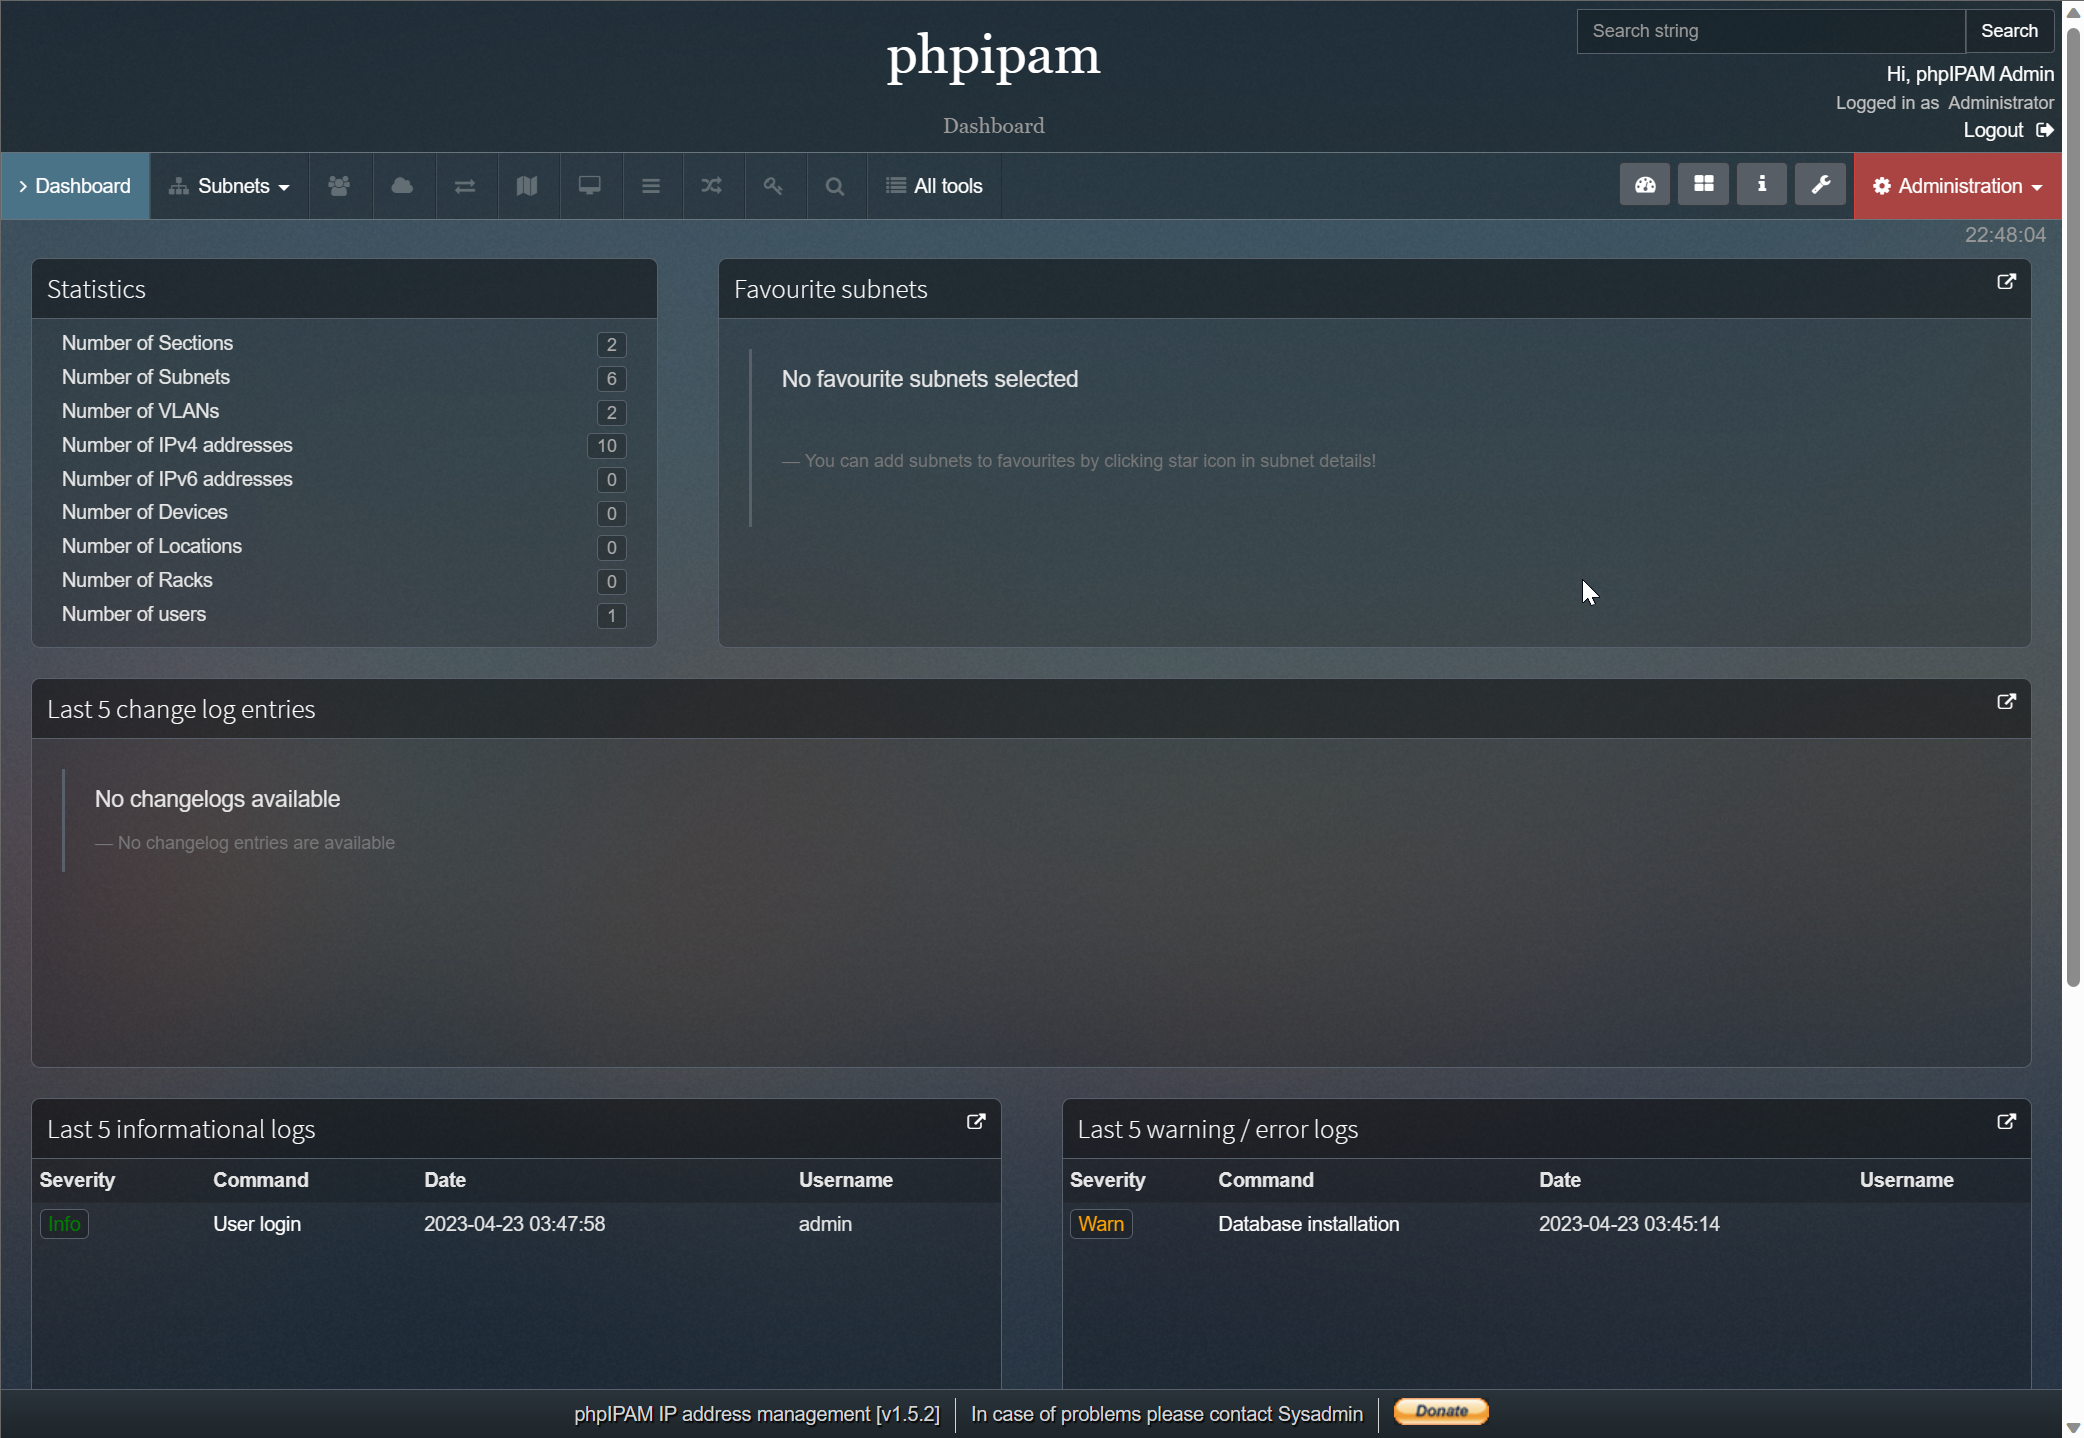
Now, we have the phpipam solution up and running.
Integrating Google Maps API Key
You’ll need a Google Maps API key to display maps with subnet locations in the phpIPAM web UI. You can browse out to the Google Maps API documentation to obtain your API key, and then enter it in the phpIPAM settings.
Advanced Configuration and Customization
There are a few advanced configuration options to note. There are things like device-specific integration, multi-host container management, and other features. You can also use Docker secrets and store your data options to help with your IP address management.
Patching phpIPAM and Upgrading to New Versions
When a new version of phpIPAM is released, you can upgrade your existing installation by using the upgrade process as outlined by phpIPAM documentation. However, keep in mind that Dockerizing your phpIPAM installation will help in this respect since it will mean you can simply pull a new version of your container for both phpIPAM and MySQL.
You can use a solution like Watchtower to have an automated way to pull new containers as these become available. You can see how to set that up in my post here: Watchtower Docker Compose – Auto Update Docker containers.
Securing phpIPAM with Docker Secrets
Docker secrets is a way to have better security with secrets. It can store sensitive information, such as passwords, API keys, and other credentials. You can use Docker secrets to store things like your MySQL password, Google Maps API key if yo uhave one, and other sensitive data.
Beow, you can see how to create Docker secrets:
docker secret create secret_name secret_fileReplace secret_name with a descriptive name for the secret and secret_file. Use the path to the file containing the sensitive information. Once you have created the secrets, you can manage them through the Docker Compose configuration.
phpIPAM Multi-Host Containers and Reverse Proxy Configuration
If your network setup requires running phpIPAM on multiple hosts or exposing it through a reverse proxy, you must configure the base URI, perform rewrites, and set up environment variables accordingly.
Multi-Host Containers
You can run your phpIPAM configuration across multiple hosts if you want. You can spread your phpIPAM frontend and backend DB across multiple Docker container hosts in your configuration. There isn’t much difference with this config as you just need to tell phpIPAM where your container is located and how to connect to it.
Also, you can use a reverse proxy configuration like Traefik or Nginx Proxy Manager to add trusted SSL to your environment. Using a reverse proxy allows managing access to your phpIPAM instance and setting up automated certificate management with LetsEncrypt certs.
Just update the base URI and environment variables in the phpIPAM configuration to reflect the reverse proxy setup.
Device-Specific Integration and Customization
phpIPAM allows extending the built-in functionality by writing custom modules, importing device data, or integrating with third-party applications. This makes it a very extensible IPAM solution that can do a lot. There are many community supported extensions you can use as well.
phpIPAM FAQs
Q: What is phpIPAM, and how does it help with IP address management? A: phpIPAM is an open-source IP address management (IPAM) application that simplifies the process of planning, tracking, and organizing IP addresses and associated network resources within an organization.
Q: How do I set up phpIPAM using Docker Compose? A: Create a docker-compose.yml file with the appropriate configuration for both the MySQL and phpIPAM containers. Then, run docker-compose up -d in the terminal to spin up the containers.
Q: How can I secure sensitive information in phpIPAM using Docker secrets? A: Store sensitive information like MySQL passwords and API keys as Docker secrets. Create secrets using the docker secret create command and manage them through the Docker Compose configuration.
Q: How can I configure phpIPAM to work with multiple hosts or a reverse proxy? A: Modify the Docker Compose configuration to expose resources and ports on the host system for multi-host setups. For reverse proxy configurations, adjust the settings in your proxy server to forward requests to the phpIPAM container and update the base URI and environment variables accordingly.
Q: How can I keep my phpIPAM installation up-to-date and secure? A: Monitor the phpIPAM project source for new releases and updates, and plan upgrades by reviewing release notes and documentation for the target release. This ensures a smooth upgrade process with the latest security patches, bug fixes, and feature improvements.
Posts you may also like
Wrapping up
phpIPAM is a good solution to spin up for managing your IP address space. Using Docker, as we have shown in this guide allows you to easily spin up the containers needed for phpIPAM, including MySQL. I like phpIPAM a lot as it can help keep track of IP address space, VLANs, subnets, and other network information. This helps with troubleshooting and other tasks.
Google is updating how articles are shown. Don’t miss our leading home lab and tech content, written by humans, by setting Virtualization Howto as a preferred source.
About The Author