Adguard Home Docker Compose with Traefik Ingress
I have been playing around with different DNS sinkhole services in the home lab environment. I have been running Pi-Hole for a while now, but I wanted to take Adguard Home for a spin. Since I run Docker hosts and Kubernetes in the home lab, my first thought on spinning up Adguard to “kick the tires” was to spin it up using Docker Compose, along with my other home lab services. Since I use Traefik ingress controller, I wanted to get Adguard Home up and running secured with SSL. Let me walk you guys through the process to spin up Adguard Home Docker compose with Traefik ingress configuration for SSL.
Table of contents
What is Adguard Home?
Adguard Home is a powerful network-wide ad blocker and privacy solution that acts as a DNS server to block ads, trackers, and malicious websites. This blog post will guide you through setting up Adguard Home using Docker Compose with Traefik ingress. We will discuss topics such as installing Adguard Home, configuring the DHCP server, and ensuring data and configuration persistence for a seamless experience.
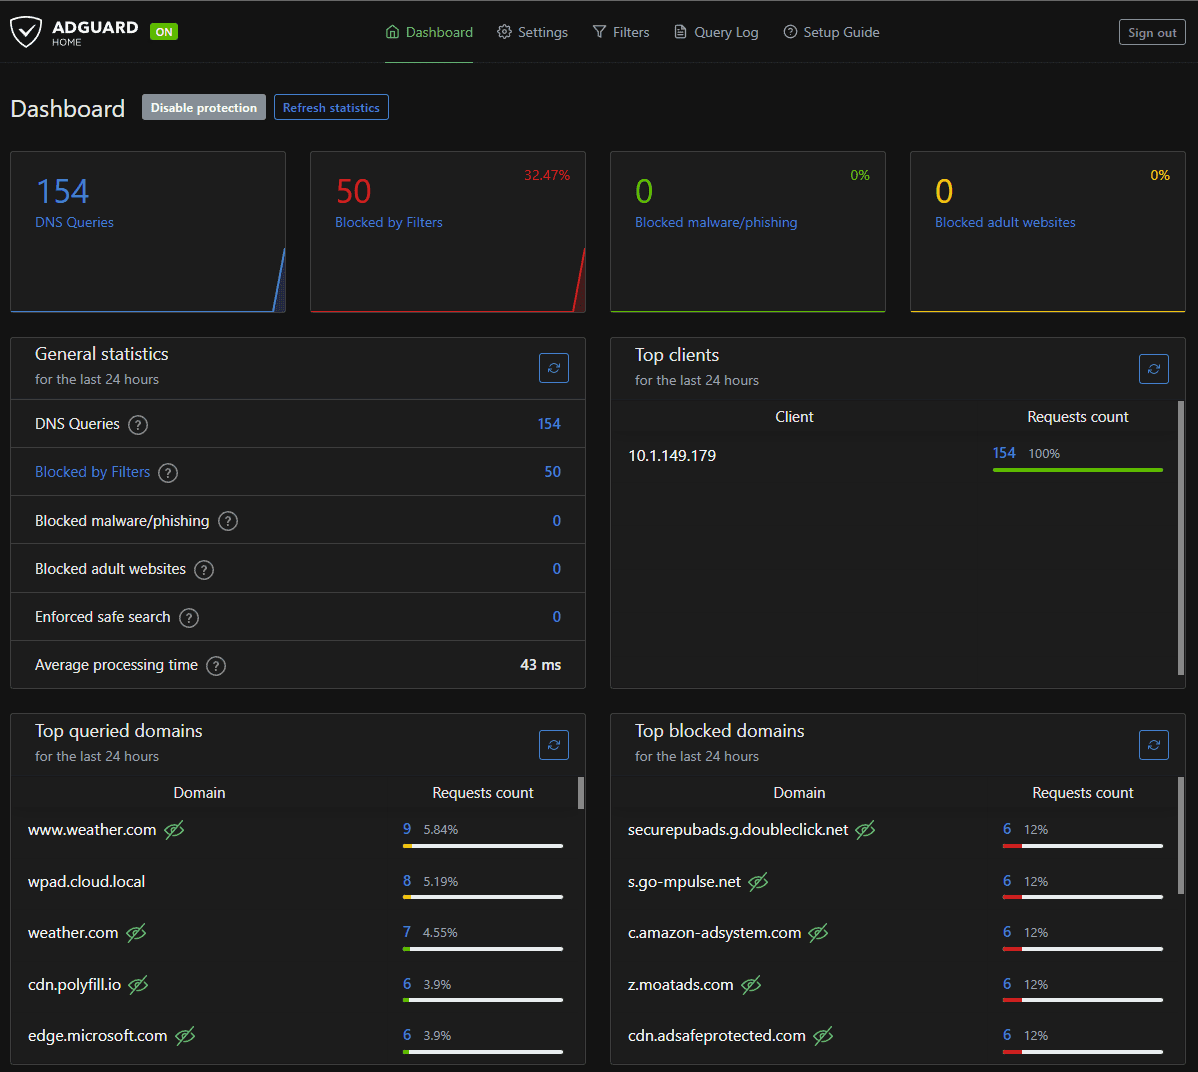
Below is a look at the Adguard Home’s admin panel:
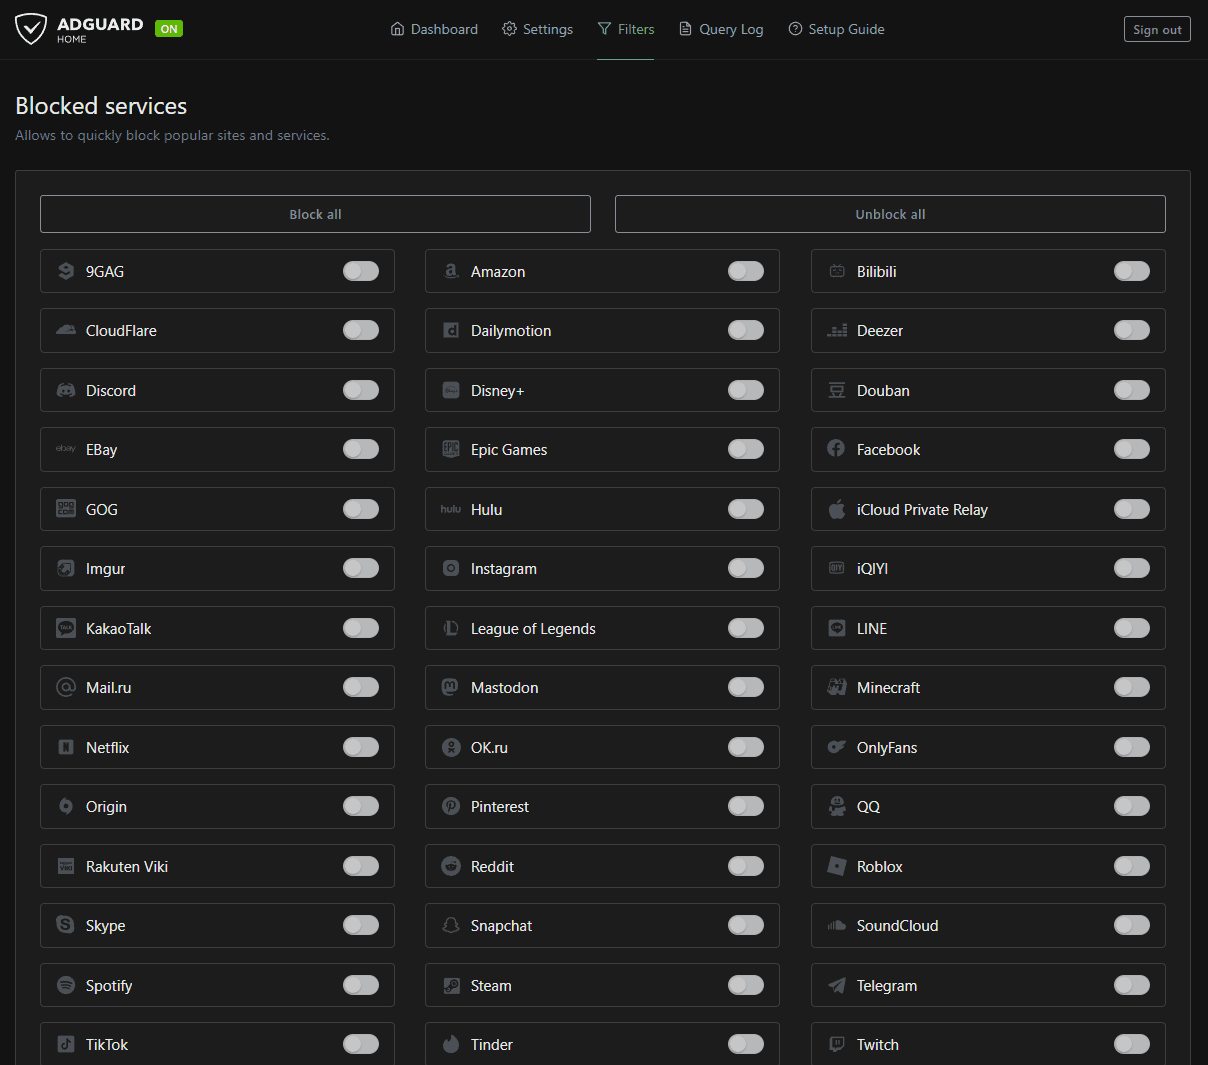
Below is a look at Adguard Home and how you can easily block services:
Top queried domains dashboard widget:

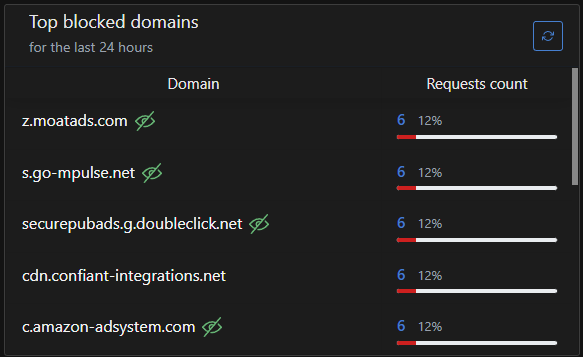
Top blocked domains widget:
Using Docker run to install Adguard Home
Before you install Adguard Home, ensure that you have a Docker host, Docker Desktop, or Docker EE installed on your Linux hosts or Windows Server host system. This software allows you to run containers, including Adguard Home, on your machine. You can find Docker documentation on the official Docker website.
According to the official Adguard Home Docker Hub site documentation, you can run the Docker container and pull the docker image as you run it. Below, we are port mapping the external to internal ports required for Adguard. You can change the external ports to be what you need for the administration side. However, you must leave DNS port 53 and DHCP port 67 untouched, as these are the standard ports that client-side software will use to communicate with these services.
docker run --name adguardhome
    --restart unless-stopped
    -v /your/own/workdir:/opt/adguardhome/work
    -v /your/own/confdir:/opt/adguardhome/conf
    -p 53:53/tcp -p 53:53/udp
    -p 67:67/udp -p 68:68/udp
    -p 80:80/tcp -p 443:443/tcp -p 443:443/udp -p 3000:3000/tcp
    -p 853:853/tcp
    -p 784:784/udp -p 853:853/udp -p 8853:8853/udp
    -p 5443:5443/tcp -p 5443:5443/udp
    -d adguard/adguardhome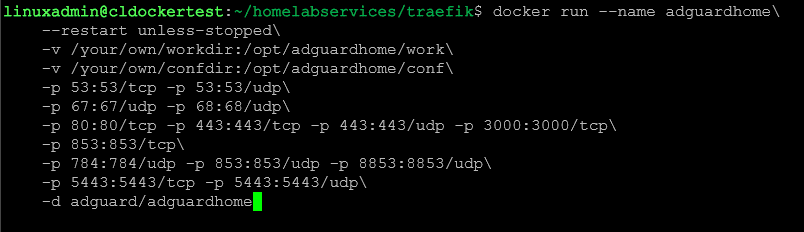
To start or stop the container, you could use the following:
docker start adguardhome stop adguardhomeTo remove the adguardhome container:
docker stop adguardhome removeTo run the container:
docker run name adguardhomeDocker Persistent configuration
If you have not worked with Docker and are unfamiliar with the concept, you need to have persistent storage allocated for your Docker configuration. In this way, your configuration and data are persistent, regardless of whether or not you stop or upgrade the container.
As you see in the command above, you need to create a local persistent volume mount for opt/adguardhome/conf directory on your host system for configuration persistence. This configuration directory will store all the necessary files and settings, ensuring that your Adguard Home instance retains its configuration even when the Docker container is updated or restarted. This option instructs docker to mount persistent data in the local folder.
Create the necessary config directories with the following command:
mkdir -p opt/adguardhome/confSetting Up Adguardhome’s DHCP server
Adguard Home’s built-in DHCP server can manage IP address assignments for all your home devices. To set up the DHCP server, you’ll need to configure the dhcpserver section in the AdGuardHome.yaml file located in the opt/adguardhome/conf directory. You can configure the range of IP addresses, lease duration, and other settings to suit your network requirements.
Here’s an example of a basic DHCP server configuration:
dhcp:
  enabled: true
  interface_name: eth0
  gateway_ip: 192.168.1.1
  subnet_mask: 255.255.255.0
  range_start: 192.168.1.100
  range_end: 192.168.1.200
  lease_duration: 86400
Remember to replace the values with the ones that match your network setup. Save the changes and exit the editor.
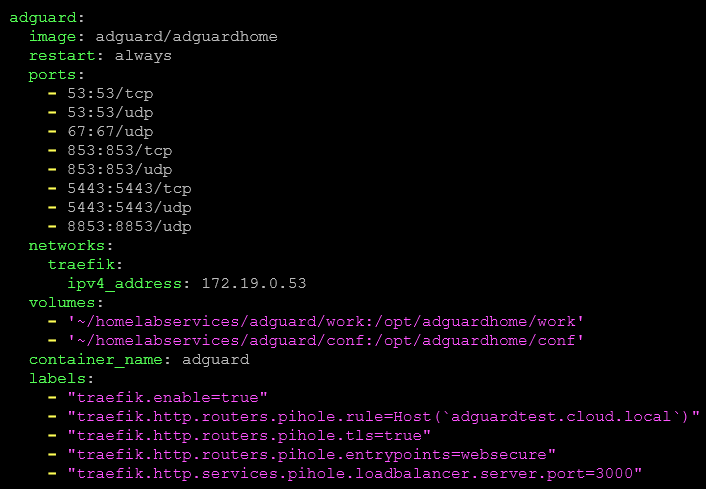
Adguard Home Docker Compose configuration
To run Adguard Home using Docker Compose, create a docker-compose.yml file in the same directory as your opt/adguardhome/conf folder. This file will define the Adguard Home service, configure the necessary port mappings, and ensure data and configuration persistence.
Here’s an example docker-compose.yml file with Traefik used:
version: '3.3'

services:
  traefik2:
    image: traefik:latest
    restart: always
    command:
      - "--log.level=DEBUG"
      - "--api.insecure=true"
      - "--providers.docker=true"
      - "--providers.docker.exposedbydefault=true"
      - "--entrypoints.web.address=:80"
      - "--entrypoints.websecure.address=:443"
      - "--entrypoints.web.http.redirections.entryPoint.to=websecure"
      - "--entrypoints.web.http.redirections.entryPoint.scheme=https"
    ports:
      - 80:80
      - 443:443
    networks:
      traefik:
        ipv4_address: 172.19.0.10
    volumes:
      - /var/run/docker.sock:/var/run/docker.sock
    container_name: traefik

  adguard:
    image: adguard/adguardhome
    restart: always
    ports:
      - 53:53/tcp
      - 53:53/udp
      - 67:67/udp
      - 853:853/tcp
      - 853:853/udp
      - 5443:5443/tcp
      - 5443:5443/udp
      - 8853:8853/udp
    networks:
      traefik:
        ipv4_address: 172.19.0.53
    volumes:
      - '~/homelabservices/adguard/work:/opt/adguardhome/work'
      - '~/homelabservices/adguard/conf:/opt/adguardhome/conf'
    container_name: adguard
    labels:
      - "traefik.enable=true"
      - "traefik.http.routers.adguard.rule=Host(`adguardtest.cloud.local`)"
      - "traefik.http.routers.adguard.tls=true"
      - "traefik.http.routers.adguard.entrypoints=websecure"
      - "traefik.http.services.adguard.loadbalancer.server.port=3000"

networks:
  traefik:
    driver: bridge
    name: traefik
    ipam:
      driver: default
      config:
        - subnet: 172.19.0.0/16
Once you have completed the setup wizard, you will need to configure the DNS server address on your devices to point to the IP address of the Adguard Home container. This will ensure that all DNS requests from your devices are routed through the Adguard Home DNS server, allowing it to block ads, trackers, and malicious websites.
To find the IP address of your Adguard Home container, run the following command:
docker inspect -f '{{range .NetworkSettings.Networks}}{{.IPAddress}}{{end}}' adguardhomeThis will display the container’s IP address within your Docker-bridged network. Alternatively, you can use the host system’s IP address if you have configured the host networking driver for your Adguard Home container.

Ensuring Data and Configuration Persistence
As mentioned earlier, the opt/adguardhome/conf directory on your host system is used for configuration persistence. To ensure that all changes made to your Adguard Home configuration are saved, you need to map this directory to the /opt/adguardhome/conf directory within the Adguard Home container.
This mapping is achieved using the volumes directive in the docker-compose.yml file:
volumes:
      - ./opt/adguardhome/conf:/opt/adguardhome/conf
      - ./opt/adguardhome/work:/opt/adguardhome/work
These volume mappings ensure that the configuration and data directories are persistent and survive container restarts, updates, or removals.
Managing Adguard Home
To manage your Adguard Home container, you can use the following Docker commands:
To start Adguard Home: docker start adguardhome
To stop Adguard Home: docker stop adguardhome
To remove Adguard Home container: docker rm adguardhome
To update Adguard Home: docker rm adguardhome pull && docker-compose up -d
Remember that your settings will be retained even when updating or removing the container, thanks to the volume mappings and configuration persistence.
Wrapping
In this blog post, we have covered setting up Adguard Home using Docker Compose with Traefik ingress. It allows you to quickly deploy and manage a network-wide ad and trackers blocking DNS server, enhancing privacy and security for all connected devices in your home.
Hopefully, the code snippets listed above will help to give you a leap start on configuring your Adguard Home environment.