If you are running Unifi gear, you are undoubtedly running the Unifi controller in your environment, whether in your home lab network or even a production environment using Unifi equipment. The Unifi controller has a user-friendly interface for configuring, monitoring, and controlling your Unifi devices. I have been rapidly migrating critical home lab services from full virtual machines to running these in containers. The Unifi controller is a great service to run inside a container and provides many benefits over running it in a virtual machine. This post will consider how to migrate Unifi Controller installations from an existing Unifi controller virtual machine to a Docker container.
Why migrate from a virtual machine to Docker container for Unifi Controller
There is no harm in running your Unifi controller in a full virtual machine. Many do this, I have done this a long while, and it is a great way to run a controller. However, as I migrate things to containerized infrastructure, I constantly look for services that make sense to be run inside a Docker container.
The Unifi controller is a great candidate for containerization. Running your Unifi controller in a Docker container is a great way to simplify upgrades to your Unifi controller. Whereas you may need to adjust your update repos when updating to account for a new major version or update requirements such as Java with the controller on a virtual machine, with a Docker container, this is done automatically for you.
When you pull the new version of the container, it contains all the requirements bundled together nice and neat for deployment.
These update advantages and more graceful handling of requirements and prerequisite updates are the two main reasons I am migrating. Also, as I will detail below, with a container, I can place a cool reverse proxy like Traefik in front of my Unifi controller, and it will allow easily pulling trusted certificates to use in the home lab for the Unifi controller.
Understand the Controller Version and Controller Hostname
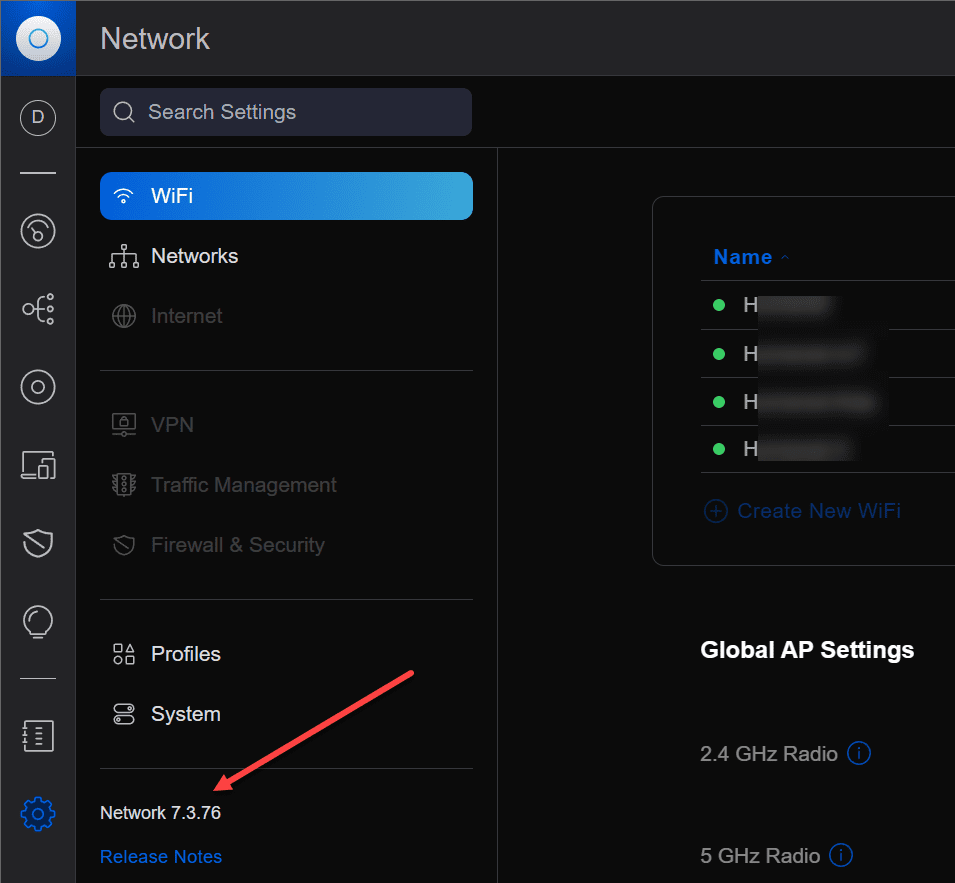
Before you start a Unifi controller migration, you need to understand the controller version you’re using. This information will help you understand the process and the tools you need to migrate the controller. You can find the version information on the Unifi Controller settings page.
There are many different approaches to migrate Unifi controller settings from an old unifi controller to a new unifi controller. You can move from an existing Unifi Controller to a new host or server, or you can create a backup file from your existing controller and restore the backup file on the new unifi controller you have provisioned, assume identity and IP address from the old Unifi controller.
Export and Forget Devices on the Old Controller
The Unifi Controller settings include different options, such as site switcher, site configuration, and system settings. In the migration process, you will need to export the site configuration, system settings, and forget the devices connected to the old controller.
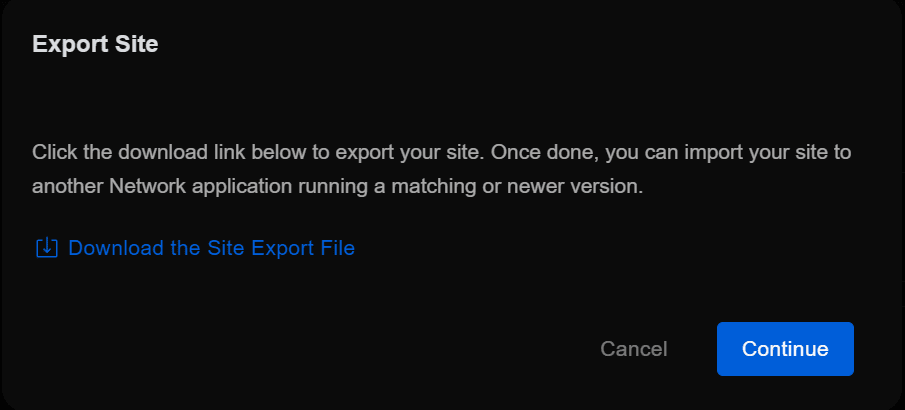
The export feature will come in handy if there are any issues with the migration process and you need to revert to the old controller. You can back up the old controller by exporting the site using the Export Site function.
Understand Multi-Site Management
If you have multiple sites on your Unifi network, it is important to migrate them to the new controller. The migration process involves exporting the configuration for each site and importing it into the new controller.

Migrating Unifi Controller to a New Server
In my case, I will be migrating my existing Unifi controller from a virtual machine, spinning up a new Unifi controller running in a Docker container, and then restoring the backup into the docker container. I will assume the IP address of the original virtual machine for the Docker host, simplifying the process as the APs will connect to the same IP address.
To migrate the Unifi Controller to a new server, download the new controller software and install it on the new server. The new server can be a cloud key or a different server, including a Docker container.
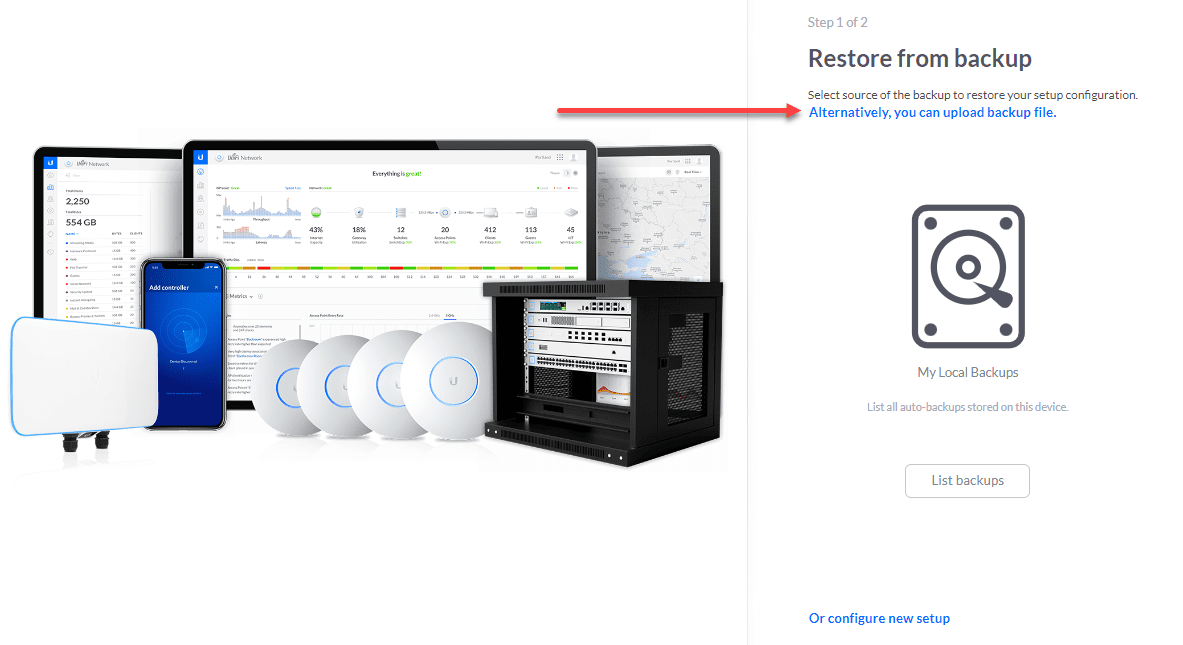
After installation, launch the Unifi Controller setup wizard to configure the controller. During the initial setup of the new Unifi Controller, you can choose to restore your backup file on the new Unifi controller running in the Docker container.
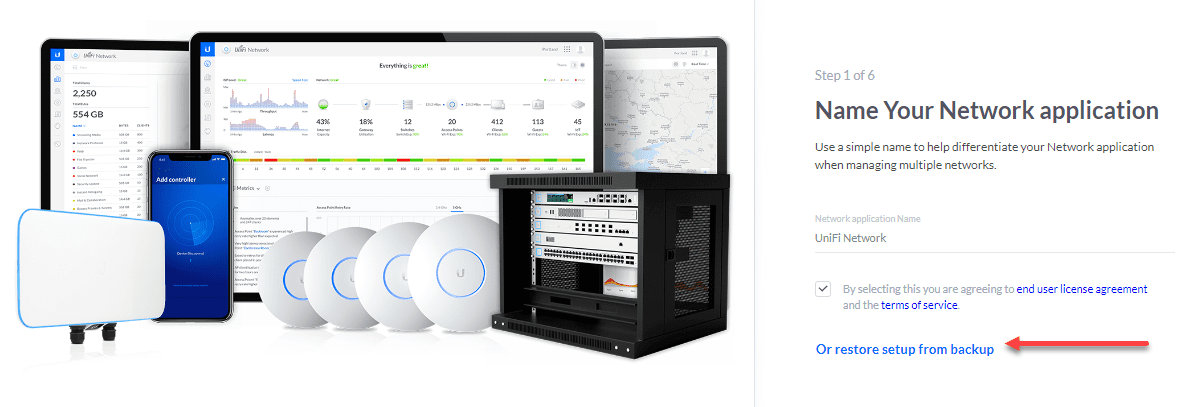
Below, you see the first screen of the initial setup wizard when setting up a new Unifi controller. The controller below is running in a Docker container. You can see the option Or restore setup from backup which allows you to upload your backup file from your old Unifi controller and import it during the setup wizard.

Understand the Old Unifi Controller
Once the new Unifi Controller is set up, you must connect it to the devices previously connected to the old controller. To do this, you can forget the devices on the old controller and reset them to their factory settings. You can forget the devices on the old controller by going to the Devices page and selecting the devices you want to forget.
However, you don’t have to forget the configuration if you are migrating to a new controller on which you restore the configuration and assume the IP of your previous server, and your access points won’t know any different.
However, let’s consider some fundamentals if you want to migrate devices to a totally new Unifi controller environment.
Migrating Unifi Controllers to a New Server
To migrate the Unifi network to the new controller, you can use the export site wizard to export the site from the old controller. Then, import site configuration into the new controller. This process ensures that the configurations of the devices remain intact.
If you are changing the IP address of the Unifi Controller, you will need to set a static IP address for the new server. You can set the static server IP address on the server’s network settings.
Use the Ubiquiti Device Discovery Tool
To ensure that the devices on the network are connected to the new controller, use the Ubiquiti Device Discovery Tool to discover the devices on the network. This tool will show you the devices’ IP address and connection status.
Remote Access and User Interface
To access the Unifi Controller remotely, you must set up remote access. Remote access allows you to manage your Unifi network from anywhere. You can set up remote access on the Unifi Controller user interface, which provides an intuitive interface for configuring, monitoring, and controlling network devices.
Check the Network Devices
Network devices on your Unifi network are the devices that connect to the Unifi Controller. When migrating the controller, it is important to ensure these devices are connected to the new controller. You can check the status of these devices on the Devices page on the Unifi Controller user interface.
Factory Reset the Devices
To connect devices to the new controller, you will need to reset them to their factory settings. To do this, go to the Devices page on the old controller and forget the devices. Then, reset the devices to their factory settings.
Use the Export Site Function
The Export Site function allows you to back up the configuration for each Unifi network site. This feature is handy when migrating the Unifi Controller to a new server or host.
Use the Inform URL
The inform URL is the address that the devices on your Unifi network use to connect to the Unifi Controller. If you are migrating the controller to a new server, you must set inform URL to the new controller’s address.
Set the Default Site
The default site is the site where new devices connect by default. If you have multiple sites on your Unifi network, you must set the default site to the site that you want new devices to connect to.
Understand the Unifi OS Settings
If you’re changing the IP address of the Unifi Controller, you will need to update the IP address of the new server on the Unifi OS settings page. You can access this page by clicking on the server icon on the Unifi Controller user interface.
What is a Unifi Cloud Key?
We are using a Docker container as the target environment. However, you may be migrating from or to a cloud key device. What is the Unifi Cloud Key? A cloud key is a device that runs the Unifi Controller software. It is a compact and affordable solution for managing your Unifi network. You can use a cloud key to migrate the Unifi Controller to a new server.
Migrating Sites and Devices
To migrate the Unifi Controller to a new server, you must export the site configuration from the old controller and import it into the new controller. Additionally, you will need to forget the devices on the old controller and reset them to their factory settings.
You can then use the Ubiquiti Device Discovery Tool to discover the devices on the network and check if they are connected to the new controller.
The Migration Wizard
The Unifi Controller also has a migration wizard that simplifies the migration process. This wizard allows you to transfer the configuration of the Unifi Controller from one controller to another. It is ideal for migrating between two controllers with different IP addresses.
Device Configurations
After migrating the Unifi Controller to a new server, you will need to configure the devices on the network. You can do this by going to the Unifi Controller user interface’s Devices page and selecting the devices you want to configure.
Fresh Config and SSH Credentials
You can create a fresh config if you prefer a fresh configuration for your Unifi network after migration. To do this, select the fresh config option and go to the Unifi Controller settings. Additionally, you can use SSH credentials to manage your Unifi network. You can find the SSH credentials on the Unifi Controller settings page.
Backing up the existing Unifi controller configuration from the virtual machine
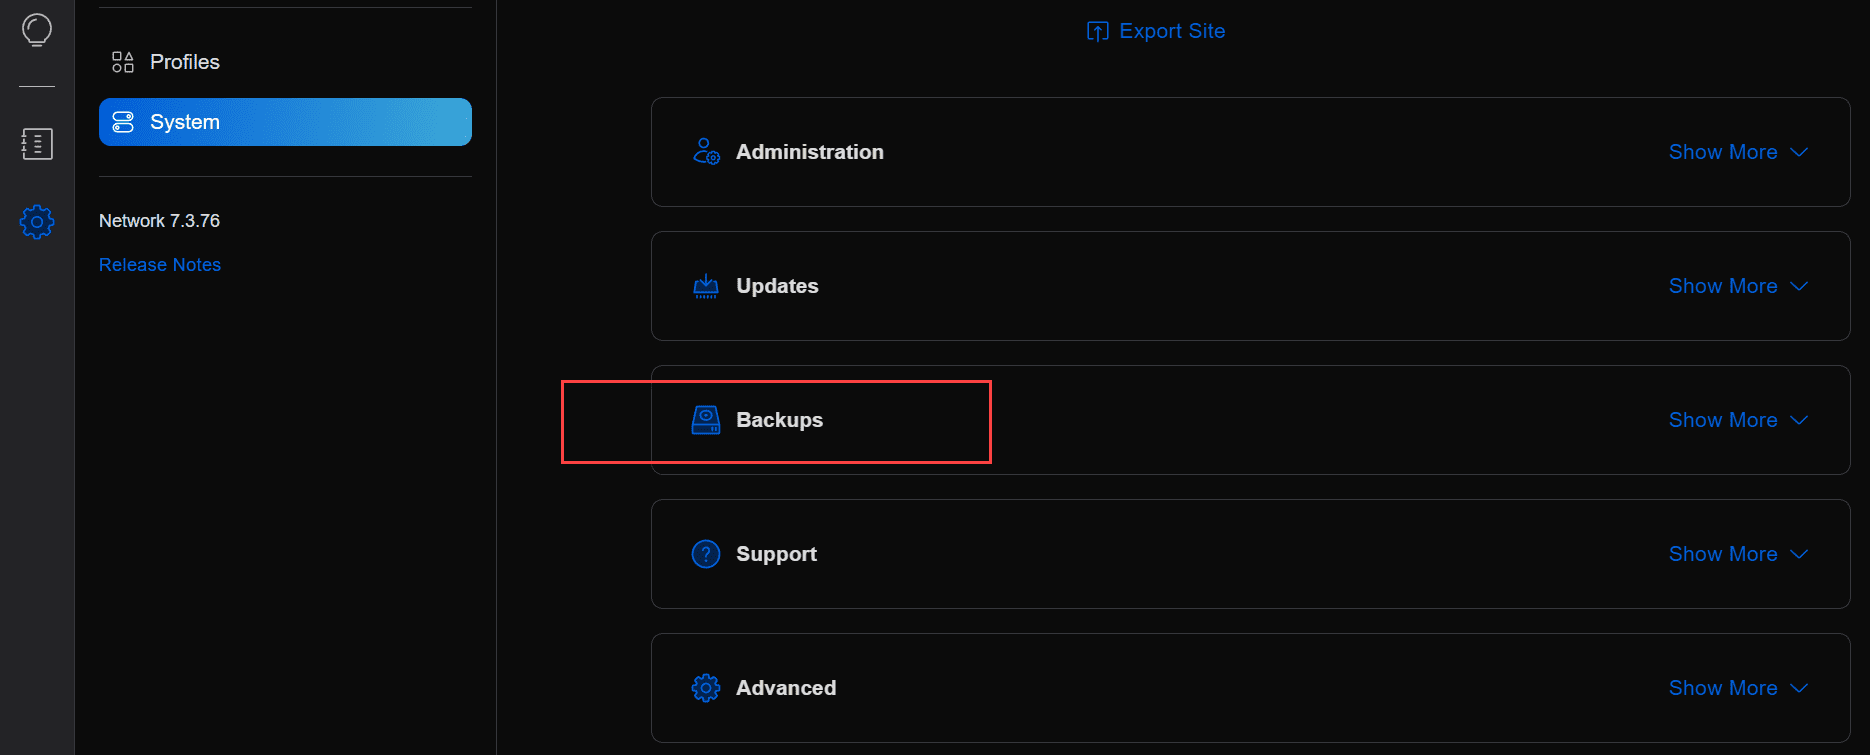
The process to backup your Unifi configuration from an existing installation, whether in a virtual machine, a Docker container, or something else, is straightforward. Under the System menu of your controller you are migrating from, you can select Backups.
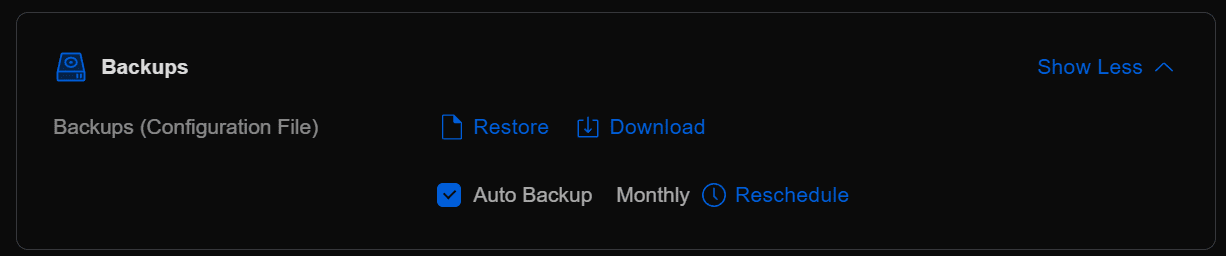
Under the Backups menu, you can choose to Show More, and then select Download.
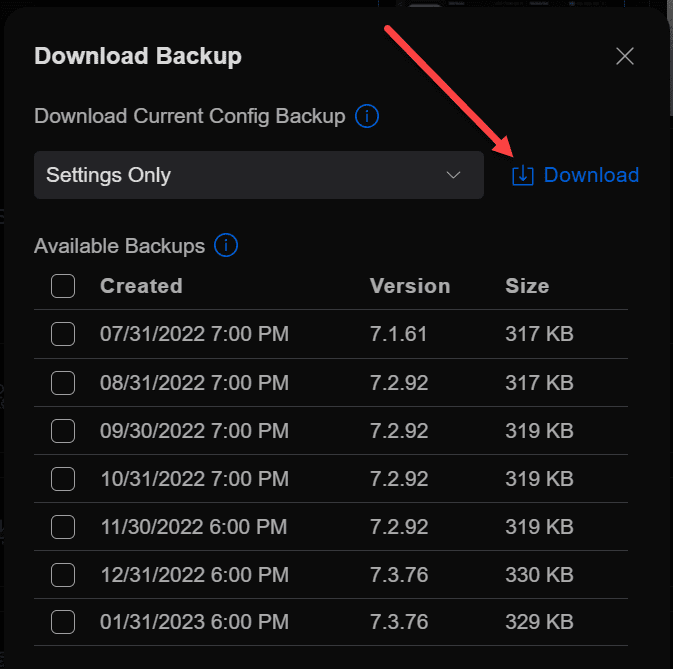
When you select Download, you will see the option at the top that allows downloading the Settings Only or you can choose to download the settings along with various levels of history.
Now that we have our backup file from the source Unifi controller, we can create the target Docker container.
Using Docker Compose to create a Unifi Controller running in Docker with Traefik
Let’s look at the Docker compose code to spin up Traefik and the Unifi controller. What is Traefik? It is a very popular open-source reverse proxy solution for Docker and Kubernetes allowing you to route traffic to your internal containerized services.
I want to place Traefik in front of my Unifi controller since it will allow me to pull legitimate SSL certificates using LetsEncrypt and access our controller without certificate warnings. Below, I am setting quite a few options, including configuring a connection to Cloudflare via API key and verifying DNS records automatically to spin up legitimate SSL certificates. Also, we are doing wildcard certificates with the below configuration.
version: '3.3'

services:

  traefik2:

    image: traefik:latest

    restart: always

    command:

      # Tell Traefik to discover containers using the Docker API

      - --providers.docker=true

      # Enable the Trafik dashboard

      - --api.dashboard=true

      # Set up LetsEncrypt

      - --certificatesresolvers.letsencrypt.acme.dnschallenge=true

      - --certificatesresolvers.letsencrypt.acme.dnschallenge.provider=cloudflare

      - --certificatesresolvers.letsencrypt.acme.email=<your email>

      - --certificatesresolvers.letsencrypt.acme.storage=/letsencrypt/acme.json

      # Set up an insecure listener that redirects all traffic to TLS

      - --entrypoints.web.address=:80

      - --entrypoints.web.http.redirections.entrypoint.to=websecure

      - --entrypoints.web.http.redirections.entrypoint.scheme=https

      - --entrypoints.websecure.address=:443

      # Set up the TLS configuration for our websecure listener

      - --entrypoints.websecure.http.tls=true

      - --entrypoints.websecure.http.tls.certResolver=letsencrypt

      - --entrypoints.websecure.http.tls.domains[0].main=example.com

      - --entrypoints.websecure.http.tls.domains[0].sans=*.example.com

      - --serverstransport.insecureskipverify=true

    environment:

      - CLOUDFLARE_EMAIL=<your email address>

      - CLOUDFLARE_DNS_API_TOKEN=<your token>

    ports:

      - 80:80

      - 443:443

    networks:

      - traefik

    volumes:

      - /var/run/docker.sock:/var/run/docker.sock:ro

      - ~/homelabservices/letsencrypt:/letsencrypt

    labels:

      - "traefik.enable=true"

      - 'traefik.http.routers.traefik.rule=Host(`10.1.149.76`)'

      - "traefik.http.routers.traefik.entrypoints=websecure"

      - "traefik.http.routers.traefik.service=api@internal"

      - 'traefik.http.routers.traefik.middlewares=strip'

      - 'traefik.http.middlewares.strip.stripprefix.prefixes=/traefik'

    container_name: traefik

unifi:

    container_name: unifi

    image: jacobalberty/unifi:latest

    restart: always

    networks:

      - traefik

    volumes:

      - '~/homelabservices/unifi/data/lib:/var/lib/unifi'

      - '~/homelabservices/unifi/data/log:/var/log/unifi'

      - '~/homelabservices/unifi/data/run:/var/run/unifi'

    ports:

      - '3478:3478/udp'

      - '10001:10001/udp'

      - '6789:6789/tcp'

      - '8080:8080/tcp'

      - '8880:8880/tcp'

      - '8843:8843/tcp'

    environment:

     - TZ=America/Chicago

    labels:

      - "traefik.enable=true"

      - "traefik.http.routers.unifi.rule=Host(`ubnt.example.com`)"

      - "traefik.http.routers.unifi.tls=true"

      - "traefik.http.routers.unifi.entrypoints=websecure"

      - "traefik.http.services.unifi.loadbalancer.server.scheme=https"

      - "traefik.http.services.unifi.loadbalancer.server.port=8443"

networks:

  traefik:

    external: true
Restoring the configuration file
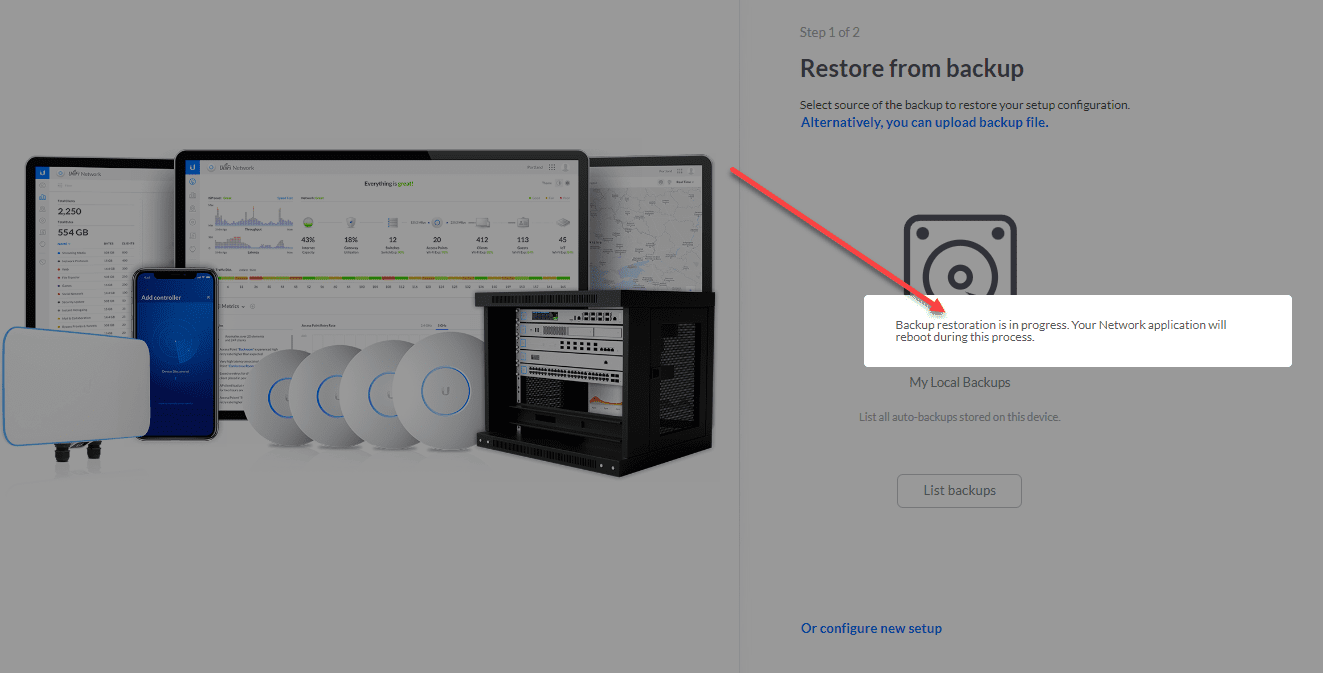
Now we can restore the configuration file on the new controller running inside Docker, and we are up and running.
Confirm the restoration of the backup file.

Conclusion
As we have shown, migrating Unifi controller configuration from a virtual machine to a container is not too difficult. It involves simply backing up the configuration of your Unifi controller on your virtual machine and restoring the configuration in the new Unifi controller configuration running in Docker.
Using a docker compose configuration, we can easily spin up Traefik and the Unifi controller to have proper SSL certificates protecting our Unifi controller and we can take advantage of Traefik and wildcard certificates to spin up multiple containers that can benefit from proper SSL certificates.
Google is updating how articles are shown. Don’t miss our leading home lab and tech content, written by humans, by setting Virtualization Howto as a preferred source.
About The Author