Nginx is a very popular web server that is used throughout many organizations worldwide. However, in case you didn’t know, it can be effectively used as a bare metal load balancer for Kubernetes workloads. It is simple, easy to set up, and lightweight. Also, you can get up and running with Nginx in literally 30 seconds with an apt-get command in Ubuntu. In this post, we will take a look at Kubernetes bare metal load balancer configuration with Nginx and see how this can be configured.
Why Nginx for Kubernetes Load Balancer?
You may wonder, why use Nginx for a Kubernetes bare metal Load Balancer? Well, it is free, open-source, and easy. It provides a great option for those looking for an easy load balancer solution if a commercially available load balancer is not already used. Also, it is a great option for a load balancer in the home lab environment.
Kubernetes Bare Metal Load Balancer configuration with Nginx
To begin setting up the Kubernetes bare metal load balancer configuration with Nginx, we need to install Nginx. In the home lab environment, I have spun up a quick new Ubuntu 20.04 virtual machine using my Terraform deployment script, making it quick and easy to get a new Ubuntu workload up and running quickly.
Then we perform the following:
- Install Nginx
- Edit the nginx.conf file
- Add the load balance configuration
- Test load balancing
1. Install Nginx
After install Ubuntu, you will want to install Nginx:
sudo apt-get install nginx -y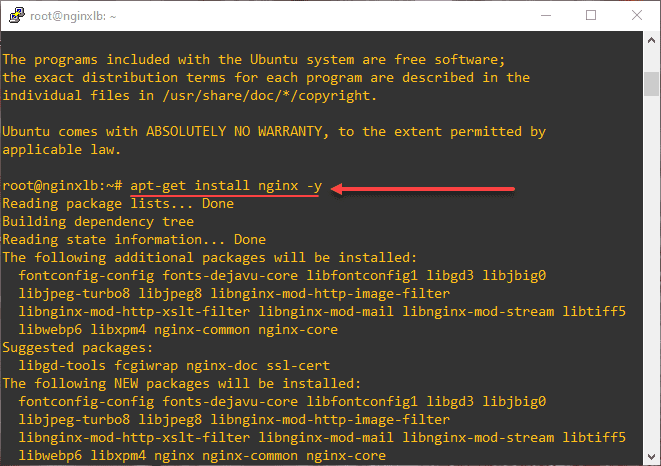
2. Edit the nginx.conf file
After you install Nginx, the work we will do will be in the /etc/nginx/nginx.conf file. You will want to comment out the lines below the “events” section like the following. Also, you can delete the section entirely as well. Below is the default nginx configuration with the comments made. You can easily do this in VS Code with the Toggle Line Comment feature under the Edit menu.
user www-data;
worker_processes auto;
pid /run/nginx.pid;
include /etc/nginx/modules-enabled/*.conf;

events {
	worker_connections 768;
	# multi_accept on;
}

# http {

# 	##
# 	# Basic Settings
# 	##

# 	sendfile on;
# 	tcp_nopush on;
# 	tcp_nodelay on;
# 	keepalive_timeout 65;
# 	types_hash_max_size 2048;
# 	# server_tokens off;

# 	# server_names_hash_bucket_size 64;
# 	# server_name_in_redirect off;

# 	include /etc/nginx/mime.types;
# 	default_type application/octet-stream;

# 	##
# 	# SSL Settings
# 	##

# 	ssl_protocols TLSv1 TLSv1.1 TLSv1.2 TLSv1.3; # Dropping SSLv3, ref: POODLE
# 	ssl_prefer_server_ciphers on;

# 	##
# 	# Logging Settings
# 	##

# 	access_log /var/log/nginx/access.log;
# 	error_log /var/log/nginx/error.log;

# 	##
# 	# Gzip Settings
# 	##

# 	gzip on;

# 	# gzip_vary on;
# 	# gzip_proxied any;
# 	# gzip_comp_level 6;
# 	# gzip_buffers 16 8k;
# 	# gzip_http_version 1.1;
# 	# gzip_types text/plain text/css application/json application/javascript text/xml application/xml application/xml+rss text/javascript;

# 	##
# 	# Virtual Host Configs
# 	##

# 	include /etc/nginx/conf.d/*.conf;
# 	include /etc/nginx/sites-enabled/*;
# }


#mail {
#	# See sample authentication script at:
#	# http://wiki.nginx.org/ImapAuthenticateWithApachePhpScript
#
#	# auth_http localhost/auth.php;
#	# pop3_capabilities "TOP" "USER";
#	# imap_capabilities "IMAP4rev1" "UIDPLUS";
#
#	server {
#		listen     localhost:110;
#		protocol   pop3;
#		proxy      on;
#	}
#
#	server {
#		listen     localhost:143;
#		protocol   imap;
#		proxy      on;
#	}
#}
3. Add the load balance configuration
As an example of a simple way to load balance the API access to multiple master nodes, you can use the following code in the nginx.conf. The magic happens with the stream and upstream stanzas.
- Both the upstream and stream stanzas are included in the parent stream code
- upstream defines the target servers you will be accessing in your Kubernetes clusters and the ports
- server defines the port on your local Nginx host that is listening on a specific port
- proxy_pass tells Nginx that you will be passing this traffic to the upstream servers you have configured
Below, I am setting up Kubernetes bare metal load balancer configuration with Nginx to load balance connections to the Kubernetes API.
stream {
  upstream k8s {
    server 10.1.149.167:6443;
    server 10.1.149.169:6443;
    server 10.1.149.172:6443;
  }
  server {
    listen 6443;
    proxy_pass k8s;
  }
}
To make the config file less “noisy” I removed the extra configuration from the nginx.conf file. My nginx.conf file looks like this after adding the stream code:
user www-data;
worker_processes auto;
pid /run/nginx.pid;
include /etc/nginx/modules-enabled/*.conf;

events {
	worker_connections 768;
	# multi_accept on;
}

stream {
  upstream k8s {
    server 10.1.149.167:6443;
    server 10.1.149.169:6443;
    server 10.1.149.172:6443;
  }
  server {
    listen 6443;
    proxy_pass k8s;
  }
}
Now, that we have the configuration in place, you need to restart nginx:
service nginx restart
or
systemctl restart nginx
4. Test load balance configuration
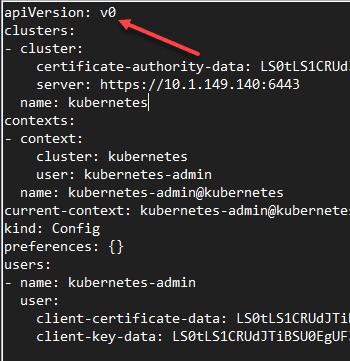
Since I will be using the connection to the Kubernetes API as a test of the load balancer, we need to point the kubeconfig file to the IP of the load balancer. To do this, edit your Kube config file to point to our load balancer instead of the K8s master(s). Below, the server: https://10.1.149.103:6443 is the IP of my Nginx load balancer.
apiVersion: v1
clusters:
- cluster:
    certificate-authority-data: LS0tLS1CRUdJTiBDRVJUSUZJQ0FURS0tLS0tCk1JSUM0VENDQWNtZ0F3SUJBZ0lCQURBTkJna3Foa2lHOXcwQkFRc0ZBREFTTVJBd0RnWURWUVFERXdkcmRXSmwKTFdOaE1CNFhEVEl5TURFeE1URTJOVEV4TWxvWERUTXlNREV3T1RFMk5URXhNbG93RWpFUU1BNEdBMVVFQXhNSAphM1ZpWlMxallUQ0NBU0l3RFFZSktvWklodmNOQVFFQkJRQURnZ0VQQURDQ0FRb0NnZ0VCQU13RldCMHdjV00wClVrclpXdnBQaFlFa0lvQ2FNalhtTk5GRGtyanVKSU04Z1l0WWNSTTYrdzlaMmxFWUNUYk43ZTdJXSzB0TnU4Ykl0NHdMaS9MYkhxUFAydVZGeGIKZURCQ25KWi82WC8rMTFRU1NTNU1XVmtIUTArMXJZb011VFM4VWVOZEQ2Z2p4VzJDUXJzRkR4Z1RpQVVldHJWVQpRcDUyUCs0cmsvMENBd0VBQWFOQ01FQXdEZ1lEVlIwUEFRSC9CQVFEQWdLa01BOEdBMVVkRXdFQi93UUZNQU1CCkFmOHdIUVlEVlIwT0JCWUVGREtkbGJGNVUrdXZLMnNpY2NIa2MxRTZGeXh5TUEwR0NTcUdTSWIzRFFFQkN3VUEKQTRJQkFRQzdYZnlrTWZ3azRtNUs5bjNJS0ViRjg2dVkzYmdqelBuUjJSNDFFbFdRcU5jaGRDK1JqOXRtZXc4Rwo0d05oNk9GWFNPZFVockttVGlNOHlwQXRLaG9HNU5ya04yZHkwTXZ4M3FuVkIwYldUSGVwb0NEMzdvSUhGUjhBCllxZGc0NVhsRmdOK0RBbnNRNGdhbWNNVjR0cjZjVytQR01RYVlLZmpFWERDdVVtVi82MmhFWUd5c0V4YVNHT1gKeTJQY2xZWFp0UkNQZFpMY2h3ZHBGQnEvYVd1Ty81eDFFN3RkQTBpQlRmbDExb0JtYXNTUHJtNXBKVTFSOTJ2Two1ZGgza2FTbEd4Zk9vcCt3M3JueTdreE1UU2tFNE15elZ0dWFTTzA0cDhhQ29XTHJYdTJTUm92aE5qK3JZL1JiCkN0azFwd1paZHB1dEVmZnZ6cTYzRHJoaWlDTnQKLS0tLS1FTkQgQ0VSVElGSUNBVEUtLS0tLQo=
    server: https://10.1.149.103:6443
  name: k8svsphere
contexts:
- context:
    cluster: k8svsphere
    user: k8svsphere
  name: k8svsphere
current-context: k8svsphere
kind: Config
preferences: {}
users:
- name: k8svsphere
  user:
    token: kubeconfig-user-lvg5l5phcv:v22dfgs6m85mtw8td4k8c4lcl7q5d9gnfwznsw9nt8jq452tnk7ssv
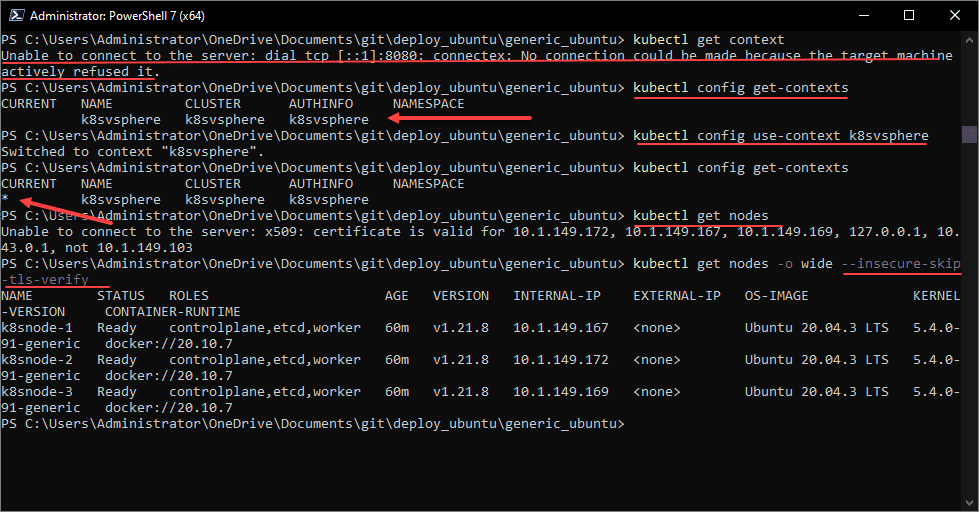
Let me walk you through the commands below as I ran into a couple of hiccups:
- If you see the error dial tcp [::1]:8080: connectex: No connection could be made because the target machine actively refused it, you need to check your kubectl context.
- Run the command kubectl config get-contexts
- Get the name of the environment and set the context to this
- kubectl config use-context <your context>
- Check the context again to verify you have the asterisks in place as default
- Now, run a normal kubectl command like kubectl get nodes
- You will likely receive a TLS error as I did below
- It knows the certificate does not match on the load balancer
- You can get around this with the –insecure-skip-tls-verify switch
- Now, running the kubectl get nodes command successfully connects and returns data from our Kubernetes API
Wrapping up and thoughts
Hopefully, this walkthrough of Kubernetes bare metal load balancer configuration with Nginx helps to show how easy it is to use Nginx to configure a load balancer for your Kubernetes cluster. While I am showing an example connecting to the Kubernetes API on 6443, you can use Nginx for any port that you have exposed on your Kubernetes cluster for various applications. If you are using Node Port to expose an application, you can set up the port on your Nginx load balancer to forward the “external” port and traffic to the port exposed on your Kubernetes cluster.