One of the cool things I have done recently in the lab is working with shared storage class configurations with Kubernetes persistent volumes. I recently set up an NFS share on my Synology NAS device and used the nfs-subdir-external-provisioner to add persistent shared storage to the cluster for spinning up storage for my apps. Let’s look at how to set up an NFS share, and install the nfs-subdir-external-provisioner.
What is the nfs-subdir-external-provisioner?
The NFS subdir external provisioner serves as an automated provisioner that leverages your pre-configured NFS server to allow you to support dynamic provisioning of Kubernetes Persistent Volumes through Persistent Volume Claims. The naming convention for the provisioned persistent volumes follows the format: ${namespace}-${pvcName}-${pvName}.
Basically, the boiled-down version is the NFS subdir external provisioner, which allows you to connect your Kubernetes cluster to NFS persistent storage. It sets up a storage class that provides automatic storage provisioning for your Kubernetes pods.
NFS storage and Kubernetes
For Kubernetes clusters, NFS storage is a great solution for persistent volumes. NFS allows multiple pods to access the storage at the same time and access the same data. This is important since you want to make sure all your hosts and pods can access the data for failover scenarios.
NFS is a protocol that has been around for a long while and is likely found in many environments, meaning you won’t have to set up a new kind of storage just for Kubernetes. You can make use of what you already have.
Setup an NFS share in Synology
While I will show the steps in Synology, the general steps will work with other NFS server types. In the home lab, I currently have the Synology NAS device as my main NAS storage. Let’s look at setting up the NFS share for Kubernetes.
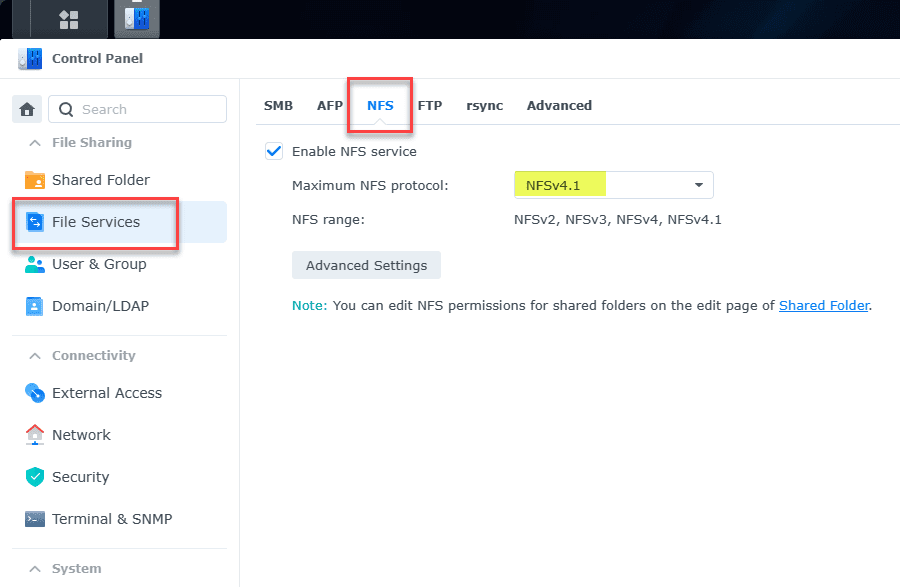
Enable NFS
One of the first steps we need to accomplish is to enable NFS under the file services. Navigate to Control Panel > File Services > NFS. Enable the NFS service and set your maximum NFS protocol.
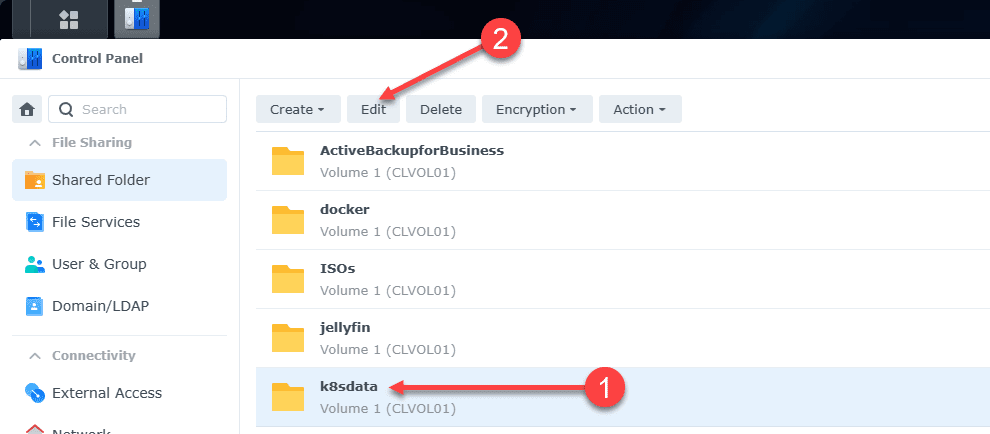
Create and edit your shared folder
Navigate to Control Panel > Shared Folder. Create a new folder, which you can do under the Create menu. Then click Edit.
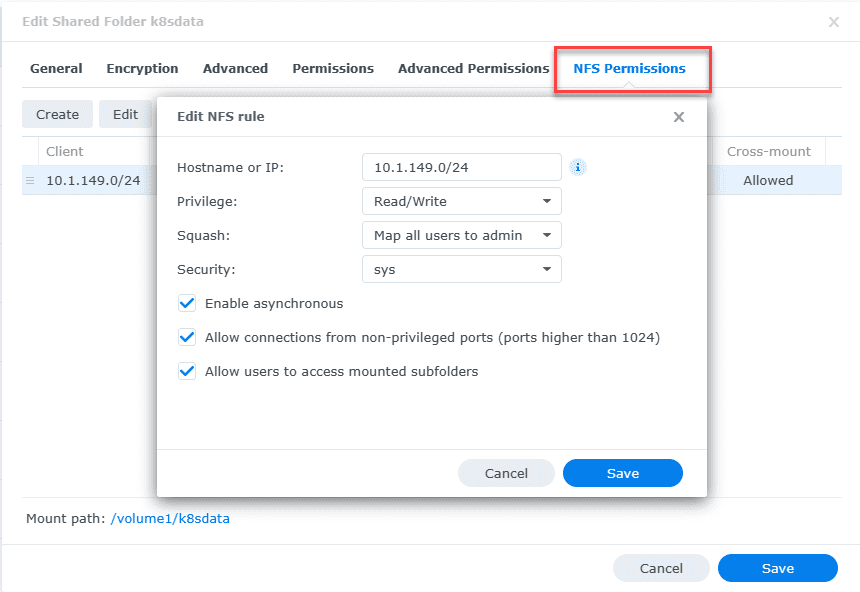
Next, click NFS Permissions. Make sure you have the following defined:
- Hostname or IP – The IP address or IP range you want to allow to connect
- Privilege – Read/Write
- Squash – Map all users to admin
- Security – sys
- Enable asynchronous – checked
- Allow connects from non-privileged ports (ports higher than 1024) – checked
- Allow users to access mounted subfolders – checked
Ok, now we should be configured on the Synology NAS side of things. Next, we will test our connection to the NFS share.
Install NFS client on your Linux test box and Kubernetes hosts
Your Linux test box and Kubernetes hosts may be one and the same. You will need to install the NFS tools on your Kubernetes hosts so they can make the NFS connections needed. I first thought this wasn’t need on the Kubernetes hosts themselves. But, with some testing, this is not the case.
If you don’t install it, you will get an error message when the Kubernetes cluster tries to provision a persistent volume claim using the NFS provisioner.
apt install nfs-common -y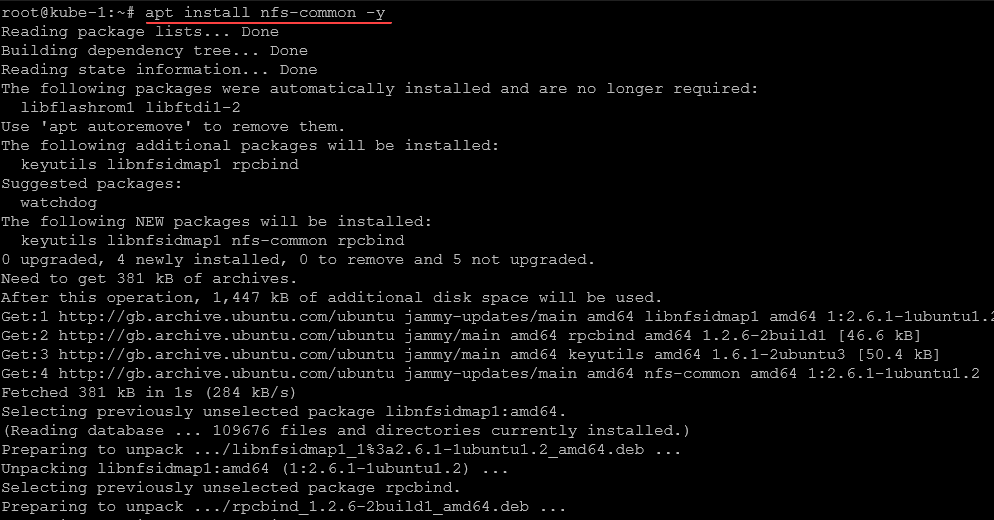
Testing the connection to the NFS server
We can test using an NFS client root NFS mount. Use the following syntax to test your NFS server/NAS connection. Below is what I used for my environment. Replace with settings from your environment with the NFS client root mountpath.
mount -t nfs 10.1.149.4:/volume1/k8sdata /mntNow, let’s install the NFS subdir external provisioner.
Installing the NFS subdir external provisioner in your Kubernetes cluster
Now that we have tested the NFS share running on your storage system and can connect to it, let’s install the NFS subdir external provisioner in the Kubernetes cluster. This will install the NFS client provisioner containers from the special container image for the provisioner.
##Add the helm repo
helm repo add nfs-subdir-external-provisioner https://kubernetes-sigs.github.io/nfs-subdir-external-provisioner/

##Configure the provisioner for your NFS share
helm install nfs-subdir-external-provisioner nfs-subdir-external-provisioner/nfs-subdir-external-provisioner \
    --set nfs.server=x.x.x.x \
    --set nfs.path=/exported/path
You can also use Kustomize with an NFS client provisioner spec and NFS client provisioner image, deployment metadata, nfs client accessmodes, template, replicas, pod specification, serviceaccount name, etc, or install it manually. Still, it is way more involved than simply using the helm chart.
If you need different role-based access control, you can configure this in rbac.yaml files for authentication, specifying the configuration needed for your app.
Viewing your storage class configuration
After installing the nfs-subdir external provisioner, we can now issue a:
kubectl get scBelow we see the provisioner_name value listed for the NFS provisioner in the example.
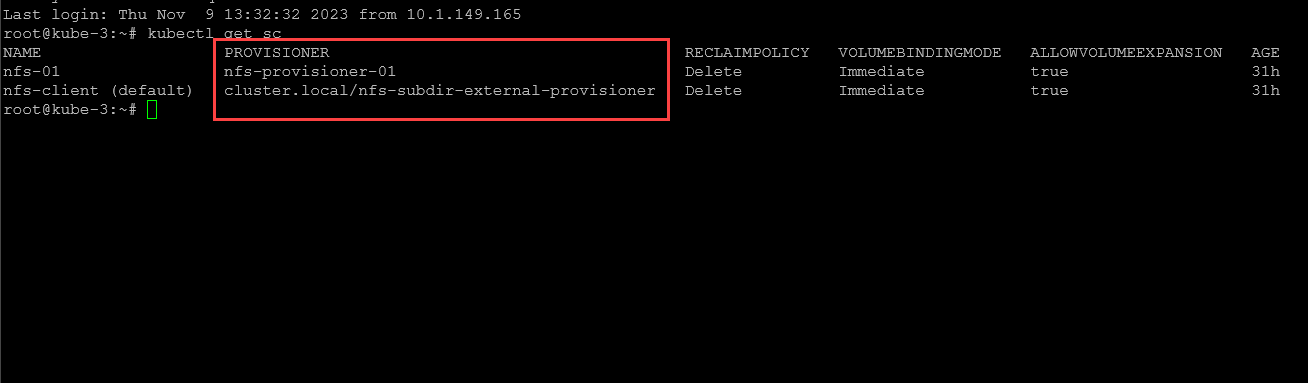
We see the storage classes listed now as an automatic provisioner. as a note. I did have to change it from the “nfs-01” provisioner that was set as default out of the install to the “nfs-client”. Once I did this, pods were able to provision storage as expected.
If you need to do that, you can use this command:
kubectl patch storageclass nfs-client -p '{"metadata": {"annotations":{"storageclass.kubernetes.io/is-default-class":"true"}}}'Create a container to use persistent storage
Now that we have the persistent storage configured using the NFS client provisioner, we can create a test container using a deployment.yaml file to test out the automatic provisioning of persistent storage from the persistent storage class.
Below, we are creating an Nginx container and targeting the nfs-client storage class, specifying the PVC size, images, provider, env, labels, etc and storing this in a YAML file.
# pod-with-pvc.yaml
---
apiVersion: v1
kind: PersistentVolumeClaim
metadata:
  name: nginx-pvc
spec:
  storageClassName: nfs-client
  accessModes: [ReadWriteOnce]
  resources: { requests: { storage: 5Gi } }
---
apiVersion: v1
kind: Pod
metadata:
  name: nginx
spec:
  volumes:
    - name: pvc
      persistentVolumeClaim:
        claimName: nginx-pvc
  containers:
    - name: nginx
      image: nginx:latest
      ports:
        - containerPort: 80
      volumeMounts:
        - name: pvc
          mountPath: /usr/share/nginx/html
Create the file above as pod.yaml or any other name you want with the .yaml extension. Then, we will run the following:
kubectl create -f pod.yamlCheck the persistent volume claims (PVC)
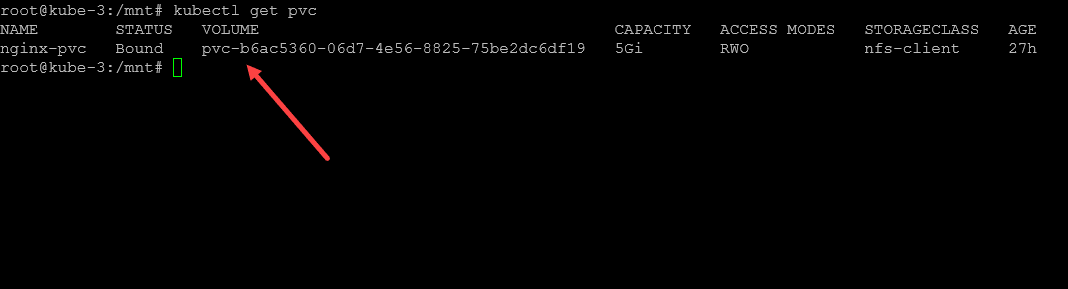
Once the container is created, we can take a look at thepersistentvolumeclaims to see if our Nginx container was able to successfully create the PVC and see if it is in the bound state. You can look at your persistent volumes using the command:
kubectl get pvcAs we can see below, we have a new persistent volume called nginx-pvc and the status is bound.
Kubernetes Synology NAS NFS video walkthrough
Wrapping up
One of the most important parts of your Kubernetes infrastructure is your storage. Most likely you will want to have persistent storage for at least a few of your pods that depend on having storage for persistent data. Most network environments have a traditional NAS or server with NFS storage configured.
For home lab users, if you are running Synology or TrueNAS in your environment, as we have shown, you can easily set up an NFS share and connect your Kubernetes cluster. Using the NFS subdir external provisioned, you can target your NFS share super easy.
This is a great way to start learning about Kubernetes storage and adding persistent storage to your homelab and even production clusters and take advantage of the data resiliency of your NAS device or NFS solution that is likely backed with some type of redundancy.
More in this topic

Discuss this in the Community
Google is updating how articles are shown. Don’t miss our leading home lab and tech content, written by humans, by setting Virtualization Howto as a preferred source.
About The Author
