Kubernetes persistent volume management is a cornerstone of modern container orchestration. Utilizing persistent storage can lead to more resilient and scalable applications. This guide delves into an experiment using Microk8s, Ceph, and Rook to create a robust storage solution for your Kubernetes cluster.
Table of contents
- What is a Kubernetes Persistent Volume?
- Storage experiment in the home lab
- Integrating Ceph and Rook
- FAQs
- How does integrating Microk8s, Ceph, and Rook improve persistent storage in a Kubernetes cluster?
- Can I expand a bound volume within a Kubernetes cluster?
- What are the best practices for managing storage assets in Kubernetes?
- What’s the difference between statically provisioned volumes and dynamically provisioned volumes in Kubernetes?
- How do ReadWriteOnce resource requests differ from other access modes in persistent volume claims?
- Can previous claimant’s data remain after a bound PV is released, and how is this managed?
- Is there any difference between volume binding modes, and what’s the significance of choosing the right one?
- Wrapping up
- Other posts you may like
What is a Kubernetes Persistent Volume?
Kubernetes persistent volumes (PVs) are a critical storage asset in the Kubernetes volume architecture, providing a way to manage storage resources within the cluster. This section explores Kubernetes persistent volumes’ core concepts, components, and advantages.
Understanding Persistent Volumes
Persistent volumes are designed to provide storage capacity that outlives the lifespan of individual containers. Unlike regular volumes, these storage assets are not deleted when a pod is terminated, ensuring the data storage remains intact.
Components of Kubernetes Persistent Volumes
A Kubernetes persistent volume consists of several elements:
Storage Class
Defines the type and nature of the storage provided, including underlying storage provider, provisioning method (static or dynamic), and other parameters like access modes.
Persistent Volume Claim (PVC)
A request for storage by a user specifying the requested storage size and access mode.
Access Modes
Defines how the storage volume can be accessed. Common access modes include ReadWriteOnce, where a single node can mount the volume as read-write.
Volume Modes
These are specific configurations that describe the nature of the storage, such as raw block volume or filesystem.
Persistent Volume Lifecycle
Understanding the lifecycle of a Kubernetes persistent volume helps manage storage usage effectively. Key stages include:
Creating a Persistent Volume: The PV task begins with creating a PV object, defining the underlying storage, capacity, and other parameters like storage class and access modes.
Binding PV and PVC: The Kubernetes control plane matches PVC objects to an appropriate PV, creating a bound volume relationship between the PV and the PVC.
Using and Accessing Persistent Storage: Once bound, the storage can be used by pods. If required, volume expansion can be done.
Reclaiming and Deleting: Once the PVC is deleted, depending on the reclaim policy, the PV can either be retained or deleted. It’s important to note that previous claimant’s data remains intact unless explicitly deleted.
Integration with External Infrastructure
Kubernetes persistent volumes can be linked with various storage systems, including cloud storage, network attached storage, and specific offerings like Azure Disk or OpenStack block storage. This flexibility allows administrators to choose the best solution for their needs.
High Availability and Performance
With the right configuration, persistent volumes in Kubernetes can provide high availability and performance. By utilizing features like dynamically provisioned volumes and storage classes, cluster administrators can tailor storage resources to meet specific needs.
Handling Multiple Pods and Nodes
Persistent Storage allows configuring storage for multiple nodes and pods, with the ability to present a storage volume, volume modes, PV and persistent volume claims in your cluster.
Storage experiment in the home lab
I have recently been playing around with many different storage architectures and technologies in the home lab. Using Microk8s, I wanted to play around with Rook and Ceph storage for Kubernetes persistent volumes for workloads.
Deploying Microk8s
Microk8s is a lightweight, single-node Kubernetes deployment suited for developers and small-scale environments. Let’s see how we can easily deploy a Microk8s cluster environment.
Below we are installing Microk8s with the following command. Note, in the screenshot, I am using the 1.28 release candidate as 128 was not yet released when writing up the blog. According to Canonica’s documentation, microceph needs 1.28.
snap install microk8s --channel=1.28/stable --classic
##Get the status of the cluster
microk8s status --wait-ready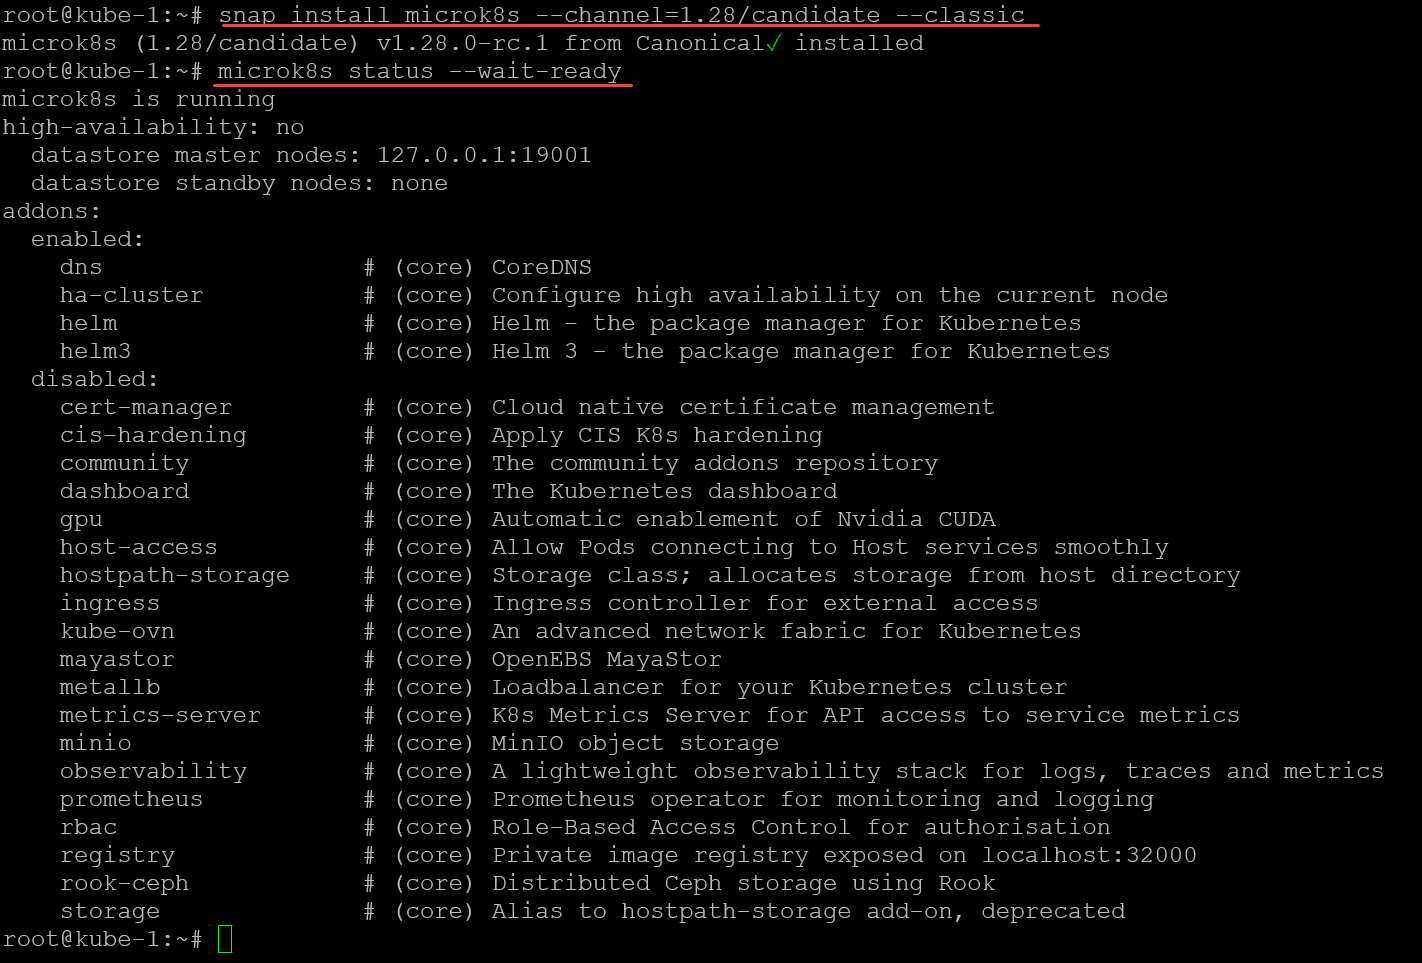
Next, we are going to add our additional nodes to microk8s. To do that, use the command:
microk8s add-node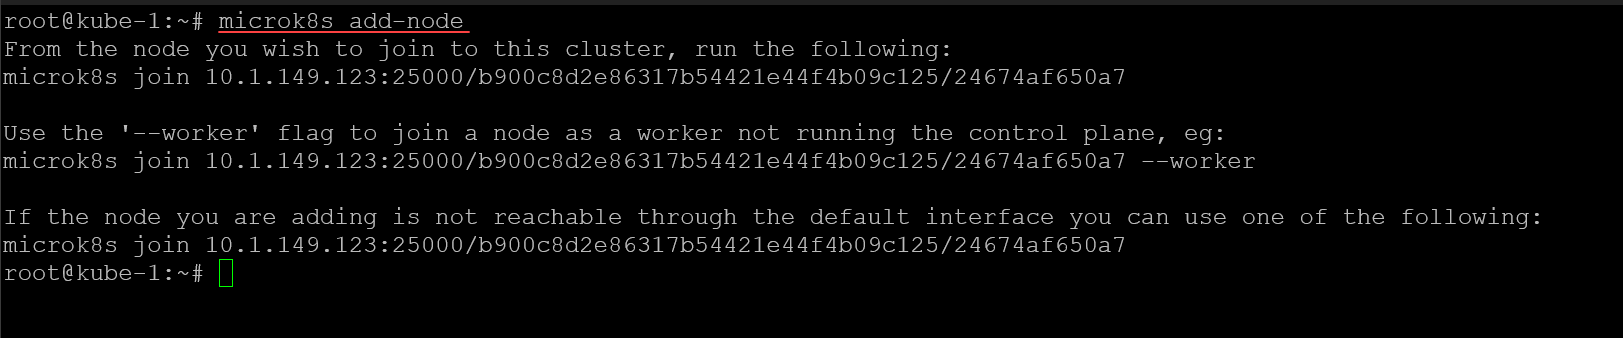
Now, we need to install Microk8s on the additional nodes, using the same command:
snap install microk8s --channel=1.28/stable --classic
Now, we take the join token generated on the master node, and use it to join the additional nodes.
microk8s join <your master node and token string>
After installing and joining the additional nodes, I am checking the nodes in the cluster:
microk8s kubectl get nodes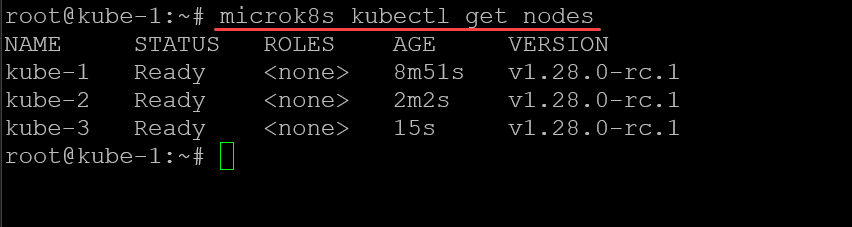
Integrating Ceph and Rook
Ceph and Rook together provide high availability and scalability to Kubernetes persistent volumes. Understand how these two interact and facilitate storage usage.
Ceph Storage System
Ceph is an open-source storage platform that offers network-attached storage and supports dynamic provisioning.
It’s not just for Kubernetes. You can use it for HCI storage in Proxmox as well. Check out my video here:
You can install a variant called microceph for use with Microk8s. To do that, run the following on all of your Microk8s nodes:
sudo snap install microceph --channel=latest/edge
Next, we run the microceph bootstrap command (also nevermind the “sudo” in the command with root, it is habit):
microceph cluster bootstrap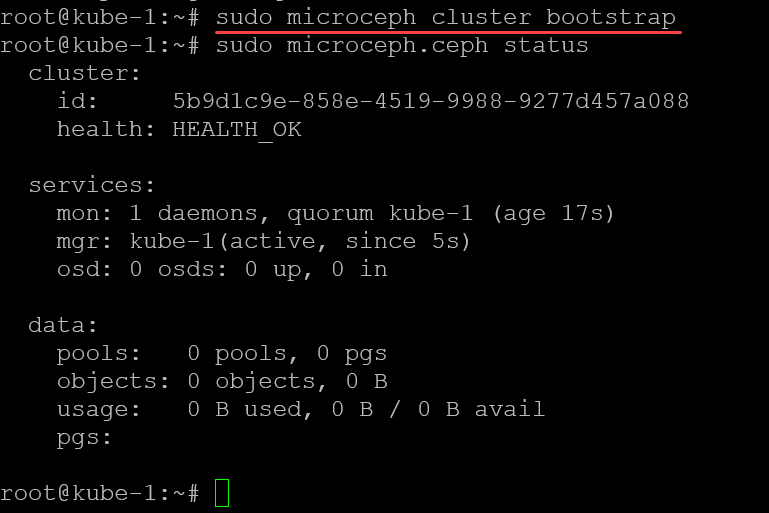
To generate the join token, use the command:
microceph cluster add <your node name>
microceph cluster add <your other node name>
Once you have the join token, you will run the command on each additional node to join the nodes to the Ceph cluster:
microceph cluster join <join token>
On each of my Microk8s cluster hosts (Ubuntu 22.04 virtual machines) I added an additional 20 gig disk to each VM. You can check your disks using the following:
lsblk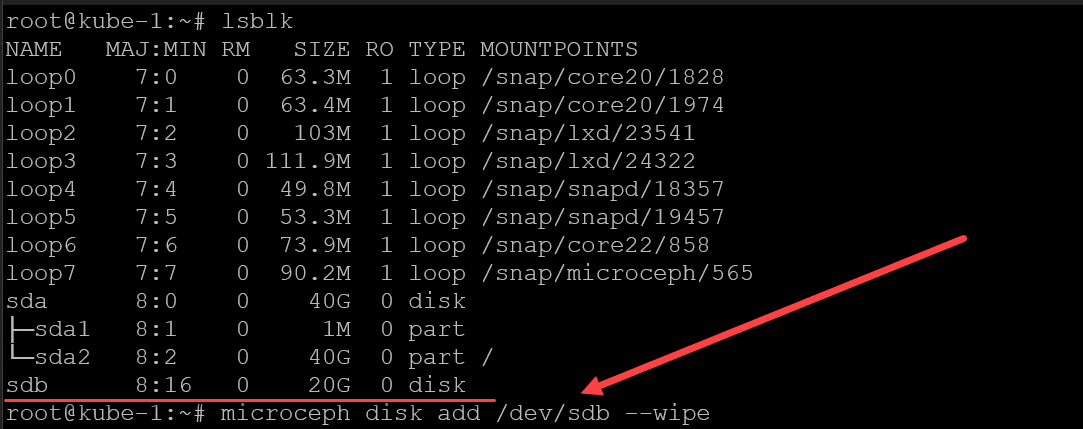
Add the disks as OSDs using the command:
microceph disk add /dev/sdb --wipeNow, we should be able to run the ceph status command and see the status of the ceph cluster. Notice we see the Health is OK after adding the OSDs.
ceph status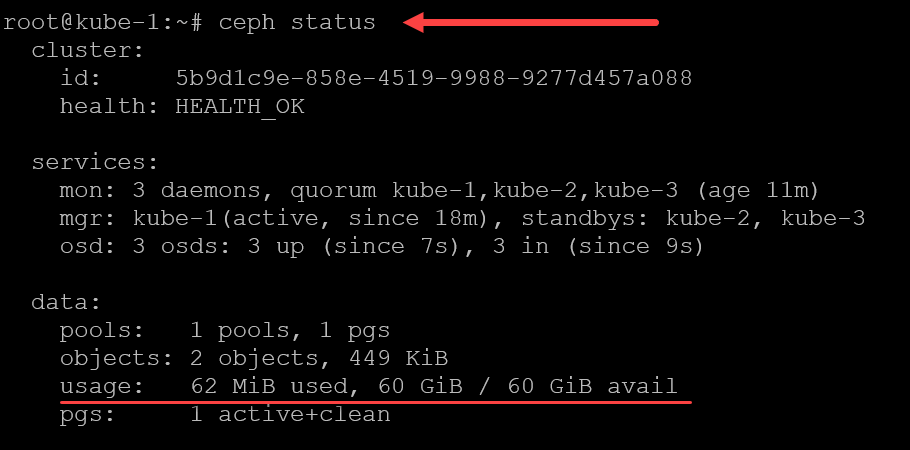
Rook: Orchestrating Storage
Rook is a control loop within Kubernetes to manage storage resources like Ceph. It enables the Kubernetes control plane to handle storage classes and dynamically provisioned volumes.
Let’s enable rook in Microk8s. You can do this with the command:
microk8s enable rook-ceph

##After you enable rook-ceph, connect to your ceph storage using the command:

microk8s connect-external-ceph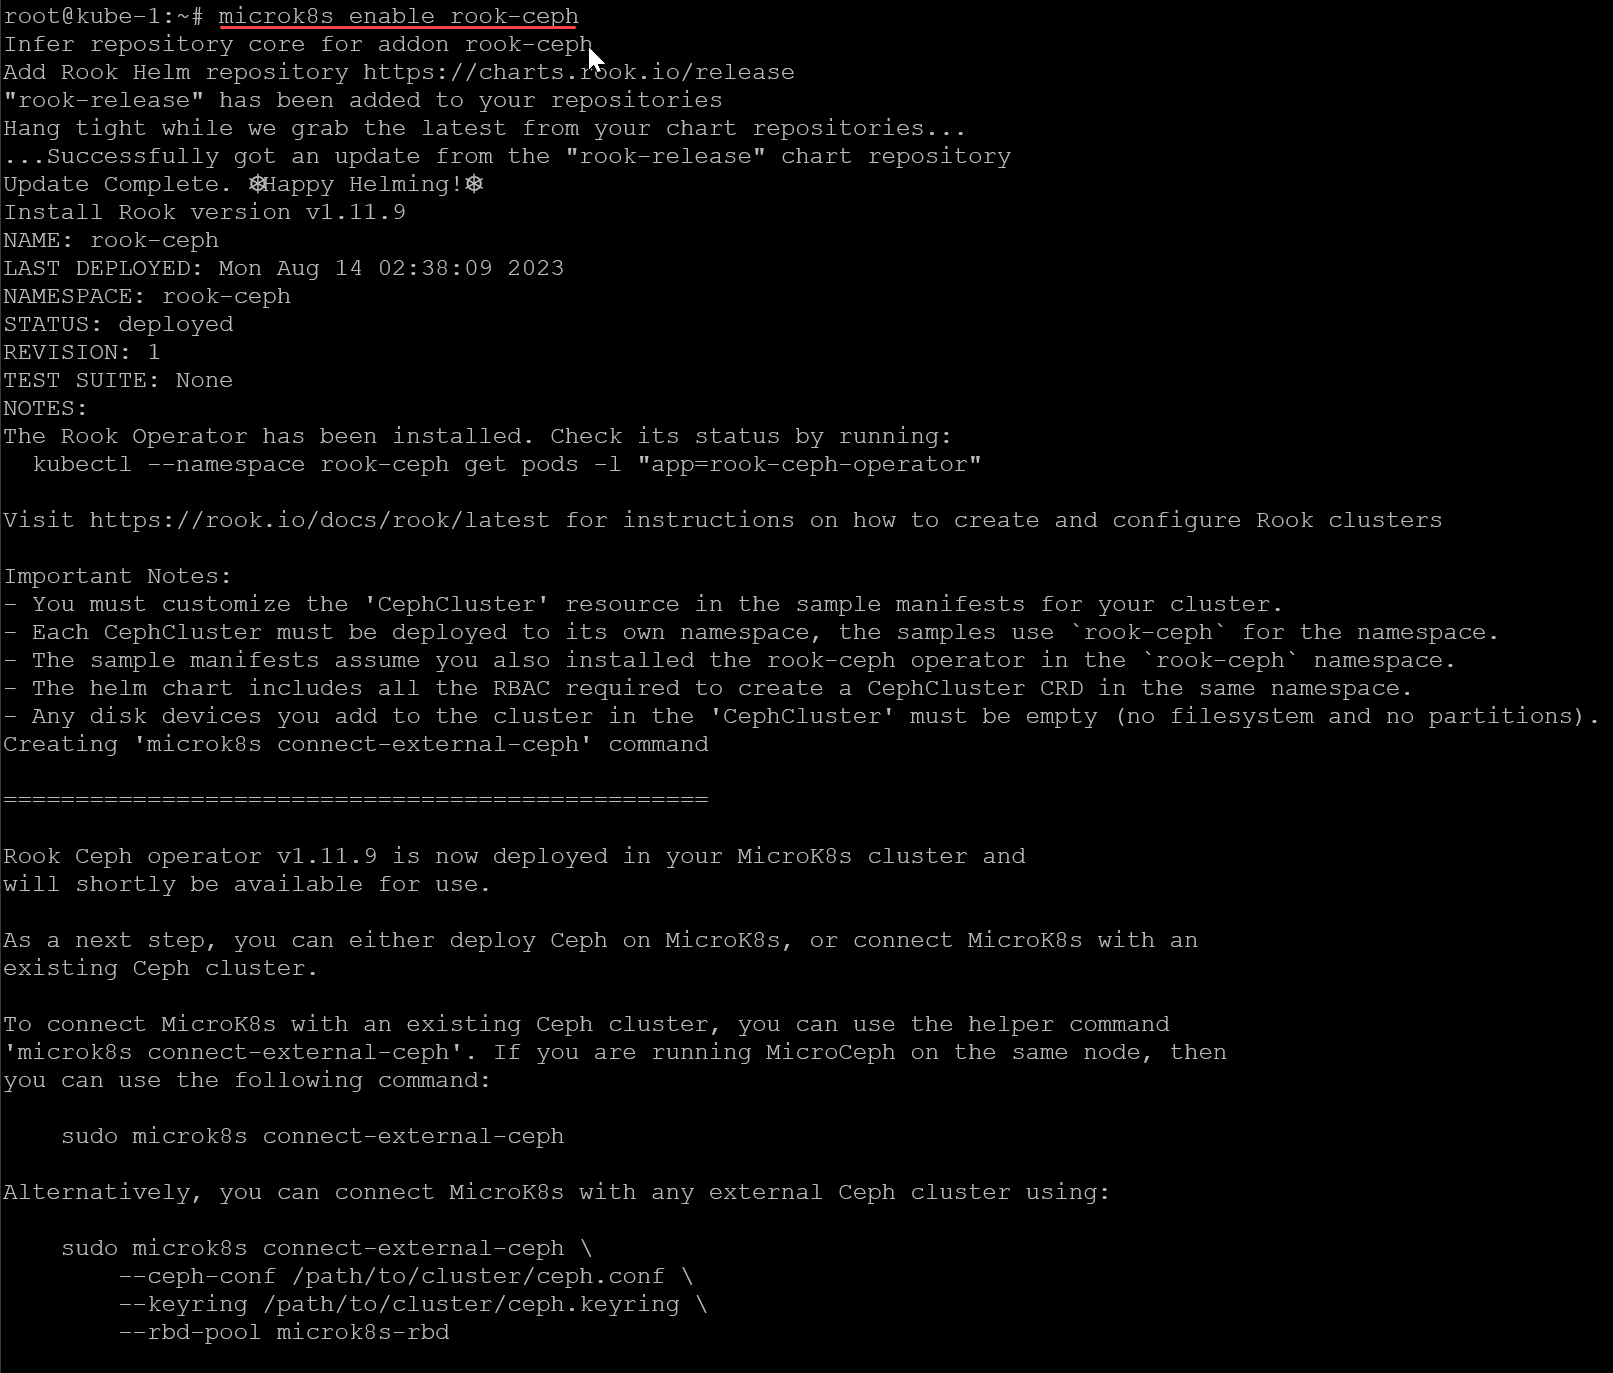
Creating a pod configured with persistent storage
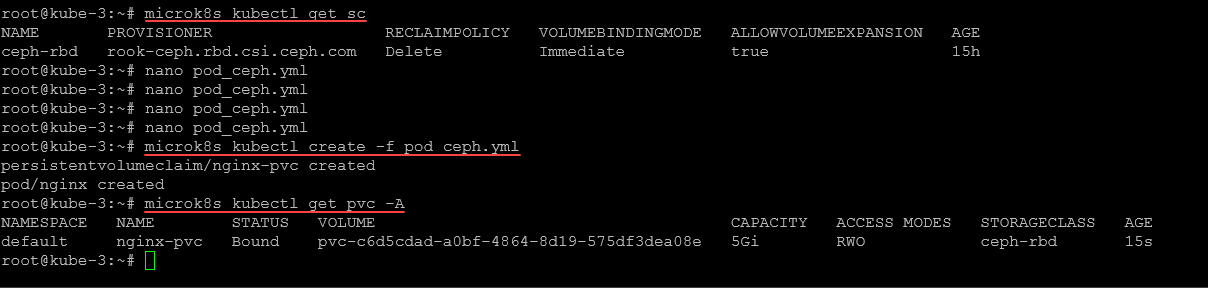
Now that we have our storage configured and we have the ceph-rbd storage class available let’s create a new pod that can use the persistent storage.
# pod-with-pvc.yaml
---
apiVersion: v1
kind: PersistentVolumeClaim
metadata:
  name: nginx-pvc
spec:
  storageClassName: ceph-rbd
  accessModes:
    - ReadWriteOnce
  resources:
    requests:
      storage: 5Gi
---
apiVersion: v1
kind: Pod
metadata:
  name: nginx
spec:
  volumes:
    - name: pvc
      persistentVolumeClaim:
        claimName: nginx-pvc  # This should match the PVC name
  containers:
    - name: nginx
      image: nginx:latest
      ports:
        - containerPort: 80
      volumeMounts:
        - name: pvc
          mountPath: /usr/share/nginx/html
You then apply the above file using this command:
microk8s kubectl create -f pod-with-pvc.yamlThen we can view the persistent volume claim using the command:
microk8s kubectl get pvc -AWe see the bound status for the persistent volume claim of the Nginx pod.
FAQs
How does integrating Microk8s, Ceph, and Rook improve persistent storage in a Kubernetes cluster?
The integration leads to more efficient and flexible storage management, allowing for both statically and dynamically provisioned volumes.
Can I expand a bound volume within a Kubernetes cluster?
Yes, volume expansion can be managed through the Kubernetes control plane.
What are the best practices for managing storage assets in Kubernetes?
Follow the guidelines of your cluster administrators and rely on robust storage volume plugins, considering the underlying storage requirements and high availability needs.
What’s the difference between statically provisioned volumes and dynamically provisioned volumes in Kubernetes?
Statically provisioned volumes are pre-created by cluster administrators and available for use, while dynamically provisioned volumes are created on-the-fly as needed. Dynamic provisioning allows for a more flexible approach, allocating storage volume based on specific PVC object requests. It can be achieved through certain storage classes that support this functionality.
How do ReadWriteOnce resource requests differ from other access modes in persistent volume claims?
ReadWriteOnce resources requests specify that a single node can mount the volume as read-write. Other access modes, such as ReadWriteMany, allow the volume to be mounted by multiple nodes. The choice of access modes will depend on the underlying storage provider and the application’s requirements. Properly matching access modes to your workload’s needs can enhance efficiency and performance.
Can previous claimant’s data remain after a bound PV is released, and how is this managed?
Yes, the previous claimant’s data remains depending on the reclaim policy set for the persistent volume. If the policy is set to “Retain,” the data stays intact, and a cluster administrator can manually reclaim the volume. If set to “Delete,” the data and the volume are automatically removed when the PVC is deleted.
Is there any difference between volume binding modes, and what’s the significance of choosing the right one?
Volume binding modes determine when a PV should be bound to a PVC. Immediate binding happens when a PVC is created, while delayed binding (or WaitForFirstConsumer) ensures the PV is only bound once a PVC pod is scheduled. Selecting the right volume binding mode is vital for optimal storage usage. It can prevent issues related to un-schedulable pods due to the unavailability of suitable storage in the required zone.
Wrapping up
This guide on Kubernetes persistent volume experiments with Microk8s, Ceph, and Rook offers a comprehensive look at storage in Kubernetes. It aims to help users create, manage, and understand storage classes, persistent volumes, persistent volume claims, and other related concepts. By leveraging this guide, one can develop a more efficient and resilient Kubernetes volume management system.
Other posts you may like
Google is updating how articles are shown. Don’t miss our leading home lab and tech content, written by humans, by setting Virtualization Howto as a preferred source.
About The Author

Hi,
Thanks for the clear guide! There is a typo here “microk8s add node”.
Would be nice to follow this up and use Promox ceph as solution instead of creating another Ceph cluster. 🙂
Po,
Thank you so much for your comment! Also, thank you for pointing out the typo in the script box. I have corrected that. Thank you again! Also, great suggestion on the follow up post. What are you using in your home lab today?
Brandon
Thanks for the guide.
I am wondering about your opinion on what are the minimum hardware requirements for a 3 node ceph cluster, either with microk8s or proxmox? Do you believe 10G between nodes is a minimum? Have you tried with mini pcs using thunderbolt networking between them?
Marcelo,
Thank you for your comment! In my opinion, I think 10G for HCI is definitely something you would shoot for. However, (I haven’t tested this in my lab as of yet), but I think 2.5G networks would also provide acceptable performance for lab purposes. Here are the following requirements that Proxmox mentions for hardware, which are here: https://www.proxmox.com/en/proxmox-virtual-environment/requirements:
Intel EMT64 or AMD64 with Intel VT/AMD-V CPU flag.
Memory, minimum 2 GB for OS and Proxmox VE services. Plus designated memory for guests. For Ceph or ZFS additional memory is required, approximately 1 GB memory for every TB used storage.
Fast and redundant storage, best results with SSD disks.
OS storage: Hardware RAID with batteries protected write cache (“BBU”) or non-RAID with ZFS and SSD cache.
VM storage: For local storage use a hardware RAID with battery backed write cache (BBU) or non-RAID for ZFS. Neither ZFS nor Ceph are compatible with a hardware RAID controller. Shared and distributed storage is also possible.
Redundant Gbit NICs, additional NICs depending on the preferred storage technology and cluster setup – 10 Gbit and higher is also supported.
For PCI(e) passthrough a CPU with VT-d/AMD-d CPU flag is needed.
However, in a lab, we know we can get away with a bit less hardware. It basically comes down to the performance level that you want to achieve, 10G for best performance in HCI, but also, 1 & 2.5G options will also do the job.
Brandon
Hi.
I followed all your steps and have 2 issues
Installation Failed? But working
“sudo microk8s connect-external-ceph” shows
….
Importing external Ceph cluster
Error: INSTALLATION FAILED: failed to download “rook-release/rook-ceph-cluster”
=================================================
Successfully imported external Ceph cluster. You can now use the following storageclass
to provision PersistentVolumes using Ceph CSI:
NAME PROVISIONER RECLAIMPOLICY VOLUMEBINDINGMODE ALLOWVOLUMEEXPANSION AGE
ceph-rbd rook-ceph.rbd.csi.ceph.com Delete Immediate true 22m
the sample pod stay in status pending
microk8s kubectl get pvc -A
NAMESPACE NAME STATUS VOLUME CAPACITY ACCESS MODES STORAGECLASS AGE
default nginx-pvc Pending ceph-rbd 4m36s
The kubernetes dashboard shows:
“0/3 nodes are available: persistentvolumeclaim “pod-pvc” not found. preemption: 0/3 nodes are available: 3 Preemption is not helpful for scheduling..”
I followed the tuto too.
At the end the kubernetes dashboard shows:
“0/3 nodes are available: persistentvolumeclaim “pod-pvc” not found…”
The PVC is named “nginx-pvc” as we can see:
kind: PersistentVolumeClaim

metadata:

  name: nginx-pvc
I delete the PVC and the POD, update the creation scrypt:
spec:

  volumes:

    - name: pvc

      persistentVolumeClaim:

        claimName: nginx-pvc
After that all work fine
Hi Frederic, thank you for the comment. What versions of Microk8s and Ceph are you using in your environment just out of curiosity?
MicroK8s v1.28.7
sudo microceph –version
ceph-version: 18.2.0
After some issues with the “–channel=latest/edge”, I use the
“microceph –channel=latest/stable”
Because “stable” is more stable…
https://github.com/canonical/microceph/issues/317
Frederic,
Thank you for your comment and notes! I think when I originally wrote the blog post, the latest/edge was the only channel available right before it was released. So definitely would recommend going that route for stable deployment. I appreciate your notes on this to help others avoid any issues with the latest branch.
Brandon