You may be at the point in your learning, lab environment, or even a production environment where you are ready to setup Kubernetes. Ubuntu is arguably one of the most popular and easiest Linux distributions to get started with. So, it makes sense if you are learning something else new like Kubernetes, you don’t want to have blockers from your Linux distribution side such as vague documentation, or lack of repo resources. Ubuntu is a great distribution for playing around with Kubernetes. In this post, I will walk you through how to setup Kubernetes Ubuntu 20.04 to see how you can get started with setting up a Kubernetes cluster for learning, or other use cases.
Installing Ubuntu 20.04
Can you install Ubuntu 20.04 distro by hand? Yes, you can. Actually, it is always better to do things manually if you are not familiar with the process as this helps with the learning process overall. However, if you are comfortable with installing Ubuntu, for lab environments, learning, and other use cases you should definitely consider automating your installation of Ubuntu. What is the best way to do that?
See my blog posts below. I discuss how to use Hashicorp Packer for automated installations of both Ubuntu 20.04 and 21.04.
- Basic Terraform Installation and VMware vSphere Automation
- Packer Build Ubuntu 21.04 for VMware vSphere
- Getting Started with Packer and VMware vSphere
- Create Unattend Answer File for Windows Server 2019 Automated Packer Installation
- Automated Packer VMware vSphere templates with CI/CD Pipeline Build
Build up (3) Ubuntu 20.04 servers that are on the network. Make sure to name the servers, place static addresses on them, and get them up-to-date with the latest patches available after installation. This will put you in a position to create a snapshot or checkpoint in Hyper-V for easy rollbacks.
Setup Kubernetes Ubuntu 20.04
Let’s take a look at the steps required to setup Kubernetes in Ubuntu 20.04. The steps look something like the following:
- Install Ubuntu and patches (discussed earlier)
- Install Docker
- Install Kubectl and Kubernetes
- Initialize the cluster and master node
- Install Networking overlay
- Join the worker nodes to the Kubernetes cluster
- Copy your kubectl config to your management workstation
1. Install Ubuntu and patches
We have already discussed this earlier. However, the Ubuntu 20.04 virtual machines in this configuration will server as the Kubernetes hosts that will server as the Kubernetes Master and Worker nodes. In my lab configuration, I have (1) master node and (2) worker nodes. This represents (3) virtual machines.
2. Install Docker
Kubernetes is not a container runtime in itself. It provides container orchestration and management. For the underlying container runtime, we need to install this. Docker, of course, is the most widely used container runtime. It is what I am using in my lab build to setup Kubernetes Ubuntu 20.04.
First, get things ready. Update the apt package index and install packages to allow apt to use a repository over HTTPS:
sudo apt-get install \
    apt-transport-https \
    ca-certificates \
    curl \
    gnupg \
    lsb-release
Next, add Docker’s official GPG key:
curl -fsSL https://download.docker.com/linux/ubuntu/gpg | sudo gpg --dearmor -o /usr/share/keyrings/docker-archive-keyring.gpgSetup the stable repository:
echo \
  "deb [arch=amd64 signed-by=/usr/share/keyrings/docker-archive-keyring.gpg] https://download.docker.com/linux/ubuntu \
  $(lsb_release -cs) stable" | sudo tee /etc/apt/sources.list.d/docker.list > /dev/null
Update and then run the installation:
sudo apt-get update
sudo apt-get install docker-ce docker-ce-cli containerd.io
Change Docker to systems:
cat <<EOF | sudo tee /etc/docker/daemon.json
{
  "exec-opts": ["native.cgroupdriver=systemd"],
  "log-driver": "json-file",
  "log-opts": {
    "max-size": "100m"
  },
  "storage-driver": "overlay2"
}
EOF
3. Install Kubectl and Kubernetes
The next step after installing Docker and configuring Docker as needed is to install Kubectl and Kubernetes. As most of you are already aware, kubectl is the command-line tool that you use for literally EVERYTHING Kubernetes related. The kubectl command allows you to interact with, configure, manage, and administer a Kubernetes cluster. As part of the installation, you install kubectl in addition to Kubernetes itself.
Follow the code snippets below on all three of your Kubernetes nodes.
sudo apt-get install -y apt-transport-https ca-certificates curlAdd the official GPG key for Kubernetes:
sudo curl -fsSLo /usr/share/keyrings/kubernetes-archive-keyring.gpg https://packages.cloud.google.com/apt/doc/apt-key.gpgAdd the official repository for installing Kubernetes and kubectl:
echo "deb [signed-by=/usr/share/keyrings/kubernetes-archive-keyring.gpg] https://apt.kubernetes.io/ kubernetes-xenial main" | sudo tee /etc/apt/sources.list.d/kubernetes.listNext we the update command to incorporate the new repository and begin installing. Note the apt-mark hold command is optional. However, it allows ensuring your Kubernetes components are not accidentally updated if you don’t want them to be.
sudo apt-get update
sudo apt-get install -y kubelet kubeadm kubectl
sudo apt-mark hold kubelet kubeadm kubectl
4. Initialize the cluster and master node
Now that the components are installed on our nodes, we can initialize the cluster and master node. To do that, run the following command on your node that is to be the master node of the Kubernetes cluster.
A few notes on the following. I am setting the CIDR for the Kubernetes pod network. Also, I am passing the ignore parameter for ignoring errors in the lab environment. You can omit this if you want the initialization to be stopped by certain errors.
kubeadm init --pod-network-cidr=10.244.0.0/16 --ignore-preflight-errors=all5. Install Networking overlay
Kubernetes requires a networking overlay component. Here I am choosing to use the Flannel networking overlay for my Kubernetes cluster. To implement the Flannel network overlay, use the following command:
kubectl apply -f https://raw.githubusercontent.com/coreos/flannel/master/Documentation/kube-flannel.yml6. Join the worker nodes to the Kubernetes cluster
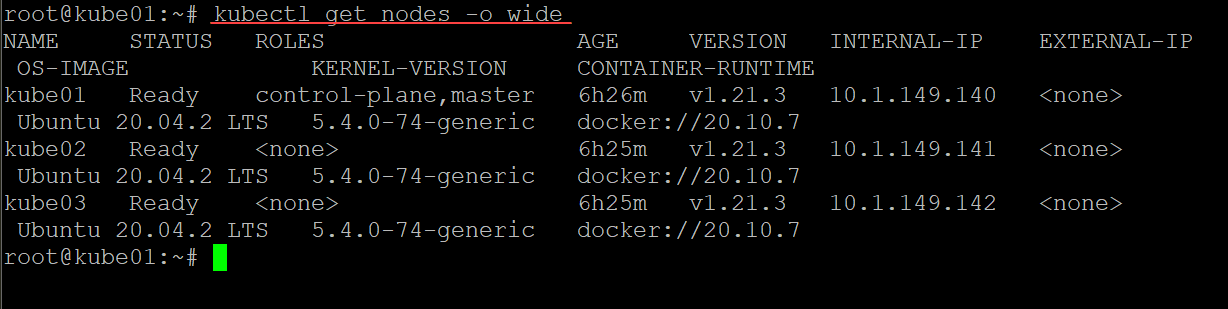
At this point, you should have a Kubernetes cluster with a single master node joined. We need to join the other worker nodes to the cluster. To do that, you run the command that is displayed on your master node once you initialize the cluster. Copy and run this specific command to join your worker nodes to the cluster. It will look like this:
kubeadm join 10.1.149.140:6443 --token cxvxla.dwpk3bkjda9ezwex --discovery-token-ca-cert-hash sha256:05bd06a8db90687be2e9a1407bbe30c7a409257338fdf25bb3505452a0c1f9aeWhat if you lost the command displayed after you initialized the cluster or you disconnected from the session? You can display the command and tokens you need to join the cluster from the other nodes using the following command:
kubeadm token create --print-join-command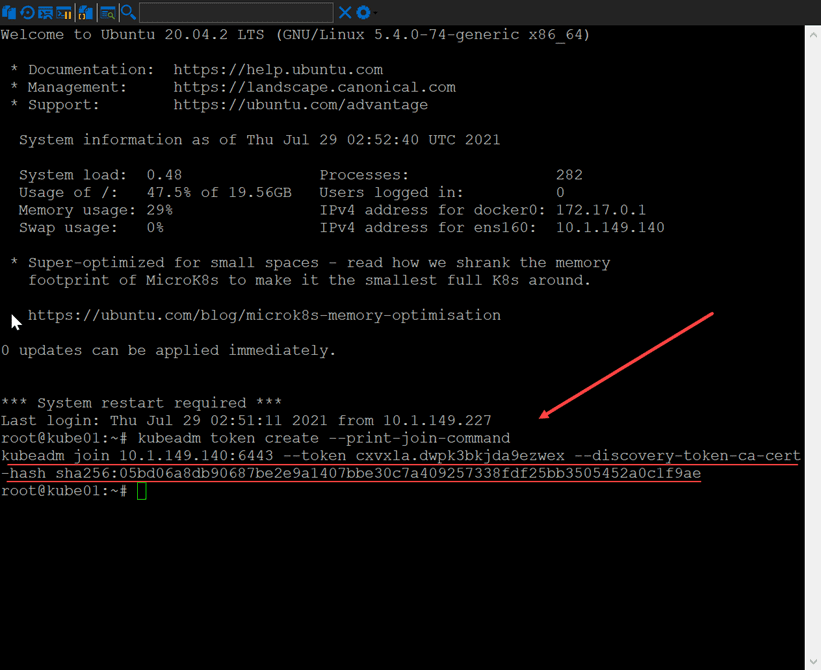
7. Copy your kubectl config to your management workstation
You will most likely not want to have to SSH into your master or worker nodes to manage the Kubernetes cluster. The easiest way to manage your cluster is going to be from a management workstation running kubectl. To connect your kubectl installation on your management workstation to the Kubernetes cluster, you need to copy the kubectl configuration file from your cluster to your management workstation.
I have written about how to install kubectl on Windows and then create the config file here:
Wrapping Up
Hopefuly this overview of how to setup Kubernetes Ubuntu 20.04 will help any who want to use Ubuntu 20.04 as the platform to create their Kubernetes master and worker nodes for their Kubernetes cluster. If you would rather use machine containers, take a look at my write up on how to use LXC containers to house your Kubernetes nodes:
More in this topic


Discuss this in the Community
Google is updating how articles are shown. Don’t miss our leading home lab and tech content, written by humans, by setting Virtualization Howto as a preferred source.
About The Author
