AWS

AWS Load Balancer Controller installation and configuration

AWS Load Balancer Controller installation and configuration. Looking at the AWS LB controller that manages AWS Load Balancers

Amazon’s Elastic load balancer is a great solution many use in their cloud environments. However, what tools are available to manage them? Let’s look at an open-source solution called the AWS Load Balancer Controller that allows you to manage your elastic load balancers with Kubernetes ingress.

What is an AWS Load Balancer?

Network load balancers have been a standard solution in enterprise data centers for years. However, now that companies are moving to the cloud, cloud service providers have their solutions to load balance traffic. An AWS Load Balancer is an Amazon Web Services (AWS) service that automatically distributes incoming application traffic across multiple Amazon Elastic Compute Cloud (EC2) instances. The elastic load balancers help improve fault tolerance and ensure your applications are highly available by distributing traffic evenly across multiple resources.

There are three types of AWS Load Balancers: Application Load Balancer (ALB) to create application load balancer URL configurations, Network Load Balancer (NLB), and Classic Load Balancer. Each type is designed to handle different types of traffic, with ALB being best suited for HTTP/HTTPS traffic, NLB for TCP/UDP traffic, and Classic Load Balancer for both HTTP/HTTPS and TCP/UDP traffic.

What is an AWS Load Balancer Controller?

The AWS Load Balancer Controller (AWS LB controller) is an open-source project that allows you to manage elastic load balancers with Kubernetes. It automatically provisions and configures AWS Application Load Balancers (ALBs) to route traffic to your Kubernetes services, improving your applications’ performance, reliability, and security.

The Kubernetes controller watches for Kubernetes Ingress resources and then creates or updates ALBs to route traffic to the appropriate Kubernetes services. It also creates and deletes Target Groups, listener rules, and security groups, ensuring your AWS network Load Balancer is always configured correctly.

Kubernetes Ingress and Application Load Balancer

Kubernetes Ingress is a Kubernetes resource that defines how external traffic should be routed to services within a cluster. An Ingress controller is responsible for fulfilling the Ingress, usually with a load balancer.

The ALB ingress controller allows you to ingress traffic to resources for your Kubernetes cluster. It integrates with the AWS Application Load Balancer, allowing you to create an Ingress resource in your cluster that routes traffic through an ALB to your Kubernetes services.

Using the AWS ALB ingress controller, you can take advantage of advanced features like path-based routing, SSL termination, and WebSockets support, making it an excellent choice for routing HTTP/HTTPS traffic in a Kubernetes cluster.

Decouple Load Balancers and Kubernetes Resources with TargetGroupBinding

TargetGroupBinding is a custom Kubernetes resource introduced by the AWS Load Balancer Controller. This resource allows you to decouple the management of AWS Load Balancers from your Kubernetes services, giving you more flexibility and control over how traffic is routed within your cluster.

Instead of directly associating your Kubernetes services with a Load Balancer, you create a TargetGroupBinding resource that maps your Kubernetes services to a Target Group. The controller then manages the Target Group and updates the ALB listener rules to route traffic to the appropriate Target Group.

This decoupling allows you to manage your Kubernetes services and Load Balancers independently, giving you more control over how traffic is routed and balanced within your cluster.

Ingress Creation Process

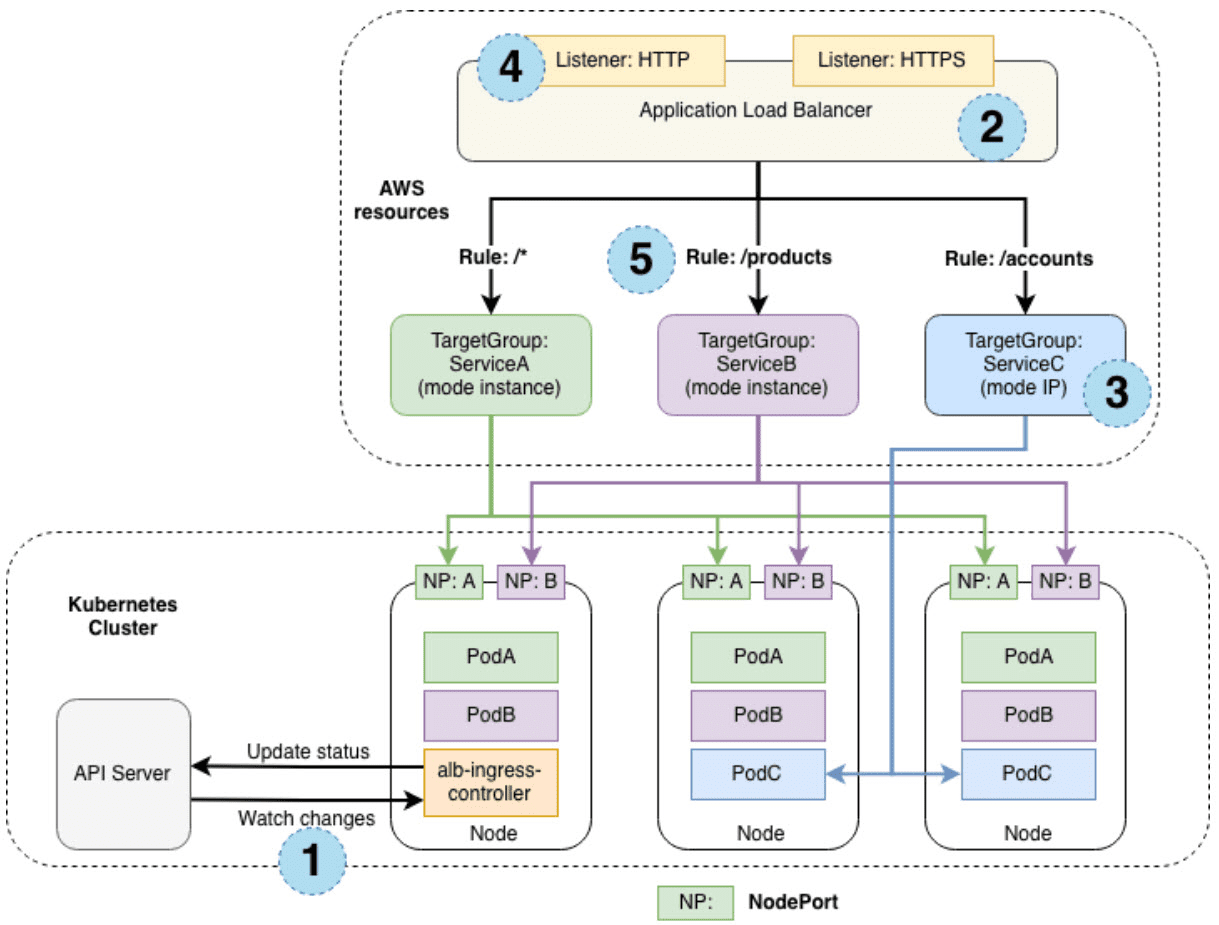
This section outlines each step (circle) mentioned above, demonstrating the creation of a single ingress resource.

  1. The controller monitors the API server for ingress events. When it identifies ingress resources that fulfill its requirements, it starts creating the corresponding AWS resources.

  2. An Application Load Balancer (ALB, also known as ELBv2) is created in AWS for the new ingress resource. This ALB can be either internet-facing or internal, and you can use annotations to specify the subnets it is created in.

  3. Target Groups are created in AWS for each distinct Kubernetes service specified in the ingress resource.

  4. Listeners are created for every port specified in the ingress resource annotations. If no port is specified, reasonable defaults (80 or 443) are used. Certificates can also be attached through annotations.

  5. Rules are established for each path described in the ingress resource, ensuring that traffic directed to a specific path is routed to the appropriate Kubernetes Service.

In addition to the steps above, the controller also:

  • Deletes AWS components when ingress resources are removed from Kubernetes.

  • Modifies AWS components when ingress resources change in Kubernetes.

  • Compiles a list of existing ingress-related AWS components upon startup, allowing for recovery in case the controller is restarted.

Ingress Traffic

The AWS Load Balancer controller supports two traffic modes:

  • Instance mode

  • IP mode

By default, Instance mode is used. Users can explicitly select the mode via the alb.ingress.kubernetes.io/target-type annotation.

Instance Mode

In Instance mode, ingress traffic originates from the ALB and reaches the Kubernetes nodes through each service’s NodePort. This means that services referenced in ingress resources must be exposed as type: NodePort to be reachable by the ALB.

IP Mode

In IP mode, ingress traffic starts at the ALB and directly reaches the Kubernetes pods. Container Network Interfaces (CNIs) must support directly accessible pod IPs via secondary IP addresses on Elastic Network Interfaces (ENIs).

AWS Load Balancer Controller on EKS Cluster

To install and configure the AWS Load Balancer Controller on an Amazon EKS cluster, you’ll need to follow these steps:

  1. Create an EKS cluster or use an existing one.

  2. Install and configure the AWS CLI and Kubernetes command-line tools (kubectl and eksctl).

  3. Set up the necessary IAM roles and policies for the controller.

  4. Deploy the AWS Load Balancer Controller using a Helm chart or YAML manifests.

Following these steps ensures that your EKS cluster has the necessary components and permissions to run the AWS Load Balancer Controller.

Creating an EKS Cluster

To create an EKS cluster, you can use the AWS Management Console, the AWS CLI, or the eksctl command-line tool. For this guide, we’ll focus on using eksctl.

  1. Install the latest version of eksctl.

  2. Configure your AWS credentials by setting up the AWS CLI or setting environment variables. 3. Run the following command to create an EKS cluster with the desired name and region:

eksctl create cluster --name your-cluster-name --region your-region

This command creates an EKS cluster with the default settings. You can customize the cluster configuration by adding additional flags or using a configuration file.

After creating the cluster, you can use the kubectl command-line tool to interact with your cluster and deploy applications.

Installing the AWS Load Balancer Controller

The AWS Load Balancer Controller manages AWS Elastic Load Balancers for a Kubernetes cluster, provisioning the following resources:

  • An AWS Application Load Balancer (ALB) when a Kubernetes Ingress is created.

  • An AWS Network Load Balancer (NLB) when a Kubernetes service of type LoadBalancer is created. Previously, the Kubernetes network load balancer was used for instance targets, while the AWS Load Balancer Controller was used for IP targets. With version 2.3.0 or later of the AWS Load Balancer Controller, you can create NLBs using either target type.

Formerly known as the AWS ALB Ingress Controller, the AWS Load Balancer Controller is an open-source project managed on GitHub. This topic describes the installation of the controller using default options. Full documentation for the controller is available on GitHub. Before deploying the controller, reviewing the prerequisites and considerations in Application load balancing on Amazon EKS and Network load balancing on Amazon EKS. These topics also include steps on deploying a sample application that requires the AWS Load Balancer Controller to provision AWS Application Load Balancers and Network Load Balancers.

Prerequisites

  • An existing Amazon EKS cluster (see Getting started with Amazon EKS).

  • An existing AWS Identity and Access Management (IAM) OpenID Connect (OIDC) provider for your cluster (see Creating an IAM OIDC provider for your cluster).

  • If your cluster is version 1.21 or later, ensure that your Amazon VPC CNI plugin for Kubernetes, kube-proxy, and CoreDNS add-ons are at the minimum versions listed in Service account tokens.

  • Familiarity with AWS Elastic Load Balancing (see the Elastic Load Balancing User Guide).

  • Familiarity with Kubernetes service and ingress resources.

Deploying the AWS Load Balancer Controller to an Amazon EKS Cluster

Replace the example values with your own values in the following steps.

  1. Create an IAM policy.

    • Download an IAM policy for the AWS Load Balancer Controller, allowing it to make calls to AWS APIs on your behalf.

      • AWS GovCloud (US-East) or AWS GovCloud (US-West) AWS Regions:

        curl -O https://raw.githubusercontent.com/kubernetes-sigs/aws-load-balancer-controller/v2.4.7/docs/install/iam_policy_us-gov.json

      • All other AWS Regions:

        curl -O https://raw.githubusercontent.com/kubernetes-sigs/aws-load-balancer-controller/v2.4.7/docs/install/iam_policy.json

    • Create an IAM policy using the policy downloaded in the previous step. If you downloaded iam_policy_us-gov.json, change iam_policy.json to iam_policy_us-gov.json before running the command.

      aws iam create-policy  --policy-name AWSLoadBalancerControllerIAMPolicy  --policy-document file://iam_policy.json

  2. Create an IAM role.

    • Create a Kubernetes service account named aws-load-balancer-controller in the kube-system namespace for the AWS Load Balancer Controller, and annotate the Kubernetes service account with the name of the IAM role.

    • Use eksctl or the AWS CLI and kubectl to create the IAM role and Kubernetes service account.

  3. Configure the AWS Security Token Service endpoint type used by your Kubernetes service account (optional).

  4. Uninstall the AWS ALB Ingress Controller or the 0.1.x version of the AWS Load Balancer Controller (only if installed with Helm) if you currently have them installed. Complete the procedure using the tool that you originally installed it with. The AWS Load Balancer Controller replaces the functionality of the AWS ALB Ingress Controller for Kubernetes.

    • If you installed the incubator/aws-alb-ingress-controller Helm chart, uninstall it.

      helm delete aws-alb-ingress-controller -n kube-system

    • If you have version 0.1.x of the eks-charts/aws-load-balancer-controller chart installed, uninstall it. The upgrade from 0.1.x to version 1.0.0 doesn’t work due to incompatibility with the webhook API version.

      helm delete aws-load-balancer-controller -n kube-system

  5. Install the AWS Load Balancer Controller using Helm V3 or later or by applying a Kubernetes manifest. If you want to deploy the controller on Fargate, use the Helm procedure. The Helm procedure doesn’t depend on cert-manager because it generates a self-signed certificate.

    1. Add the eks-charts repository.

      helm repo add eks https://aws.github.io/eks-charts

    2. Update your local repo to ensure you have the most recent charts.

      helm repo update

    3. If your nodes don’t have access to the Amazon ECR Public image repository, pull the following container image and push it to a repository that your nodes have access to.

      public.ecr.aws/eks/aws-load-balancer-controller:v2.4.7

    4. Install the AWS Load Balancer Controller. If you’re deploying the controller to Amazon EC2 nodes that have restricted access to the Amazon EC2 instance metadata service (IMDS), or if you’re deploying to Fargate, add the following flags to the helm command that follows:

      • –set region=region-code

      • –set vpcId=vpc-xxxxxxxx

      • Replace my-cluster with the name of your cluster. In the following command, aws-load-balancer-controller is the Kubernetes service account that you created in a previous step.

        helm install aws-load-balancer-controller eks/aws-load-balancer-controller -n kube-system –set clusterName=my-cluster –set serviceAccount.create=false –set serviceAccount.name=aws-load-balancer-controller

  6. Verify that the controller is installed.

    kubectl get deployment -n kube-system aws-load-balancer-controller

    NAME READY UP-TO-DATE AVAILABLE AGE aws-load-balancer-controller 2/2 2 2 84s

  7. You receive the previous output if you deployed using Helm. If you deployed using the Kubernetes manifest, you only have one replica.

Application Load Balancer – Traffic Routing

The AWS Load Balancer Controller leverages the Application Load Balancer for routing traffic to Kubernetes services. ALB provides advanced traffic routing features such as path-based routing, host-based routing, and support for multiple domains.

To configure traffic routing using the AWS Load Balancer Controller, create an Ingress resource in your Kubernetes cluster that specifies the desired routing rules. For example, you can create an Ingress that routes traffic based on the request path or the host header.

Here’s a sample Ingress resource that demonstrates path-based routing:

apiVersion: networking.k8s.io/v1
kind: Ingress
metadata:
  name: my-ingress
  annotations:
    kubernetes.io/ingress.class: alb
spec:
  rules:
  - http:
      paths:
      - path: /app1
        pathType: Prefix
        backend:
          service:
            name: app1-service
            port:
              number: 80
      - path: /app2
        pathType: Prefix
        backend:
          service:
            name: app2-service
            port:
              number: 80

This Ingress resource routes traffic to the app1-service Kubernetes service when the request path starts with /app1 and to the app2-service when the request path starts with /app2.

Ingress Group – Multiple Ingress Resources Together

Sometimes, you may need to group multiple Ingress resources together to share a single ALB. The AWS Load Balancer Controller supports this functionality through the concept of an Ingress Group.

To create an Ingress Group, add the alb.ingress.kubernetes.io/group.name annotation to your Ingress resources:

apiVersion: networking.k8s.io/v1
kind: Ingress
metadata:
  name: my-ingress
  annotations:
    kubernetes.io/ingress.class: alb
    alb.ingress.kubernetes.io/group.name: my-ingress-group

By adding this annotation to multiple Ingress resources, the AWS Load Balancer Controller will ensure they share a single ALB, allowing you to manage traffic routing for multiple applications efficiently.

Deploy Applications

After configuring the AWS Load Balancer Controller and defining the necessary Ingress resources, you can deploy your applications to the EKS cluster. To deploy your applications, create a Kubernetes Deployment resource that describes your application, its desired replicas, and any necessary configuration, and a Kubernetes Service resource that exposes your application within the cluster.

Here’s an example of a Deployment and Service for a sample web application:

apiVersion: apps/v1
kind: Deployment
metadata:
  name: sample-web-app
spec:
  replicas: 3
  selector:
    matchLabels:
      app: sample-web-app
  template:
    metadata:
      labels:
        app: sample-web-app
    spec:
      containers:
      - name: sample-web-app-container
        image: sample-web-app:latest
        ports:
        - containerPort: 80

---

apiVersion: v1
kind: Service
metadata:
  name: sample-web-app-service
spec:
  selector:
    app: sample-web-app
  ports:
    - protocol: TCP
      port: 80
      targetPort: 80
  type: NodePort

This example deploys a sample web application with three replicas and exposes it as a service within the cluster. With the AWS Load Balancer Controller and the previously created Ingress resource, external traffic can be routed to this service based on the defined routing rules.

To deploy your application, save the Deployment and Service configuration in a YAML file, and then use the kubectl apply command to create the resources in your EKS cluster:

kubectl apply -f sample-web-app.yaml

Monitor the status of your Deployment and Service using the kubectl command-line tool. Once the resources are successfully created and running, the AWS Load Balancer Controller will automatically configure the Application Load Balancer to route traffic to your application based on the Ingress rules you’ve defined.

Setup Load Balancing

Once you have deployed your applications and have the AWS Load Balancer Controller and Ingress resources in place, setting up load balancing is straightforward. The AWS Load Balancer Controller automatically provisions and configures the Application Load Balancer to distribute traffic among the backend services specified in the Ingress rules.

To set up load balancing, ensure that your Ingress resource defines the appropriate routing rules, including paths, hostnames, and backend services. The AWS Load Balancer Controller then creates target groups, registers targets, and configures listener rules on the Application Load Balancer to route traffic based on the defined rules.

Remember that you may need to configure security groups, IAM roles, and other AWS resources to allow the proper flow of traffic between the Application Load Balancer and your backend services. Additionally, you should monitor and adjust the health check settings for your target groups to ensure optimal load-balancing performance.

Design Considerations with IngressGroup

When using IngressGroup to manage multiple Ingress resources together, there are some design considerations to keep in mind:

  1. Resource Sharing: IngressGroup allows sharing a single Application Load Balancer among multiple Ingress resources, which can reduce costs and simplify resource management. However, make sure that the shared resources, such as security groups and SSL certificates, meet the requirements of all associated Ingress resources.

  2. Namespace Isolation: IngressGroup enables you to group Ingress resources from different namespaces, providing flexibility in designing your application architecture. However, be cautious when combining resources from different namespaces, as this can potentially expose your applications to security and management risks.

  3. Routing Rules: When using IngressGroup, ensure that the routing rules defined in the associated Ingress resources do not conflict with each other. Conflicting rules can lead to unexpected behavior and complicate troubleshooting efforts.

  4. Resource Limits: Keep in mind that Application Load Balancers have limits on the number of target groups, listener rules, and other resources. Be aware of these limits when designing your IngressGroup and Ingress resources to prevent potential issues with scalability and performance.

By carefully considering these design aspects when using IngressGroup, you can ensure that your application architecture remains scalable, secure, and easy to manage.

Monitoring, scaling, and optimizing

With your applications deployed and the AWS Load Balancer Controller managing traffic routing, you can now focus on monitoring, scaling, and optimizing your workloads in the EKS cluster. Here are some best practices and considerations to keep in mind as you manage your applications and infrastructure:

  1. Monitoring and Logging: Use tools like Amazon CloudWatch, AWS X-Ray, and third-party solutions to monitor your application performance, resource usage, and error rates. Enable logging for your Application Load Balancer to analyze and optimize your traffic patterns.

  2. Scaling: Use Kubernetes Horizontal Pod Autoscaler (HPA) and the Cluster Autoscaler to automatically scale your applications and the underlying infrastructure based on resource utilization or custom metrics. This ensures that your applications can handle increased traffic while minimizing costs.

  3. Security: Implement security best practices for your Kubernetes cluster, such as using strong authentication and authorization mechanisms, network segmentation, and encryption. Review and update your AWS Identity and Access Management (IAM) policies, security groups, and other security configurations for your EKS cluster and the Application Load Balancer.

  4. Backup and Disaster Recovery: Ensure you have a robust backup and disaster recovery strategy for your applications and infrastructure. Use tools like Amazon EBS Snapshots, Amazon RDS, and third-party solutions to back up your data and implement a disaster recovery plan that meets your organization’s requirements.

  5. Cost Optimization: Continuously monitor and optimize your infrastructure costs by analyzing your resource utilization, implementing rightsizing, and making use of cost-saving features such as AWS Savings Plans and Reserved Instances.

By following these best practices and leveraging the capabilities of the AWS Load Balancer Controller, you can effectively manage and optimize your Kubernetes applications running on EKS. Integrating the Application Load Balancer with the Kubernetes Ingress resources provides advanced traffic routing, high availability, and scalability, ensuring that your applications are always ready to handle the demands of your users.

Stay up-to-date on Best Practices

As your applications and infrastructure continue to evolve, it’s essential to stay informed about the latest developments and best practices related to the AWS Load Balancer Controller, EKS, and Kubernetes. Note the following resources that are great for staying up-to-date on the latest information:

  1. AWS Documentation: Consult the official AWS documentation for the most accurate and comprehensive information on AWS services, including the AWS Load Balancer Controller, EKS, and related services. The documentation also provides step-by-step guides, FAQs, and troubleshooting tips to help you maximize your AWS resources.

  2. AWS Blogs: Follow the AWS blogs for the latest news, updates, and best practices related to the AWS Load Balancer Controller, EKS, and other AWS services. AWS blogs often feature deep dives, case studies, and tutorials that can help you improve your understanding and usage of these services.

  3. GitHub Repositories: Track the progress and participate in developing the AWS Load Balancer Controller and other related projects on GitHub. You can find the source code, report issues, and contribute to the project by submitting pull requests.

  4. Kubernetes Special Interest Groups (SIGs): Join Kubernetes SIGs, such as SIG AWS, to collaborate with other community members on improving the integration and support of AWS services in Kubernetes. Participating in SIGs allows you to learn from the experiences of others and contribute to the advancement of the Kubernetes ecosystem.

  5. Webinars, Meetups, and Conferences: Attend webinars, meetups, and conferences focused on AWS and Kubernetes topics to learn from industry experts, share your experiences, and network with other professionals. These events provide valuable insights and opportunities to expand your knowledge and skills.

Wrapping up

The AWS Load Balancer is a powerful cloud-based solution allowing you to load balance traffic in your AWS environment effectively. The AWS Load Balancer Controller is a robust tool that simplifies traffic routing management for your Kubernetes applications running on EKS.

The controller enables advanced routing features, high availability, and scalability for your applications. Proper configuration, deployment, and best practices allow admins to harness the full power of the AWS Load Balancer Controller to optimize application deployments and ensure scalability.

Subscribe to VirtualizationHowto via Email 🔔

Enter your email address to subscribe to this blog and receive notifications of new posts by email.

Brandon Lee

Brandon Lee is the Senior Writer, Engineer and owner at Virtualizationhowto.com and has over two decades of experience in Information Technology. Having worked for numerous Fortune 500 companies as well as in various industries, Brandon has extensive experience in various IT segments and is a strong advocate for open source technologies. Brandon holds many industry certifications, loves the outdoors and spending time with family.

Leave a Reply

Your email address will not be published. Required fields are marked *

This site uses Akismet to reduce spam. Learn how your comment data is processed.