The more operational tasks that can be automated, the more time vSphere administrators can accomplish other objectives—one of the tasks that can take time out of a busy schedule VMware template patching. VMware vSphere templates are a great way to save time to deploy new machines. However, these need to be updated to include the latest patches and updates for lifecycle management. In this post, we will look at how to automate VMware template patching for Windows Servers. There is a really great provisioner available for use with Packer that can shortcut this process. Let’s see how.
Packer Windows Update Provisioner
The Packer Windows Update Provisioner is a Packer plugin for installing Windows updates. It contains many features that allow controlling, configuring, and installing Windows Updates.
- Search criteria, filters, and update limit – You can scope the installation of Windows Updates based on the search criteria, filtering, and also define how many updates are installed at a time.
- You can read more on the official Github page here: GitHub – rgl/packer-provisioner-windows-update: Packer plugin for installing Windows updates
The following are various search criteria settings you can configure
| Name | search_criteria | filters |
|---|---|---|
| Important | AutoSelectOnWebSites=1 and IsInstalled=0 | $true |
| Recommended | BrowseOnly=0 and IsInstalled=0 | $true |
| All | IsInstalled=0 | $true |
| Optional Only | AutoSelectOnWebSites=0 and IsInstalled=0 | $_.BrowseOnly |
Automate VMware template patching for Windows
When you start to look at how to automate VMware template patching for Windows, there are only a few components (6 files in the way that I have this configured).
- Packer
- packer-provisioner-windows-update.exe (the utility mentioned above)
- Windows Server 2019 JSON file
- Windows Server 2019 variables file
- Autounattend.xml
- PowerShell script for WinRM configuration
Let’s take a look at each of these components and see how these are put together for the automated VMware template patching solution for Windows Server.
1. Packer
You will want to download the latest version of Hashicorp Packer. You can do that here:

After downloading, just place this file somewhere on your workstation. I made a proper folder for the download in the c:\program files directory under packerio. However, this is not a requirement. You can download it anywhere and have this as your working directory when running your packer build.
2. Packer-provisioner-windows-update.exe
This file can be downloaded from the official Github repository page found here:
Place this in the same directory with your Packer file.
3. Windows Server 2019 JSON file
Now, we start getting into creating the files needed for a Windows Server 2019 packer build that installs Windows Server 2019, and with the windows-update provisioner, installs Windows Updates.
There are a few parts of the below Windows Server 2019 JSON file that you will want to pay attention to. The rest is just basic Packer code and variables which will be defined in the variables JSON file.
Notice the following sections below:
- Floppy files – here I am listing out the files that will be mounted to the “floppy drive.” These will allow mounting and running these files. There are a number of ways to do that. Note the winrm.ps1 file. This is where we are going to run some WinRM configuration to get it up and running healthy so Packer can connect to it. WinRM is a nightmare, however, I will show you in the file below with some snippets I found to help with that.
"floppy_files": [
         "setup/win19_updates/autounattend.xml",
         "setup/winrm.ps1",
         "setup/vmtools.cmd"
       ]
- Note the provisioners section. Here is where we have the section that calls the section below:
{
         "type": "windows-update",
         "search_criteria": "IsInstalled=0",
         "filters": [
             "exclude:$_.Title -like 'Preview'",
             "include:$true"
         ],
         "update_limit": 25
     }
Below is the full file.
  {
   "builders": [
     {
       "CPUs": "{{user cpu_num}}",
       "RAM": "{{user mem_size}}",
       "RAM_reserve_all": true,
       "cluster": "{{user vsphere_compute_cluster}}",
       "communicator": "winrm",
       "convert_to_template": "true",
       "datacenter": "{{user vsphere_dc_name}}",
       "datastore": "{{user vsphere_datastore}}",
       "disk_controller_type": "lsilogic-sas",
       "firmware": "bios",
       "floppy_files": [
         "setup/win19_updates/autounattend.xml",
         "setup/winrm.ps1",
         "setup/vmtools.cmd"
       ],
       "folder": "{{user vsphere_folder}}",
       "guest_os_type": "windows9Server64Guest",
       "host": "{{user vsphere_host}}",
       "insecure_connection": "true",
       "iso_paths": [
         "{{user os_iso_path}}",
         "{{user vmtools_iso_path}}"
       ],
       "network_adapters": [
         {
           "network": "{{user vsphere_portgroup_name}}",
           "network_card": "vmxnet3"
         }
       ],
       "password": "{{user vsphere_password}}",
       "storage": [
         {
           "disk_size": "{{user disk_size}}",
           "disk_thin_provisioned": true
         }
       ],
       "type": "vsphere-iso",
       "username": "{{user vsphere_user}}",
       "vcenter_server": "{{user vsphere_server}}",
       "vm_name": "{{user vsphere_template_name}}",
       "winrm_password": "{{user winadmin_password}}",
       "winrm_username": "Administrator"
     }
   ],
   "provisioners": [
     {
       "inline": [
         "dir c:\"
       ],
       "type": "windows-shell"
     },
     {
         "type": "windows-update",
         "search_criteria": "IsInstalled=0",
         "filters": [
             "exclude:$_.Title -like 'Preview'",
             "include:$true"
         ],
         "update_limit": 25
     }
   ],
   "sensitive-variables": [
     "vsphere_password",
     "winadmin_password"
   ],
   "variables": {
     "cpu_num": "",
     "disk_size": "",
     "mem_size": "",
     "os_iso_path": "",
     "vmtools_iso_path": "",
     "vsphere_compute_cluster": "",
     "vsphere_datastore": "",
     "vsphere_dc_name": "",
     "vsphere_folder": "",
     "vsphere_host": "",
     "vsphere_password": "",
     "vsphere_portgroup_name": "",
     "vsphere_server": "",
     "vsphere_template_name": "",
     "vsphere_user": "",
     "winadmin_password": ""
   }
 }
4. Windows Server 2019 Variables File
In my variables file for my home lab, I have the following information. Note, while the below is storing credentials in the variables file, you don’t want to do this for production. You will want to use Hashicorp Vault or other to store and retrieve your credentials for automated builds. I will cover that in a future post.
{
     "vsphere_server": "vcsa.cloud.local",
     "vsphere_user": "[email protected]",
     "vsphere_password": "P@$$w0rd",
     "vsphere_template_name": "Win2019clone_updates",
     "vsphere_folder": "Templates",
     "vsphere_dc_name": "CloudLocal",
     "vsphere_compute_cluster": "vsancluster",
     "vsphere_host": "10.1.149.14",
     "vsphere_portgroup_name": "DPG-Servers",
     "vsphere_datastore": "vsanDatastore",
     "winadmin_password": "P@$$w0rd",
     "cpu_num": "4",
     "mem_size": "4096",
     "disk_size": "102400",
     "os_iso_path": "[vsanDatastore] ISO/en_windows_server_2019_updated_nov_2020_x64_dvd_8600b05f.iso",
     "vmtools_iso_path":"[vsanDatastore] ISO/windows.iso"
 }
5. Autounattend.xml file
The autounattend.xml file contains the unattended XML installation answer file for Windows Server 2019. I am not posting this here as there are a number of these available for download and are straightforward to use for installing Windows Server 2019.
However, the section that is pertinent is the FirstLogonCommands that I want to highlight. As you saw above in the floppy files section, I am referencing the winrm.ps1 file. I am going to call that in the unattend file to run this PowerShell file on the first logon. This will configure WinRM.
The below is not parsed very well in the WordPress editor, however, hopefully you can tell what is going on here.
<FirstLogonCommands>
                <SynchronousCommand wcm:action="add">
				    <Order>1</Order>
                    <CommandLine>powershell -ExecutionPolicy Bypass -File a:\winrm.ps1</CommandLine>
                    <RequiresUserInput>true</RequiresUserInput>
                </SynchronousCommand>
6. PowerShell script for WinRM configuration
There is a great blog post here where I got a lot of the snippet I am using. It is found here: https://blog.petegoo.com/2016/05/10/packer-aws-windows/
Most of this should look fairly intuitive. I have added a sleep statement in the beginning just to give the machine some breathing room before starting the configuration after the initial login. The below code snippet should help to not get the dreaded waiting for WinRM to become available.
start-sleep -s 120

Set-ExecutionPolicy Unrestricted -Scope LocalMachine -Force -ErrorAction Ignore

# Don't set this before Set-ExecutionPolicy as it throws an error
$ErrorActionPreference = "stop"


#WinRM Configure
winrm quickconfig -quiet
winrm set winrm/config/service '@{AllowUnencrypted="true"}'
winrm set winrm/config/service/auth '@{Basic="true"}'

# WinRM
write-output "Setting up WinRM"
write-host "(host) setting up WinRM"
cmd.exe /c netsh advfirewall firewall set rule group="remote administration" new enable=yes
cmd.exe /c netsh firewall add portopening TCP 5985 "Port 5985"
cmd.exe /c net stop winrm
cmd.exe /c sc config winrm start= auto
cmd.exe /c reg add "HKEY_LOCAL_MACHINE\Software\Policies\Microsoft\Windows\WinRM\Service" /v AllowUnencryptedTraffic /t REG_DWORD /d 1 /f
cmd.exe /c net start winrm
cmd.exe /c wmic useraccount where "name='vagrant'" set PasswordExpires=FALSE
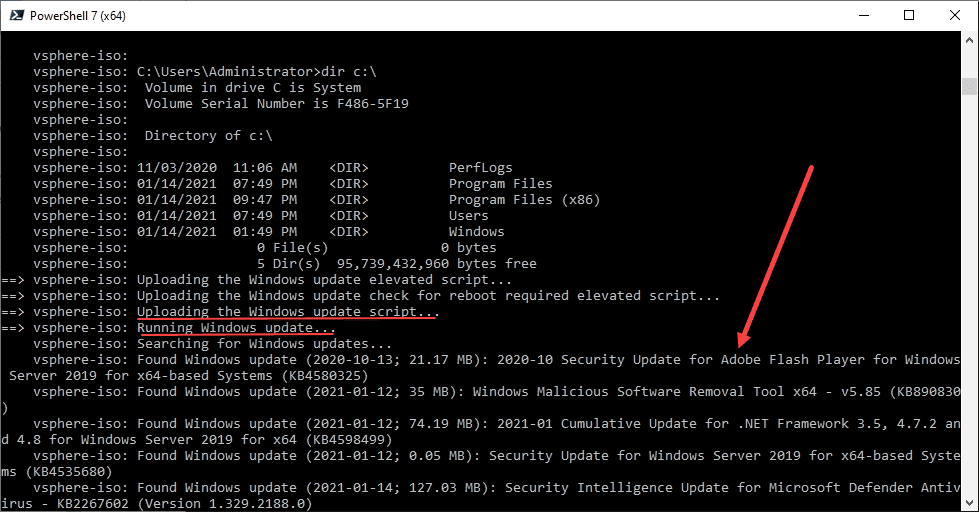
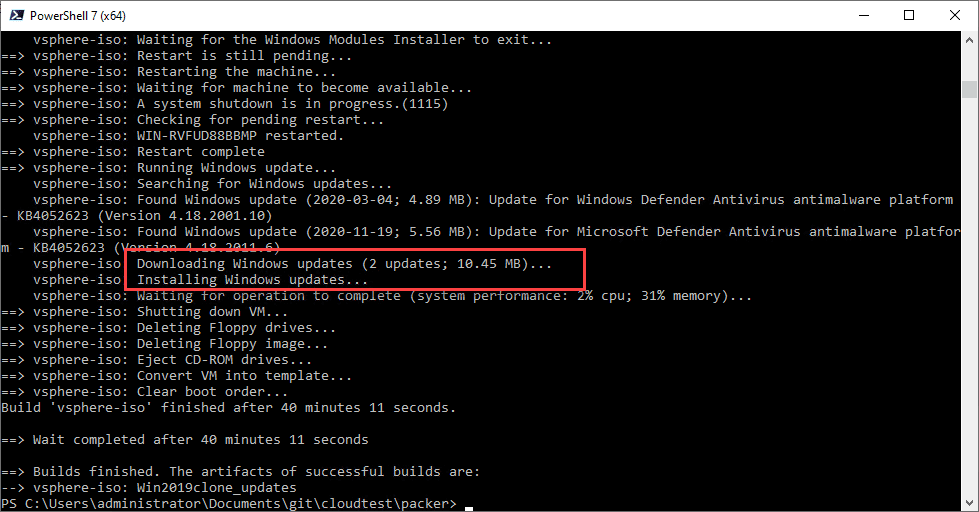
Windows Updates begin installing as part of the Packer Build
So, what do you see as a result of the Windows Update provisioner? After WinRM is configured and comes online, Packer will begin to configure the Windows Updates that it finds for your Windows Server version. I am building a Windows Server 2019 template. Below are some screenshots of the Windows Update provisioner at work.
It will scan and download Windows Updates, download the updates, and install the updates.
The provisioner will reboot the system as needed during the update process and will pick back up installing updates after the reboot.
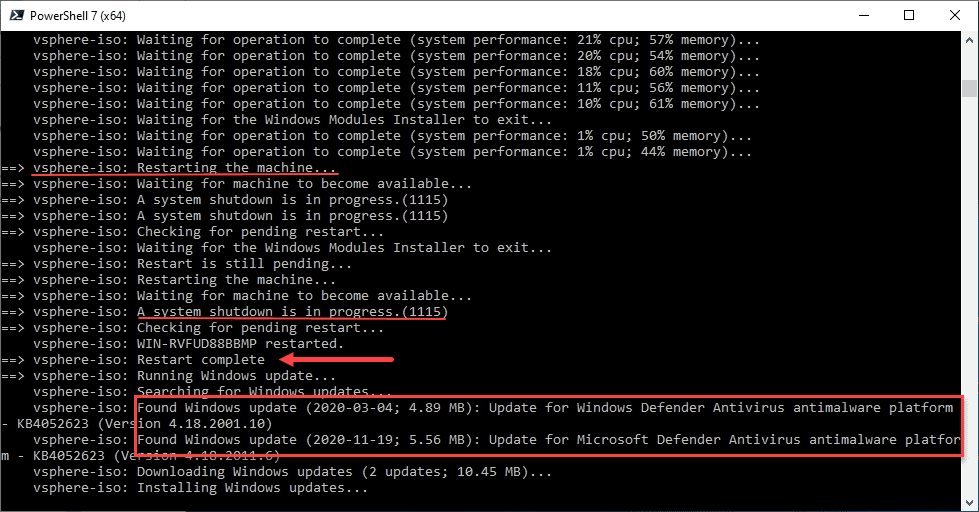
The last round of Windows Updates download and install successfully and the virtual machine is powered off and converted to a template successfully.
Wrapping Up
The ability to Automate VMware template patching for Windows is made easy with Packer and a few pieces of configuration. Hopefully this walkthrough will help any who might be struggling to get a working automated VMware template patching solution in place. In this way, you can schedule the packer build to run at set intervals and this will always keep your VMware templates for Windows Server up-to-date.
Google is updating how articles are shown. Don’t miss our leading home lab and tech content, written by humans, by setting Virtualization Howto as a preferred source.
About The Author