Hyper-V Instant VM Recovery with NAKIVO Backup and Replication
One of the key metrics that organizations look at when deciding upon SLAs during a diaster recovery event is the RTO, or the amount of time the organization is ok to operate without business-critical data. For the backup administrator this usually means what is the acceptable amount of time it will take to recover a business-critical virtual machine in its entirety, restore a SQL database, or recover business-critical files that have been deleted. Obviously, organizations want to be able to recover files or entire virtual machines as quickly as possible, or even “instantly” if possible. However, is instant recovery possible for business-critical VMs? What if organizations run their production infrastructure on top of Microsoft’s Windows Server Hyper-V environment? NAKIVO Backup & Replication v7.4 introduced the ability to perform instant recovery of Hyper-V VMs which basically eliminates the time needed to fully restore a virtual machine from backup. How is this possible? How do you go abot performing an Instant VM Recovery for Hyper-V using NAKIVO Backup & Replication v7.4 and higher? Let’s take a look at Hyper-V Instant VM Recovery with NAKIVO Backup and Replication and see how this powerful functionality provided allows meeting and exceeding RTOs defined in SLAs during disaster recovery.
Hyper-V Instant VM Recovery with NAKIVO Backup and Replication
It is really great to see NAKIVO expanding the ability to perform this “instant” VM recovery also to Hyper-V environments and shows their commitment to providing the same functionality that exists on the VMware side of things to Hyper-V customers. What is Instant VM Recovery and how does it work?
NAKIVO Instant VM Recovery, aka Flash VM Boot, works by booting VMs directly from the NAKIVO compressed and dedplicated backups on the backup repository. This enables bringing a virtual machine back up in seconds as opposed to minutes when thinking about restoring all the VM data “before” bringing the virtual machine back up. This bypasses the process of data being restored as the virtula machine is literally booted from the backup files for the particular virtual machine. Any changes made to the virtual machine while booted from the backup files do not modify or remove data in your virtual machine backup.
One might assume that to do this, you would have to manually configure connections from the backup server to the Hyper-V host, manually mount the backup files, provision a new virtual machine and then gain access to your data. However, the great thing with this functionality from NAKIVO is the process is automated. Without any special configuration from the administrator, NAKIVO is able to automatically provision and configure the needed environment requirements for provisioning the Instant Recovered virtual machine.
How does NAKIVO automate the process of being able to automatically provision a new virtual machine connected to the Hyper-V environment?
NAKIVO employs a couple of components residing in Backup & Replication – the Director and Transporter. The Director is the component in Backup & Replication that provides management to the platform. The Transporter is the component that actually performs data protection and recovery. These are both installed with the NAKIVO Backup and Replication all-in-one appliance.
When a Flash VM Boot job is executed, the Director component takes care of creating the new VM on the target Hyper-V server. This virtual machine is a “shell” virtual machine that does not have any disks attached as of yet. Then, the Transporter presents VM disks from the NAKIVO backup repository as iSCSI targets. Then the Director takes back over and actually mounts the iSCSI targets to the new Hyper-V virtual machine created in the beginning of the Flash VM Boot job. Very slick indeed!
Hyper-V Backup and Flash VM Boot Recovery Job
Let’s take a look at how the process is performed from a backup perspective as well as actually performing the Flash VM boot job. First things first, you need to connect to the Hyper-V host or Hyper-V cluster which is also supported with NAKIVO Backup & Replication.

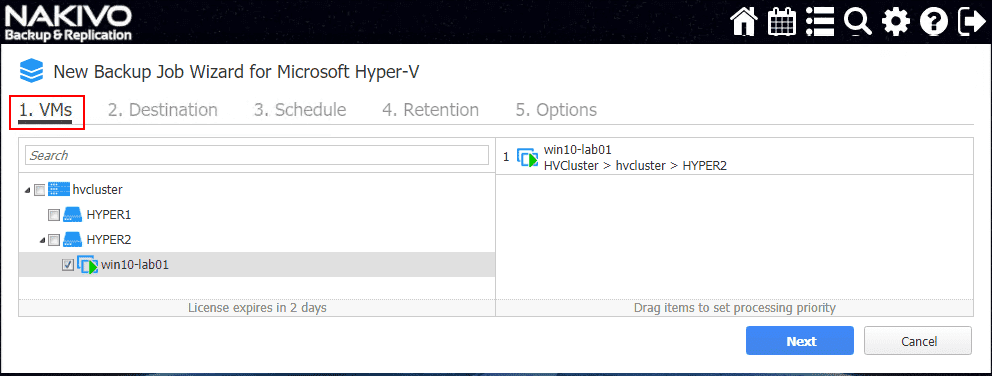
Once the Hyper-V host or cluster is added to the environment, you can create your Hyper-V backup job by choosing the Hyper-V virtual machine from inventory.
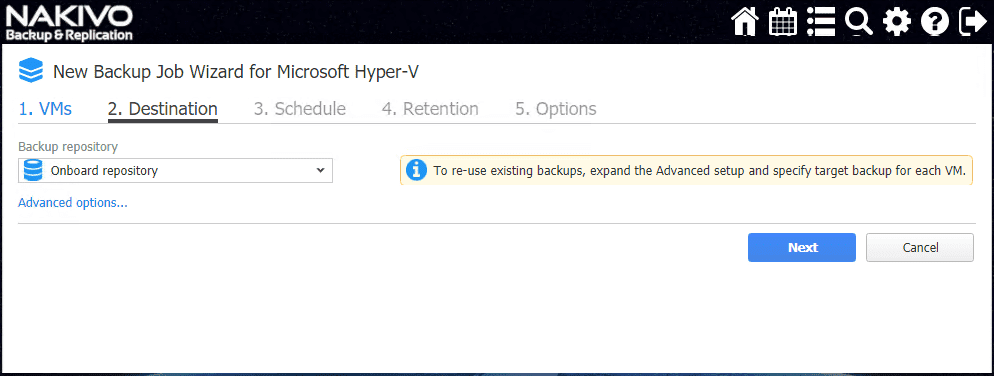
Next, the Destination. This is an important detail to remember as the Flash VM Boot Recovery will boot the VM directly from the backup repository where the backups are located.
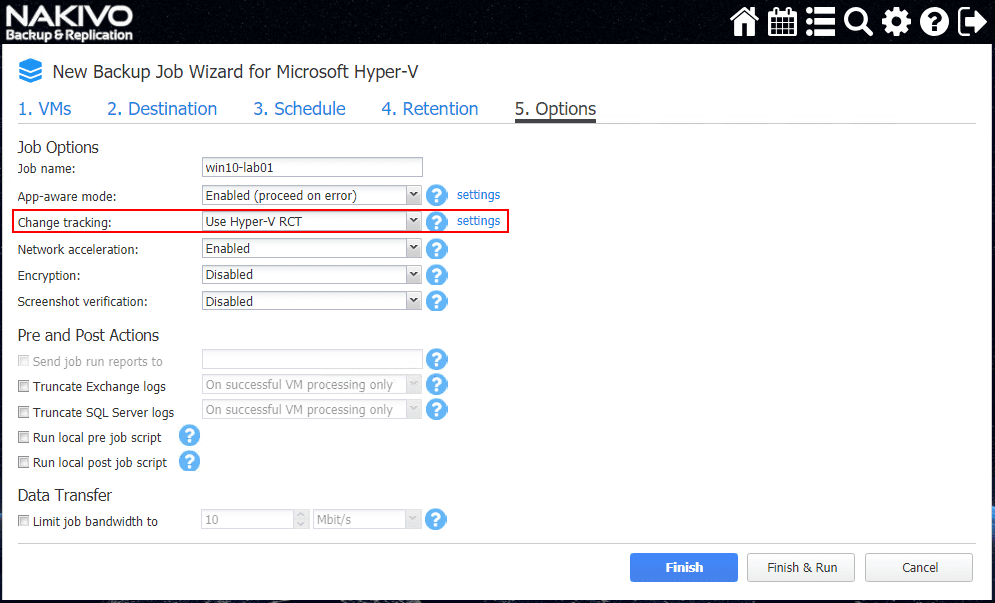
Skipping past the Schedule and Retension screens, note on the Options screen a couple of important settings, especially for application aware purposes and efficiency with business critical application backups for Microsoft SQL server and other database driven applications (App-aware mode and Change tracking).
You need to have a completed Hyper-V backup job to perform a Flash VM Boot Recovery job.
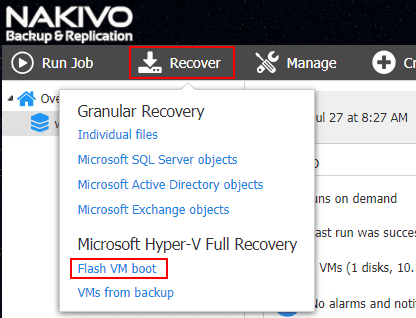
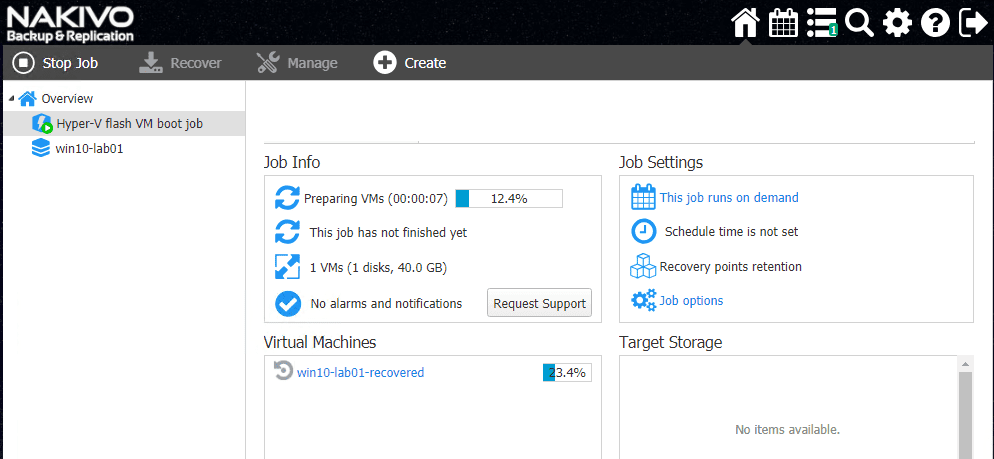
Once the backup job completes, we can now demonstrate the process and perform the Flash VM Boot Recovery. Choose Recover >> Microsoft Hyper-V Full Recovery >> Flash VM boot.
The New Flash Boot Job Wizard launches. This simple (4-step) process allows quickly configuring a new Flash VM Boot Recovery job. On the Backups screen, choose the backup job and the recovery point you want to use as the base for the Flash VM Boot job.

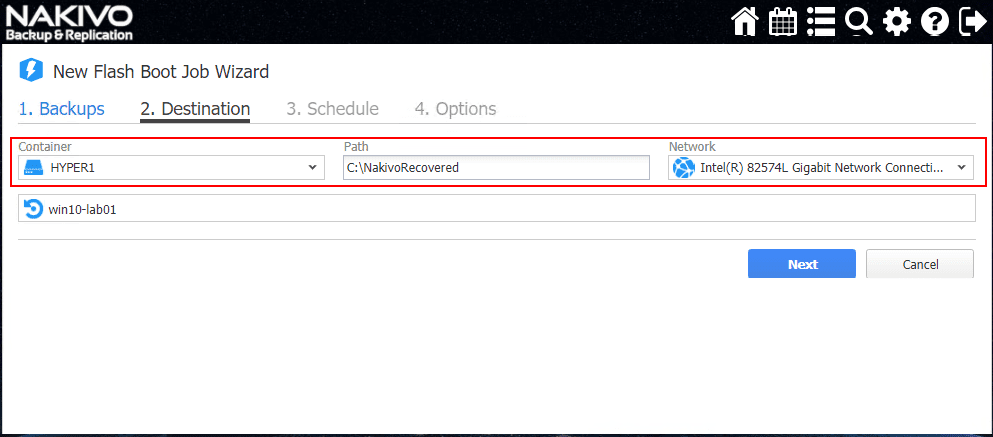
On the Destination screen, you choose the destination Hyper-V host, path to the restore directory on the host, and the network connection to utilize for the restored VM.
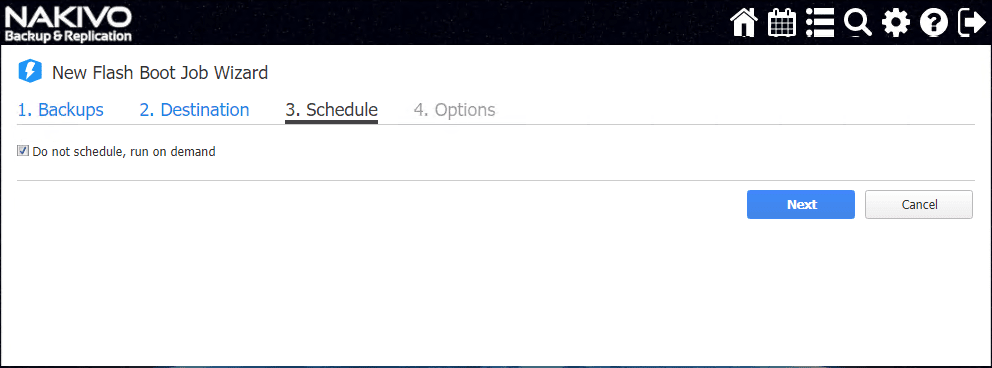
Step 3, has you choose the Schedule. Most likely this is a process that you may simply run once for recovery. However you can schedule the Flash VM Boot Recovery job to run as well. In addition to the VM recovery capabilities, the Flash VM boot feature is good for other purposes:
- Accessing files, folders, application objects, etc
- Testing system updates and patches before installing them in production
- Verifying a VM backup to make sure the virtual machine operating system as well as any applications are functioning correctly and being backed up properly.
- Copy a VMDK or VHDX file and then delete the virtual machine
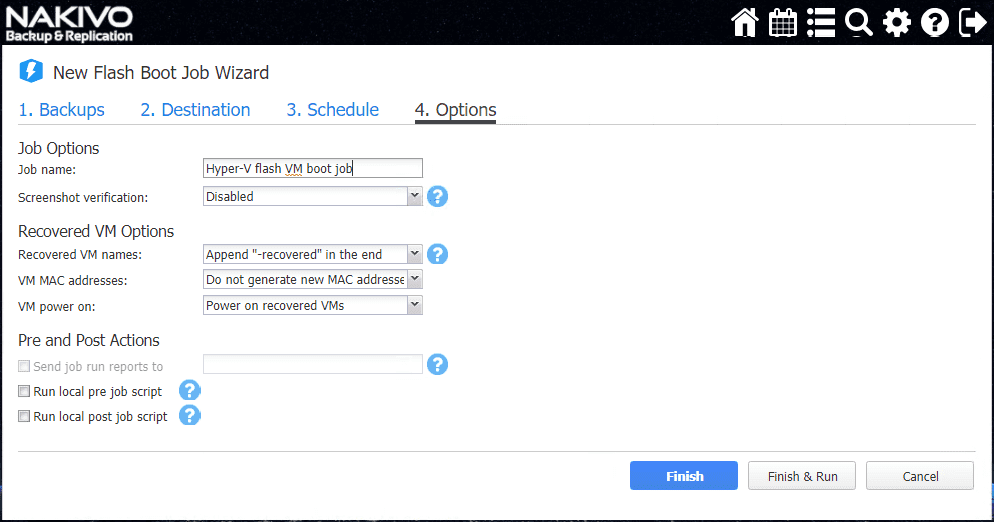
The final screen, the Options screen allows configuring the Flash VM Boot to handle inventory name, MAC address, and power state to name a few configuration items of interest. A new MAC address can be generated to handle any MAC conflicts that may arise if the production VM is still in inventory with the duplicate MAC.
Running the Flash VM Boot Recovery job. This can be done by literally right clicking the job and running it.
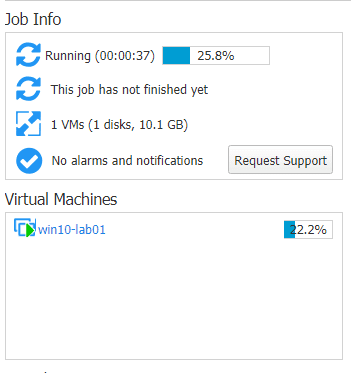
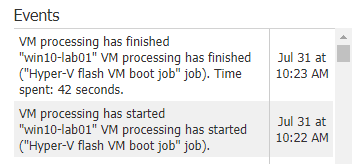
As you can see below, the processing started at 10:22 A.M. and was completed at 10:23 A.M. So phenomenal RTOs here with a minute or less to have the VM restored.
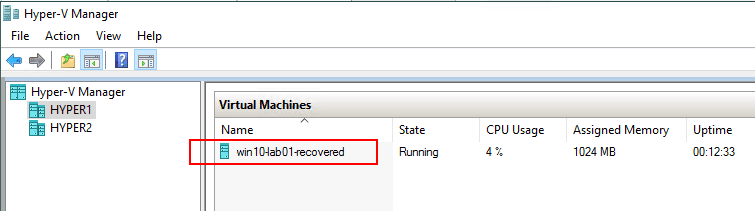
In Hyper-V Manager, you can see the win10-lab01-recovered VM running.
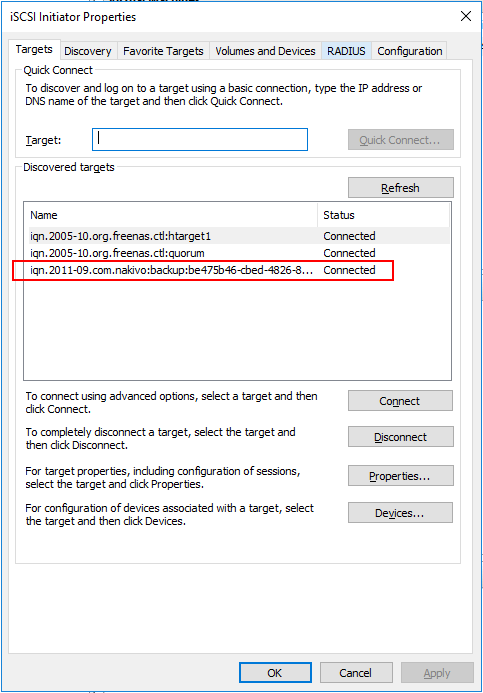
A look at the Hyper-V host iSCSI connections shows the NAKIVO iSCSI target connected on the server. So, we are indeed talking to the NAKIVO backup repository for the VM’s storage.
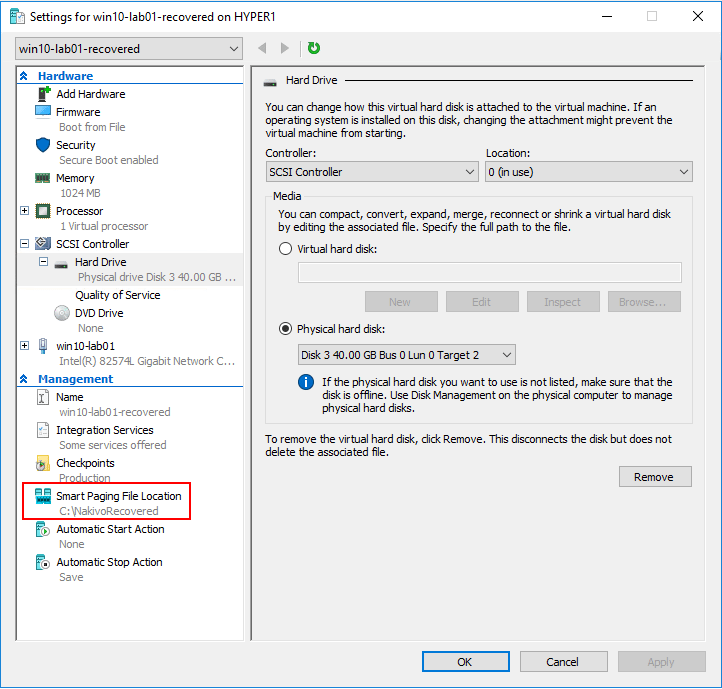
The Smart Paging File Location shows the NAKIVO recovery directory.
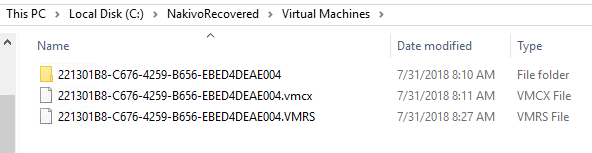
The VMCX and VMRS files are contained in the recovery directory that was defined in step 2, Destination configuration.
Once a VM is up and running, you can migrate the VM to production for permanent recovery which allows administrators to have the best of both worlds – instant access to data and permanent recovery.
Takeaways
The Hyper-V Instant VM Recovery with NAKIVO Backup and Replication is a powerful new feature that is found in NAKIVO Backup & Replication v7.4. With this functionality Hyper-V administrators can now instantly recovery business-critical Hyper-V VMs in seconds and have restored virtual machine access to services and files. When business-critical services are down, every minute counts. The Instant Recovery feature by way of the Flash VM Boot Recovery job eliminates the longer waits to fully restore VM data before accessing. NAKIVO also takes the heavy lifting out of the process itself by automating all the configuration required to present the backup repository to the Hyper-V host as mounted storage to make the Flash VM Boot possible. It is great to see that this process has now been extended to include Hyper-V as this was a feature for VMware environments in previous versions. Each version of NAKIVO keeps getting better and the Hyper-V Instant VM recovery is a case in point to that. Be sure to check out a trial version of NAKIVO Backup & Replication here.