


There are myriads of Docker containers spread across many docker registries on the Internet. Most of these are on popular registries like Docker Hub, but others are found on other registries. Having these readily available images makes is super easy to spin up new apps in a home lab or production environment. But, this convenience can come back to bite you though if you don’t scrutinize the container image first. Why? There are many security, dependency, and other dangers that can crop up if you don’t take a deeper look at your container images. Let me show you the checks I make before I trust any docker image that I spin up in my home lab.
1. Make sure of who actually published the image
One of the first things that I like to take a look at is not the tag for the container image or how many downloads it may have. But I like to check out to see if I am downloading the “official” image of the actual project. GitHub projects are easy to fork and create similar images based off of official projects. So, really, just about anyone can spin up their own version of the image.
A good way to make sure you are getting to the official image and repo is to “first” check the official documentation. Usually this will lead you to links for the official GitHub repo. This will lead you to the official registry.
I verify the entire image reference:
registry.example.com/publisher/project:tagYou can inspect the remote image information in the registry with:
docker buildx imagetools inspect ghcr.io/example/project:1.4.2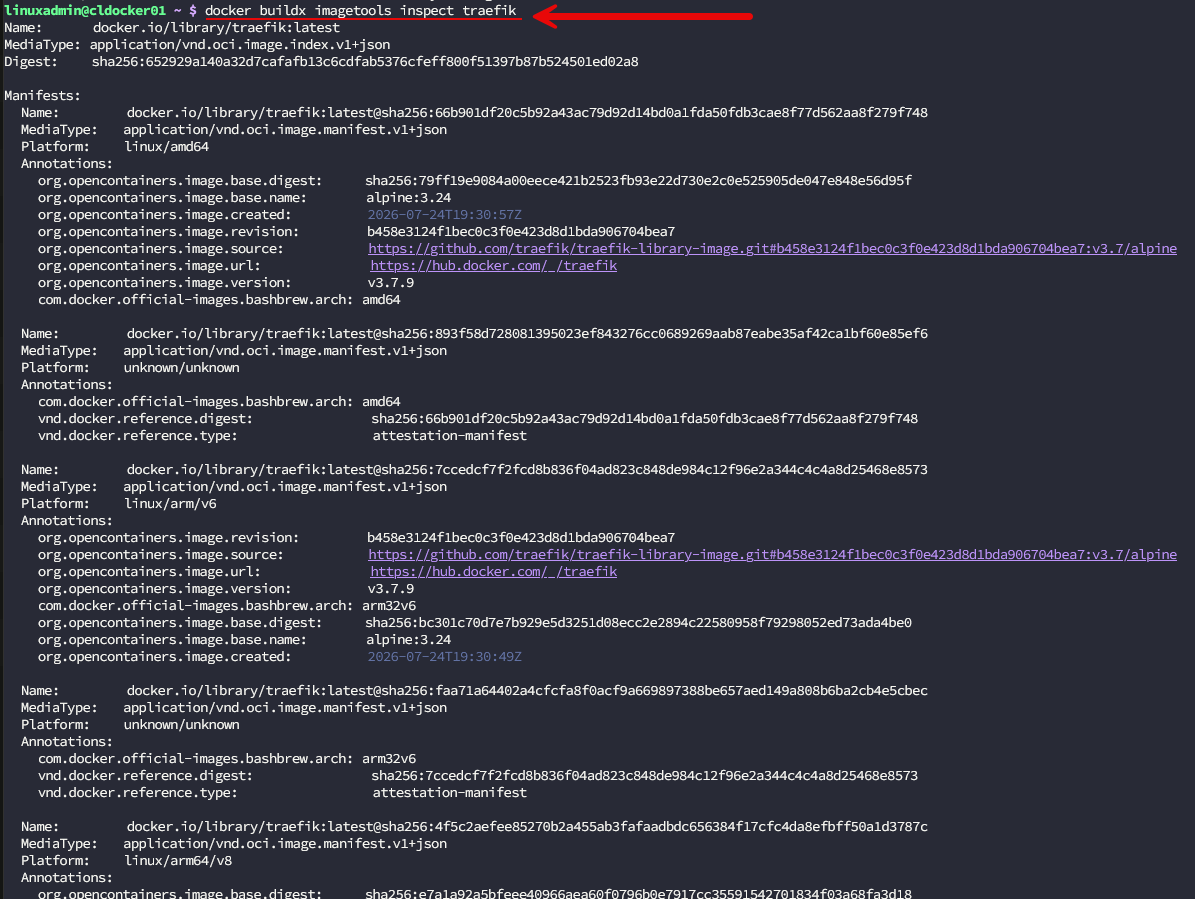
2. I check to see the project is still being maintained
This is one of the huge things that is important to me with projects that I bring into the home lab. There are so many projects you will find or stumble on that look great, until you see when the project was last updated. It may be a year, two years, or older and that isn’t good.
A good indicator of freshness is having a look at the repo’s releases, commits, issues, pull requests, and general updates. How frequently the project is getting commits can also be misleading too. A good project may not have to have commits every day to be mature and worthy of use. But, overall, I look for signs of the project being “maintained” and this usually is represented by the amount of activity around it.
I look for a few other things too like:
- Is the repository archived?
- Does the project document how you report vulnerabilities?
- Are dependency update PRs being reviewed?
- Are issues getting responses from the developers?
- Does the project have good release notes?
- Is the container image built automatically from tagged releases?
None of these things on their own proves an image is safe. But, again, these are “signals” that can tell me whether the project has a good maintenance process.
3. What about the dockerfile?
If you have the dockerfile available to you, it can be an important piece of information to understand what is included in the container image.
Start looking at the FROM statement at the top. This is the base image the project uses. Look for supported and well known base images with good versions defined explicitly. Also, look at the following statements in a dockerfile:
- RUN
- COPY
- ADD
- ENTRYPOINT
- CMD
- USER
Pay attention to the commands that download and any remote binaries or scripts during the build. For example, I would be a bit cautious if I see something like this in the RUN command:
RUN curl -fsSL https://example.com/install.sh | shRunning a command or script in itself isn’t necessarily malicious but the script may contain something that is or calls another script that could be as well. Take a look and see what is copied into the image as well.
COPY . /app4. Inspect the image metadata and layers
After pulling the image, I inspect what Docker knows about it before I start a container.
I normally begin with:
IMAGE="yourimage"

docker pull "$IMAGE"
docker image inspect "$IMAGE"
Docker’s image inspection command exposes detailed configuration such as the default user, entrypoint, command, exposed ports, volumes, environment variables, and filesystem layers.
I then review the image history:
docker image history "$IMAGE"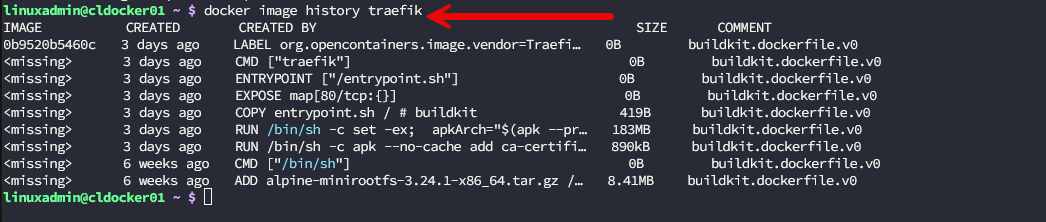
With this command, you can see package installation commands. Also, you see copied files, shell operations, and layers with a large size. As a note, it is normal for many rows in the IMAGE column to show <missing>. Modern images are often built with BuildKit or pulled from a registry without their intermediate build images. The underlying filesystem layers are still present. Docker simply does not have a separate local image ID for every Dockerfile instruction.
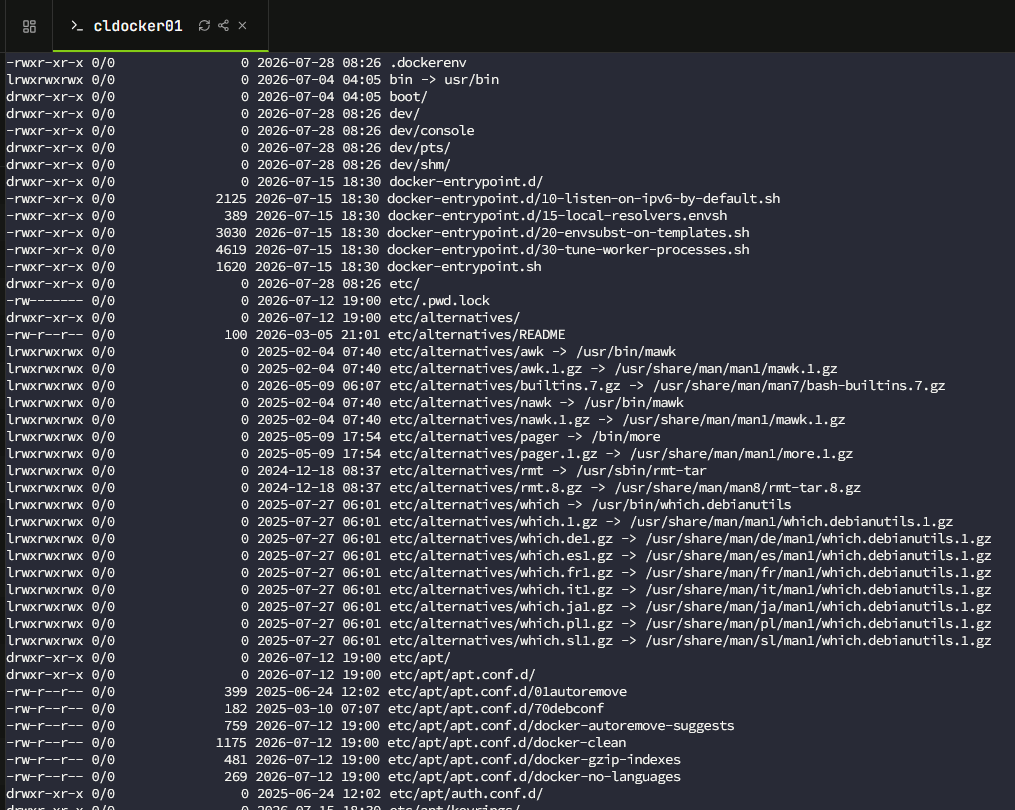
Another cool command to take a look at is to actually look at the files contained in its filesystem. For instance you can run the following command:
CID=$(docker create nginx)

docker export "$CID" | tar -tvf - | less

docker rm "$CID"
You will see the output of files contained:
5. I look for unexpected runtime privileges
High level runtime privileges are not good when it comes to containers. Honestly, this is one that is important like not exposing ports that don’t need to be exposed. We are looking for least privilege here. An image can be dangerous when it has more privileges than it needs, like a user account, etc. Be sure to review any community Docker Compose files for excessive privileges or running as root, etc.
The settings that ;should give you pause when looking at a containerized solution may look like the following:
privileged: true
network_mode: host
pid: host
I also closely inspect options like:
cap_add:
devices:
volumes:
security_opt:
user:
The Docker socket is one of the biggest security concerns. If you see this, why does the container need this?
volumes:
  - /var/run/docker.sock:/var/run/docker.sock
The bottom line is that the permissions should match the purpose of the application and not anything beyond that. Additional privileges is just careless or may even be suspicious.
6. I scan my container images
Scanning your images for vulnerabilities is an important step as part of a layered approach. Like an operating system, if a container image has outdated software as part of its build, it can be vulnerable to those security issues.
A scanner can identify known vulnerabilities in system packages, language libraries, and other components that may be a part of your container image. Keep in mind though that it has limitations. Even though it can tell you vulnerabilities, it can’t tell you if the publisher is trustworthy. Also, it can’t tell you if a startup script is malicious.
You can use tools like Trivy or Docker Scout to scan for vulnerabilities. With Docker Scout:
docker scout cves "$IMAGE"Docker Scout is good tool built inside of Docker Desktop that can discover components with vulnerability information. It has a CLI also that can analyze images, registry references, local archives, directories, and other artifacts as part of the image.
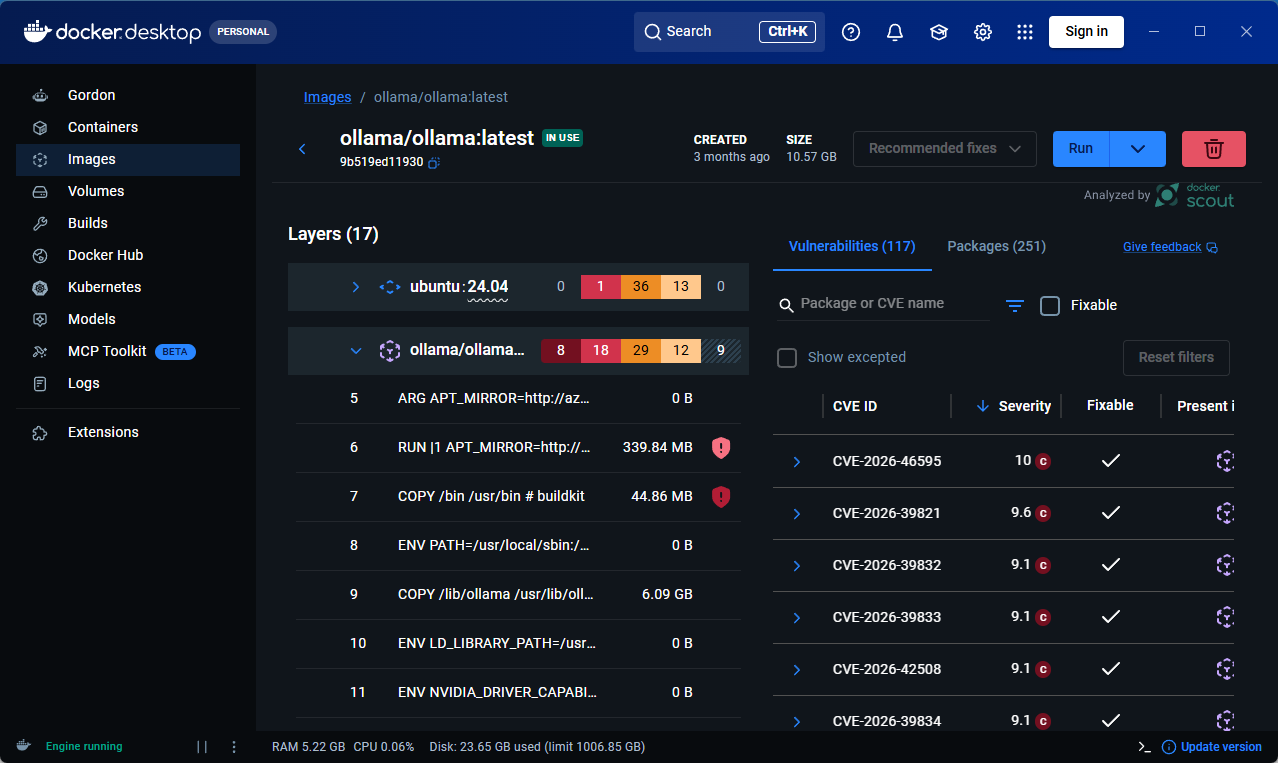
Trivy can scan container images for operating system and application-library vulnerabilities. Its image scanner supports severity filtering and optional handling for vulnerabilities without available fixes.
You can run a simple scan with this command:
trivy image "$IMAGE"To just get the higher-severity findings first, you can do the following:
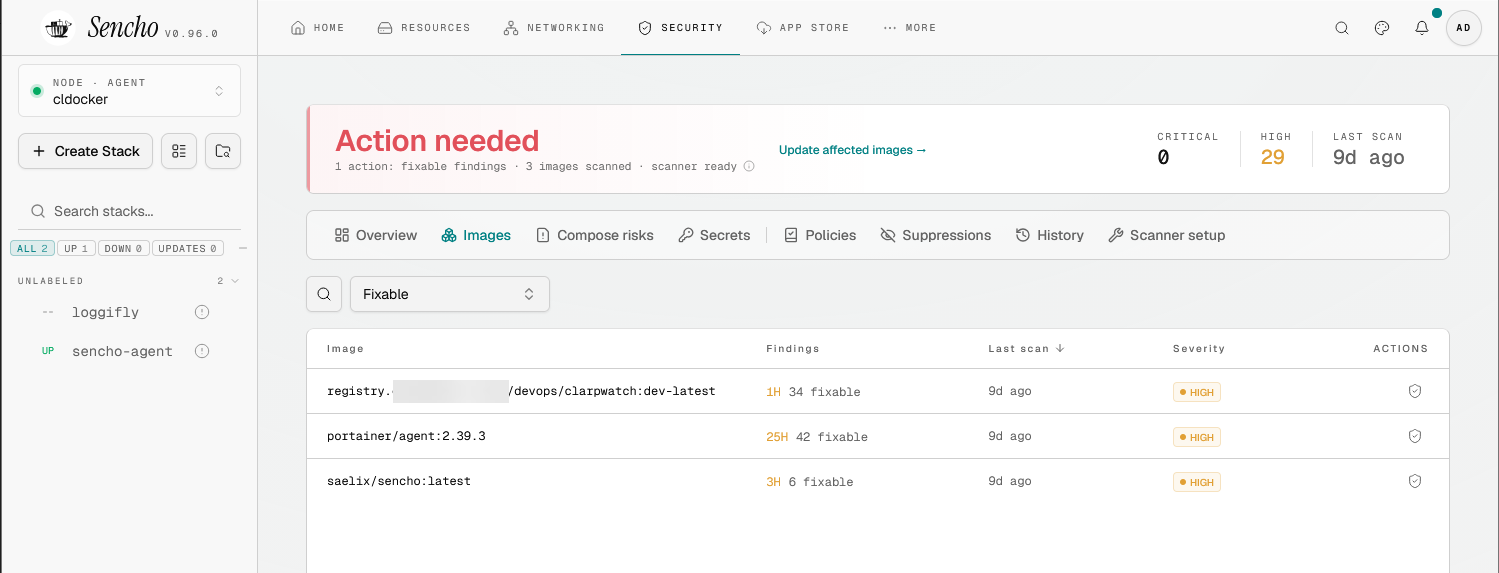
trivy image --severity HIGH,CRITICAL "$IMAGE"Also, many other Docker dashboard type solutions have vulnerability scanning built-in using Trivy. Sencho has become my favorite lately and you have the ability to scan images before updates, etc:
7. You can also check code signatures
With supply chain attacks and other security issues growing more common, one of the ways to know that you are getting what the developer intended to be include is looking at any image signing. A cryptographic signature is generated that identifies the image is signed by the developer and the image hasn’t changed from what they intended it to be.
This helps to make sure that a malicious package wasn’t slipped into the image somewhere along the way. For a key-based signature, you can test it using something like the following with the public key:
cosign verify --key cosign.pub \
  ghcr.io/example/project@sha256:IMAGE_DIGEST
Cosign verifies signatures against the provided key and makes sure that the digest in the signature payload matches the container image.
8. I decide on tags or digests
You may not have realized this before, but “tags” are things that publishers can essentially “move” to another image. So the image referenced by this tag today, may point to a different image the next day if the publisher replaces the image.
example/project:1.4But, if you reference an image hashed digest value, this identifies the exact image content, much like the image signing that we talked about earlier. It is a hash value that represents the contents of that image:
example/project@sha256:abc123...Docker documents image digests as cryptographic identifiers and notes that, unlike mutable tags, a digest can be used to pull the same exact image consistently.
After pulling an image, I can display its repository digests with:
docker image inspect --format '{{json .RepoDigests}}' yourimage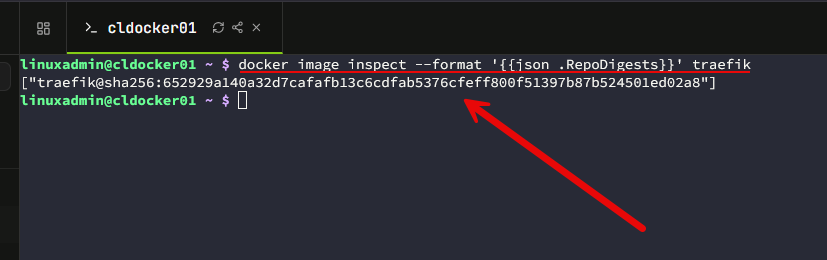
You can also keep the readable version tag and just add the digest to it as well:
services:
  app:
    image: ghcr.io/example/project:1.4.2@sha256:abc123...
9. I test the image on a test docker host first
Even with all of the above checks completed, it is still good to deploy the image to a test docker host first. This way you have a way to look at the behavior of the container and how it runs on a test docker host. Another safety protocol you can implement is to start the container with networking disabled.
docker run --rm \
  --name someimage \
  --network none \
  --read-only \
  --cap-drop ALL \
  --security-opt no-new-privileges=true \
  --tmpfs /tmp:rw,noexec,nosuid,size=64m \
  "$IMAGE"
Many applications will not run successfully with all of these restrictions. That is part of the test. Watch the logs:
docker logs -f someimageYou can also inspect the running container:
docker inspect someimage
docker stats someimage
docker top someimage
Monitor outbound and DNS connections made by the container as well to see if there is anything suspicious it is trying to connect to.
Wrapping up
As you can see, there is quite a lot we can do to make sure we trust the docker container images that we pull down and decide to run in our home labs or production environments for that matter. There are several things that give you a layered approach to verifying the image is what it says it is and contains and behaves like you expect. Security is always about a layered approach, even when it comes to running docker containers. How about you? What preventative and security measures do you take in the home lab with your container images?
More in this topic

Google is updating how articles are shown. Don’t miss our leading home lab and tech content, written by humans, by setting Virtualization Howto as a preferred source.
About The Author
