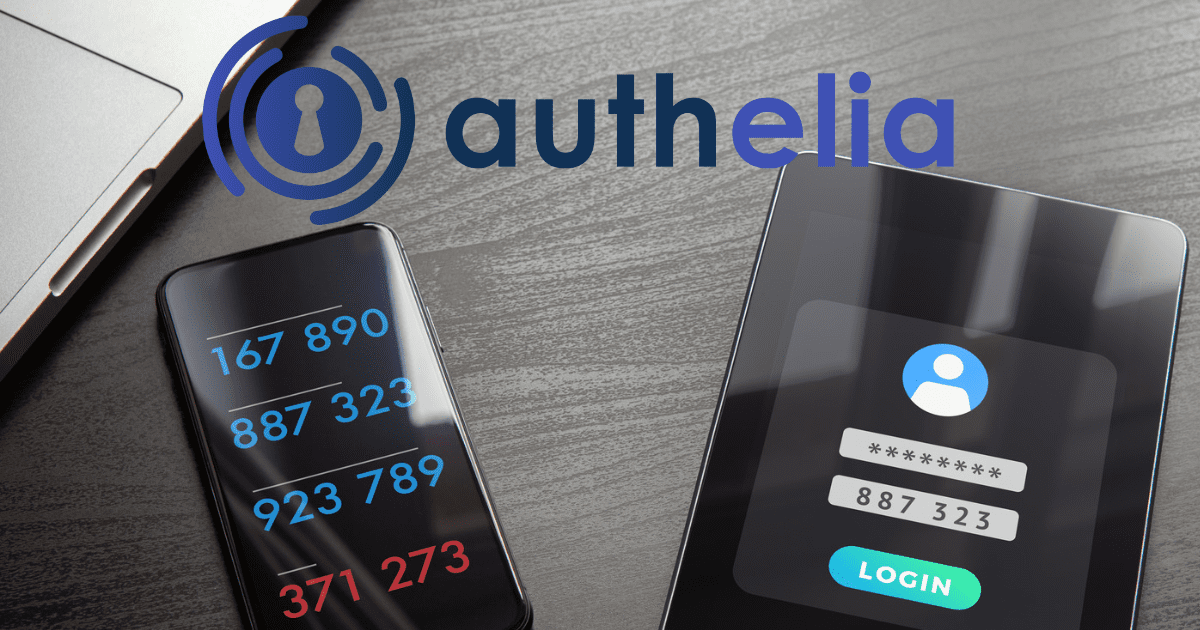
If you are looking at securing your home lab or other environment, two-factor authentication is the way to go. However, is there a way to self-host your two-factor authentication and SSO technologies? Yes, there is! I want to introduce you to a solution called Authelia that allows you to self-host your authentication solution, and it is relatively easy to set up. Also, it is officially supported to work with reverse proxies like Traefik. Let’s look at Authelia open-source SSO and MFA in Docker using a Docker Compose configuration.
Introduction to Authelia
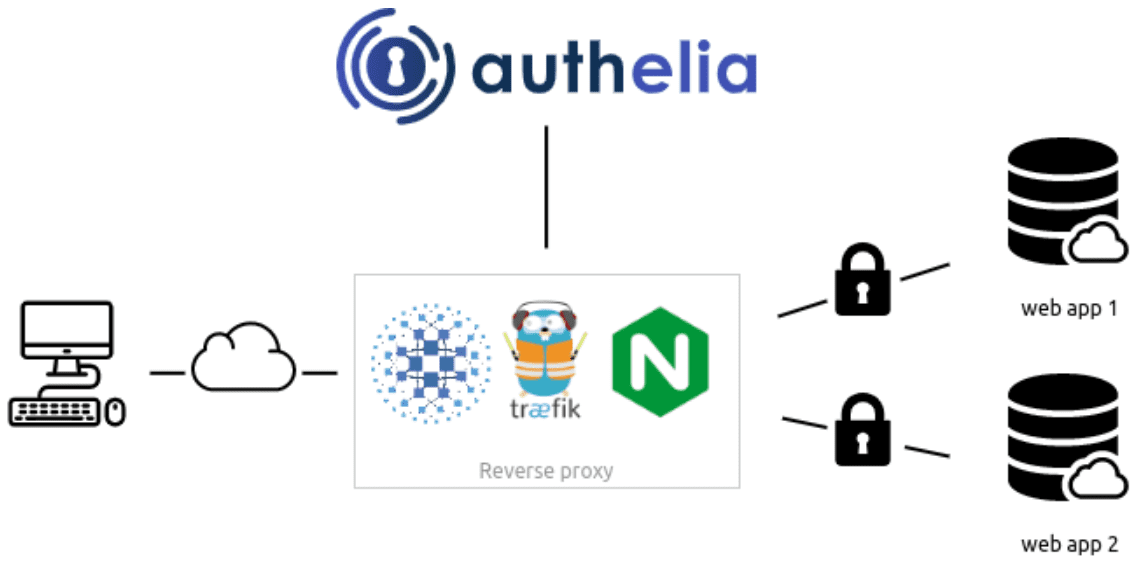
Authelia is an open-source authentication and authorization solution that can integrate with your existing reverse proxies so you can easily enable self-hosted two-factor authentication for your self-hosted web apps.
It offers features such as two-factor authentication and single sign-on and stands out with its capability to offer minimal external dependencies. It is an efficient choice for access management that can be quickly stood up.
Authelia project URL: Authelia – The Single Sign-On Multi-Factor portal for web apps
Authelia’s Key Features
One key aspect of Authelia is its support for several second-factor methods. With the ability to provide two-factor authentication, it adds an extra layer of security. Beyond the basic authentication process, Authelia authentication provides additional factor authentication measures for heightened identity verification.
Another critical feature is its support for file-based user storage and SQLite-based configuration storage. You can also integrate with an LDAP backend, enabling easy user group membership management that most likely already exists in most organizations.
Authelia’s strength in access management also includes its fine-grained access control. This feature allows for precise access restriction and supports bypass authentication under specific conditions.
Authelia: Installation and Configuration
The Authelia authentication layer works in harmony with Docker Compose. To get started, you can clone the git repository and set up the Docker Compose.yml file. This file acts as a guide for your local compose bundle.
Configuring Authelia requires careful attention to the config file. Commands like docker-compose up can be run following command line interactions. With Docker Compose, Authelia benefits from reverse proxy support. How proxy support Authelia works is particularly interesting as it allows the service to work effectively with reverse proxies, enabling more efficient traffic management.
Let’s look at setting up Authelia using Docker Compose. I based my initial configuration on the documentation found here:
Docker-compose.yml
In the example, configuration for Authelia exists along with Heimdall and Nextcloud. Below is my docker-compose file modified for my environment.
Be sure to replace the following:
hostnames
trusted IPs and ranges
---
version: "3.8"
networks:
net:
driver: bridge
services:
traefik:
container_name: traefik
image: traefik:v2.9
restart: always
command:
- '--api=true'
- '--api.dashboard=true'
- '--api.insecure=false'
- '--pilot.dashboard=false'
- '--global.sendAnonymousUsage=false'
- '--global.checkNewVersion=false'
- '--log=true'
- '--log.level=DEBUG'
- '--log.filepath=/config/traefik.log'
- '--providers.docker=true'
- '--providers.docker.exposedByDefault=false'
- '--entryPoints.http=true'
- '--entryPoints.http.address=:8080/tcp'
- '--entryPoints.http.http.redirections.entryPoint.to=https'
- '--entryPoints.http.http.redirections.entryPoint.scheme=https'
## Please see the Forwarded Header Trust section of the Authelia Traefik Integration documentation.
- '--entryPoints.http.forwardedHeaders.trustedIPs=10.1.149.0/24,192.168.1.0/24,fc00::/7'
- '--entryPoints.http.proxyProtocol.trustedIPs=10.1.149.0/24,192.168.1.0/24,fc00::/7'
- '--entryPoints.http.forwardedHeaders.insecure=false'
- '--entryPoints.http.proxyProtocol.insecure=false'
- '--entryPoints.https=true'
- '--entryPoints.https.address=:8443/tcp'
## Please see the Forwarded Header Trust section of the Authelia Traefik Integration documentation.
- '--entryPoints.https.forwardedHeaders.trustedIPs=10.1.149.0/24,192.168.1.0/24,fc00::/7'
- '--entryPoints.https.proxyProtocol.trustedIPs=10.1.149.0/24,192.168.1.0/24,fc00::/7'
- '--entryPoints.https.forwardedHeaders.insecure=false'
- '--entryPoints.https.proxyProtocol.insecure=false'
networks:
net: {}
ports:
- "80:8080"
- "443:8443"
volumes:
- /var/run/docker.sock:/var/run/docker.sock
- ${PWD}/data/traefik:/config
labels:
- 'traefik.enable=true'
- 'traefik.http.routers.api.rule=Host(`traefik.cloud.local`)'
- 'traefik.http.routers.api.entryPoints=https'
- 'traefik.http.routers.api.tls=true'
- 'traefik.http.routers.api.service=api@internal'
- 'traefik.http.routers.api.middlewares=authelia@docker'
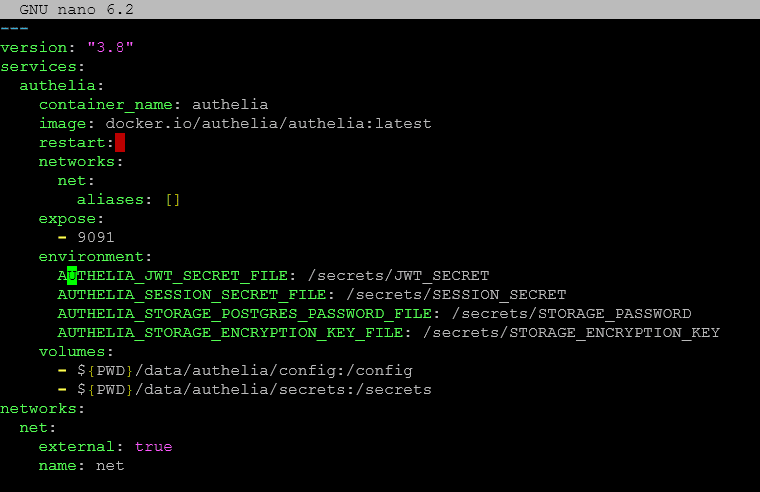
authelia:
container_name: authelia
image: authelia/authelia
restart: unless-stopped
networks:
net: {}
expose:
- 9091
volumes:
- ${PWD}/data/authelia/config:/config
environment:
TZ: "America/Chicago"
labels:
- 'traefik.enable=true'
- 'traefik.http.routers.authelia.rule=Host(`auth.cloud.local`)'
- 'traefik.http.routers.authelia.entryPoints=https'
- 'traefik.http.routers.authelia.tls=true'
- 'traefik.http.middlewares.authelia.forwardAuth.address=http://authelia:9091/api/verify?rd=https://auth.cloud.local'
- 'traefik.http.middlewares.authelia.forwardAuth.trustForwardHeader=true'
- 'traefik.http.middlewares.authelia.forwardAuth.authResponseHeaders=Remote-User,Remote-Groups,Remote-Name,Remote-Email'
nextcloud:
container_name: nextcloud
image: linuxserver/nextcloud
restart: unless-stopped
networks:
net: {}
expose:
- 443
volumes:
- ${PWD}/data/nextcloud/config:/config
- ${PWD}/data/nextcloud/data:/data
environment:
PUID: "1000"
PGID: "1000"
TZ: "Australia/Melbourne"
labels:
- 'traefik.enable=true'
- 'traefik.http.routers.nextcloud.rule=Host(`nextcloud.cloud.local`)'
- 'traefik.http.routers.nextcloud.entryPoints=https'
- 'traefik.http.routers.nextcloud.tls=true'
- 'traefik.http.routers.nextcloud.middlewares=authelia@docker'
heimdall:
container_name: heimdall
image: linuxserver/heimdall
restart: unless-stopped
networks:
net: {}
expose:
- 443
volumes:
- ${PWD}/data/heimdall/config:/config
environment:
PUID: "1000"
PGID: "1000"
TZ: "Australia/Melbourne"
labels:
- 'traefik.enable=true'
- 'traefik.http.routers.heimdall.rule=Host(`heimdall.cloud.local`)'
- 'traefik.http.routers.heimdall.entryPoints=https'
- 'traefik.http.routers.heimdall.tls=true'
- 'traefik.http.routers.heimdall.middlewares=authelia@docker'
You can run the docker-compose up -d command to bring up the workloads in the Docker compose file. However, you will most likely see the Authelia container error out in a boot loop. This is because the configuration file is created with the default/example code.

Check the status of your docker-compose containers using:
docker-compose ps
Authelia config file
Below is my configuration file that I have modified and created under the following path:
<your path>/data/authelia/configThe example code includes the following. Note the following changes I have made:
Create a jwt_secret value
Change the default_redirection_url
Under the section AUTHELIA_SESSION_SECRET_FILE, make sure to change the domain to match the protected root domain
Under the access_control: section, note that we have listed the resources we want to protect underneath and if we want to use one_factor or two_factor.
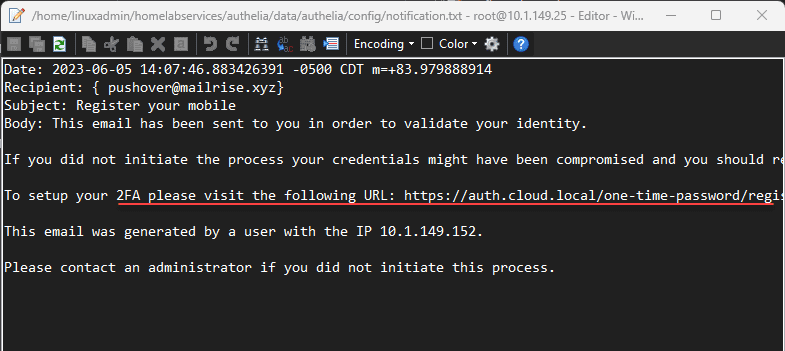
- Configure the notification.txt file location if you are not setting up proper email forwarding and only want to capture the registration messaging in a file instead, which is great for testing and home lab POCs.
---
###############################################################
#                   Authelia configuration                    #
###############################################################

server:
  host: 0.0.0.0
  port: 9091
log:
  level: debug
theme: dark
# This secret can also be set using the env variables AUTHELIA_JWT_SECRET_FILE
jwt_secret: yourjwtsecret
default_redirection_url: https://auth.cloud.local
totp:
  issuer: authelia.com

# duo_api:
#  hostname: api-123456789.example.com
#  integration_key: ABCDEF
#  # This secret can also be set using the env variables AUTHELIA_DUO_API_SECRET_KEY_FILE
#  secret_key: 1234567890abcdefghifjkl

authentication_backend:
  file:
    path: /config/users.yml
    password:
      algorithm: argon2id
      iterations: 1
      salt_length: 16
      parallelism: 8
      memory: 64

access_control:
  default_policy: deny
  rules:
    # Rules applied to everyone
    - domain: nextcloud.cloud.local
      policy: one_factor
    - domain: heimdall.cloud.local
      policy: two_factor

session:
  name: authelia_session
  # This secret can also be set using the env variables AUTHELIA_SESSION_SECRET_FILE
  secret: unsecure_session_secret
  expiration: 3600  # 1 hour
  inactivity: 300  # 5 minutes
  domain: cloud.local  # Should match whatever your root protected domain is

regulation:
  max_retries: 3
  find_time: 120
  ban_time: 300

storage:
  encryption_key: a_very_important_secret # Now required
  local:
    path: /config/db.sqlite3

notifier:
  # smtp:
  #   username: test
  #   # This secret can also be set using the env variables AUTHELIA_NOTIFIER_SMTP_PASSWORD_FILE
  #   password: password
  #   host: mail.example.com
  #   port: 25
  #   sender: [email protected]
  filesystem:
    filename: /config/notification.txt

...
User database config file
The next piece of the puzzle is creating the user database configuration file. This file houses the user configuration database that Authelia will use if you are not tying your authentication configuration into LDAP. Below the password is “Authelia”.
---
# Users
users:
  testuser:
    displayname: "Test User"
    password: "$argon2id$v=19$m=65536,t=3,p=4$hGazLuz31MzVX8Zp3HELaw$J+vU/hXNrTglUCE4bM9tBXTF2G4G+hE6NACLpp0emDg"
    email: [email protected]
    groups:
      - admins
      - dev
...
You may ask how you get the argon2id hashed password. Great question!
Creating the argon2id hashed password
To create the argon2id hashed password, you can use a special-purpose container from Authelia that allows creating a hashed version of your chosen password to use in your configuration file.
You can find the documentation for creating the special password hash here: Passwords – Reference – Authelia. Replace ‘password’ below with your chosen password, and it will display the hash for the password which you can copy into your users config file.
docker run authelia/authelia:latest authelia crypto hash generate argon2 --password 'password'Registering your device
Once you have plugged in your hashed password in the user database config, you can restart your docker-compose deployment and you should be good to use the password contained in the user configuration database file.
Now, browse to your Authelia host.
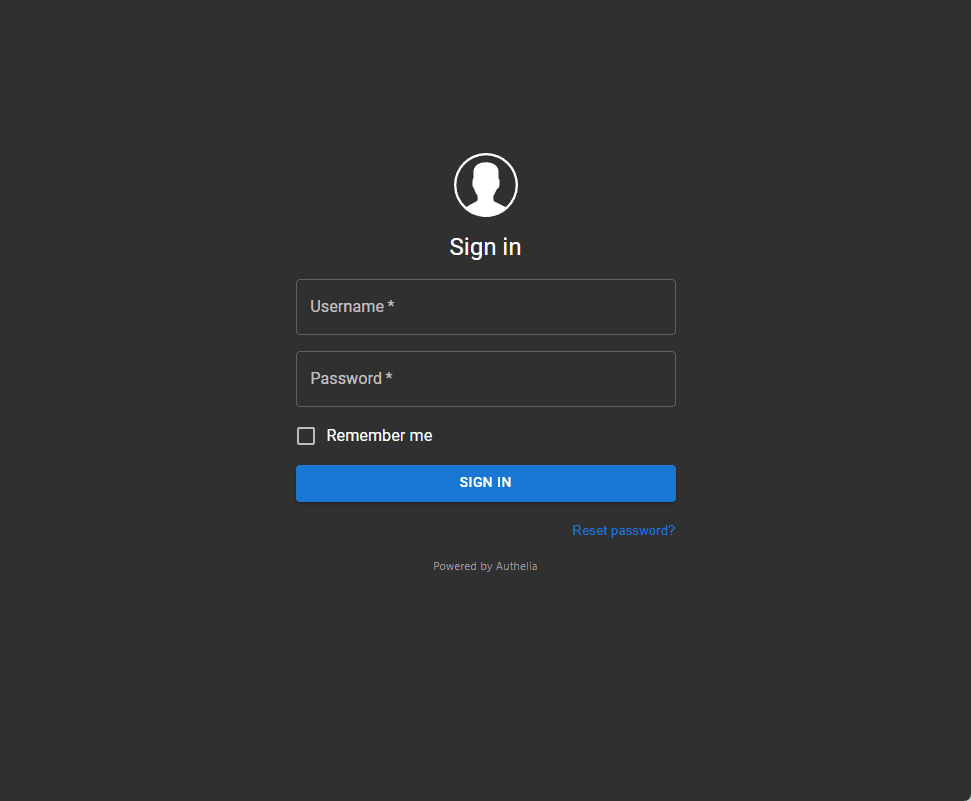
Click the register device link.
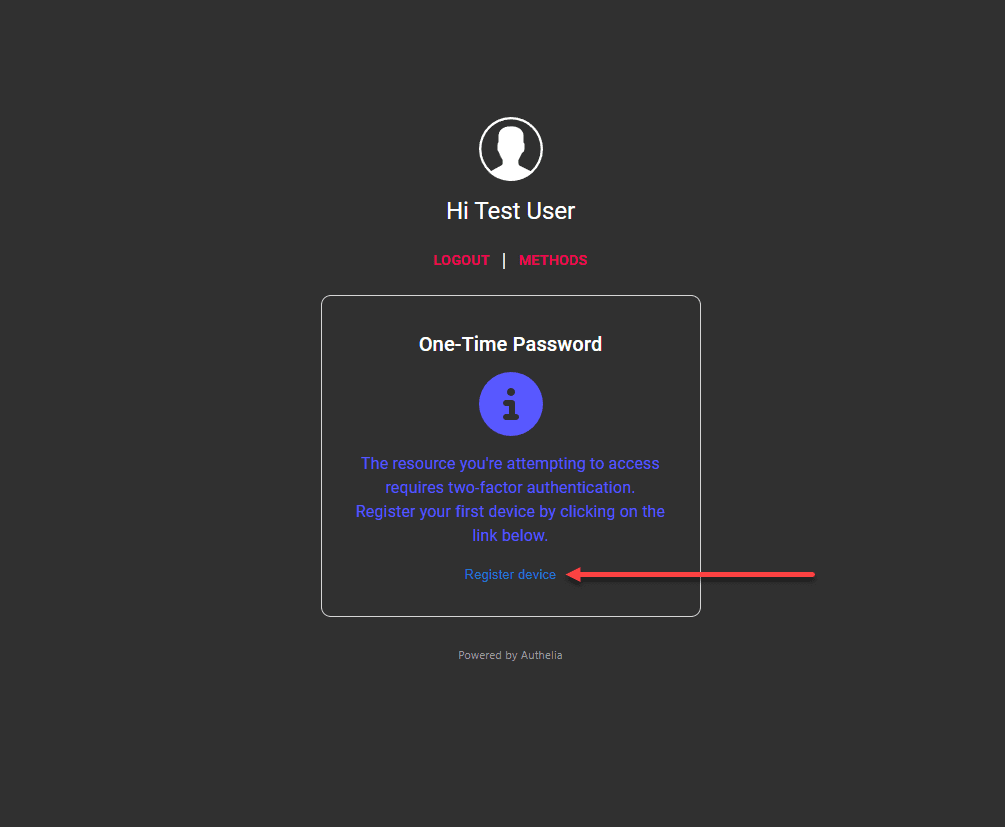
Registering 2FA using email or notification.txt file
If you have proper email configured, you should receive an email with the link to set up your device.
Otherwise, you can open the notification.txt file to see the URL information.
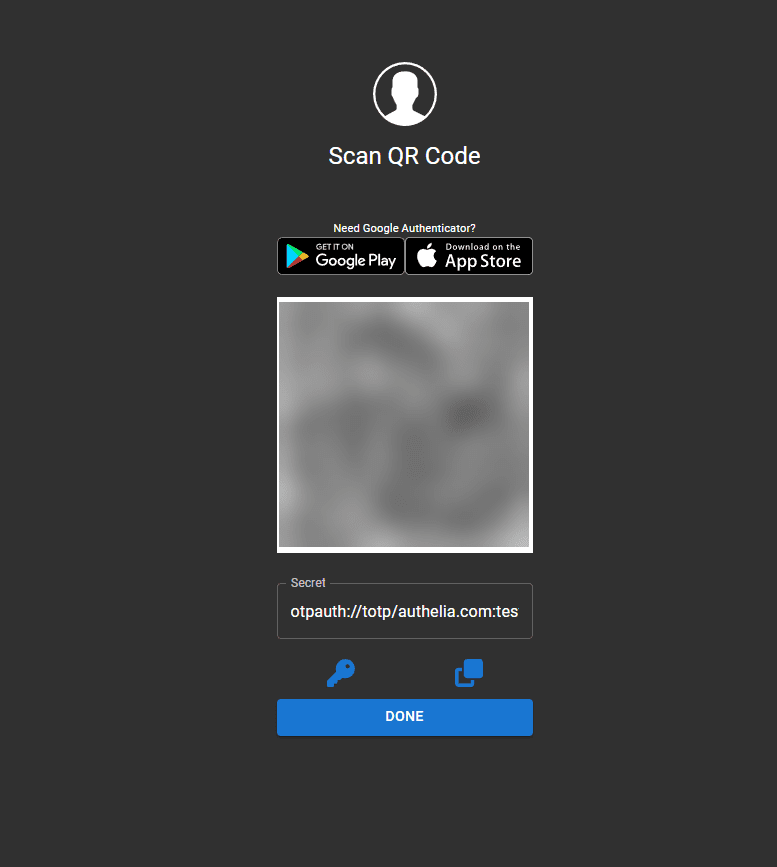
When you visit the URL, you will see a familiar QR code to setup your 2FA account in your TOTP app.
Testing 2FA after registering a device
Now you can authenticate to either your authentication URL or any of the resources protected by the Authelia authentication solution and you should be prompted for 2FA. Enter your one-time passcode.
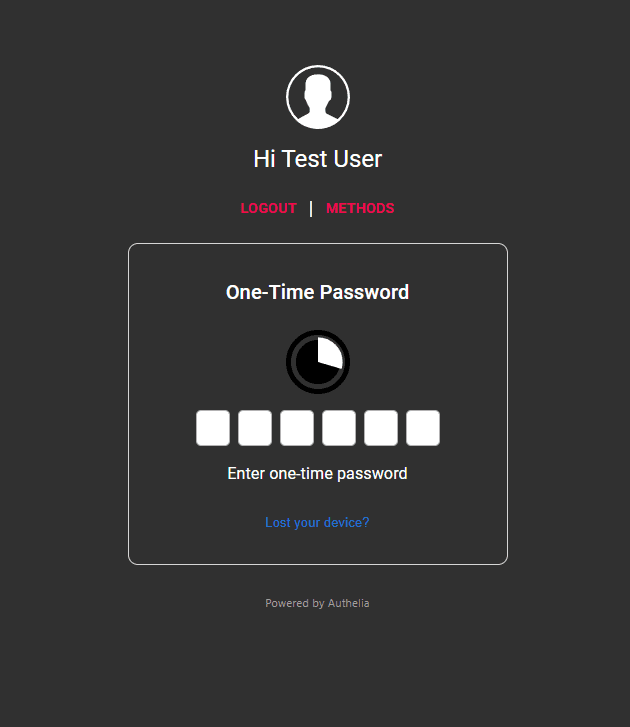
You should see your authentication succeed.
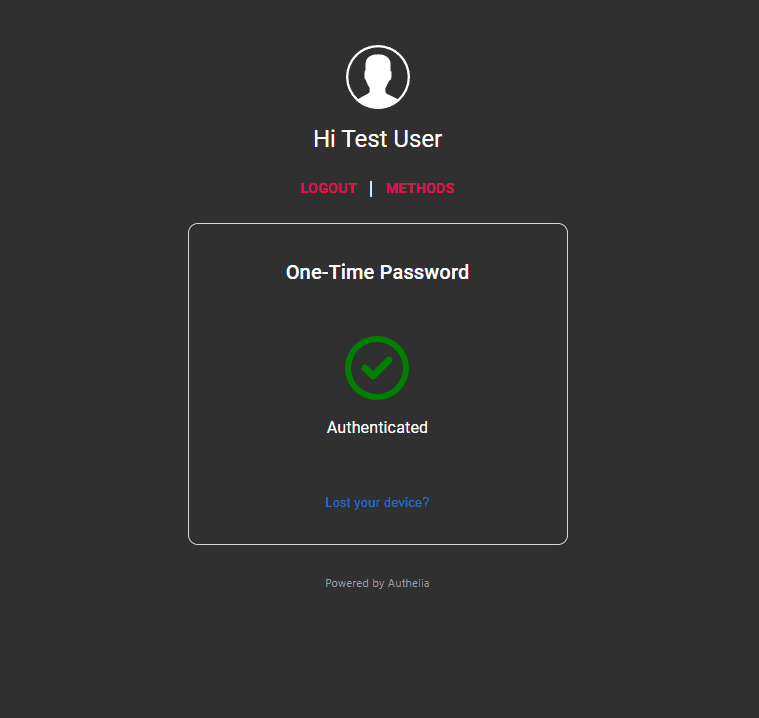
Now you can authenticate to one of the protected resources and have it prompt for a one_factor or two_factor authentication login.
Wrapping up
Authelia is an excellent open-source authentication and authorization solution. It has fine-grained access control, two-factor authentication, and single sign-on capabilities. It offers awesome protection for your web portal. Its support for Docker Compose, support for versatile proxy support, and active community development make it a great solution for your home lab or production environment for securing modern containerized resources.
More in this topic

Discuss this in the Community
Google is updating how articles are shown. Don’t miss our leading home lab and tech content, written by humans, by setting Virtualization Howto as a preferred source.
About The Author
