Proxmox cluster installation and configuration
After running a Proxmox single node server in your home lab or development environment, you probably want to graduate to using multiple nodes for high-availability. Creating a Proxmox cluster is a great way to have HA and have the option to move workloads around for maintenance and failover. Let’s look at Proxmox cluster installation and configuration.
What is Proxmox Cluster?
A Proxmox cluster is multiple Proxmox hosts that work together as a single logical unit. They usually have some type fo shared storage between them. This way, if a host fails, the other hosts can run the VMs and containers the failed host was running and restarts them on a healthy host.
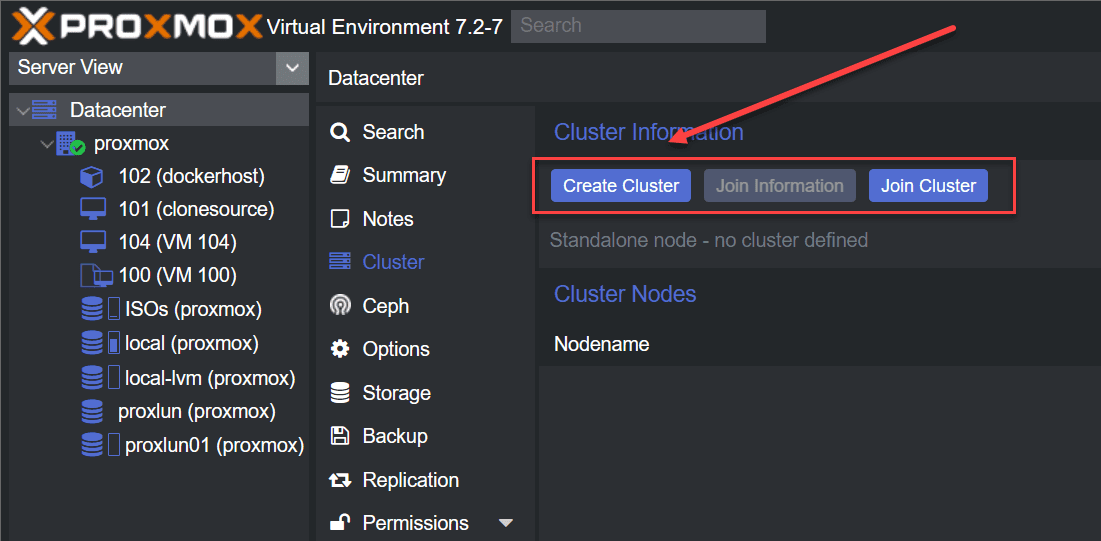
The Proxmox cluster uses hosts loaded and installed with Proxmox Virtual Environment (VE). After you install one Proxmox VE host, you can navigate to your datacenter settings > Cluster > Create Cluster.
Proxmox cluster benefits
A Proxmox Cluster provides many benefits, including
- high availability of VMs and LXC containers
- Automated failover
- Making sure VMs are always available
- Bolstering maintenance operations making it easy to keep hosts updated or taking them down for maintenance.
Minimum Requirements for Building a Proxmox Cluster
There are requirements for a Proxmox cluster like there are for an ESXi cluster, Hyper-V cluster, etc. To create a Proxmox VE cluster, you need to have at least 2 Proxmox nodes for the cluster. Like other cluster configurations, it is best practice to have identical hardware for the cluster to make sure you have compatibility between them and everything is uniform and consistent when it comes to resources and running VMs.
The nodes communicate back and forth to carry out management tasks and make sure everything is up and running and reachable.
As mentioned, shared storage is really a requirement for HA and other production workloads or in the home lab. With shared storage, it means the storage or data doesn’t really move if a host fails. The healthy hosts just spin up the failed VM or containers from the failed host and bring them back online.
Firewall Requirements
There are also firewall requirements. The cluster uses TCP ports to communicate between nodes. So, you want to make sure the ports are open on the firewall or any firewalls in between.
IP addresses
As with networking best practices and functionality, your Proxmox nodes each have their own unique IP address. Also, with a cluster configuration, there will be other IP addresses these may have, including for cluster communication, and for things like running Ceph storage.

Config files and Corosync
The configuration files for a Proxmox Cluster can be stored on either on local storage that is directly attached to a Proxmox node or shared storage accessible from multiple nodes.
Just make sure to choose the right type of storage for your needs, hardware requirements, and other factors that are going to be unique in each environment.
The corosync communication protocol is the protocol that manages Proxmox cluster communication between nodes in a Proxmox Cluster. It is responsible for making sure the nodes in the cluster can communicate with each other. It is also responsible for the transfer of information and data between nodes.
Failure, Cluster Manager, and Node types
Let’s talk about node failures. When a node fails, the remaining healthy node or nodes with continue to work and operate normally in the cluster. These other nodes will be the target of failover operations for high-availability so that your VMs and LXC containers are restarted over on healthy hosts.
The corosync cluster manager is responsible for automatically failing over to the remaining nodes in the event of a failure.
The cluster manager is the node that is responsible for performing these management tasks. These include live migrations of VMs and automated failover operations. It is one of the important roles that is found inside the cluster management plane that handles events and coordinates during failures.
In a Proxmox Cluster, there are two types of nodes: the main node and the slave node or second node.
- The main node is responsible for performing management tasks
- the slave node is responsible for running virtual machines.
In the event of a failure of the main node, the slave node will take over and perform management tasks until the main node is restored.
Can you run a single node?
Yes. A single-node cluster is a Proxmox cluster that has only one node and is used in smaller environments for testing or home labs. It is not used for production.
You can setup a single nde cluster in Proxmox. You will need to have install Proxmox on a single node and configure the network settings. Once Proxmox is installed, you can create a new single-node cluster using the Proxmox Web GUI or the command line.
Home Lab Environments
A home lab environment has a small number of physical servers. Most run often only one or two, and is used for testing and learning purposes.
Using a Proxmox cluster in your home lab can provide the same benefits of high availability and easy migration of virtual machines. This doesn’t have to be a large cluster, just a cluster of two nodes.
Clusters introduce some complexity in the lab environment, such as more network requirements and properly configuring the firewall. However, the extra complexity is usually worth it for a good learning environment that is stable and one you can easily move things around.
Setting up a cluster itself is also a great way to learn about virtual environments and to gain hands-on experience with Proxmox. Everything you configure in a lab is nothing more than real world experience that you can take into production environments.
Create a Proxmox cluster
Step 1: Log in to the Proxmox Web GUI
To create a Proxmox Cluster using the Proxmox Web GUI, you will need to log in to the Proxmox Web GUI on one of the nodes in the cluster.
The Proxmox Web GUI can be accessed by navigating to https://<node-ip-address>:8006 in a web browser.
Step 2: Create a new cluster
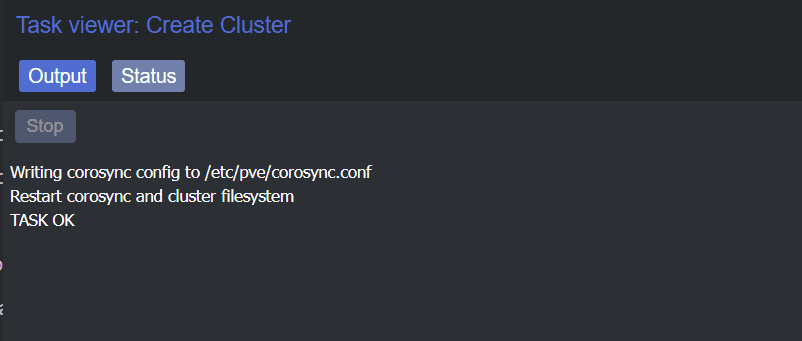
To create a new cluster, click on the “Cluster” tab in the Proxmox Web GUI and then click on the “Create Cluster” button. This will open a dialog where you can enter the name of the new cluster.
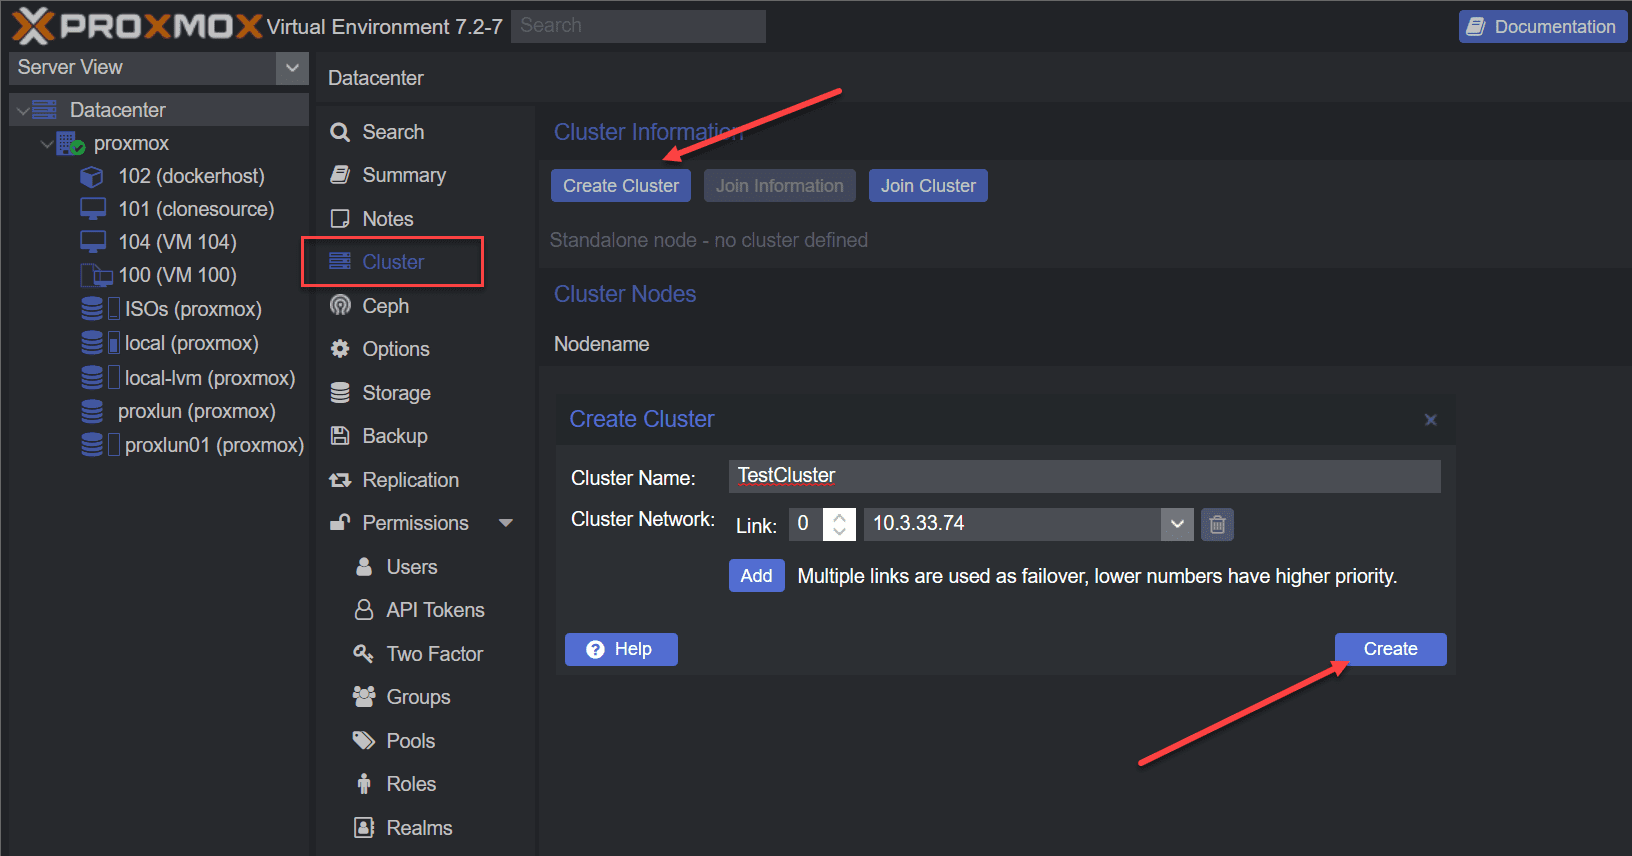
You can also create this from the command line:
pvecm create <cluster-name>Step 3: Add nodes to the cluster
Once the new cluster has been created, you can add additional nodes to the cluster. To do this, click on the “Cluster” tab in the Proxmox Web GUI and then click on the “Add Node” button. This will open a dialog where you can enter the node’s IP address you want to add to the cluster.

You will use this join information to join cluster on the second, and third node.
You can also do this from the command line:
pvecm join <ip-address-of-the-main-node>Step 4: Configure the corosync communication protocol
To configure the corosync communication protocol, click on the “Cluster” tab in the Proxmox Web GUI and then click on the “Edit” button next to the cluster you want to configure.
This will open a dialog where you can modify the settings for the corosync communication protocol, including the communication port and the number of votes required to reach quorum.
Step 5: Add virtual machines to the cluster
Once the cluster has been configured, you can add virtual machines to the cluster. To do this, click on the “Virtual Machines” tab in the Proxmox Web GUI and then click on the “Create VM” button.
This will open a dialog where you can create and configure virtual machines, including specifying the virtual machine name, the operating system, and the storage location.
Step 6: Monitor the cluster
This can be done using the Proxmox Web GUI by clicking on the “Cluster” tab and then clicking on the “Monitor” button. Make sure to keep updates as part of your regular schedule of lifecycle updates.
Cluster cold start
Cluster cold start refers to the process of starting a Proxmox Cluster from scratch, without any configuration or state information. A cluster cold start usually happens in the following
After a complete failure of the cluster: In the event of a complete failure of the cluster, all configuration information and state information are lost, and a cluster cold start is necessary to rebuild the cluster from scratch.
When setting up a new Proxmox Cluster: When setting up a new Proxmox Cluster, a cluster cold start is necessary to create a new cluster and configure the cluster from scratch.
When changing the cluster configuration: When changing the configuration of an existing Proxmox Cluster, such as adding or removing nodes, a cluster cold start may be necessary to properly reconfigure the cluster.
A cluster cold start in Proxmox Clusters involves installing Proxmox on each node, configuring the network settings, creating a new cluster, adding nodes to the cluster, and configuring the corosync communication protocol. This process can be performed using the Proxmox Web GUI or by using the command line.
It is important to note that a cluster cold start can result in data loss, as all virtual machines and configurations will need to be recreated. As such, it is important to plan properly and back up all virtual machines and configurations prior to performing a cluster cold start.
Wrapping Up
Proxmox is a great platform for running home lab workloads and production environments. With Proxmox clusters, you can set up a high-availability environment to protect your virtual machines from a single node failure in the data center.
If you follow all the steps listed to create a Proxmox cluster, you can easily create a Proxmox cluster using the web UI and CLI.