Public cloud infrastructure provides powerful capabilities, features, and functionality for today’s enterprise as it allows businesses to access the hyperscale infrastructure of today’s cloud service providers. They can build their own infrastructure on top of the same environment that Amazon, Google, and Microsoft use for their own purposes. Additionally, public cloud infrastructure is exposed using modern APIs. This means organizations can effectively automate their infrastructure using tools like Terraform. In this tutorial, we will take a look at a quick example of how to create an ec2 instance using terraform and see how easy this process is with just a few lines of code.
Create an EC2 Instance Using Terraform
When we look at how to create an EC2 instance using Terraform, there are a few things that we need to consider. However, the process can be accomplished using the following steps:
- Authenticating to Amazon AWS
- Configuring Terraform providers, data, and resources
- Run Terraform init, plan, and apply
1. Authenticating to Amazon AWS
One of the first tasks you need to accomplish in your Terraform code is authenticating to your AWS environment. Like anything you work with, whether it be vSphere, Windows, or any other cloud solution, you need to authenticate with the solution before you are able to make changes, configure, manage, etc. The same is true with AWS.
AWS uses an access key and a secret key for accessing the AWS environment. These are provisioned in your AWS IAM console. There are many different ways to authenticate to Amazon AWS for the purposes of automating your infrastructure there with Terraform, or any other automation tool for that matter. You can leverage the following in general terms:
- Hard code the IAM access key and secret key (very insecure)
- Leverage environment variables and AWS profiles
- Use a credential solution like Hashicorp Vault
For the purposes of this quick walkthrough, we will be using the “hard coded” approach as this is simple and easy. To do this, we will hard code the credentials into the tfvars Terraform file like so. Note, when using Windows the “\” is an escape character, so we have to use two of them to define the path.
aws_access_key = ""

aws_secret_key = ""

key_name = "AWS key pair"

key_path = "c:\\keys\\awskey.pem"
However, take a look at my how-to on using Hashicorp Vault with Terraform and VMware vSphere to get an idea of the possibilities:
2. Configuring Terraform variables providers, data, and resources
So, we will have a main.tfvars file that will hold the AWS access key and secret key as mentioned above. Then we will have a main.tf file that will contain the call out to the variables, providers, data, and resources. Let’s look at the variables section of the code. Below all of the code blocks will be housed in the main.tf file.
Variables:
In the main.tf file, we are declaring the variables we are going to use, including:
- aws_access_key
- aws_secret_key
- key_path
- key_name
- region
variable "aws_access_key" {}
variable "aws_secret_key" {}
variable "key_path" {}
variable "key_name" {}
variable "region" {
  default = "us-east-1"
}
Providers:
Next, in the Providers section, we will call the AWS provider in Terraform. According to Terraform documents, Providers are a logical abstraction of an upstream API. They are responsible for understanding API interactions and exposing resources.
Using the variables declared earlier, we use the access_key, secret_key, and region variables declared earlier. You can also use AWS profiles that can be configured using the AWS configure command when you have the AWS CLI installed.
provider "aws" {
  access_key = var.aws_access_key
  secret_key = var.aws_secret_key
  region     = var.region
}
Data:
Next, we need to define the data block that describes the AWS EC2 instance we want to provision. Here we are defining that we want an Amazon AMI. You can also see further examples and explanation of this here:
data "aws_ami" "aws-linux" {
  most_recent = true
  owners      = ["amazon"]

  filter {
    name   = "name"
    values = ["amzn-ami-hvm*"]
  }

  filter {
    name   = "root-device-type"
    values = ["ebs"]
  }

  filter {
    name   = "virtualization-type"
    values = ["hvm"]
  }
}
Resources:
Next, we actually define the resources we want Terraform to build. For EC2, we just need to define a few things, including the VPC and security group it will use as well as the EC2 resource itself.
VPC:
resource "aws_default_vpc" "default" {

}
Security Group:
Below, we are creating the security group that allows incoming connections to port 22 for SSH as well as allows egress to any port. You can scope the SSH ingress to your specific IP address in the form of 1.2.3.4/32 if you want to restrict to your specific IP address.
resource "aws_security_group" "ssh_allow" {
name = "SSH allow"
description = "Allow ingress SSH"
vpc_id = aws_default_vpc.default.id

ingress {
from_port = 22
to_port = 22
protocol = "tcp"
cidr_blocks = ["0.0.0.0/0"]
}
egress {
from_port = 0
to_port = 0
protocol = -1
cidr_blocks = ["0.0.0.0/0"]
}
}
EC2 Instance:
Below, we are creating the EC2 resource, referencing the security group that will be assigned to the EC2 instance, as well as the key name that will be used.
resource "aws_instance" "MyLinuxServer" {
ami = data.aws_ami.aws-linux.id
instance_type = "t2.micro"
key_name = var.key_name
vpc_security_group_ids = [aws_security_group.ssh_allow.id]

connection {
type = "ssh"
host = self.public_ip
user = "ec2-user"
private_key = file(var.key_path)

}
}
Run Terraform init, plan, and apply
After you have created your two files, main.tf and main.tfvars, you are ready for the fun part, building the EC2 instance. This comes down to three commands:
- terraform init – This downloads the required plugin for the AWS provider so Terraform can work with the AWS environment
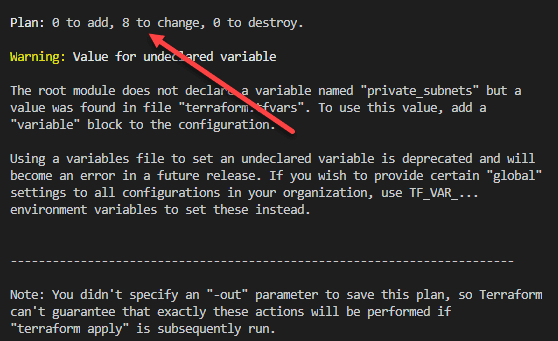
- terraform plan – Plan basically shows you what you are going to do when running the code. It will show the “intent” if you will for your apply operation. It also checks syntax and other things. It will show the resources that are to be added, destroyed, or changed.
terraform apply – Terraform apply is the command to actually run the code. Running terraform apply actually performs the operations. You do have the opportunity to type yes after you run Terraform apply so there is one more step in case you don’t actually want to run it.
Wrapping Up
The process to Create an EC2 Instance Using Terraform is fairly straightforward and just requires a few things in terms of code blocks that include variables, providers, data, and resources. This allows creating infrastructure as code and makes the process of automating your environment extremely easy. Terraform provides a very human-readable language that allows getting up to speed quickly with just a bit of time working through the code and going through a few labs if you have access to an AWS environment to play around with.
Google is updating how articles are shown. Don’t miss our leading home lab and tech content, written by humans, by setting Virtualization Howto as a preferred source.
About The Author