A while ago, I had written a blog post about installing Windows Updates during an unattended install of Windows Server 2019. Let’s take a look at how to work with Windows Update in Windows Server 2019 including, logs, installing updates, and using PowerShell to automatically install Windows updates in Windows Server 2019. By controlling Windows Updates with PowerShell, you open a lot of doors to being able to implement effective configuration management and automated desired state with your infrastructure. Let’s look at Windows Server 2019 Automating Windows Update with PowerShell and Logs to see how this can be done.
Windows Server 2019 Windows Update Logs
Microsoft has departed from using the traditional windowsupdate.log file starting with Windows 10 and recent Windows Server versions starting with Windows Server 2016. Windows Server 2019 has followed suit with using PowerShell as the method to aggregate your log files. In case you are not familiar with this change in Windows Update logging, let’s step through that process and see how you can effectively gain access to your Windows Update logs in a readable format that is easily viewable.
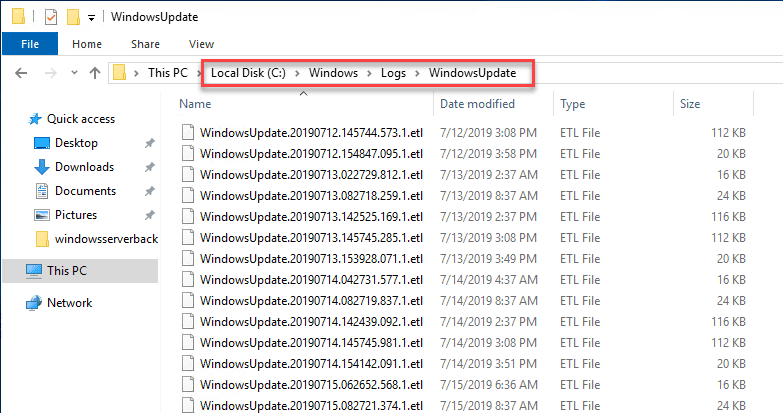
On a Windows Server 2016 and higher server, if you look in the location c:WindowsLogsWindowsUpdate you will see various log files that are in the format of .etl files. These are not easily readable if you are to simply try to open them up to edit and view their contents. However, there is a PowerShell command that Microsoft has provided that essentially creates a WindowsUpdate.log file similar to the legacy file that we have been used to viewing and troubleshooting with.
Below is a look at the c:windowslogswindowsupdate directory.
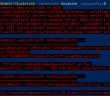
The command to aggregate your ETL log files into an easily readable format is the cmdlet:
Get-WindowsUpdateLog
As you can see below, you will see the message converting c:windowslogswindowsupdate into c:users<your username>Desktopwindowsupdate.log. As you can see with the arrow, the traditional WindowsUpdate.log file gets created as a result of the cmdlet.
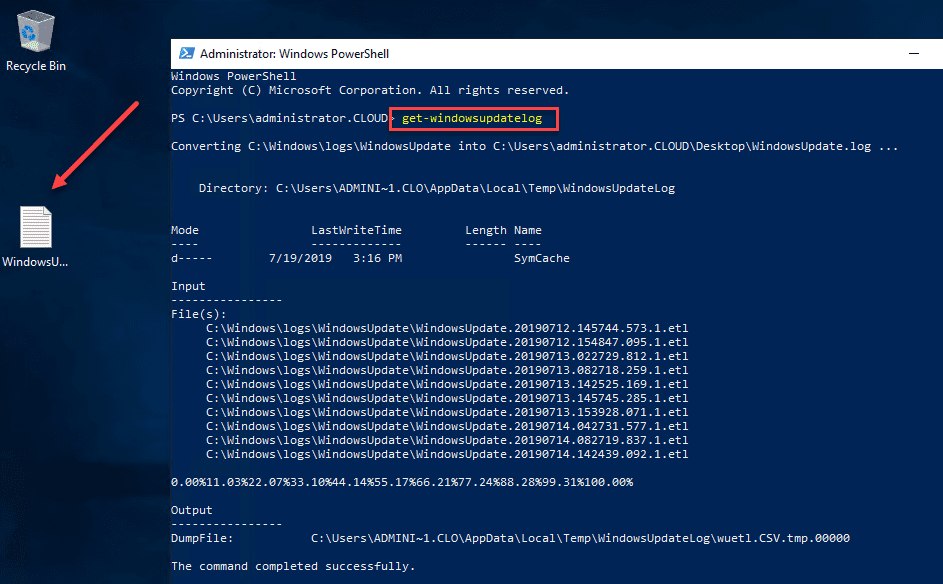
The WindowsUpdate.log file that is created has the usual log information. Below is a snippet from the one generated in the screenshot above from a Windows Server 2019 VM.
2019/07/19 14:58:27.5442492 4328  6336  Agent           LogHistory called. idUpdate={BF584F11-3B97-415D-B596-E2BFB6BC4E7A}.200, resultMapped=0, resultUnMapped=0
2019/07/19 14:58:27.5477844 4328  6336  Agent           Install updates CallerId = Windows Defender Antivirus (77BDAF73-B396-481F-9042-AD358843EC24)
2019/07/19 14:58:27.5480030 4328  6336  IdleTimer       WU operation (CInstallCall::Init ID 5, operation # 30) stopped; does not use network; is not at background priority
2019/07/19 14:58:27.5503666 8880  7240  ComApi           Install ClientId = Windows Defender Antivirus (77BDAF73-B396-481F-9042-AD358843EC24)
2019/07/19 14:58:27.5503778 8880  7240  ComApi          Install call complete (succeeded = 1, succeeded with errors = 0, failed = 0, cancelled = 0, unaccounted = 0
2019/07/19 14:58:27.5503836 8880  7240  ComApi          Reboot required = False
2019/07/19 14:58:27.5503855 8880  7240  ComApi          * END *   Install ClientId = Windows Defender Antivirus (77BDAF73-B396-481F-9042-AD358843EC24)
2019/07/19 14:58:27.5504177 4328  7276  Agent           WU client calls back to install call {565D23B1-7445-4604-8120-B11E6B73C271} with code Call complete and error 0
2019/07/19 14:58:27.5551328 8880  8556  ComApi          Install call complete (succeeded = 1, succeeded with errors = 0, failed = 0, cancelled = 0, unaccounted = 0
2019/07/19 14:58:27.5551402 8880  8556  ComApi          * END *   All federated installs have completed. ClientId = Windows Defender Antivirus (77BDAF73-B396-481F-9042-AD358843EC24) (cV = Fl5ilwUoSEqn9HfP.3.1)
2019/07/19 15:08:27.5752052 4328  8400  Agent           Earliest future timer found:
2019/07/19 15:08:27.5752233 4328  8400  Agent               Timer: 29A863E7-8609-4D1E-B7CD-5668F857F1DB, Expires 2019-07-20 19:26:35, not idle-only, not network-only
2019/07/19 15:08:28.5871440 4328  96    Shared          UninitializeSUS
2019/07/19 15:08:28.5871472 4328  96    Misc            CSusClientGlobal::DoServicePreShutdown
2019/07/19 15:08:28.5873373 4328  96    IdleTimer       Idle timer disabled in preparation for service shutdown
2019/07/19 15:08:28.5873574 4328  96    Misc            WUTaskManager uninit
2019/07/19 15:08:28.5873602 4328  96    Agent           Earliest future timer found:
2019/07/19 15:08:28.5873691 4328  96    Agent               Timer: 7971F918-A847-4430-9279-4A52D1EFE18D, Expires 2019-07-19 20:51:09, not idle-only, network-only
2019/07/19 15:08:28.5916952 4328  96    Misc            CreateSessionStateChangeTrigger, TYPE:2, Enable:No
2019/07/19 15:08:28.5917026 4328  96    Misc            CreateSessionStateChangeTrigger, TYPE:4, Enable:No
2019/07/19 15:08:28.6273705 4328  96    Misc            Agent uninit
2019/07/19 15:08:28.6289738 4328  96    Misc            Reporter uninit
2019/07/19 15:08:28.6297334 4328  96    Misc            network cost manager uninit
2019/07/19 15:08:28.6297439 4328  96    Misc            Eventer uninit
2019/07/19 15:08:29.6336957 4328  96    Misc            ServiceManager uninit
2019/07/19 15:08:29.6337784 4328  96    Misc            PersistentTimeoutScheduler uninit
2019/07/19 15:08:29.6337806 4328  96    Misc            datastore uninit
2019/07/19 15:08:29.6883274 4328  96    Misc            setting cache uninit
2019/07/19 15:08:29.6883300 4328  96    Misc            security checker uninit
2019/07/19 15:08:29.6883341 4328  96    Misc            Test Hook uninit
2019/07/19 15:08:29.6883414 4328  96    Misc            IdleTimer uninit
2019/07/19 15:08:29.6887794 4328  96    Shared          * END * Service exit Exit code = 0x240001
One thing to note about the WindowsUpdate.log file that is created with the PowerShell cmdlet is that it is static. It doesn’t autoupdate like the traditional WindowsUpdate.log file did. You can just rerun the PowerShell cmdlet to regenerate the WindowsUpdate.log file to review the latest logs generated.
Automating Windows Updates in Windows Server 2019
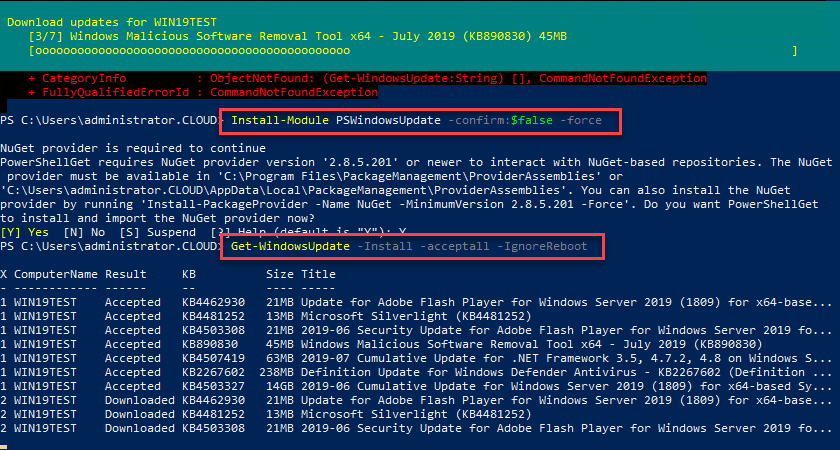
I have covered this utility before, however, there is a great module available for installation – the GetWindowsUpdate cmdlet found in the PSWindowsUpdate. It is installed using the following PowerShell commands and requirements:
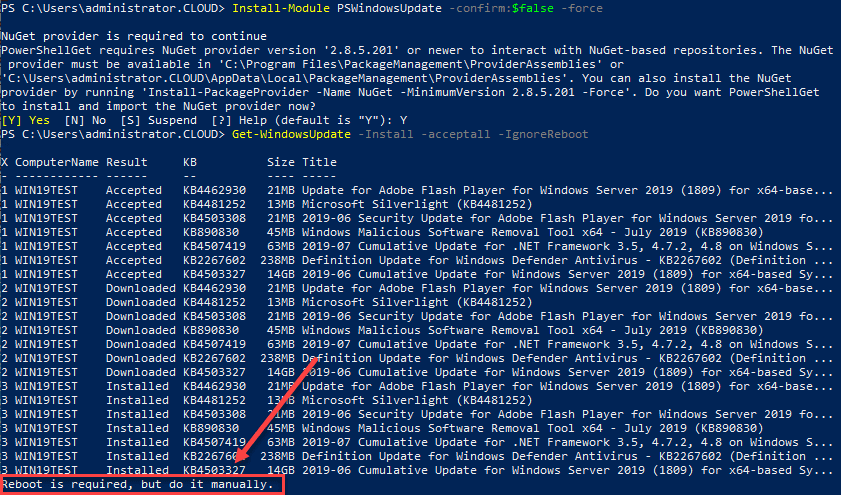
#Install PS Windows Update Module

Get-PackageProvider -name nuget -force
Install-Module PSWindowsUpdate -confirm:$false -force
Get-WindowsUpdate -Install -acceptall -IgnoreReboot
Below, is a look at installing the PSWindowsUpdate Module for installing Windows Updates in Windows Server 2019 using PowerShell.
After running the Get-WindowsUpdate command on a Windows Server 2019 server with the installation of available updates. Note the Reboot is required, but do it manually at the end. This can be controlled with the -IgnoreReboot switch.
Wrapping Up Windows Server 2019 Automating Windows Update with PowerShell and Logs
With Windows Server 2019 automating Windows Update with PowerShell is a great way to control Windows updates with Windows Server 2019. Also, Windows Server 2019 Windows Update logs are easily obtained with PowerShell as well by running a PowerShell cmdlet to aggregate the various ETL files that are created by Windows Server 2019. The great thing about PowerShell is that Microsoft has fully embraced it in all aspects of both client and server operating systems. Having PowerShell performing the heavy lifting with Windows Updates is a great way to control and automate the process.
Google is updating how articles are shown. Don’t miss our leading home lab and tech content, written by humans, by setting Virtualization Howto as a preferred source.
About The Author