How to flash Avago LSI RAID controller firmware with boot disk
In working on provisioning a new Supermicro lab server that is outfitted with an Avago LSI 9380-4i4e SAS RAID controller, one of the first tasks I wanted to complete was flashing the firmware to the latest version. There are a few posts out there that detail creating a DOS boot disk and using the MegaCLI utility from Avago. Unfortunately, this utility has been deprecated in favor of the StorCLI utility which is available for download from Avago. The problem is this is no longer a 16 bit DOS application and is a 32 or 64 bit Windows application. So let’s see how to flash Avago LSI RAID controller firmware with boot disk.
How to flash Avago LSI RAID controller firmware with boot disk
The first thing we need to do is grab the tools we need to build the boot disk. As mentioned above, the 16 bit DOS disk will not work with the StorCLI utility. So I decided to utilize the Windows PE platform for initializing the boot environment to run the StorCLI command. The easiest way to get access to be able to create a PE boot disk is to download the Windows ADK kit from Microsoft. This is readily available as a free download. The one for Windows 10 is found here from Microsoft. The only downside is the install takes quite a while, but is a great utility/tool to have for future deployments, boot disk creations, etc.
Creating the boot disk
To create the WADK boot disk, open your Deployment and Imaging Tools Environment command prompt and after you have inserted your USB drive run the following commands. Note as you can see I have included the commands for both 32 and 64 bit, so choose your options here.
copype x86 C:winpe_x86
copype amd64 c:winpe_x64

makewinpemedia /ufd c:winadk_x86 E:
makewinpemedia /ufd c:winadk_x64 E:
Once you have your Windows ADK boot disk created, let’s get the tools and firmware from Avago/LSI that we need. You will want two things – the firmware itself and the StorCLI utility.
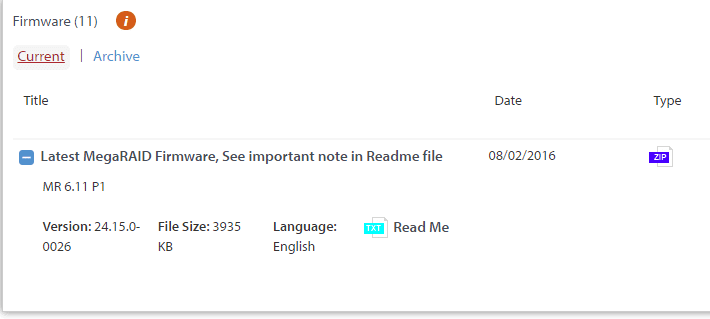
On the Avago site, under Support Documents and Downloads, you will choose your RAID controller. There are several options under the Downloads section. However, look for Firmware and expand the box. You should see the current firmware listed. As you see below, it is a ZIP file containing the normal readme documentation and the firmware itself.
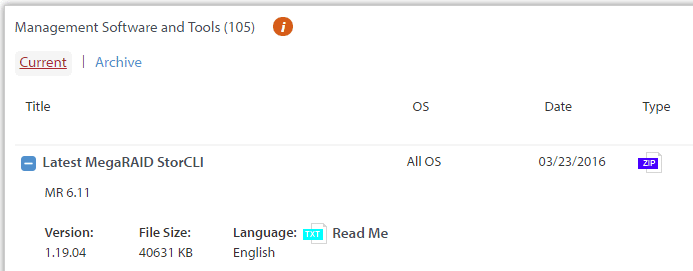
To get the StorCLI utility, look for the Management Software and Tools section. One oddity I noticed was for my 9380-4i4e card, there wasn’t a listing for the StorCLI under the Current list – I had to expand the Archive. However, when I searched for downloads under the 9380-8e card which is in the same family, there was a StorCLI download under current.
After extracting the firmware ZIP file, the contents looked like the following. Look for the file that ends in *.rom which is the actual firmware file.
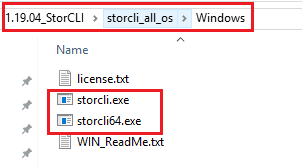
For the StorCLI utility, download the ZIP file and extract it. The Windows files are found in the directory structure shown below. Note, you have both storcli.exe and storcli64.exe. Depending on which Windows ADK boot disk you make, you will need to use the appropriate file. However, I believe the 32 bit version will work in the 64 bit disk but not the other way around.
Now simply copy your .rom file and either the storcli.exe or storcli64.exe file to the root of your Windows USB boot disk created with the Windows ADK.
Running the firmware upgrade
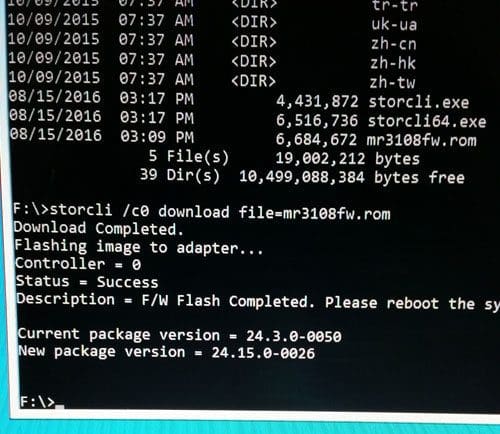
Now all we have left to do is boot from our ADK USB boot disk and run the upgrade process. The command line syntax using the storcli command to upgrade firmware is the following:
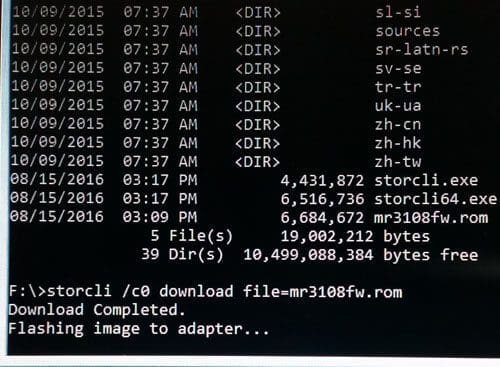
storcli /c0 download file=yourfirmware.rom
Here the command to download the firmware has started and the flashing begins.
After a few minutes, you should see the Status = Success message and a note that you need to reboot. You should now have a newly flashed RAID controller with the latest firmware.
Final Thoughts
Avago LSI documentation on flashing firmware and making boot disks is lacking. Hopefully the process above on how to flash Avago LSI RAID controller firmware with boot disk will help any who may be struggling to figure out how to create a boot disk to use with the StorCLI utility to upgrade firmware to the latest version.


