
I have been playing around with Packer and getting templates updated in the home lab. In moving more into Proxmox in the lab environment, I wanted to get similar templates in place as I have with VMware vSphere. Let’s look at how to build a Proxmox Packer template for Ubuntu 24.04 and see how you can automate Ubuntu installations on Proxmox.
Why is Packer helpful?
Packer is extremely helpful since it allows you to have automated installations of operating systems in your virtualized environment. You can use Packer in a script or other automation, like a CI/CD pipeline to keep your templates updated regularly, instead of making this a manual process.
What do you need to get started?
You need:
- Proxmox VE server installed on a host
- Generated Proxmox API token
- Packer downloaded and working
- The Proxmox plugin for Packer
- Required files for the Packer build
Let’s look at these one by one.
1. Proxmox VE Server installed on a host
Getting Proxmox installed is super easy. It involves downloading the ISO, using something like Ventoy or Rufus to “burn” the ISO to a USB boot device, then booting your server. You can also use nested virtualization if you want to try out Proxmox.
Check out a few resources here:
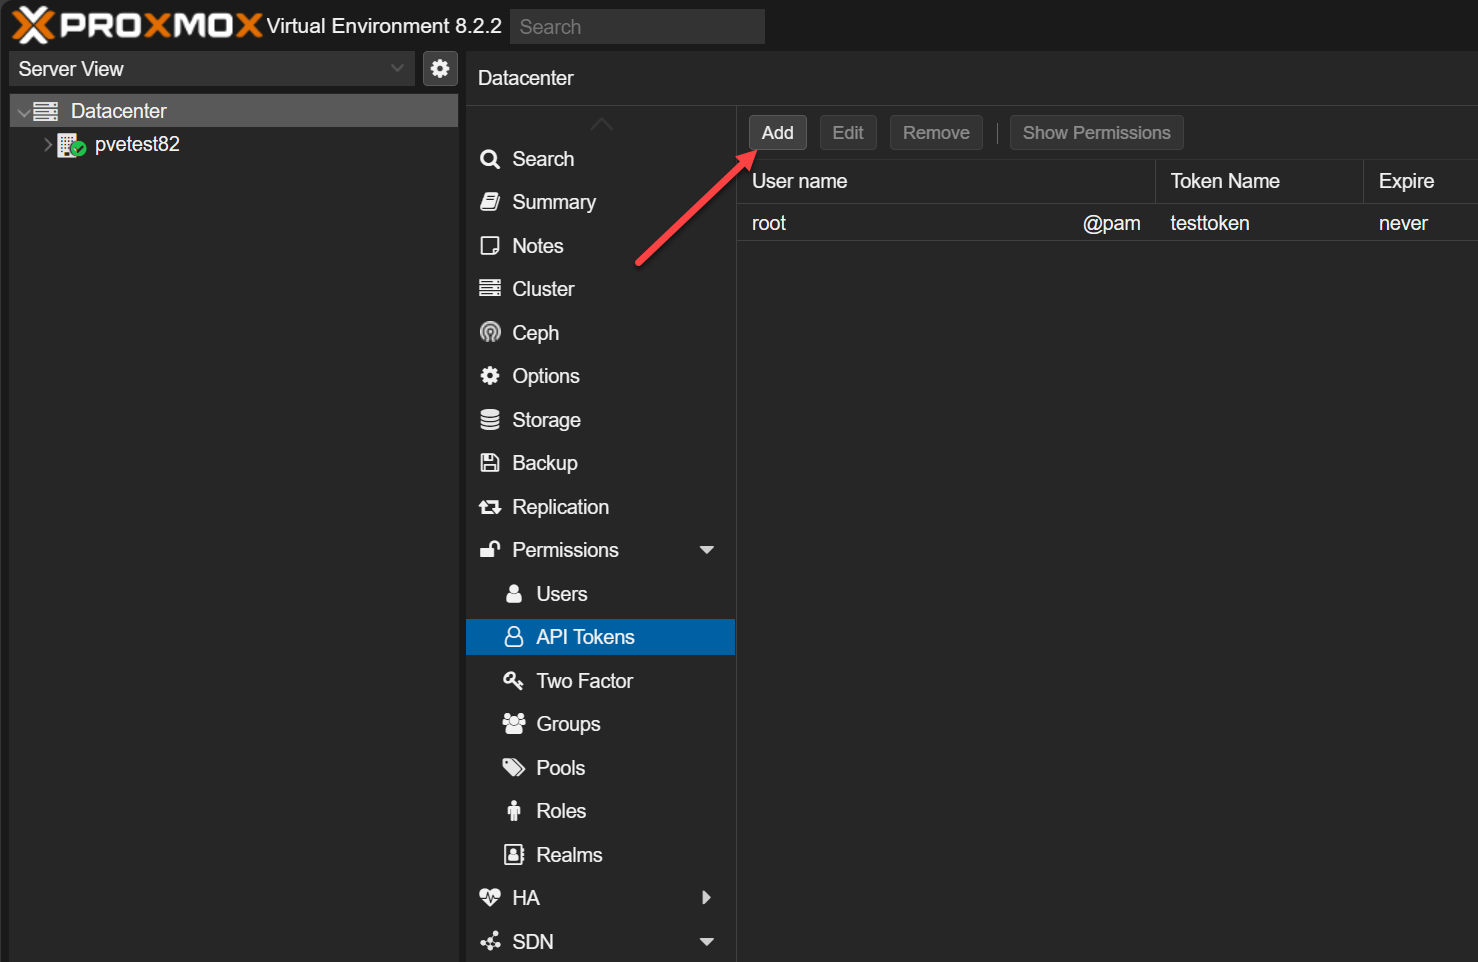
2. Generated Proxmox API token
In your Proxmox environment, you need to generate an API token for Packer to use to access the environment. To do that, you need to perform the following steps:
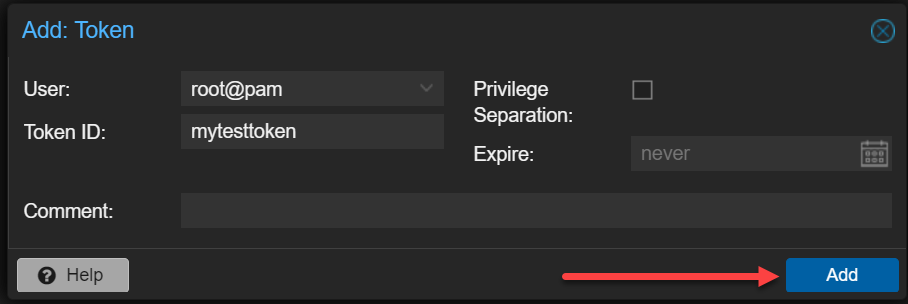
In the Add: Token dialog, choose the user you want to use, then enter a Token ID and uncheck Privilege Separation. Click Add.
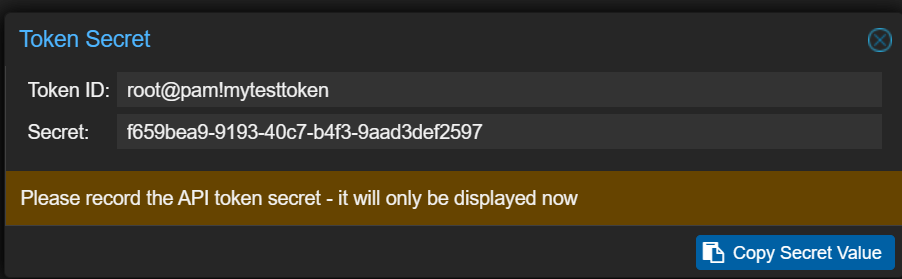
On the Token Secret dialog, you will see the Token ID and Secret displayed. You will want to copy these values as we will use them in our Packer build files.
3. Packer downloaded and working
You can download Packer for your platform you are using as your admin workstation to work with your Promxox environment here: Install | Packer | HashiCorp Developer.
4. The Proxmox plugin for Packer
Like Terraform, Packer works similarly with plugins that allow it to “talk” to various infrastructure environments, including Proxmox.
You can download the Proxmox plugin for Packer using the following command:
packer plugins install github.com/hashicorp/proxmoxIn addition, Packer will automatically download and install the needed plugins if these are referenced in your Packer build code. We will see this in the example files, but the following code tells Packer which plugin it needs to build the infrastructure on Proxmox.
packer {
  required_plugins {
    name = {
      version = "~> 1"
      source  = "github.com/hashicorp/proxmox"
    }
  }
}
Then you can run the Packer init command to initialize your Packer environment, which will automatically pull the required plugin files:
packer init .
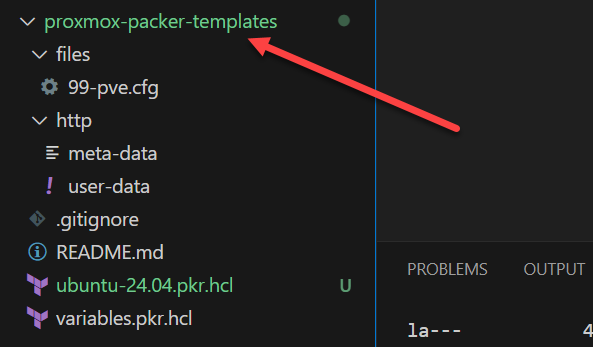
5. Required files for the Proxmox Packer Template for Ubuntu 24.04
As a note, I have take a lot of what Christian “My Digital Life” posted for Ubuntu 22.04 Packer template and modified them for my purposes and for Ubuntu 24.04. You can find his resources here. There are a few files required to build a Proxmox Packer template for Ubuntu 24.04:
- ubuntu-24.04.pkr.hcl – contents below
- variables.pkr.hcl – contents below
- user-data – contents below
- meta-data – this file is blank
- 99-pve.cfg – contents below
You can see the directory structure of where the files need to be place below:
ubuntu-24.04.pkr.hcl
Below you will see the resource definition file for your Ubuntu 24.04 build with Packer on Proxmox. Note the http_bind_address you can use if you need to specify which IP address you want to use.
# Ubuntu Server Noble Numbat
# ---
# Packer Template to create an Ubuntu Server 24.04 LTS (Noble Numbat) on Proxmox

# Resource Definition for the VM Template

packer {
  required_plugins {
    name = {
      version = "~> 1"
      source  = "github.com/hashicorp/proxmox"
    }
  }
}

source "proxmox-iso" "ubuntu-server-noble-numbat" {

    # Proxmox Connection Settings
    proxmox_url = "${var.proxmox_api_url}"
    username = "${var.proxmox_api_token_id}"
    token = "${var.proxmox_api_token_secret}"

    # (Optional) Skip TLS Verification
    insecure_skip_tls_verify = true

    # VM General Settings
    node = "pvetest82"
    vm_id = "199"
    vm_name = "ubuntu-server-noble-numbat"
    template_description = "Noble Numbat"

    # VM OS Settings
    iso_file = "local:iso/ubuntu-24.04-live-server-amd64.iso"
    iso_storage_pool = "local"
    unmount_iso = true
    template_name        = "packer-ubuntu2404"

    # VM System Settings
    qemu_agent = true

    # VM Hard Disk Settings
    scsi_controller = "virtio-scsi-pci"

    disks {
        disk_size = "20G"
        format = "raw"
        storage_pool = "local-lvm"
        type = "virtio"
    }

    # VM CPU Settings
    cores = "1"

    # VM Memory Settings
    memory = "2048"

    # VM Network Settings
    network_adapters {
        model = "virtio"
        bridge = "vmbr0"
        firewall = "false"
    }

    # VM Cloud-Init Settings
    cloud_init = true
    cloud_init_storage_pool = "local-lvm"

    # PACKER Boot Commands
    boot_command = [
        "<esc><wait>",
        "e<wait>",
        "<down><down><down><end>",
        "<bs><bs><bs><bs><wait>",
        "autoinstall ds=nocloud-net\\;s=http://{{ .HTTPIP }}:{{ .HTTPPort }}/ ---<wait>",
        "<f10><wait>"
    ]
    boot = "c"
    boot_wait = "5s"

    # PACKER Autoinstall Settings
    http_directory = "./http"
    #http_bind_address = "10.1.149.166"
    # (Optional) Bind IP Address and Port
    # http_port_min = 8802
    # http_port_max = 8802

    ssh_username = "ubuntu"

    # (Option 1) Add your Password here
    ssh_password = "ubuntu"
    # - or -
    # (Option 2) Add your Private SSH KEY file here
    # ssh_private_key_file = "~/.ssh/id_rsa"

    # Raise the timeout, when installation takes longer
    ssh_timeout = "20m"
}

# Build Definition to create the VM Template
build {

    name = "ubuntu-server-noble-numbat"
    sources = ["proxmox-iso.ubuntu-server-noble-numbat"]

    # Provisioning the VM Template for Cloud-Init Integration in Proxmox #1
    provisioner "shell" {
        inline = [
            "while [ ! -f /var/lib/cloud/instance/boot-finished ]; do echo 'Waiting for cloud-init...'; sleep 1; done",
            "sudo rm /etc/ssh/ssh_host_*",
            "sudo truncate -s 0 /etc/machine-id",
            "sudo apt -y autoremove --purge",
            "sudo apt -y clean",
            "sudo apt -y autoclean",
            "sudo cloud-init clean",
            "sudo rm -f /etc/cloud/cloud.cfg.d/subiquity-disable-cloudinit-networking.cfg",
            "sudo rm -f /etc/netplan/00-installer-config.yaml",
            "sudo sync"
        ]
    }

    # Provisioning the VM Template for Cloud-Init Integration in Proxmox #2
    provisioner "file" {
        source = "files/99-pve.cfg"
        destination = "/tmp/99-pve.cfg"
    }

    # Provisioning the VM Template for Cloud-Init Integration in Proxmox #3
    provisioner "shell" {
        inline = [ "sudo cp /tmp/99-pve.cfg /etc/cloud/cloud.cfg.d/99-pve.cfg" ]
    }

}
variables.pkr.hcl
The variables file houses the variables for our Packer build. Below are the real values I used in my test environment. I want you to be able to see how these look populated.
variable "proxmox_api_url" {
  type = string
  default = "https://10.1.149.199:8006/api2/json"
}

variable "proxmox_api_token_id" {
  type = string
  default = "root@pam!testtoken"
}

variable "proxmox_api_token_secret" {
  type = string
  default = "de7cd80c-cf3c-43fc-bd26-df6cf3b9c98c"
  sensitive = true
}
user-data
The user-data file controls the cloud config portion of the build. Below the hashed password for the ubuntu user is ubuntu. You can create a hashed password for your user using the Linux commands:
sudo apt-get install whois
mkpasswd --method=SHA-512 --rounds=4096
After you generate your password you want to use, you can replace the hashed value below.
#cloud-config
autoinstall:
  version: 1
  locale: en_US
  keyboard:
    layout: us
  ssh:
    install-server: true
    allow-pw: true
    disable_root: true
    ssh_quiet_keygen: true
    allow_public_ssh_keys: true
  packages:
    - qemu-guest-agent
    - sudo
  storage:
    layout:
      name: direct
    swap:
      size: 0
  user-data:
    package_upgrade: false
    timezone: America/Chicago
    users:
      - name: ubuntu
        passwd: "$6$rounds=4096$4SY5kMDOITTy3R6s$vgp01IwfMWJRYxY1pa.D6xS.TEzGkMpVqxZtxPQrYuHzvywq2sSw/Z.yEmG3hsWnERCorBbN7tdMttVTcj4u61"
        groups: [adm, sudo]
        lock-passwd: false
        sudo: ALL=(ALL) NOPASSWD:ALL
        shell: /bin/bash
99-pve.cfg
datasource_list: [ConfigDrive, NoCloud]What to do next: Download the files from Github
To make it easier to get started with all the files in place that you need, you can clone down the repo I have for Packer builds that includes the Proxmox Packer template for Ubuntu 24.04:
git clone https://github.com/brandonleegit/PackerBuilds.gitAre you looking for a Packer template for Ubuntu 24.04 and VMware? Check out my recent post here with a step-by-step walkthrough:
Wrapping up
I use Packer to keep things freshly built and provisioned in the home lab and production environments. It makes streamlining this otherwise labor intensive process into something that you can automate. You can have this run on a schedule in a CI/CD pipeline or a BASH script, etc. Trust me in that it is one of the coolest tools that you can learn how to use in the home lab. What about you? Have you been using Packer already or going to start using it?
More in this topic


Discuss this in the Community
Google is updating how articles are shown. Don’t miss our leading home lab and tech content, written by humans, by setting Virtualization Howto as a preferred source.
About The Author
