Most of you are no strangers to JIRA. It is arguably the most popular Agile project management solution adopted worldwide. Like most companies, Atlassian is pushing everyone to the cloud. The self-managed JIRA Server offering is deprecated and will no longer be available in the near future. However, you still can download and host JIRA Core Server on your own hardware, cloud, etc. In case you are tasked with managing one of these instances as I have been, it can be intimidating to update and perform other lifecycle management for Jira. However, I will show you in this quick walkthrough how to perform a JIRA Upgrade JIRA Core Self-management Server and the steps involved.
Confusion over upgrade processes
If you google how to upgrade Jira, you will land on various Atlassian KBs. However, these can be confusing on what processes you need to follow. There are various software packages and installations that you need to be aware of with JIRA. These include (per my understanding):
- JIRA Core Server – The core Jira Server solution you can self-host
- JIRA Software – The JIRA Software application that sits on top of JIRA Core
- JIRA Service Desk – JIRA Service Desk solution which again “plugs into” the JIRA Core Server
- JIRA Datacenter – The new offering from Jira that is cloud-based
Please correct me on any of the above descriptions if I have misstated the descriptions above.
JIRA Upgrade JIRA Core Self-managed Server
The process to perform a JIRA Upgrade on a JIRA Core self-managed server is fairly straightforward. To being, you need to perform a few tasks before Jira considers you ready to perform the upgrade. These include the following, which will be asked during the upgrade process:
Upgrade checklist – Complete these steps to have a smooth upgrade experience. If you need more details, see https://docs.atlassian.com/jira/jadm-docs-0822/Preparing+for+the+upgrade. The steps include the following:
1. Run a JIRA health check – Run a Jira health check to verify that you’re ready to upgrade. Make sure that checks related to the license and database have passed, but you can also fix other detected problems.
2. Check app compatibility – Make sure your apps are compatible with the JIRA version you’re upgrading to. Disable all incompatible apps, so they don’t affect your upgrade.
3. Back up the database – Back up the JIRA database using your database’s native backup tools.
After you have run through the JIRA Upgrade checklist, you need to pull down the latest version of Jira Server Core. To do that, navigate here:
I suggest you download the BIN file as this will provide the most automated process and a “wizard-like” experience from the command line. The tar.gz file requires extracting and performing the upgrade in a more manual process.
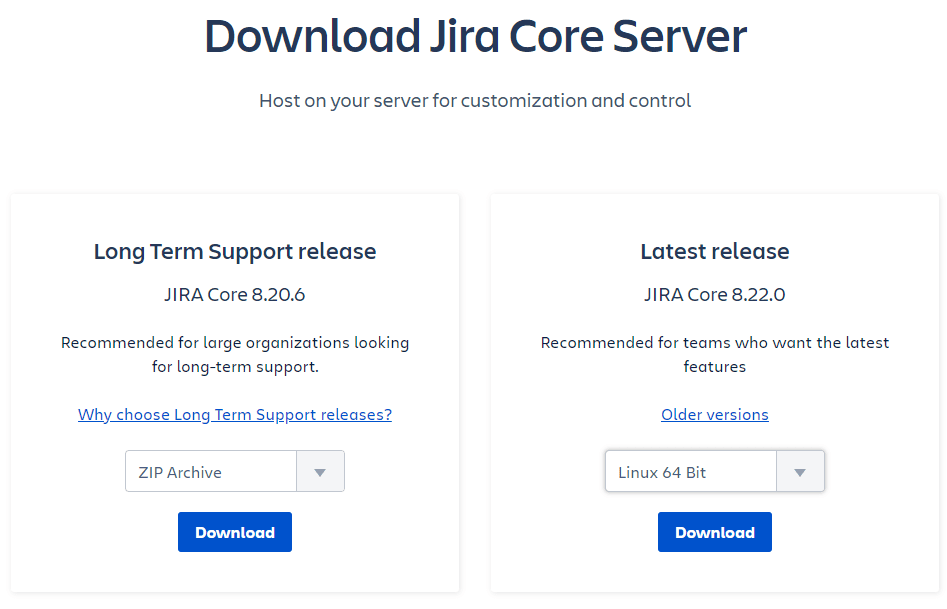
Once you have downloaded the .BIN file, you need to copy this to your JIRA Server. For me, that file was:
- atlassian-jira-core-8.22.0-x64.bin
As a note, on my server, I have a named “jira” user that exists in Linux. This is the user that I use to run Jira. However, to run the installation, I ran this as a sudo user as the installation will warn you that you are running as a user without administrative privileges and some aspects of the installation may not be available. So, I simply ran as sudo and everything worked fine. After the installation was finished, I set the permissions on the installation directory back to my jira user to actually run JIRA .
Make sure your previous installation of JIRA is stopped, using the /opt/atlassian/jira/BIN/stop-jira.sh script.
Below is the output of running the JIRA .BIN file.
-bash-4.2$ ./atlassian-jira-core-8.22.0-x64.bin

Checking if your instance of Jira Core is running

Upgrade checklist
Complete these steps to have a smooth upgrade experience. If you need more
details, see
https://docs.atlassian.com/jira/jadm-docs-0822/Preparing+for+the+upgrade.

1. Run a Jira health check
Run a Jira health check to verify that you're ready to upgrade. Make sure
that checks related to the license and database have passed, but you can
also fix other detected problems.

2. Check app compatibility
Make sure your apps are compatible with the Jira version you're upgrading
to. Disable all incompatible apps, so they don't affect your upgrade.

3. Back up the database
Back up the Jira database using your database's native backup tools.

Have you completed all these steps?
Yes [y], No [n, Enter]
y
Your existing Jira installation is about to be upgraded! Do you want to proceed?
Upgrade [u, Enter], Exit [e]


Have you completed all these steps?
Yes [y], No [n, Enter]
y
Your existing Jira installation is about to be upgraded! Do you want to proceed?
Upgrade [u, Enter], Exit [e]
u

Your instance of Jira is currently being upgraded.
Checking if Jira has been shutdown...
Backing up the Jira installation directory

Backing up the Jira home directory

Deleting the previous Jira installation directory...

Extracting files ...


Please wait a few moments while Jira Core is configured.

Installation of Jira Core 8.22.0 is complete
Start Jira Core 8.22.0 now?
Yes [y, Enter], No [n]
n

Installation of Jira Core 8.22.0 is complete
Your installation of Jira Core 8.22.0 is now ready.

Custom modifications
Your previous Jira installation contains customisations (eg server.xml) that
must be manually transferred. Refer to our documentation more information:
http://docs.atlassian.com/jira/jadm-docs-0822/Upgrading+JIRA+applications+manually#UpgradingJIRAapplicationsmanually-configuringnewjiraasold3.4MigrateyourexistingJIRAconfigurationsovertoyournewJIRAinstallation
Finishing installation ...
As you see from the script above, it will ask you various questions. Be sure to choose 3 – Upgrade to upgrade your existing installation. It will automatically back up your installation of JIRA as a .ZIP file which you will find in the installation path /opt/atlassian if you are using the defaults.
On another note, you will see that I chose n on the question to start JIRA after the upgrade finished. I chose no as I want to reset the permissions on the installation directory and then run Jira with my jira user.
Notes I took after upgrading
If you are like me and don’t do JIRA Core Server upgrades every day, the process, even though fairly straightforward, can be wrought with missteps if you aren’t careful. As you see above, it output that I had customizations to files. I wasn’t sure if these customizations were needed, so I went ahead and started the server anyway.
After running the upgrade, I knew one of the things that didn’t transfer was my SSL configuration. So, I know (after testing) this was part of the customization that was mentioned with the server.xml.
Ok, so after shutting Jira down again, I modified my server.xml in the new installation to match the old file. As a note, you can find your old file in the .zip archive it creates as part of the upgrade if you need to compare. Then you can easily use Notepad++ or VSCode to compare the files if needed.
After getting the server.xml straightened out, I was able to restart Jira and it started up correctly. I knew it was better the second go-around as it was correctly answering to HTTPS:// and the JIRA port.
After starting this time, I was taken to the you’ve just been upgraded screen. Take note of any errors or notables on this page. The Application links failed in my case was Confluence was stopped while I was running the upgrade. After the JIRA instance was upgraded, it noted it could not longer get to Confluence, which was expected in my case.

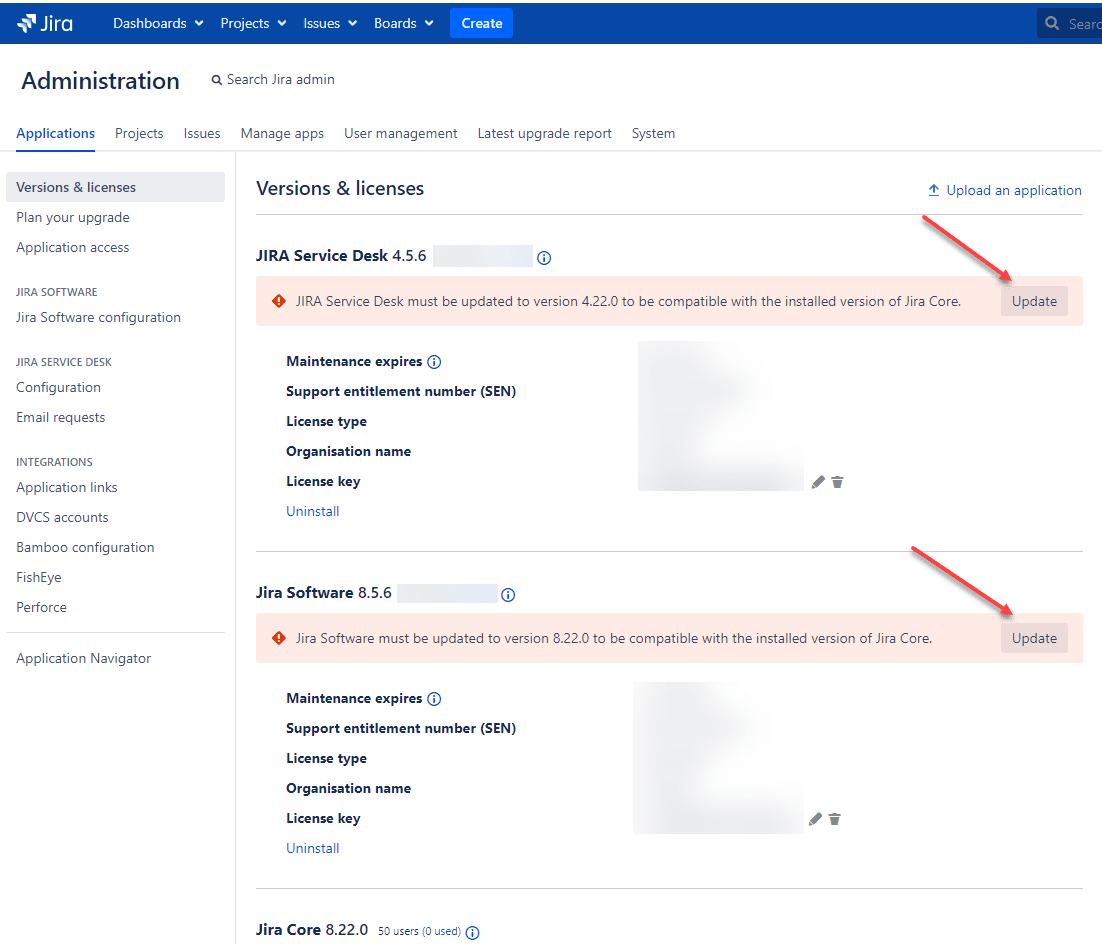
Upgrade JIRA Service Desk and JIRA Software
Now that you have the JIRA Core server upgraded to the latest and greatest, you need to upgrade JIRA Service Desk and JIRA Software. Thankfully, this is easily accomplished from your JIRA web admin portal. Navigate to Administration > Applications > Versions & licenses and you should see you have an update available for both.
Just click the Update button for each and they will update from the GUI.
JIRA Upgrade FAQs
- What is JIRA? – JIRA is arguably the world’s most popular Agile project management solution used by enterprise organizations.
- How do you upgrade JIRA? The process to upgrade JIRA Server Core involves downloading the BIN file and running through the upgrade wizard from the command line.
- What is Jira Core, Jira Service Desk, and Jira Software? JIRA Core is the server platform. JIRA Service Desk implements the Service Desk solution to Jira Core. JIRA Software is the software framework that plugs into JIRA Core.
- How do you take care of Jira Server customizations? The upgrade wizard will note the files that have customizations apart from the defaults. Take note of these files and compare the customizations with the previous files backed up by the upgrade wizard.
Final Notes
The JIRA Upgrade JIRA Core Self-managed Server process was fairly straightforward once I realized which file to use and how the process works. I highly suggest that you run through this in a lab environment before tackling your production server as this will help flush out any gotchas during the process.
More in this topic


Discuss this in the Community
Google is updating how articles are shown. Don’t miss our leading home lab and tech content, written by humans, by setting Virtualization Howto as a preferred source.
About The Author
