Terraform vSphere tutorial: Linux Virtual Machine Clone
Terraform is a great infrastructure as code (IaC) platform that allows easily spinning up and customizing infrastructure. The great thing is you can use it for many different environments, not just VMware vSphere. However, for this Terraform vSphere tutorial, I will show you how easy it is to clone a VMware template and customize the template using provisioners in Terraform. Let’s get started and see how you can perform VMware vSphere code like a boss!
Why Terraform for VMware vSphere?
Terraform is a great IaC solution to use in provisioning your VMware vSphere environment resources. What is infrastructure as code anyway? This is a new way of provisioning and maintaining infrastructure that was brought about by the cloud revolution. Since cloud service providers. While you do have a GUI of sorts in cloud IaaS environments such as Amazon AWS, using these for provisioning infrastructure at scale is not feasible.
Luckily cloud service providers give you access to APIs that allow interacting with and controlling, provisioning, and configuring resources with API calls. This is where tools like Terraform come in. They allow easily interacting with various infrastructure by means of providers. The Terraform provider provides the ability to “talk” to the various infrastructure environments like AWS or vSphere.
Terraform is relatively easy to understand from a code perspective. Like PowerShell, the Hashicorp language is very human-readable and easy to understand what is going on with the code. So, from my experience, it doesn’t take much to get started and actually start seeing benefits and real value in using Terraform as a way to represent your infrastructure as code.
Keeping State data
Terraform does something that is extremely valuable. It maintains your infrastructure state in a file. In other words, it records the state of your infrastructure and this allows keeping a desired state of your infrastructure at all times. If a setting or piece of infrastructure is no longer there and you run your Terraform code against the environment, it will make the change to the infrastructure to align it with state – configuring the settings and even provisioning missing infrastructure that is supposed to be there as recorded by the state data.
Terraform vSphere tutorial: Linux Virtual Machine Clone
In this Terraform vSphere tutorial, I will show you how to easily clone a Linux virtual machine and use provisioners to run additional commands after the virtual machine has been cloned so you can further customize your cloned virtual machine from a template. I want to introduce you to three files that I use with Terraform. Let’s describe what each one does.
- main.tf – This is the main file you will have your code in that actually performs the infrastructure as code actions. This will generally contain your provider (in this case vSphere), as well as resources that you want to interact with (vCenter Server).
- variables.tf – This is the main variables file where you will place your variables. Variables can also be placed in the main.tf file which is generally where those new to Terraform put them at first. However, you want to split off your variables from the main.tf file since you will most likely be using a version control system. This allows making your code much more modular. It also affords the possibility of checking in only your main terraform file and not checking in your variables file if these contain sensitive information. A better approach is using a secrets manager such as Hashicorp Vault to store sensitive information. However, this is outside the scope of this blog post.
- terraform.tfvars – (optional) – The TFVARS file is optional. However, it can be recommended to use the TFVARS file to split up declaring your variables and the actual values the variables contain. So, you use the variables.tf file to declare your variables and the TFVARS file to store the values for these variables.
Let’s talk about the structure of your Terraform files. Terraform is great in that it stitches files together pretty intelligently as it reads the contents of your TF files and acts accordingly.
Let’s take a look at the main.tf file and its contents in the Terraform vSphere tutorial.
Main.tf file contents for VMware vSphere virtual machine clone
Below is the main.tf code that will allow cloning your virtual machine. Here I am cloning an Ubuntu 20.04 vSphere virtual machine template that was built with Hashicorp Packer. Note the following sections:
- Provider – The provider tells Terraform which type of environment you are connecting to. Here we are connecting to vSphere using the vSphere provider
- Data – Data resources define the vSphere environment and the resources terraform needs to interact with to clone and create the new virtual machine
- vSphere VMs – This is the section where we actually do the cloning of the virtual machine
- Output – Output is anything you want to have displayed back to you on the console of the machine from which you are running Terraform.
Also note the two sections here:
connection {
    type     = "ssh"
    user     = "root"
    password = var.root_pass
    host     = vsphere_virtual_machine.vm01.default_ip_address
 }

 provisioner "remote-exec" {
   inline = [
    "sleep 60",
      "sudo apt-get update && sudo apt-get upgrade -y"

    ]
 }
The connection and provisioner sections allow connecting to the cloned virtual machine once terraform powers it up, provides the credentials for doing so, and specifies the host. Here I am passing in the default_ip_address parameter that allows terraform to see what IP address it has and connect using SSH.
The provisioner then performs the action you specify. Here we are running any available updates on the Ubuntu 20.04 VM after it comes up from the template. This ensures the VM is fully patched right out of the gate. Now, a look at the file altogether.
##Provider

provider "vsphere" {
  user           = var.vsphere_user
  password       = var.vsphere_pass
  vsphere_server = var.vsphere_server

  # If you have a self-signed cert
  allow_unverified_ssl = true
}


##Data

data "vsphere_datacenter" "dc" {
  name = var.vsphere_datacenter
}

data "vsphere_datastore" "datastore" {
  name          = var.vsphere_datastore
  datacenter_id = data.vsphere_datacenter.dc.id
}

data "vsphere_compute_cluster" "cluster" {
  name          = var.vsphere_cluster
  datacenter_id = data.vsphere_datacenter.dc.id
}

data "vsphere_network" "network" {
  name          = var.vsphere_network
  datacenter_id = data.vsphere_datacenter.dc.id
}

data "vsphere_virtual_machine" "template" {
  name          = var.vsphere_template
  datacenter_id = data.vsphere_datacenter.dc.id
}

##vSphere VMs

resource "vsphere_virtual_machine" "vm01" {
  name             = "vm01"
  resource_pool_id = data.vsphere_compute_cluster.cluster.resource_pool_id
  datastore_id     = data.vsphere_datastore.datastore.id

  num_cpus = 4
  memory   = 4096
  guest_id = data.vsphere_virtual_machine.template.guest_id

  scsi_type = data.vsphere_virtual_machine.template.scsi_type

  network_interface {
    network_id   = data.vsphere_network.network.id
    adapter_type = data.vsphere_virtual_machine.template.network_interface_types[0]
  }

  disk {
    label            = "disk0"
    size             = data.vsphere_virtual_machine.template.disks.0.size
    eagerly_scrub    = data.vsphere_virtual_machine.template.disks.0.eagerly_scrub
    thin_provisioned = data.vsphere_virtual_machine.template.disks.0.thin_provisioned
  }


  clone {
    template_uuid = data.vsphere_virtual_machine.template.id


  }

 connection {
    type     = "ssh"
    user     = "root"
    password = var.root_pass
    host     = vsphere_virtual_machine.vm01.default_ip_address
 }

 provisioner "remote-exec" {
   inline = [
    "sleep 60",
      "sudo apt-get update && sudo apt-get upgrade -y"

    ]
 }

 }

 ##Output

output "ip" {
value = vsphere_virtual_machine.vm01.default_ip_address

}
Variables.tf file used for storing variables
Below is an example of your variables.tf file that allows you to store the variables used in your main.tf Terraform code. As you can see below, there are no values stored in this file. It simply declares your variables. You can store your variable values in this file like the following:
variable "vsphere_server" {
  default = "vcsa.cloud.local"
}
However, we will do that in our terraform.tfvars file. Note you can declard your variables as sensitive as well which helps to put some security context around the variables that house sensitive information. Terraform will redact these values in command output and log files, and raise an error when it detects that they will be exposed in other ways
variable "vsphere_server" {}

variable "vsphere_user" {}

variable "vsphere_pass" {
  sensitive = "true"
}

variable "root_pass" {}

variable "vsphere_datacenter" {}

variable "vsphere_network" {}

variable "vsphere_template" {}

variable "vsphere_cluster" {}

variable "vsphere_datastore" {}
Terraform.tfvars file contains the variables you want to use
Now, the terraform.tfvars file is where you actually store the values for your variables. The great thing about splitting these values from your variables.tf file again is that you can refrain from checking these values into source code. You don’t want to version control files with passwords or any other sensitive information. You can add the tfvars file as well to your gitignore file to have Git ignore syncing these files in your code repository.
A sample terraform.tfvars file may look like this for our Terraform vSphere tutorial.
vsphere_server = "vcsa.cloud.local"

vsphere_user = "[email protected]"

vsphere_pass = "Secretpassword1"

root_pass = "Secretpassword2"

vsphere_datacenter = "CloudLocal"

vsphere_network = "DPG-Servers"

vsphere_template = "ubuntu2004"

vsphere_cluster = "vsancluster"

vsphere_datastore = "vsanDatastore"
Terraform init, plan, and apply
Now you simply need to run three different commands:
- terraform init – the terraform init command initializes the directory you are working with to work with terraform. You will see some hidden directories created. Terraform will also pull down the specific provider files that are needed to work with your particular environment.
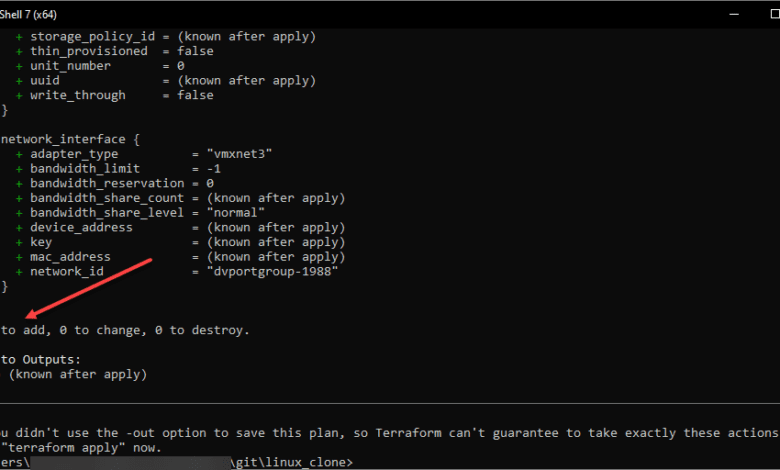
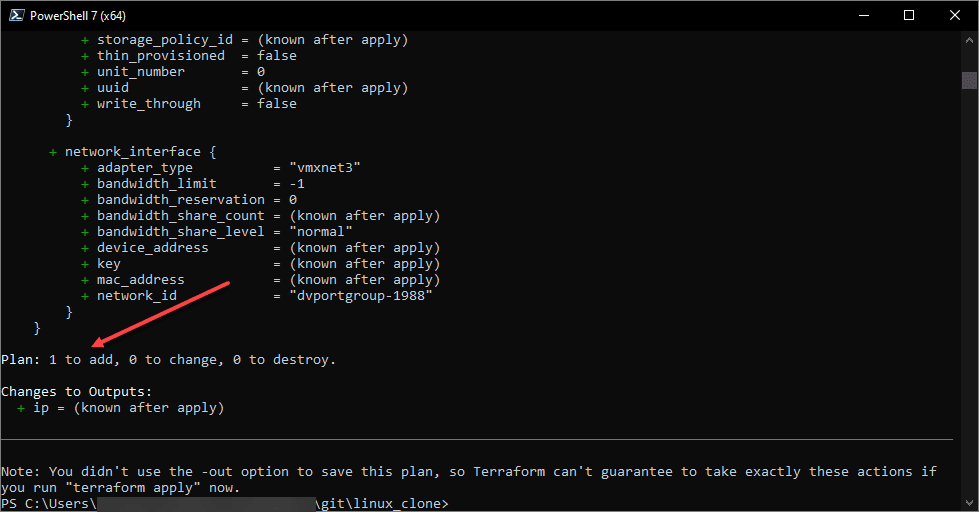
- terraform plan – terraform plan basically allows showing what terraform would do if you run your apply. This is a great step to run first as it is a good sanity check of the operation to make sure it will do what you think it is supposed to do
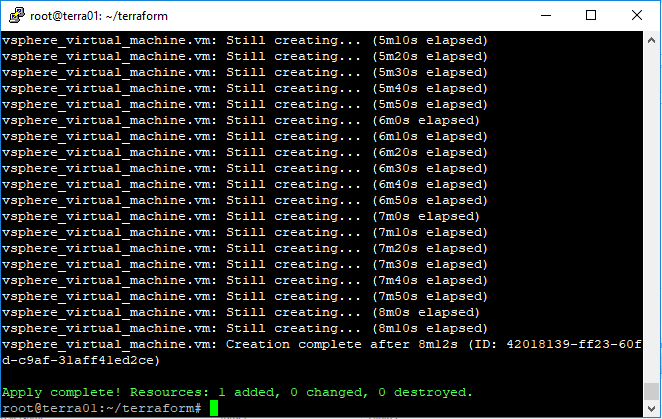
- terraform apply – The terraform apply actually makes changes in the environment
Wrapping up
With this Terraform vSphere tutorial: Linux Virtual Machine Clone post, you can start VMware vSphere coding like a boss very easily. Terraform is easy to learn and get up to speed quickly and there are lots of examples, code snippets, Git repos, and other resources to pull from.