Ultimate DevOPs Git Commands and Workflow Guide
If you are learning Git, there is a lot of nuances of the Git workflow to become familiar with. However, with a bit of practice and lab time, most of the concepts working with Git make sense for DevOps workflow. The following is an Ultimate DevOps Git command and workflow guide that helps to shed light on the various commands and situations where the commands are useful.
Download Git
You can download and work with Git SCM here:
Cloning the Repository
First, open your terminal and navigate to a directory where
you would like the code to live in.
- git clone [email protected]/DEVOPS-testing.git
With HTTPS (requires username & password)
- git clone https://yourgitrepository.com/DEVOPS-testing.git
Overview of Git Workflow
Many Git workflow environments are closely integrated with Development project management systems such as Jira. Teams may use both Jira and closely integrate with Bitbucket.
- For many environments – No merge commits are allowed (use git rebase instead of git merge or git pull)
- Fast-forward only merges to current/devops. Branches are rebased with the latest ‘current/devops’ before merging a PR.
- Intermittent commits are “fixed up” / “squashed” into one commit before merging a pull request into ‘current/devops’. This is achieved
using interactive rebase. - Branches have the following naming convention:
- Ticket branch naming conventions may look like ‘ticket/DEVOPS-100’
- Quick fix branches are named ‘fix/shortDescriptionOfFix’
- Environment branches are named ‘current/{ENVIRONMENT}’ where ENVIRONMENT is one of dev, qa, stage, or prod.
- The main development branch is ‘current/devops’
- Commits have the following naming convention:
- Ticket commit summary line is ‘DEVOPS-100: One-line summary of this ticket’
- Fix commit summary line is ‘FIX: One-line summary of fix’
Quick Git Workflow rundown
This is how a typical workflow looks like:
- git checkout -b ticket/DEVOPS-100
- git fetch
- git reset –hard origin/current/devops– Do some coding
- git commit -m “Added variable”
- — Do some more coding
- git commit -m “Added component”
- — And finish coding
- git commit -m “Integrated with API”
- git rebase -i HEAD~3
- — This opens vim by default, you replace the bottom 2 “pick” with “f”.
- — Save and quit the editor.
- git commit –amend
- — Opens vim by default, update the ticket message to be DEVOPS-100: Add API integration.
- git fetch
- git rebase origin/current/dev
- git log
- — Check that the commits look right.
- git push -f origin HEAD
Sometimes you need to stop working on one ticket mid-development and switch to another critical ticket and then come back. If you make a mistake and realize you forgot to create the branch first so now you have a commit on the wrong branch. Rebase may have merge conflicts that you have to resolve. There are also many ways to achieve the same thing in git. For example, these two sets of commands do the same thing:
Assuming you’re already on branch ticket/DEVOPS-100
- git fetch
- git rebase origin/current/dev
- git checkout current/devops
- git pull
- git checkout ticket/DEVOPS-100
- git rebase current/devops
You could also combine the ‘git rebase -i HEAD~3’ and ‘git commit -amend’ steps into one by changing the top commit to ‘r’ in the interactive rebase. It mostly comes down to preference. Therefore, it’s important to understand what each command does under the hood to avoid getting confused.
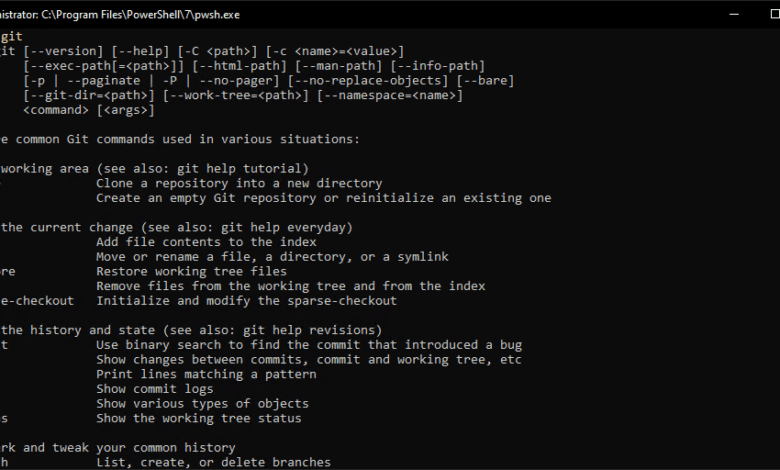
Git Status
To find out the current state of your git repo use ‘git status’. It
tells you which branch you’re on, which files you have modified, which files
are staged, and any special modes you are in such as rebasing.
- git status
Branches
Create a branch
git branch ticket/DEVOPS-100
- Creates branch ‘ticket/DEVOPS-100’
The forward ‘/’ in the branch name is just part of the name, it has
no special meaning here. Confusingly, you may sometimes see an ‘origin/’
prefix such a ‘origin/ticket/DEVOPS-100’ which does have special meaning.
Change / Switch branches
—
git switch ticket/DEVOPS-100
OR
git checkout ticket/DEVOPS-100
Staging
Staging is what you do before you make a commit. It’s a way for you to
essentially tick checkboxes next to each file that you want to include in the commit.
To stage files, use ‘git add’. It is recursive by default,
so specifying a folder will add all files from that folder.
Empty folders cannot be added to git.
- git add .
- git add some-folder/
- git add some-folder/specific-file.txt
- git add file1.txt file2.txt file3.txt
To unstage files use ‘git reset’
- git restore -staged .
- git restore -staged some-folder/
- git restore -staged some-folder/specific-file.txt
- git restore -staged file1.txt file2.txt file3.txt
OR
- git reset .
- git reset some-folder/
- git reset some-folder/specific-file.txt
- git reset file1.txt file2.txt file3.txt
Commit
‘git commit’ takes all your staged changes and packages it up
with a bowtie and message. Committing does not make permanent
changes in your Git repository, only on your machine.
- git commit
- git commit -m “DEVOPS-100: Do the things”
Side note: You can actually undo commits with
- git reset -soft
Remotes
When you clone the repository from your Git repository, by default
git will create a ‘remote’ called ‘origin’ which points
to your Git repository.
You use commands like ‘git fetch’, ‘git rebase origin/current/devops’,
‘git reset -hard origin/ticket/DEVOPS-100’, and ‘git push origin HEAD’
to interact with your Git repository. But, most git commands won’t have any
impact on the code in your Git repository. This is because all the commits you make and branches you create are all local by default, i.e. only on
your own machine. You submit those to your Git repository using commands like the ones above.
This is why there is a difference between the following 2 commands:
- git rebase current/devops
- git rebase origin/current/devops
The former may not do what you want unless your own local current/devops branch is up to date with origin/current/devops. Branches each have a local and a remote version. Your changes to a branch are local
until you issue a ‘git push’ to make them official in your Git provider.
You can have more than one remote, but it’s uncommon, which is
why you’ll usually only see ‘origin’.
Fetch
This command is always completely safe, it just reaches out to
the remotes (i.e. origin which is your Git repository) to learn about any changes that have happened. It does not make any changes to your local git repository. This essentially updates all the ‘origin/*’ branches.-
- git fetch
Reset -hard
Be careful with this command, it throws away
all changes in order to truly reset your branch. Only use it if you are
certain you want to wipe away all changes on your branch. Use ‘git status’ to verify that you don’t have any important changes you want to keep. This reset will get rid of any uncommitted changes on
your current branch.
- git reset -hard HEAD
These commands will completely reset your branch to another
branch. Make sure to run ‘git fetch’ before running these
to ensure you have the latest version of the branches.
- git reset -hard origin/current/devops
- git reset -hard origin/ticket/DEVOPS-100
Rebase
Bring over changes from another branch onto your branch.
Make sure to run ‘git fetch’ before running this command to ensure you have the latest version of the branch.
- git rebase origin/current/devops
Merge conflicts
This command may result in merge conflicts because of changes from
the incoming branch clash with changes on your branch. You’ll
have to resolve them first. ‘git status’ will tell you if you are currently in a merge conflict mode and which files have merge conflicts. At this point, we recommend using a text editor a git GUI tool to assist with the merge conflicts. UI tools can make visualization of the merge conflicts easier
and may provide extra quick-fix features that come in handy.
Interactive Rebase
git rebase -i HEAD~5
git rebase -i HEAD~8
git rebase -i HEAD~100
The number after the ~ indicates how many commits you want to grab.
It’s okay to grab more commits than you need. By default, an interactive
rebase is a no-op (if you save and quit with no changes, nothing happens). Technically, that’s not true, merge commits will be squashed.
In the interactive rebase you’ll ‘pick’ in front of each non-comment line.
You can change these to other commands in order to tell git what you want to do.
You can also reorder the commits.
- p pick – Keep this commit as is (default)
- r reword – Update the commit message
- s squash – Combine the commit with the one above it. When you do this,
- you’ll also be prompted to update the commit message of the
- combined commit.
- f fixup – Same thing as squash but disregards the commit’s message in favor of the message of the commit above.
git reflog
If you make a mistake with one of your git commands, and you want
to undo those changes, git reflog can help. Git remembers each intermittent
commit you make when issuing commands, and git reflog allows you to find them.
git reflog
The log can be confusing, but trial and error can help you. Simply
copy the hash such as ‘2b3vef1’ or ‘HEAD@{11}’ and use ‘git checkout’.
- git checkout HEAD@{11}
Then do a ‘git log’ to see if everything looks right. If they do,
run ‘git checkout -b someNewBranch‘ and continue working. If not,
switch back to your previous branch and try again.
Push
To push up your local changes (commits you have made) to Bitbucket,
just do the following.
- git push origin HEAD
OR
- git push origin ticket/DEVOPS-100
OR
- git push
The last option there will require you to set the upstream. If
you run the command, git will tell you what you need to do.
If you have pushed up changes before and have since
altered prior commits that you had already pushed up
(for example squashing, editing a commit message, rebase)
then you will need to force push. This just overwrites changes
on your Git repository with what’s on your machine. Since we use
individual branches to manage our work, we don’t run the
risk of blowing away someone else’s work doing this.
- git push -f origin HEAD
Pull Requests
Most true Git production development environments will have checks and balances in place and will closely protect merges. This might look something like this:
To make your changes official, you’ll need to make and merge a pull request. This happens after you make one or more commits, squash them down into a single commit, and rebase with current/devops. You can open a pull request by going to the pull request section on your Git platform
or you can follow the link that Git gives you when you make a commit.
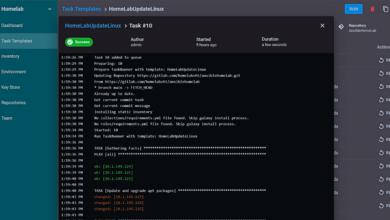
Pull requests need to be reviewed by another member of the team and the CI/CD pipeline build for the pull request needs to pass. If both those are true, you can then merge the pull request. Once that happens, a deployment to the dev environment will automatically kick off using your Git repository Pipelines.
Wrapping Up
Hopefully this Ultimate DevOPs Git commands and workflow guide will help provide a good baseline of notes and information to get started using Git for developing DevOps code or any other code for that matter. Git allows effectively working in a team environment so code is uniformly maintained and developed with the safeguards and tools in place to ensure the integrity of the development process.