Configure Dell Nseries switch stack
A quick little how to post on creating a stack between Dell Nseries switches. For the purposes of this post, the stack was created using (2) Dell Nseries 4032F 10G switches. There is just a small amount of configuration that needs to be done to configure stacking. This includes the physical cabling (stacking cables) that need installed as well as telling the switches which ports will be used for stacking purposes. Let’s take a quick look at how to configure dell nseries switch stack.
Configure Dell Nseries switch stack
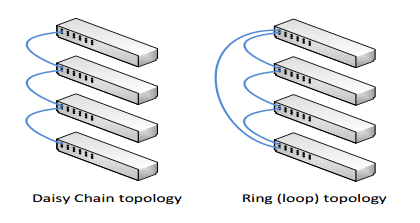
First things first, you need to install your stacking cables. In the setup I mentioned I was working with, it was a simple (2) switch configuration. So you basically “X” out your stacking cables between switches. In multiple switch configurations, you need to make sure to reference the stacking guide to verify how your cables need to be configured for a multi switch config either in a “daisy chain” or “ring topology”. A good resource for the N4000 series and others can be found here in the stacking guide.
After configuring the physical stacking cables, you can see the possible stack port options by issuing the following command:
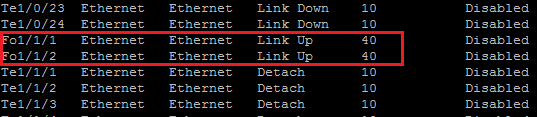
show switch stack-ports
It will show your potential stack ports. If you use the QSFP 40 gig ports, these show up as Fo1/1/1 and Fo1/1/2. Notice below after issuing the show switch stack-ports command, scrolling down to the “Fo” ports, you see they are “Link Up” but notice the type is Ethernet. So we need to change this so the switches know we are wanting to designate the ports as stacking ports instead of Ethernet.
To designate these as stacking ports, we issue the command:
stack-port fortygigabitethernet 1/1/1 stack

stack-port fortygigabitethernet 1/1/2 stack

Next Steps
After we designate the ports on both switches, we save our configuration – copy running-config startup-config.
After copying the configuration, pull power from both switches and then power up the one you want to be the master. After it is fully booted, you can then boot up the standby switch. On power up they should be designated accordingly.
Once both are fully booted, you can issue a show switch and you should see the Mgmt Sw and the Stack Mbr switch as you see below.

Master Yoda – how is master switch selected?
Other than the boot order, how is the master switch determined if all else is equal? Straight from Dell’s stacking documentation:
A Master is elected or re-elected based on the following considerations, in order:
- The switch is currently the Master.
2. The switch has the higher MAC address.
3. A unit is selected as standby by the administrator, and a fail over action is manually initiated or occurs due to a Master unit failure.
Thoughts
The process to configure configure Dell Nseries switch stack is very painless with the Nseries switches. The main thing is attention to detail and making sure your cabling is correct, designating the stack ports, saving your configuration, then powering up the switches in the order you want them to be designated.