Mikrotik makes great quality products that can do just about anything you would like them to do. The RB751 routerboard can be bought for cheap on the net and we can assure you that this little router can do WAY more than you average SOHO router you can buy at Wal-mart from the major vendors we all know/love/hate. In fact, you basically get Enterprise capabilities for your home in these little units. Most of the features are indeed overkill for the home environment, but maybe not for the small office. However, with network security on the minds of everyone these days, even home users with sensitive data on their computers and laptops, the more feature rich the device is and the more we can get it to do for us in the way of securing our network, the better.
Most geeks will be in heaven with this unit as it simply screams “geek” as it is highly configurable, able to do just about anything that can be thought of or most will want to do on their SOHO wireless network or LAN.
With the RB751, you get all of the standard encryption techniques that most may be familiar with and even some you may not be including the ability to spin your own Hotspot up at your house! So, not only can you secure your wireless network via the regular means of WPA, MAC filtering, etc, you can also require the additional level of security of a user having to authenticate to your hotspot with your own customized landing page! We will show you how to do this in a later post.
Cabling
Out of the box, the RB751 is setup so that you need to use specific ports to plug things in to make sure everything works properly.
- This is a 5 port unit, with the WAN connection or the connection that you would plugin from your cable modem/DSL modem setup on Port 1. The DHCP client is also setup on this port so that it requests an IP address from an upstream DHCP server allowing you to connect to your ISP network.
- Ports 2 and 5 are setup to be bridged to the wireless network.
Software Configuration for your home network
Out of the box, the Mikrotik RB751 is configured to work with a home ISP with a firewall already configured on Ether1 and a wireless network already setup to broadcast the SSID of “Mikrotik” with no security. To configure your RB751, you can either connect a PC to the routerboard ethernet port or connect via the default wireless network and browse to the address of https://192.168.88.1 to configure the board.
Alternatively, you can use the Winbox utility to configure your Mikrotik product(s).
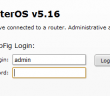
If you use a browser to navigate to your router IP address, you will be presented with the WebFig Login screen shown below:

The default account is admin with a blank password.
Once you login, you are taken to the new Quick Set configuration screen that was recently released with version 5.16. The Quick Set screen is basically an overall view of all the major configuration points that you are able to configure from that screen if you choose without going to the individual configuration sections to update the config.

IP Address Configuration
If you choose not to use the Quick Set screen for your configuration and want to delve deeper into the other options, you can set the individual settings under the appropriate menu on the left of the routerboard WebFig screen.
To set the IP address using the menu, you can browse to IP > Addresses > “default configuration”
You will then be able to set the LAN IP address to anything you want it to be for your network. Keep in mind that once you confirm this setting you will be disconnected from the router since the connection information will have changed and you will most likely be on an entirely different network if you reconfigured the subnet mask, etc.
Handing out IP addresses for clients on your office or home network
To configure DHCP for your network so that other clients will automatically grab an IP address and you won’t have to manually configure each one, navigate to IP > DHCP Server

Below you can enable or disable the DHCP server service, assign it to specific interfaces, set the lease time, address pool, etc.

To actually setup and configure the DHCP pool, which is the range of IP addresses that you want the router to use in the DHCP server, you go to IP > Pool


By default however, the DHCP server service as well as the default address pool are already setup. Keep in mind though that if you change the LAN IP Address of the router from the default, you will need to reconfigure your DHCP server Pool to hand out addresses that are in your network address.
Setting/Changing the Admin Password, Configuring Users


Wireless
Wireless setup will be important to most as they will probably use this unit as a wireless AP on their home network. To configure the wireless settings, simply navigate to Wireless on the lefthand menu in WebFig.


There are so many options that can be tweaked and setup here. Also, you have a builtin frequency scanner, Wireless Sniffer, and Wireless Snooper for detecting threats or potential problems on your network.
To configure your Wireless Security, navigate to the Security Profiles section of the Wireless config screen. To configure a classic WPA2/TKIP config simply select:
- dynamic keys
- Authentication types: WPA2 PSK
- Unicast Ciphers – tkip
- Group Ciphers – tkip
- Enter the WPA2 Pre-Shared Key

Setting up the Firewall:
Navigate to IP > Firewall to find the default configuration rules. By default, there are already rules setup configured for your WAN connection to drop certain types of traffic. The firewall capability on the RB751 is phenomenal. This little unit is a geek’s dream, because if you can think about configuring or tweaking something, you can most likely do it with this unit. That is what we like about it.

Final Thoughts
Mikrotik is making some killer products that in our opinion, blows most of the consumer grade products out of the water on sheer enterprise level configuration, the wide range of options that you have to configure this device and simply what it can do. The wireless signal of this device is really amazing and will leave end users in most situations very happy with overall signal strength and throughput. Check this device out if you are looking for a new SOHO router for your environment.
Google is updating how articles are shown. Don’t miss our leading home lab and tech content, written by humans, by setting Virtualization Howto as a preferred source.
About The Author