As you get into a home lab, running a virtualization host is the route most take to start experimenting with different technologies, and even using nested virtualization to test out hypervisors and other technologies. As you start self-hosting various services, you may want these services to be up and running all at all times and minimize the change they will go down. It usually means that you need to eliminate single points of failure. A single host running a hypervisor can easily go down due to a hardware failure or some other problem. Having a cluster of hosts helps to provide resiliency to failure. If you are running Proxmox, do you need a Proxmox Cluster for home lab?
What is a Proxmox cluster?
A “Proxmox cluster,” is a logical construct that can manage multiple servers as a single unit. Its purpose is to achieve high availability and efficient resource management.
With a Proxmox cluster, you can join multiple Proxmox nodes to create an environment that can handle the failure of individual servers without taking the cluster down. The configuration and security live in “etc pve corosync conf” and “etc pve priv authorized_keys,” to secure and have reliable cluster communication.
Why is a Proxmox Cluster helpful for Your Home Lab?
You may not think about building a “Proxmox VE cluster” at home and the decision may hinge on if you need to have continuous service availability for resources you run in your home lab. If you desire to scale resources, running your services on a cluster makes this much easier.
For instance, you may run home automation that you do not want to be taken down if you lose one of your physical servers. Or you may host DNS services for all your networks.
Migration of Virtual Machines
One of the advantages of using a Proxmox cluster, even in the home lab, is the “migration of virtual machines” from one node to another without downtime. With a Proxmox cluster, you can migrate a VM without downtime using the Live Migration functionality.
Why is this important? The reason this is important is that you don’t have t shutdown your VMs running on a single host to perform maintenance or install updates. If you have more than one node, you can move your VMs while they are running to the other node or nodes in the cluster. The you can power down the one node and perform maintenance or install updates.
Prerequisites
Proxmox cluster configuration is straightforward. You can start with a single Proxmox VE server node. Then you can add cluster nodes by creating a cluster with your first node. Then, you use the “join node to cluster” feature. This allows adding a node to cluster via the web GUI. To create the most basic cluster, the first step is preparing at least two Proxmox servers.
Another consideration for setting up a Proxmox cluster for your home lab is to have shared storage. Shared storage is required since you want all nodes in the Proxmox cluster to have access to the VMs and where you are storing configuration files and underlying disks. When a VM is migrated, it simply has the owner and memory transferred to another Proxmox host, not the underlying VM disks. These stay where they are, making a migration of virtual machines quick and easy.
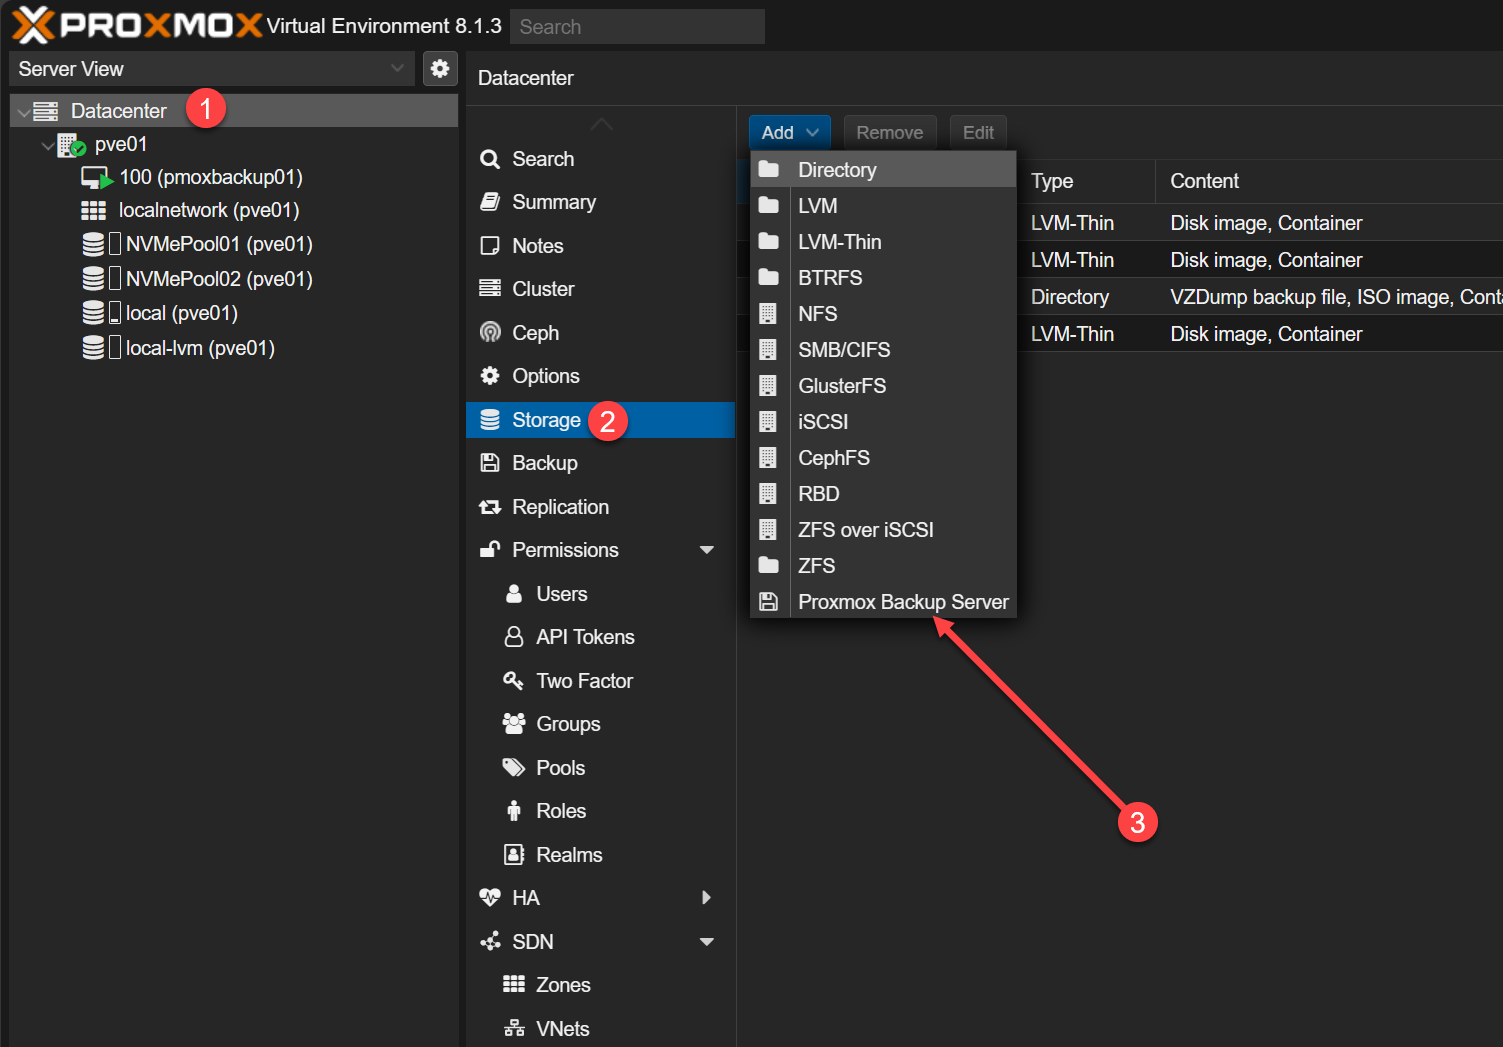
You can have shared storage via traditional storage technologies like iSCSI or NFS. But you can also do HCI storage with Ceph and Proxmox. Check out my video here:
Cluster Creation Steps
- Install Proxmox VE on all intended nodes.
- Configure Cluster Network: Make sure all nodes are connected on the same network. This ensures you can use the “cluster via command line” or “create via web GUI,” depending on your preference to successfully create the PVE cluster and join additional nodes. You can also create a separated cluster network for better performance and security.
- Initialize the Cluster: Use commands like pvecm create [cluster name] on the primary node, then pvecm add [node IP] to add more nodes.
Create via the Proxmox GUI
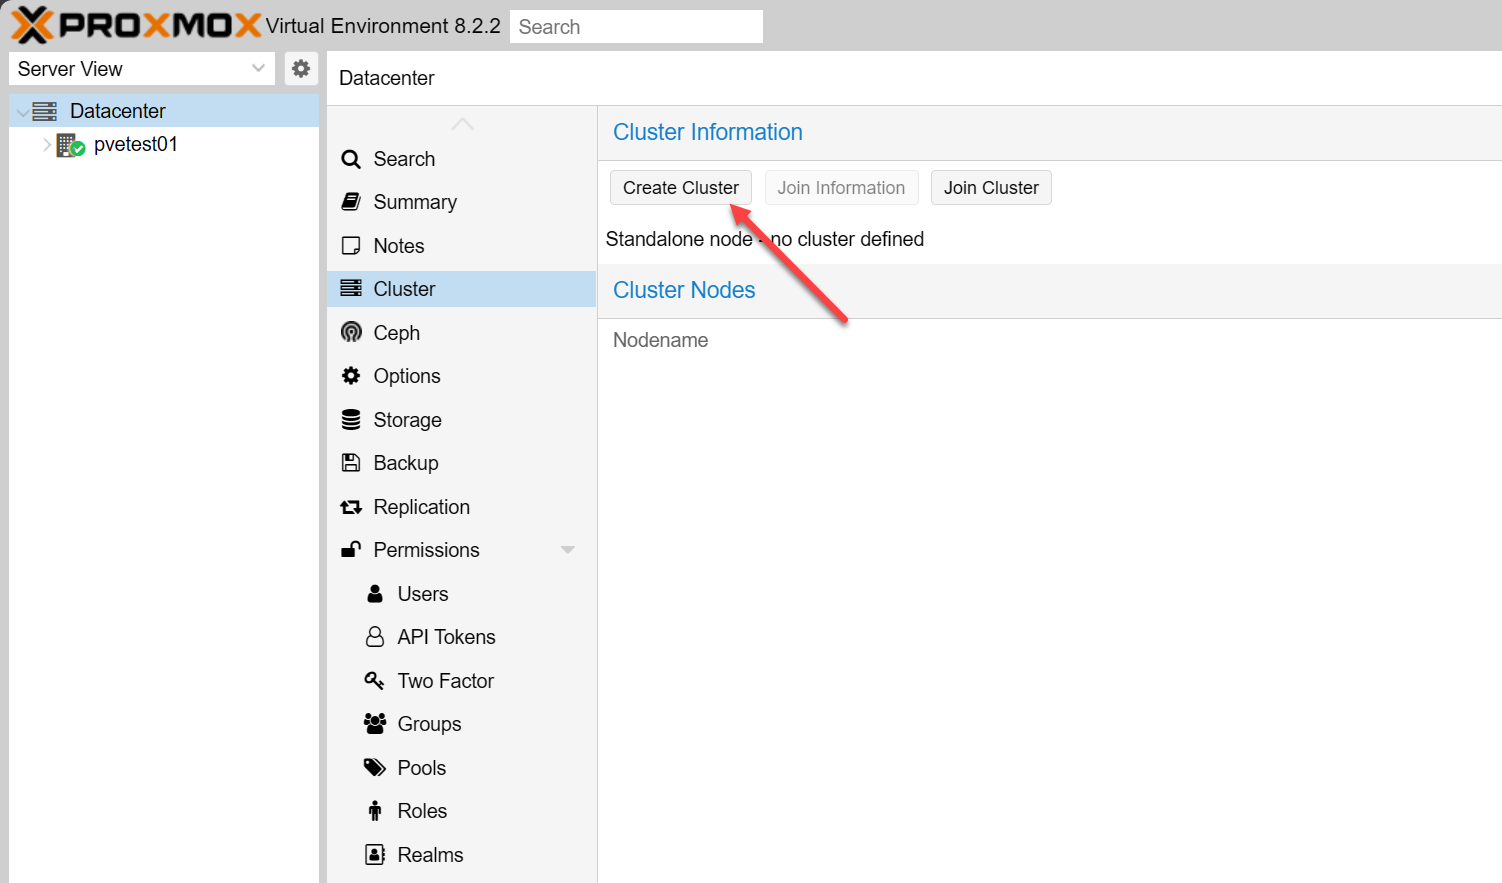
Beow, we will use the Proxmox GUI to create a new cluster. Begin by navigating to Datacenter > Cluster > Create Cluster.
The Create Cluster dialog box opens. Here you name the cluster and select the network you want to use for the cluster. Note in the dialog box you can add ip address cluster configuration. You can separate on cluster creation the network you want to use for cluster communication.

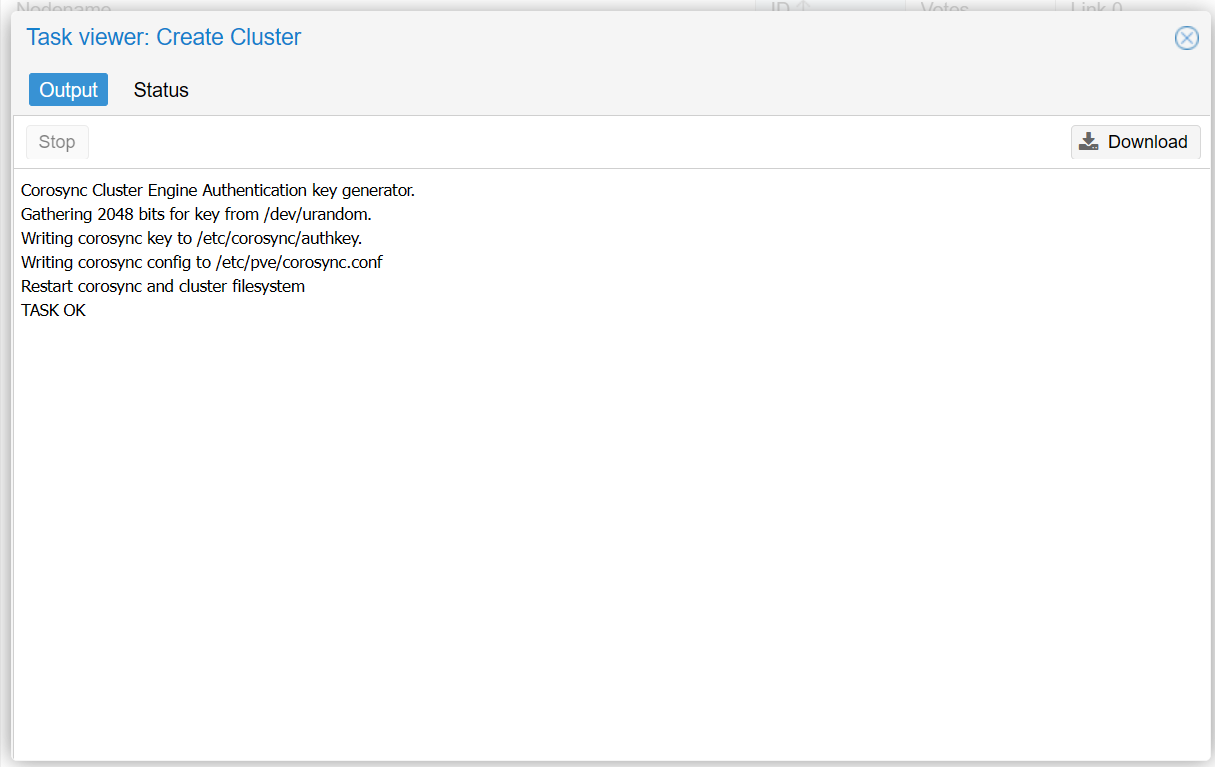
The task completes successfully creating the Proxmox cluster.
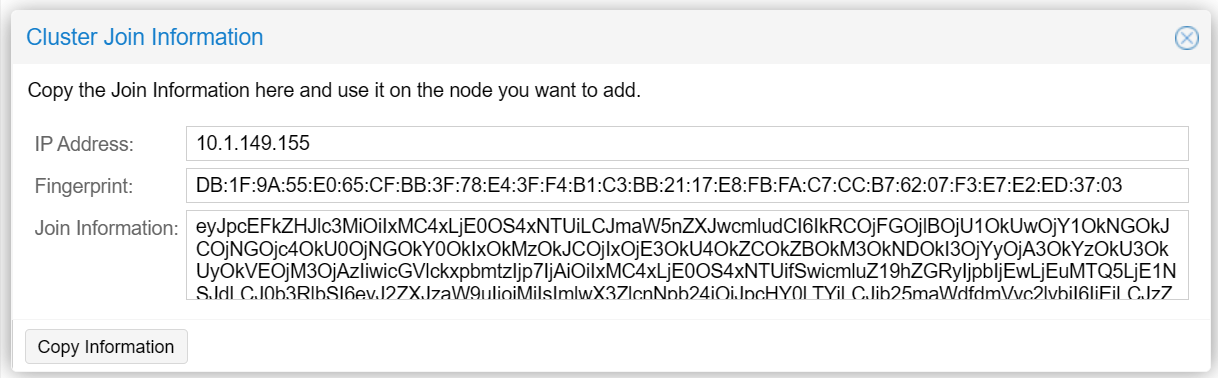
Once the cluster is created, when you navigate to Datacenter > Cluster you will see the Join information button.
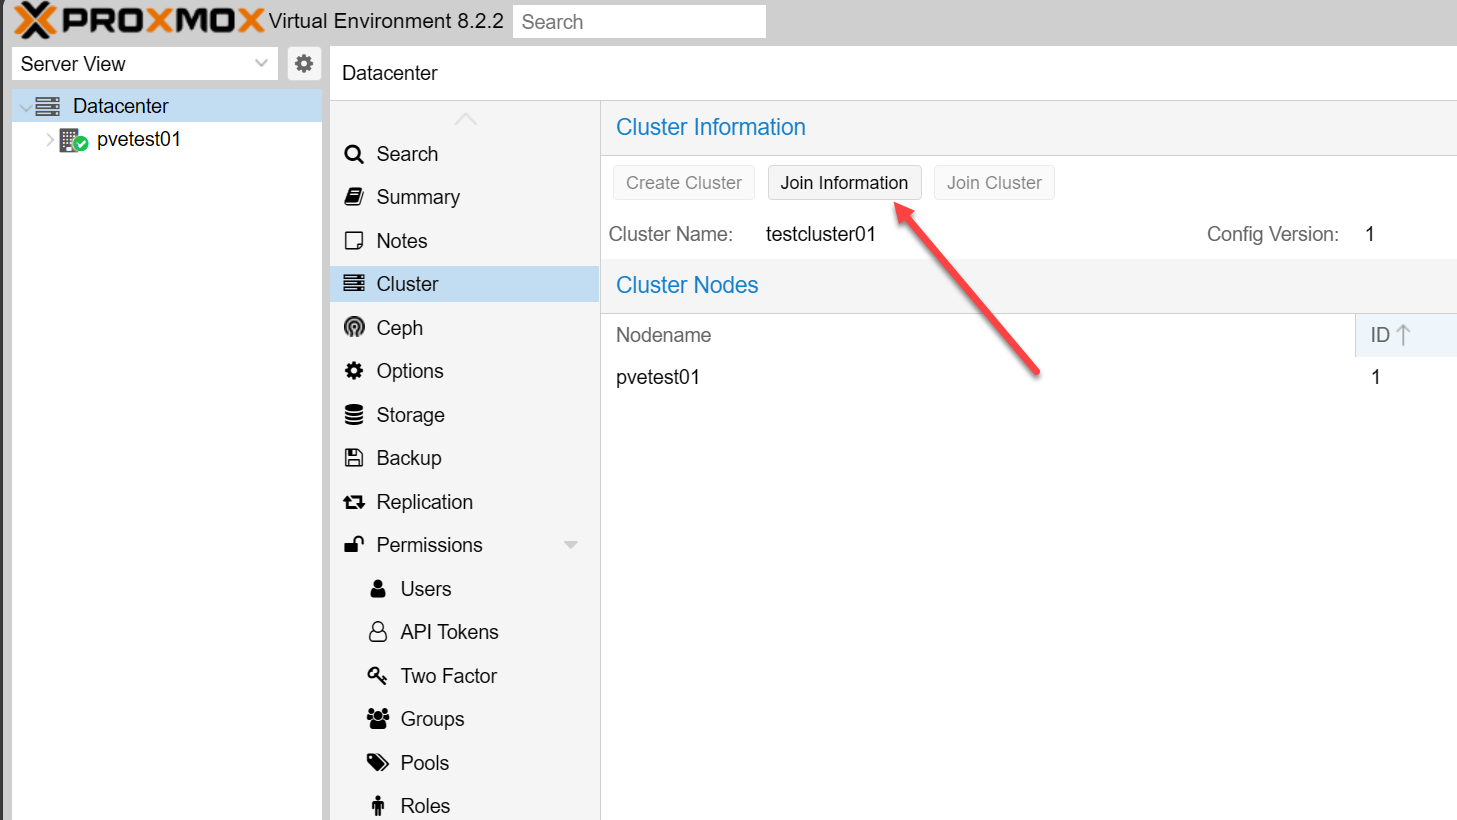
When you click the on the Join information button, you will see the Cluster Join Information dialog box. It will contain the IP address of the master cluster node, along with a long Join information hash that you need to copy. You will need this information on your subsequent Proxmox nodes that you want to join to the Proxmox cluster.
Create via the command line
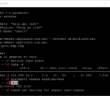
The steps to create a new Proxmox cluster via the command line are even more straightforward. Use the command:
pvecm create <cluster name>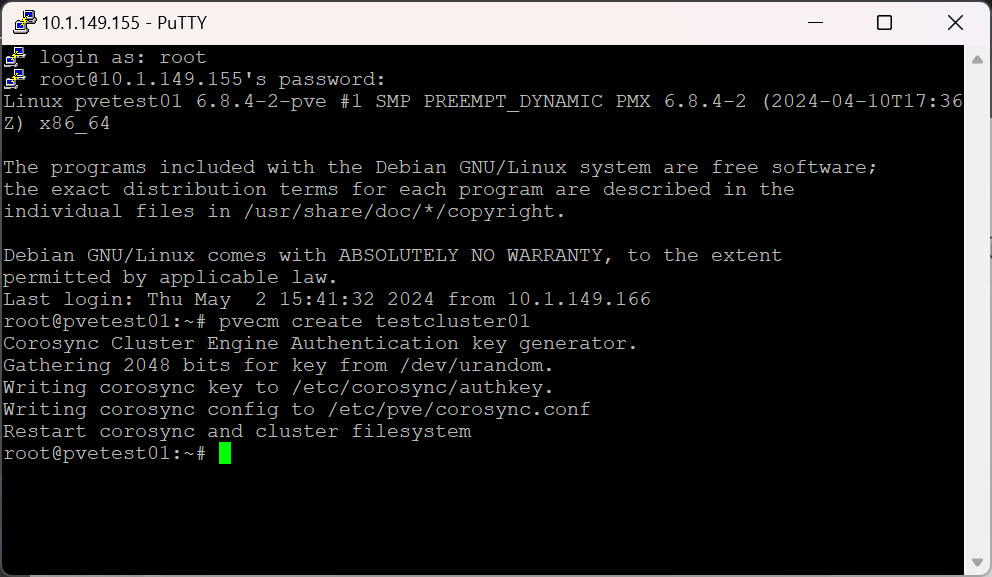
As you can see above, the creation of the Proxmox cluster is super easy via the command line.
Verifying the cluster status and health
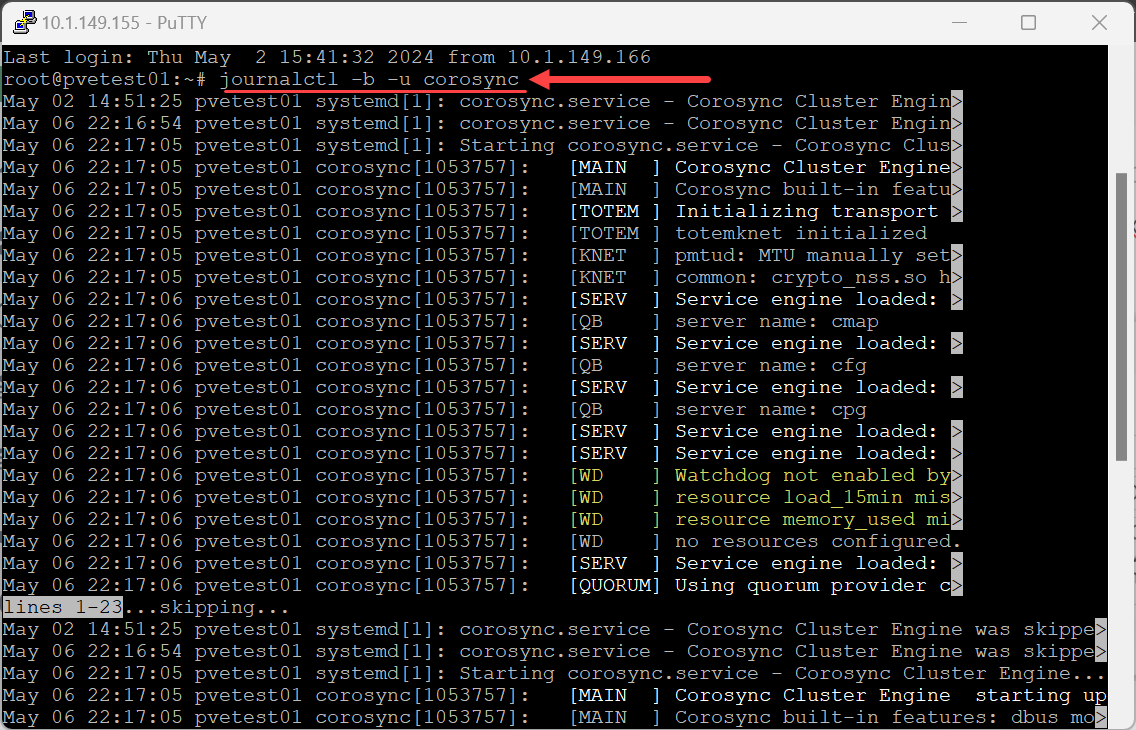
Deploying “centralized web-based management” allows for easier monitoring and management of the cluster. It’s essential to maintain “pvecm status” checks and regularly review “journalctl -b -u corosync” logs to ensure the cluster operates without issues.
You will see various information, including cluster manager status, nodeid votes name.
Advanced Proxmox Cluster Features
Proxmox has advanced features that offer more complex network setups and operational demands.
High Availability and Failover
Configure “high availability” settings to automatically handle the “migration of virtual machines” in case of node failure. This setup uses “corosync external vote support” and ensures that virtual machines are always running, even if one cluster node encounters problems.
Security and Updates
Maintain security through “explicit host key pinning” and manage system updates without downtime. It leverages the “cluster certificate authority (CA).” Regularly update configurations and apply patches to keep the cluster secure and functional.
Backups
Configure shared storage solutions, such as Ceph or ZFS, and implement network storage practices to protect data integrity across the cluster.
Removing a node from the cluster
You can also remove a node from a Proxmox cluster. I have written a fairly in depth blog post on this topic that includes how to remove a Proxmox VE Server from the cluster. When you remove an existing cluster node, it means you separate after cluster creation the node from the cluster.
Check out my blog post here: Proxmox Remove Node from Cluster Including Ceph
Troubleshooting Proxmox Cluster Creation
Creating a Proxmox cluster can sometimes encounter issues. Usually these involve networking, configuration, or node communication. You may have a nodes with separated cluster.
Common Issues and Solutions
1. Network Misconfigurations
- Problem: Incorrect network settings such as IP conflicts or misconfigured subnet masks can cause issues with nodes not being able to communicate effectively. This is crucial for cluster operations like “cluster traffic” and “cluster communication”.
- Solution: Double-check the network settings on each node. Ensure that each node has a unique IP address and that all nodes are on the same subnet. Use tools like pvecm add ip address to correctly configure IP addresses.
2. Corosync and Cluster Communication Issues
- Problem: Issues with Corosync, the cluster communication software, can lead to nodes not joining the cluster or the cluster behaving unpredictably.
- Solution: Verify the Corosync configuration files (etc pve corosync.conf) on all nodes. Ensure that “corosync supports redundant networking” is enabled for higher reliability. Use journalctl -b -u corosync to check for any errors in the logs and systemctl status corosync to ensure the service is running correctly.
3. Authorization and Key Management
- Problem: Nodes may fail to join the cluster due to authorization issues, often related to SSH keys.
- Solution: Check the etc pve priv authorized_keys file on the cluster’s master node to ensure that it contains the public keys of all other nodes. Additionally, ensure “explicit host key pinning” is configured to avoid man-in-the-middle attacks during node communication.
4. Configuration File Errors
- Problem: Errors in the cluster configuration files can prevent the cluster from functioning correctly or nodes from recognizing each other.
- Solution: Carefully review the etc pve corosync.conf and other relevant configuration files for errors. Use commands like rm etc pve corosync and pvecm create test link to reset and retest connections if necessary.
5. Version Incompatibility and Updates
- Problem: Incompatible Proxmox VE versions across nodes can lead to issues during the “cluster creation”.
- Solution: Ensure all nodes are running the same version of Proxmox VE. Upgrade any outdated nodes by following the proper upgrade path. Regularly check pve cluster insert version to monitor and manage cluster versions.
Advanced Diagnostic Techniques
For unresolved issues, advanced diagnostics may be necessary:
- Use pvecm status and pvecm nodes commands to get a detailed view of the cluster’s status and node health.
- Check for physical network issues. Sometimes, problems as simple as a disconnected cable or a faulty router/switch port can cause what seems like a more complex issue.
- Consult the Proxmox community forums and official documentation. Often, similar issues have been encountered and documented by other users.
Wrapping up: Is a Proxmox Cluster Right for Your Home Lab?
Building a Proxmox cluster in your home lab is a great way to learn the inner workings of clustering with Proxmox. Many are looking at ways to transition from VMware and Proxmox is a great platform. Outside of learning, it is also a great way to make sure your critical services in the home lab are highly available and protected from a single host failure.
Let me know in the comments if you are using Proxmox clustering in your home lab to make sure your critical services are resilient.
Google is updating how articles are shown. Don’t miss our leading home lab and tech content, written by humans, by setting Virtualization Howto as a preferred source.
About The Author