VMware Event Broker Appliance VEBA tutorial: How to create an email notification
Among the really cool projects I have stood up in the lab as of recently is the VMware Event Broker Appliance (VEBA). If you have not heard about VEBA and you are looking to take your vCenter notifications and automation to the next level, VEBA is the solution that allows VI admins to push the envelope of what is possible in the enterprise datacenter running vSphere. Let’s take a look at the VMware Event Broker Appliance (VEBA), what it is and how you use it. Then, we will look at a VEBA tutorial: how to create an email notification.
What is the VMware Event Broker Appliance (VEBA)
The VMware Event Broker Appliance is the brainchild of William Lam and Michael Gasch among other contributors to the VMware Fling. The VEBA solution allows VI/Cloud Admins, SRE/Operators, Automation Engineers, and 3rd Party Vendors to unlock the hidden VMware vSphere events and trigger workflows based on the events coming across the vCenter Server appliance.
It is currently available as a VMware Fling, freely available for download from the official VMware Fling site. Despite being a Fling, the appliance is already getting used in production environments and has certainly has the “look” of a future production-supported product from VMware or even something implemented in future vCenter releases. We will see on that front.
Download the VMware Event Broker Appliance (VEBA) here:
The great thing about the solution is how quickly you can achieve real business value from the platform. Consumers of the VEBA appliance do not have the steep learning curve of understanding the VMware vCenter Server or VMware Horizon APIs and then writing imperative automation to automate processes needed by the business.
Instead, the VEBA solution already has the built-in integration with vCenter Server and Horizon APIs. Consumers just need to know the events they are looking for in the environment and write simple functions to consume these events and do something interesting with them.
It provides a cloud-native approach of monitoring, alerting, and event-based automation based on functions, which is a very cloud-native approach. This is great as it falls in line with what most businesses are doing today – Functions-as-a-Service (FaaS).
If you have not had any DevOps or development experience at all, don’t worry. There are plenty of examples available on the VEBA Github repo and also customers who are heavily using the solution have shared out examples of the functions they have written for the benefit of the community. The community has embraced the solution and many are heavily using it for event-driven automation in their production environments.
Official links to VEBA resources:
- VMware Fling link (download the OVA): VMware Event Broker Appliance | VMware Flings
- VMware Event Broker Appliance (VEBA) site (examples, etc): VMware Event Broker Appliance (vmweventbroker.io)
VMware Event Broker Appliance VEBA tutorial: How to create an email notification
The process to get VEBA up and running and work with functions, including the following steps:
- Deploy the VMware Event Broker Appliance (VEBA) in vSphere
- Deploy and test your function with Docker locally
- Deploy the tested function to your VEBA appliance
First, let’s take a look at a few prerequisites.
Prerequisites
Since I am working on a Windows DevOps workstation for the purposes of the tutorial, things you will need or that will make things easier are the following:
- Visual Studio Code – Code IDE and makes working with the example code much easier
- Git – Git will be used to clone down the official VEBA repository
- Docker Desktop installed – Provides all the Docker components you will need to test your function locally
- Kubectl – Kubectl is the defacto tool you need to work with Kubernetes clusters. VEBA is running a Kubernetes cluster under the hood within the appliance environment. Deploying functions to the Kubernetes cluster will require you interact using kubectl.
Keep in mind, if you are not deploying and testing a container locally, you will only need Visual Studio Code (not an absolute requirement, but definitely recommended).
1. Deploy the VMware Event Broker Appliance (VEBA) in vSphere
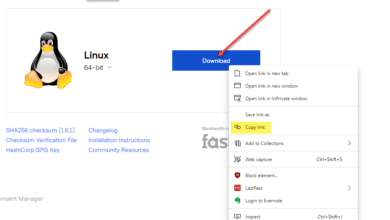
Download the appliance from the VMware Fling site here: VMware Event Broker Appliance | VMware Flings.
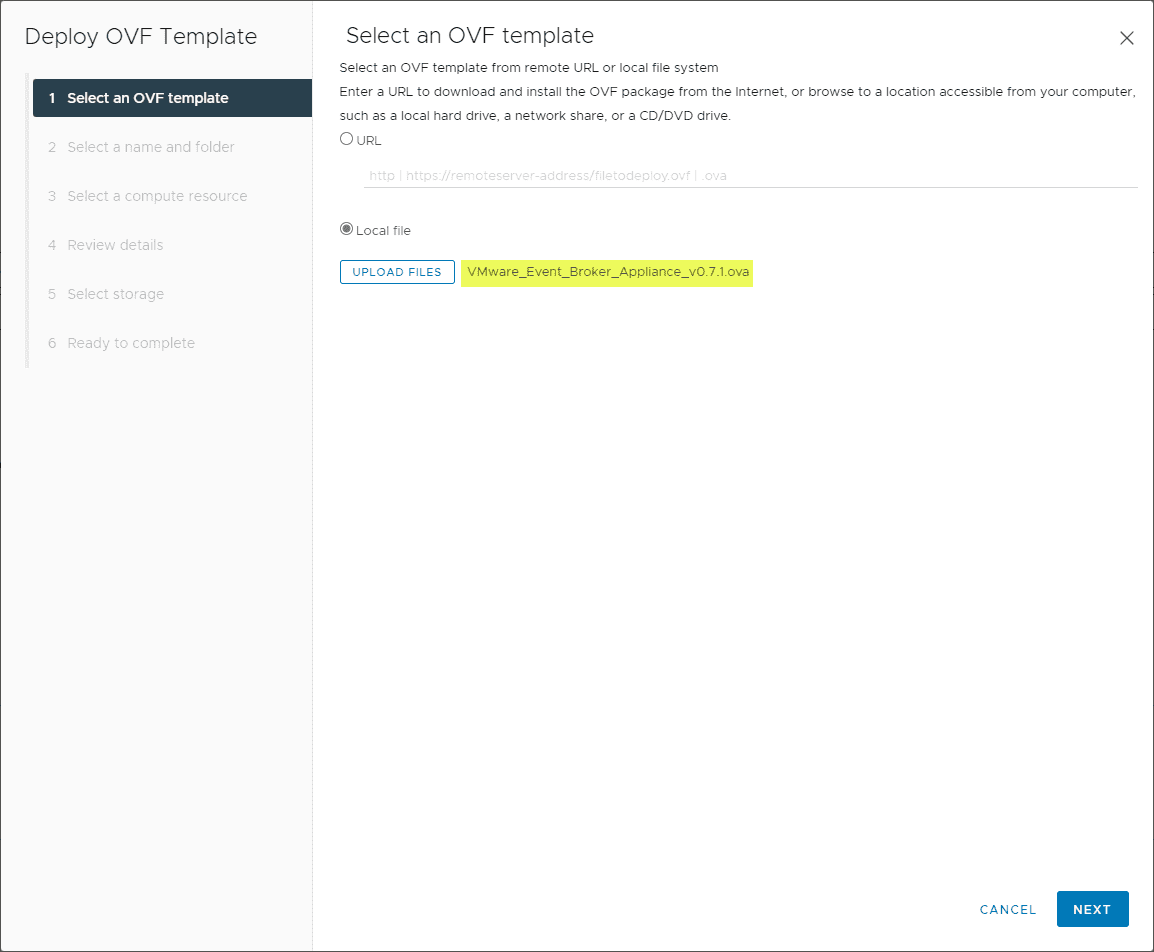
To install/deploy the VMware Event Broker Appliance (VEBA) in your environment, it is a simple process of deploying an OVA appliance in your vSphere environment. During the deployment of the VEBA OVA, you will provide vCenter Server credentials as well as credentials to install the VEBA plugin in your vCenter Server vSphere Client. Step through the normal and familiar process of deploying the VEBA OVA.
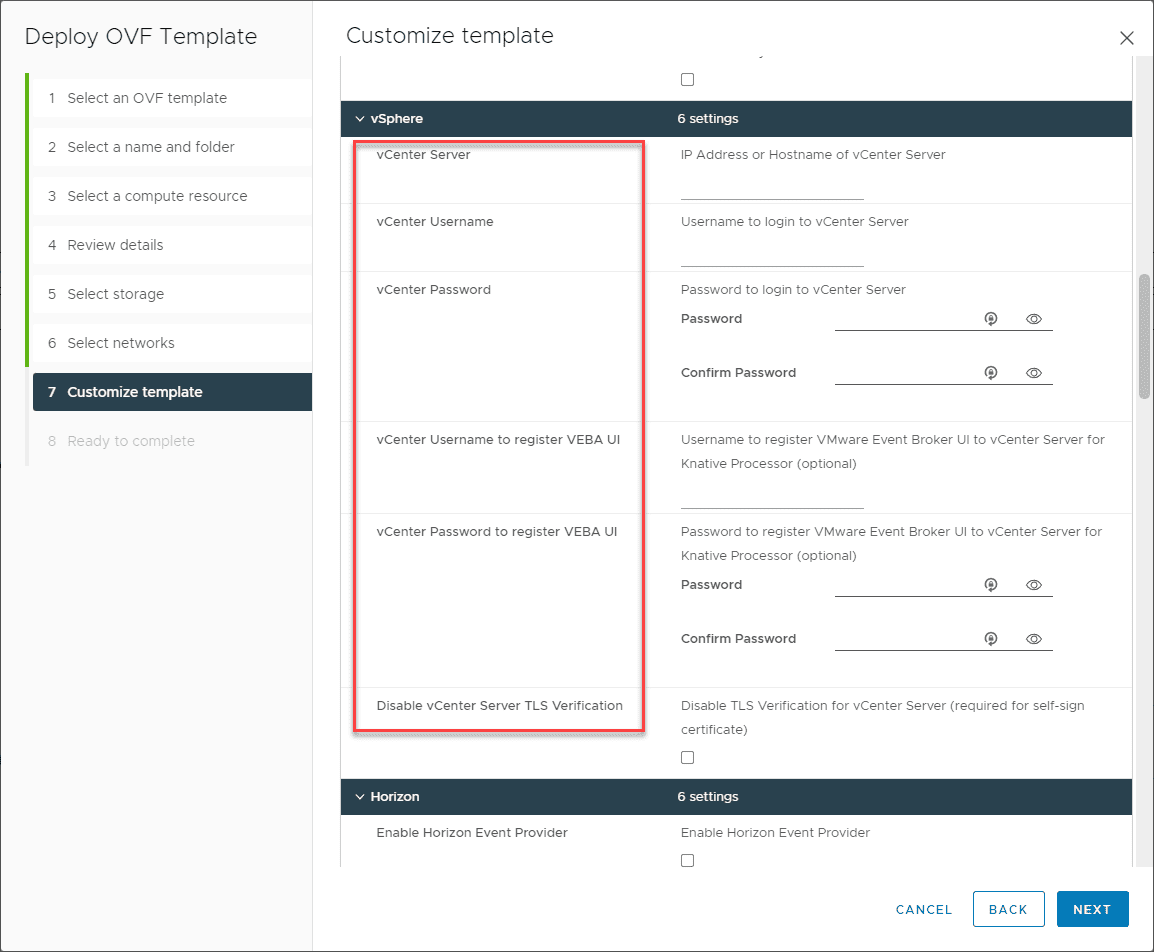
The screen to pay attention to is Step 7 – Customize template. On this screen, you will configure the network settings and the connection to your vCenter Server. Note the section pictured below. Fill in the appropriate information here and register the VEBA solution with your vSphere environment. For my lab environment on this screen, I just accepted the defaults for the default event processor (Knative) and the other settings.
2. Deploy and test your function with Docker locally
Now that we have the appliance deployed, we can start looking at setting up the first function, which for me was a simple email function. Since I think many will most likely start with simple email notifications and move outward to other platforms, let’s take a look at how to create an email notification with VEBA.
To get an email notification configured with your VEBA appliance, you can take the longer approach of testing everything first with the example code, or you can go straight to deploying the function to your VEBA appliance if you are confident of your email configuration settings. In the documentation, it has you following the workflow to test the function along with your email code first:
- Build a local test container
- Test the container by running it locally on your DevOps workstation
- Deploy the function to your VEBA appliance
To begin with, clone down the official VEBA repository. Use the command:
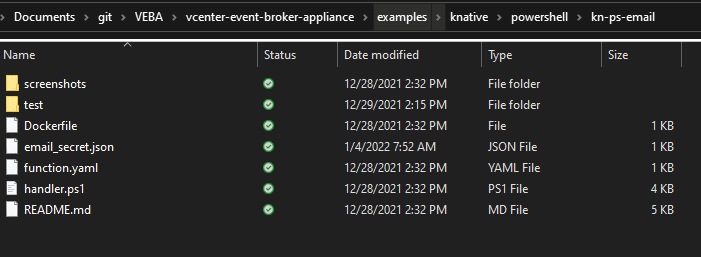
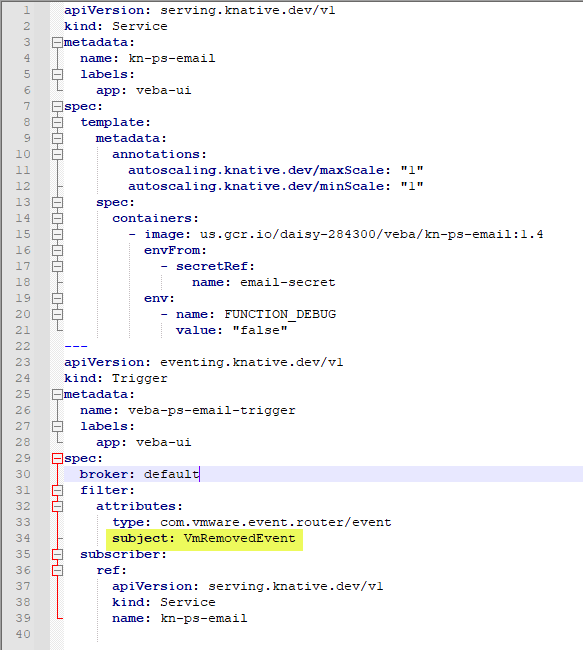
git clone https://github.com/vmware-samples/vcenter-event-broker-appliance.gitAfter you clone down the repository, it will contain the files needed to both test and deploy the function to your VEBA appliance. Note the following files below:
- Dockerfile – allows building your own customized Docker container
- email_secret.json – contains the values you need to customize for your email notifications (email server, port, username, password, etc)
- function.yaml – the actual function file needed to deploy the function to your VEBA appliance
- hander.ps1 – can be customized to suit the needs of your business. It handles the styling and wording of the emails, etc
- test directory – This directory contains files that are used to test the function before you deploy it to VEBA
Building the test Docker container
To build your test Docker container, you simply need to be in the kn-ps-email directory and run the following command. As a note, below, you are pointing to the Docker registry to deploy your test container. So, pass in your Docker username and don’t forget the trailing “period” at the end. The “1.0” is the tag that I have applied, so you can put anything here.
docker build -t <your Docker username>/kn-ps-email:1.0 .The command above uses the Dockerfile located in the directory to build the container. As a note, you can use a customized container or use this container in your function for VEBA. However, it is not required to have your own container out in the Docker registry. You can leave the container referenced in the function.yaml file pulling from the VMware registry for your functions. I think for most, this will suffice unless you need customizations in your Docker container.
Running the Docker container
Now that we have a test Docker container built, we need to run the container so we can then bounce off emails for testing. To do that, use the following command. Note, I will explain the docker-test-env-variable – gmail below under generating a test email.
docker run -e PORT=8080 --env-file "docker-test-env-variable - gmail" -it --rm -p 8080:8080 <your username>/kn-ps-email:1.0
Once the container is up and running, we can then navigate to the test folder and run the test file. Let’s look at that now.
Generating a test email
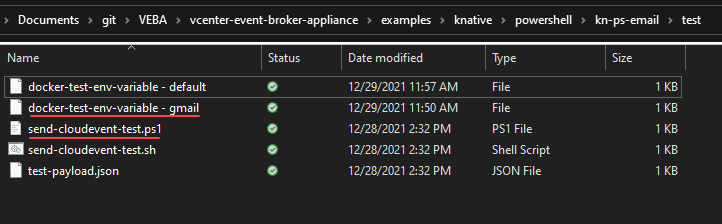
Now that we have the test Docker container running, we can generate a test email using the resources in the test folder. Note what I have in the folder. I copied the default docker-test-env-variable – default to have a starting point and customized my copied file to point to my Gmail account. The send-cloudevent-test.ps1 is the file we use to generate a simulated email event from VEBA.
The great thing about how VEBA has been engineered is the development for the functions does not require VEBA or even a vSphere environment. With the modular approach of the solution, you can develop and test everything by simply running a local Docker container as we started above.
So, you can copy as I have done the default docker-test-env-variable file or just edit the one that is there by default. No changes are required to the send-cloudevent-test.ps1 file as the email event variable file has been passed to the docker run command above.
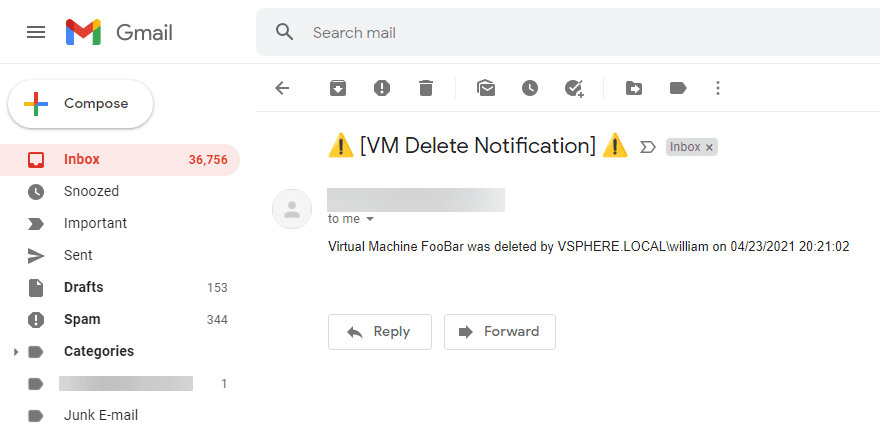
You should see a StatusCode 200 in the return from the cloudevent-test.ps1 file output. Also, you should successfully receive the email to your email address

Checking my Gmail, the email is successfully received.
Now that we have tested the email configuration and the function works as expected, we can deploy to VEBA.
Deploy the email function to VEBA
The process to deploy the function to the VEBA appliance is straightforward and only involves a couple of steps. These steps include:
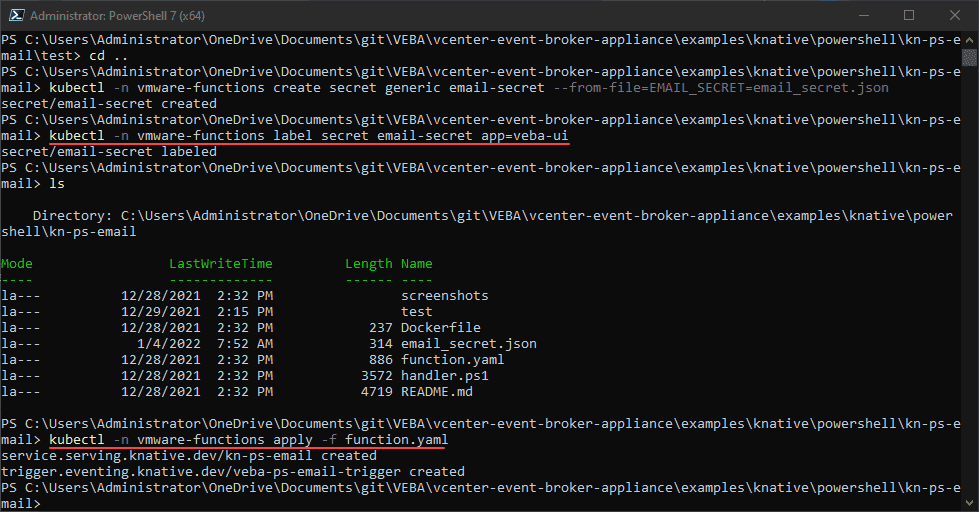
- Applying the email “secret” configuration – This is just a matter of simply applying the email server, username, password, port, etc configuration to your VEBA appliance for the email function.
- Apply the function to the VEBA appliance – This is the process of applying the email function to the VEBA appliance.
***Note*** As I alluded to above, I didn’t change the function to point to my customized Docker container. I left the function pointed to the default container from VMware.
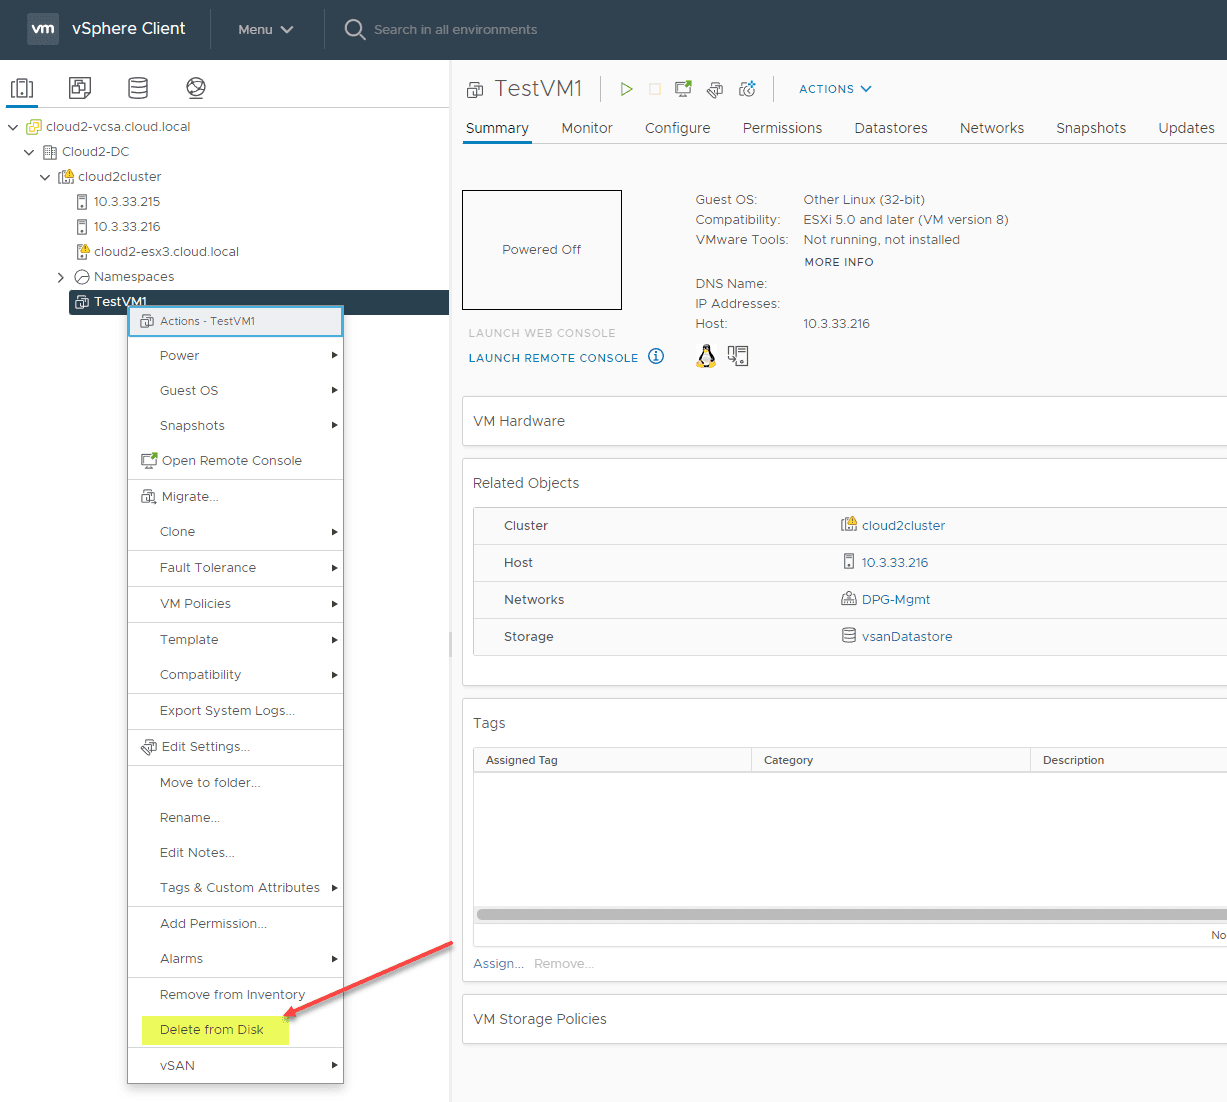
By default, the function looks for a VMRemovedEvent to come across in vCenter. So, I am testing this with a test VCSA appliance by creating a test VM and deleting it.
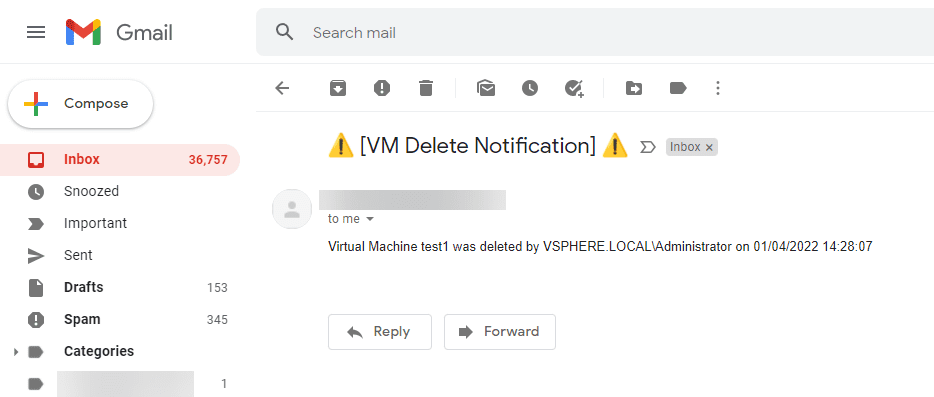
After deleting the email, I successfully received an email notification to Gmail.
How can you change the event that is trigger for the email notification? In the function.yaml. You can manually change this event in the function.yaml to point to a different event.
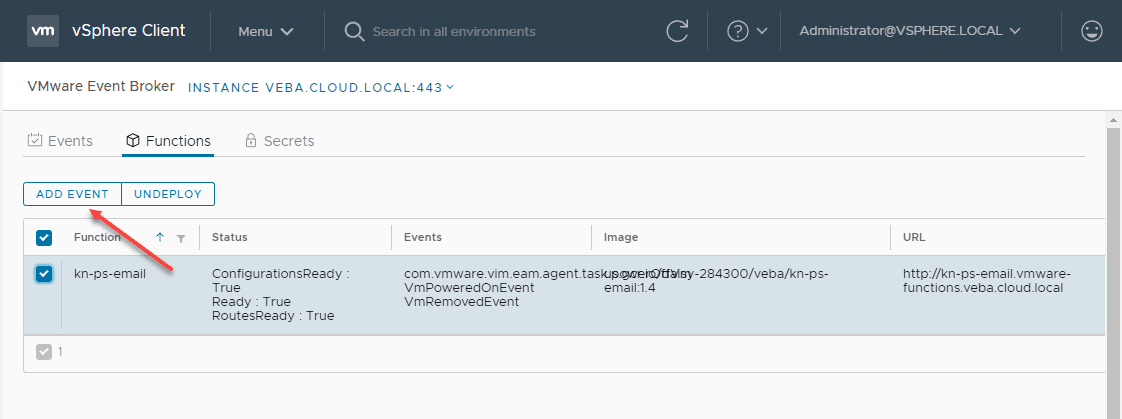
If you navigate to the VEBA plugin GUI, you can view your functions and secrets from the GUI in the vSphere Client and add events from the button.
Wrapping up
All I can say is VEBA is awesome. It provides a cloud-native approach to monitoring, alerting, and event-driven automation. Really, your imagination is the only limitation to what VEBA can do in terms of use cases and businesses processes that can be triggered based on events coming from vSphere or VMware Horizon. As shown in the tutorial, the VEBA examples are a great way to get up and running quickly. Hopefully, this VMware Event Broker Appliance VEBA tutorial: How to create an email notification will help you guys get up and running quickly with this really great solution. Definitely give a thumbs up to William and Michael for this project!