With Windows 11 now out among the masses, you are probably looking at deploying your Windows 11 installation in an automated way. Automated installations allow Windows 11 to be installed automatically which allows installing the operating system consistently, and for the purposes of what will be described below, it allows creating and updating a virtual machine template. Virtual machine templates allow a quick path to deploying an operating system. In particular, VMware vSphere templates allow you to clone a virtual machine from the template and customize the machine using a customization specification. All of these tools provide an easy way to have a fully customized VM up and running in just a few minutes. One of the tools that we can use with an automated Windows 11 installation with autounattend is Hashicorp Packer. I have written about Packer in many previous blog posts. Let’s look at automated windows 11 installation with autounattend with Packer.
What is Hashicorp Packer
Hashicorp Packer is a tool that many virtualization admins already know about. However, it is a self-contained executable that performs all of the heavy lifting by creating the virtual machine with the specified hardware and hardware configurations in an automated way. It then automatically installs the operating system with various levels of customization.
After it installs the operating system, it can automatically convert the virtual machine to a template. When installing Windows client operating systems like Windows 11, Packer can use the standard autounattend file that has been used in other solutions like MDT.
Learn more about and download Hashicorp Packer here:
Automated Windows 11 Installation with AutoUnattend and Packer
So, let’s look at how to carry out an automated Windows 11 installation with autounattend and Packer. Just to level-set on a few items. There are a few things that you need for an automated Windows 11 installation with autounattend and packer. These include:
- Packer – downloaded from Hashicorp
- Windows 11 ISO
- autounattend file
- Packer Windows 11 var file
- Packer Windows 11 HCL configuration file
Creating the autounattend file
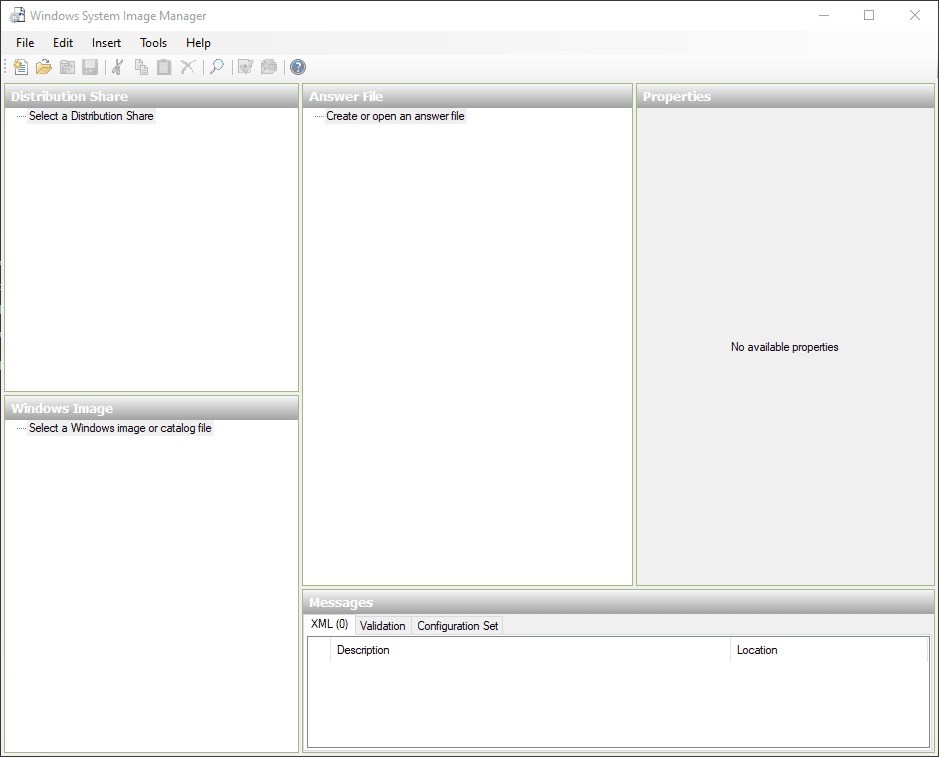
The first two items are self-explanatory as these are just downloads you need to get your hands on first. However, let’s move forward with number 3, the autounattend file. To create the autounattend file for Windows 11, you can use standard tools like the Windows System Image Manager. To use the Windows System Image Manager, you point the utility to the install.wim for Windows 11. Once you do that, you can create the autounattend file.
To save some time on the front of creating a Windows 11 autounattend file, I am posting the one I am using in the lab below that I have created. A couple of notes here that may look odd. You will note the image name is still set to Windows 10 Pro. Surprisingly, in the Windows 11 GA media, the images are still named Windows 10. I am guessing this slipped through the cracks for the initial GA media. So, this will likely change in the near future. However, Packer will hang on the Image select if you use Windows 11 Pro.
Other notables:
- The product key listed below is a KMS key for Windows 11
- It uses UEFI
- It installs VMware Tools (a:\vmtools.cmd)
- It runs a provisioning script (a:\setup.ps1)
<?xml version="1.0" encoding="utf-8"?>
<unattend xmlns="urn:schemas-microsoft-com:unattend">
    <settings pass="windowsPE">
        <component name="Microsoft-Windows-International-Core-WinPE" processorArchitecture="amd64" publicKeyToken="31bf3856ad364e35" language="neutral" versionScope="nonSxS" xmlns:wcm="http://schemas.microsoft.com/WMIConfig/2002/State" xmlns:xsi="http://www.w3.org/2001/XMLSchema-instance">
            <SetupUILanguage>
                <UILanguage>en-US</UILanguage>
            </SetupUILanguage>
            <InputLocale>en-US</InputLocale>
            <SystemLocale>en-US</SystemLocale>
            <UILanguage>en-US</UILanguage>
            <UserLocale>en-US</UserLocale>
        </component>
        <component name="Microsoft-Windows-Setup" processorArchitecture="amd64" publicKeyToken="31bf3856ad364e35" language="neutral" versionScope="nonSxS" xmlns:wcm="http://schemas.microsoft.com/WMIConfig/2002/State" xmlns:xsi="http://www.w3.org/2001/XMLSchema-instance">
            <DiskConfiguration>
                <Disk wcm:action="add">
                    <CreatePartitions>
                        <CreatePartition wcm:action="add">
                            <Type>EFI</Type>
                            <Size>512</Size>
                            <Order>1</Order>
                        </CreatePartition>
                        <CreatePartition wcm:action="add">
                            <Extend>false</Extend>
                            <Type>MSR</Type>
                            <Order>2</Order>
                            <Size>128</Size>
                        </CreatePartition>
                        <CreatePartition wcm:action="add">
                            <Order>3</Order>
                            <Type>Primary</Type>
                            <Extend>true</Extend>
                        </CreatePartition>
                    </CreatePartitions>
                    <ModifyPartitions>
                        <ModifyPartition wcm:action="add">
                            <Format>FAT32</Format>
                            <Order>1</Order>
                            <PartitionID>1</PartitionID>
                        </ModifyPartition>
                        <ModifyPartition wcm:action="add">
                            <Order>2</Order>
                            <PartitionID>2</PartitionID>
                        </ModifyPartition>
                        <ModifyPartition wcm:action="add">
                            <Format>NTFS</Format>
                            <Label>Windows</Label>
                            <Order>3</Order>
                            <PartitionID>3</PartitionID>
                        </ModifyPartition>
                    </ModifyPartitions>
                    <DiskID>0</DiskID>
                    <WillWipeDisk>true</WillWipeDisk>
                </Disk>
            </DiskConfiguration>
            <ImageInstall>
                <OSImage>
                    <InstallFrom>
                        <MetaData wcm:action="add">
                            <Key>/IMAGE/NAME</Key>
                            <Value>Windows 10 Pro</Value>
                        </MetaData>
                    </InstallFrom>
                    <InstallTo>
                        <DiskID>0</DiskID>
                        <PartitionID>3</PartitionID>
                    </InstallTo>
                    <WillShowUI>OnError</WillShowUI>
                    <InstallToAvailablePartition>false</InstallToAvailablePartition>
                </OSImage>
            </ImageInstall>
            <UserData>
                <AcceptEula>true</AcceptEula>
				<ProductKey>
                  <Key>W269N-WFGWX-YVC9B-4J6C9-T83GX</Key>
                  <WillShowUI>Never</WillShowUI>
               </ProductKey>
            </UserData>
        </component>
    </settings>
    <settings pass="specialize">
        <component name="Microsoft-Windows-Shell-Setup" processorArchitecture="amd64" publicKeyToken="31bf3856ad364e35" language="neutral" versionScope="nonSxS" xmlns:wcm="http://schemas.microsoft.com/WMIConfig/2002/State" xmlns:xsi="http://www.w3.org/2001/XMLSchema-instance">
            <TimeZone>Central Standard Time</TimeZone>
        </component>
        <component name="Microsoft-Windows-Deployment" processorArchitecture="amd64" publicKeyToken="31bf3856ad364e35" language="neutral" versionScope="nonSxS" xmlns:wcm="http://schemas.microsoft.com/WMIConfig/2002/State" xmlns:xsi="http://www.w3.org/2001/XMLSchema-instance">
            <RunSynchronous>
                <RunSynchronousCommand wcm:action="add">
                    <Path>a:\vmtools.cmd</Path>
                    <Order>1</Order>
                    <WillReboot>Always</WillReboot>
                </RunSynchronousCommand>
            </RunSynchronous>
        </component>
		 <component name="Microsoft-Windows-TerminalServices-LocalSessionManager" processorArchitecture="amd64" publicKeyToken="31bf3856ad364e35" language="neutral" versionScope="nonSxS" xmlns:wcm="http://schemas.microsoft.com/WMIConfig/2002/State" xmlns:xsi="http://www.w3.org/2001/XMLSchema-instance">
            <fDenyTSConnections>false</fDenyTSConnections>
        </component>
        <component name="Networking-MPSSVC-Svc" processorArchitecture="amd64" publicKeyToken="31bf3856ad364e35" language="neutral" versionScope="nonSxS" xmlns:wcm="http://schemas.microsoft.com/WMIConfig/2002/State" xmlns:xsi="http://www.w3.org/2001/XMLSchema-instance">
            <FirewallGroups>
                <FirewallGroup wcm:action="add" wcm:keyValue="RemoteDesktop">
                    <Active>true</Active>
                    <Group>Remote Desktop</Group>
                    <Profile>all</Profile>
                </FirewallGroup>
            </FirewallGroups>
        </component>
        <component name="Microsoft-Windows-TerminalServices-RDP-WinStationExtensions" processorArchitecture="amd64" publicKeyToken="31bf3856ad364e35" language="neutral" versionScope="nonSxS" xmlns:wcm="http://schemas.microsoft.com/WMIConfig/2002/State" xmlns:xsi="http://www.w3.org/2001/XMLSchema-instance">
            <SecurityLayer>2</SecurityLayer>
            <UserAuthentication>1</UserAuthentication>
        </component>
		<component name="Microsoft-Windows-ServerManager-SvrMgrNc" processorArchitecture="amd64" publicKeyToken="31bf3856ad364e35" language="neutral" versionScope="nonSxS" xmlns:wcm="http://schemas.microsoft.com/WMIConfig/2002/State" xmlns:xsi="http://www.w3.org/2001/XMLSchema-instance">
            <DoNotOpenServerManagerAtLogon>true</DoNotOpenServerManagerAtLogon>
        </component>
    </settings>
    <settings pass="oobeSystem">
	    <component language="neutral" name="Microsoft-Windows-International-Core" processorArchitecture="amd64" publicKeyToken="31bf3856ad364e35" versionScope="nonSxS" xmlns:wcm="http://schemas.microsoft.com/WMIConfig/2002/State" xmlns:xsi="http://www.w3.org/2001/XMLSchema-instance">
            <InputLocale>0409:00000409</InputLocale>
            <SystemLocale>en-US</SystemLocale>
            <UILanguage>en-US</UILanguage>
            <UILanguageFallback>en-US</UILanguageFallback>
            <UserLocale>en-US</UserLocale>
        </component>
	    <component name="Microsoft-Windows-Shell-Setup" processorArchitecture="amd64" publicKeyToken="31bf3856ad364e35" language="neutral" versionScope="nonSxS" xmlns:wcm="http://schemas.microsoft.com/WMIConfig/2002/State" xmlns:xsi="http://www.w3.org/2001/XMLSchema-instance">
            <AutoLogon>
                <Password>
                    <Value>Password</Value>
                    <PlainText>true</PlainText>
                </Password>
                <LogonCount>3</LogonCount>
                <Username>Administrator</Username>
                <Enabled>true</Enabled>
            </AutoLogon>
            <UserAccounts>
                <AdministratorPassword>
                    <Value>Password</Value>
                    <PlainText>true</PlainText>
                </AdministratorPassword>
            </UserAccounts>
			<OOBE>
                <HideEULAPage>true</HideEULAPage>
                <HideOEMRegistrationScreen>true</HideOEMRegistrationScreen>
                <HideOnlineAccountScreens>true</HideOnlineAccountScreens>
                <HideWirelessSetupInOOBE>true</HideWirelessSetupInOOBE>
                <NetworkLocation>Work</NetworkLocation>
                <ProtectYourPC>1</ProtectYourPC>
                <SkipUserOOBE>true</SkipUserOOBE>
                <SkipMachineOOBE>true</SkipMachineOOBE>
            </OOBE>
			<FirstLogonCommands>
                <SynchronousCommand wcm:action="add">
                    <Order>1</Order>
                    <!-- Enable WinRM service -->
                    <CommandLine>powershell -ExecutionPolicy Bypass -File a:\setup.ps1</CommandLine>
                    <RequiresUserInput>true</RequiresUserInput>
                </SynchronousCommand>
			</FirstLogonCommands>
        </component>
    </settings>
    <cpi:offlineImage cpi:source="wim:c:/users/administrator/desktop/win2016/install.wim#Windos 10 Pro" xmlns:cpi="urn:schemas-microsoft-com:cpi" />
</unattend>
Packer Windows 11 var file
For the Windows 11 var file, you need to use something similar to the following. You will note below, I am using the Preview media. This is due to the TPM check being off in the Preview media. I will be posting a workaround to this in a future blog post, so stay tuned on that front 🙂
{
    "vsphere_server": "vcsa.cloud.local",
    "vsphere_user": "[email protected]",
    "vsphere_password": "Password",
    "vsphere_template_name": "Windows11_template",
    "vsphere_folder": "Templates",
    "vsphere_dc_name": "CloudLocal",
    "vsphere_compute_cluster": "vsancluster",
    "vsphere_host": "10.1.149.14",
    "vsphere_portgroup_name": "DPG-Servers",
    "vsphere_datastore": "vsanDatastore",
    "winadmin_password": "Password",
    "cpu_num": "4",
    "mem_size": "4096",
    "disk_size": "102400",
    "os_iso_path": "[vsanDatastore] ISO/Windows11_InsiderPreview_EnterpriseVL_x64_en-us_22454.iso",
    "vmtools_iso_path":"[vsanDatastore] ISO/windows.iso"
}
Packer Windows 11 HCL configuration file
Below is the Packer Windows 11 HCL configuration file I am using in the lab environment. There are a few things to note for the Packer Windows 11 HCL configuration file, including:
- Firmware is efi-secure
- Note the floppy files included: autounattend.xml, setup.ps1, and vmtools.cmd. The setup.ps1 and vmtools.cmd files are called in the autounattend.xml.
{
  "builders": [
    {
      "CPUs": "{{user `cpu_num`}}",
      "RAM": "{{user `mem_size`}}",
      "RAM_reserve_all": true,
      "cluster": "{{user `vsphere_compute_cluster`}}",
      "communicator": "winrm",
      "convert_to_template": "true",
      "datacenter": "{{user `vsphere_dc_name`}}",
      "datastore": "{{user `vsphere_datastore`}}",
      "disk_controller_type": "lsilogic-sas",
      "firmware": "efi-secure",
      "floppy_files": [
        "setup/win11/autounattend.xml",
        "setup/setup.ps1",
        "setup/vmtools.cmd"
      ],
      "folder": "{{user `vsphere_folder`}}",
      "guest_os_type": "windows9Server64Guest",
      "host": "{{user `vsphere_host`}}",
      "insecure_connection": "true",
      "iso_paths": [
        "{{user `os_iso_path`}}",
        "{{user `vmtools_iso_path`}}"
      ],
      "network_adapters": [
        {
          "network": "{{user `vsphere_portgroup_name`}}",
          "network_card": "vmxnet3"
        }
      ],
      "password": "{{user `vsphere_password`}}",
      "storage": [
        {
          "disk_size": "{{user `disk_size`}}",
          "disk_thin_provisioned": true
        }
      ],
      "type": "vsphere-iso",
      "username": "{{user `vsphere_user`}}",
      "vcenter_server": "{{user `vsphere_server`}}",
      "vm_name": "{{user `vsphere_template_name`}}",
      "winrm_password": "{{user `winadmin_password`}}",
      "winrm_username": "Administrator"
    }
  ],
  "provisioners": [
    {
      "inline": [
        "dir c:\\"
      ],
      "type": "windows-shell"
    }
  ],
  "sensitive-variables": [
    "vsphere_password",
    "winadmin_password"
  ],
  "variables": {
    "cpu_num": "",
    "disk_size": "",
    "mem_size": "",
    "os_iso_path": "",
    "vmtools_iso_path": "",
    "vsphere_compute_cluster": "",
    "vsphere_datastore": "",
    "vsphere_dc_name": "",
    "vsphere_folder": "",
    "vsphere_host": "",
    "vsphere_password": "",
    "vsphere_portgroup_name": "",
    "vsphere_server": "",
    "vsphere_template_name": "",
    "vsphere_user": "",
    "winadmin_password": ""
  }
}
Running the Packer build for Windows 11
Running the Packer build for Windows 11 is straightforward. Once you have the files detailed above in place, you can run the Packer build process. The command to run a build is straightforward:
packer build -var-file varswin11.json windows11.json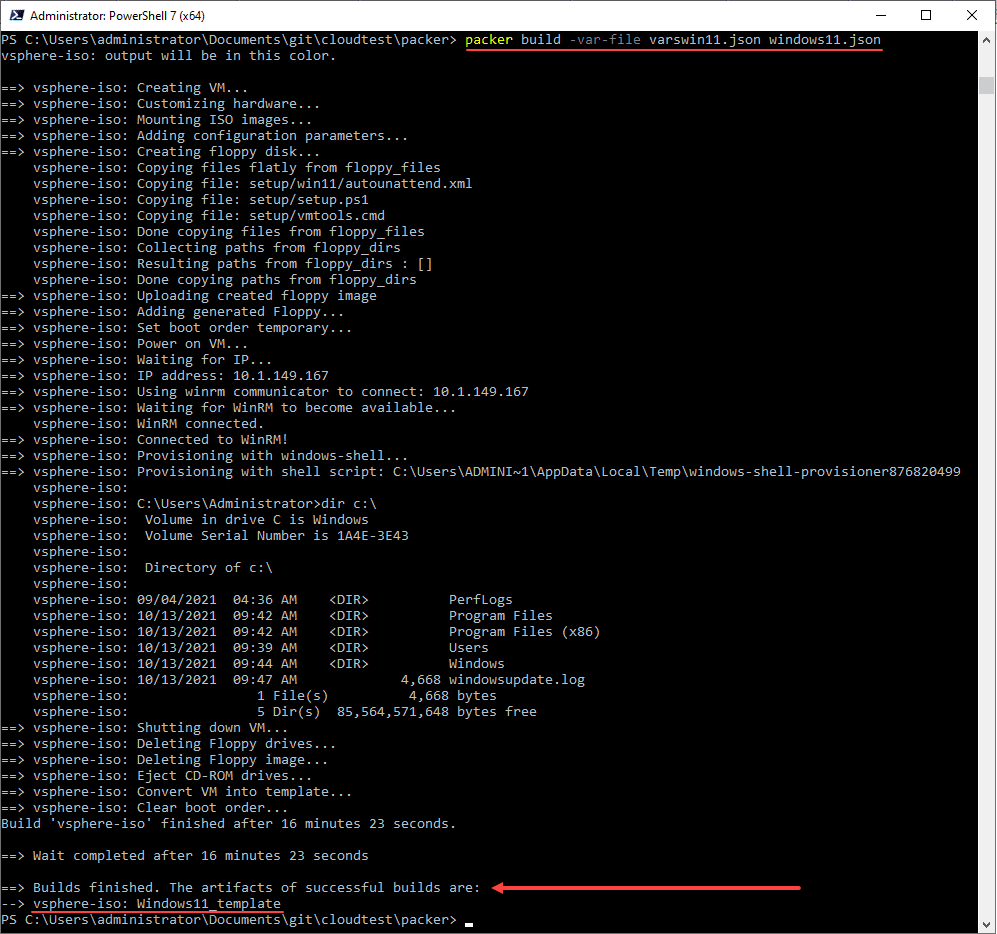
Wrapping Up
The automated Windows 11 Installation with autounattend and Packer is fairly straightforward once you have the components in place to run the Packer build. As mentioned, this includes the autounattend.xml file, Packer variables file, and Packer configuration file. Once these are in place, Packer will use the configuration to build the VMware vSphere template using the build parameters.
Take a look at my other Packer posts:
- Automated Windows Server 2022 Packer Build
- Packer Build Ubuntu 21.04 for VMware vSphere
- Automated Packer VMware vSphere templates with CI/CD Pipeline Build
Google is updating how articles are shown. Don’t miss our leading home lab and tech content, written by humans, by setting Virtualization Howto as a preferred source.
About The Author