I have written a few posts covering Kubernetes as of late and one of those was building out a Kubernetes home lab. In my opinion, there is no better way to learn any technology than getting your “hands dirty” and playing around with it – installing, configuring, and troubleshooting. Especially with troubleshooting, this is where you learn a tremendous amount. The great thing about a home lab is it isn’t unlike production. Many of the issues you run into in production environments, you will see in the home lab. Now, on to the topic at hand – VMware vSphere with Tanzu Kubernetes home lab. Let’s see how this is configured and the experience with Tanzu Kubernetes as opposed to native Kubernetes running in Linux, etc.
Why is Tanzu Kubernetes Awesome?
VMware Tanzu is an awesome Kubernetes platform that allows vSphere administrators who know and love the platform to use the same types of tools to administer their Kubernetes clusters they have been using for years now. If you have setup a Kubernetes cluster from scratch, you know the complexity and lack of visibility you have to what is going on with your cluster and everything of course is command-line driven. I like the command-line and it helps to get used to the kubectl command.
With VMware Tanzu Kubernetes, you have the beautiful vSphere interface to interact with your clusters, have visibility into information such as IP addresses, cluster names, and visually see the structure of your Kubernetes infrastructure. Not to mention the most powerful part. The integration of Kubernetes inside of vSphere brings both the API and UI of vSphere Client and Kubernetes together. The core virtualized layer of ESXi can run Kubernetes natively.
What is vSphere with Tanzu?
VMware released what we had all been waiting for with the Tanzu solution – vSphere with Tanzu. With vSphere with Tanzu, customers no longer have the requirement of VMware NSX-T. While NSX-T is equally incredible in its own right, vSphere with Tanzu allows customers who do not have NSX-T in their environment to use native vSphere networking as the underpinning for Tanzu.
This means you can use traditional vSphere Distributed Switches. In addition, you do need a load balancer. For this, however, you can freely download the HA Proxy. Let’s look at load balancer options next.
What are the load balancer options for Tanzu
There are essentially two load balancers for use with vSphere with Tanzu at the moment:
- HAProxy
- AVI – NSX Advanced Load Balancer
Don’t let the NSX Advanced Load Balancer part confuse you. You can use the AVI Load Balancer without NSX-T with vSphere with Tanzu.
Now, which to choose? For one the HAProxy load balancer is much lighter weight for a home lab. The resources are minimal for the OVA deployed HAProxy VM. However, it lacks the rich, in-depth features of the NSX-T Advanced Load Balancer. So, it is up to you on which to choose. It is a good first step to use the HAProxy LB to begin with I think as it is a bit less complex to configure. However, you will most likely want to play around with both eventually. In the below walkthrough, I will be using the HAProxy
Licensing VMware vSphere with Tanzu
So, first things first, how do you get your hands on licensing for VMware Tanzu and vSphere in general for your home lab? There are really two ways of which I advocate both – a VMUG advantage subscription or becoming a vExpert. Either will allow you to have access to free licenses for VMware vSphere products for a year. My recommendation for most is to start off with a VMUG Advantage Subscription as it will allow you to gain the technical expertise to reach out for vExpert status if you desire in the future.
- VMUG Advantage – $200 (around VMworld and other times you can get 10-20% off the price)
- vExpert – free requires the work and evangelism time required to be nominated

Understanding the networking
I will tell you, VMware vSphere with Tanzu is awesome. However, like a lot of the technologies, one of the hurdles that can cause issues with Tanzu is the networking aspect. There can be a lot of confusion when it comes to setting up the networking for vSphere with Tanzu.
The networking side is where configuration issues generally occur trying to get up and running with vSphere with Tanzu. This can become even more complicated if you use nested ESXi environments for your home lab as you have a bit of “inception” going on trying to wrap your head around network flows. Take a look at my write up here showing how to configure your vSphere with Tanzu lab using nested networking:
VMware vSphere with Tanzu Kubernetes Home Lab
There are multiple steps to deploying the VMware vSphere with Tanzu Kubernetes home lab. These include:
- Deploy your Load Balancer
- Enable Workload Management on your vSphere cluster
- Create a Kubernetes Namespace
- Connect to the Tanzu Kubernetes Supervisor Cluster
- Create TKG Guest cluster using manifest file
- Login to your TKG Guest cluster
Deploy your Load Balancer
The first step here is to deploy the HA Proxy appliance. Here we need to make sure of the networking configuration assigned. The HAProxy VM requires much of the IP configuration to be in the CIDR format, so pay attention to the details here and make sure you have the correct format. This can get confusing as well when you translate between the HAProxy deployment and enabling workload management.
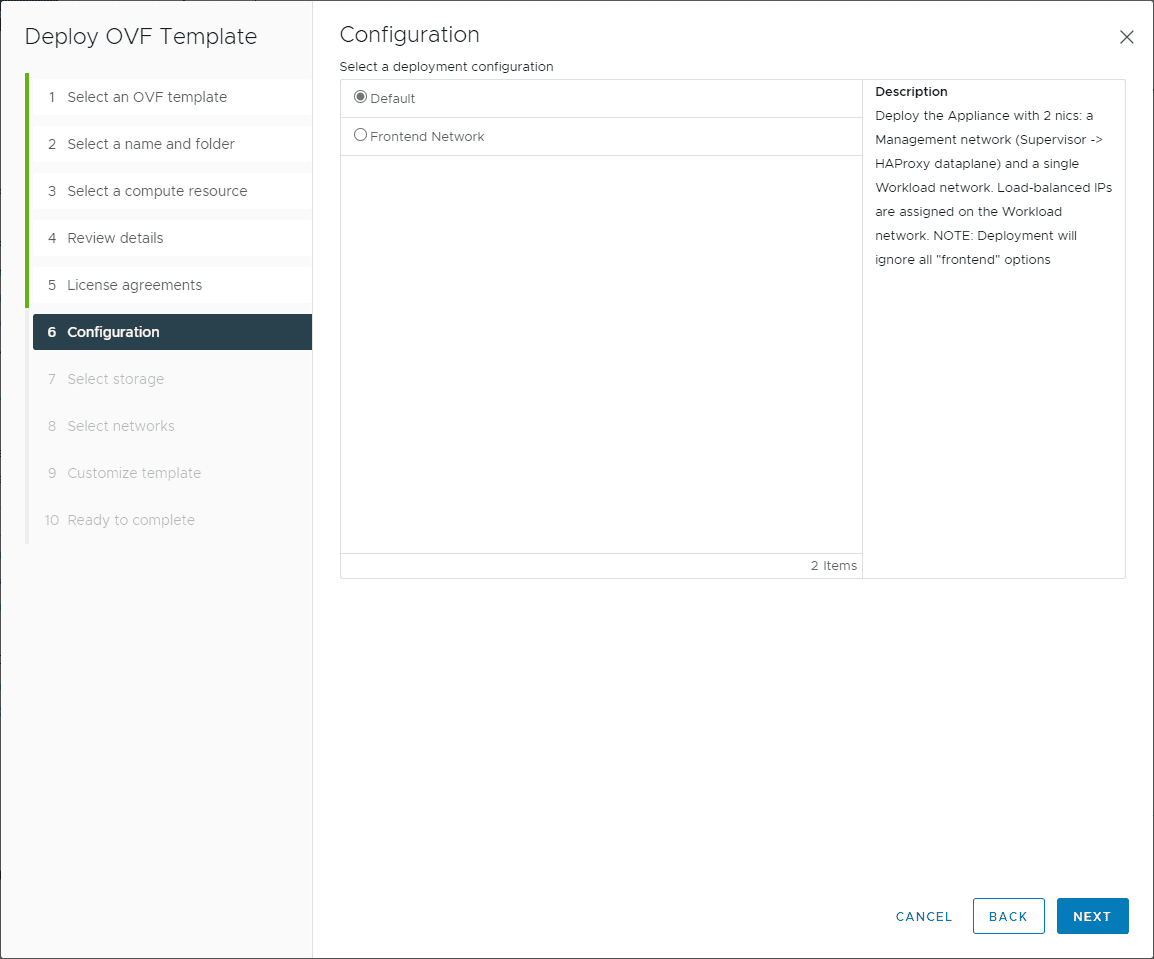
Below are the relevant screenshots from the deployment. On the step 6 configuration screen, choose your NIC layout. You can use a separate frontend network. For simplicity, the Default network is a bit easier to configuration from a networking perspective.
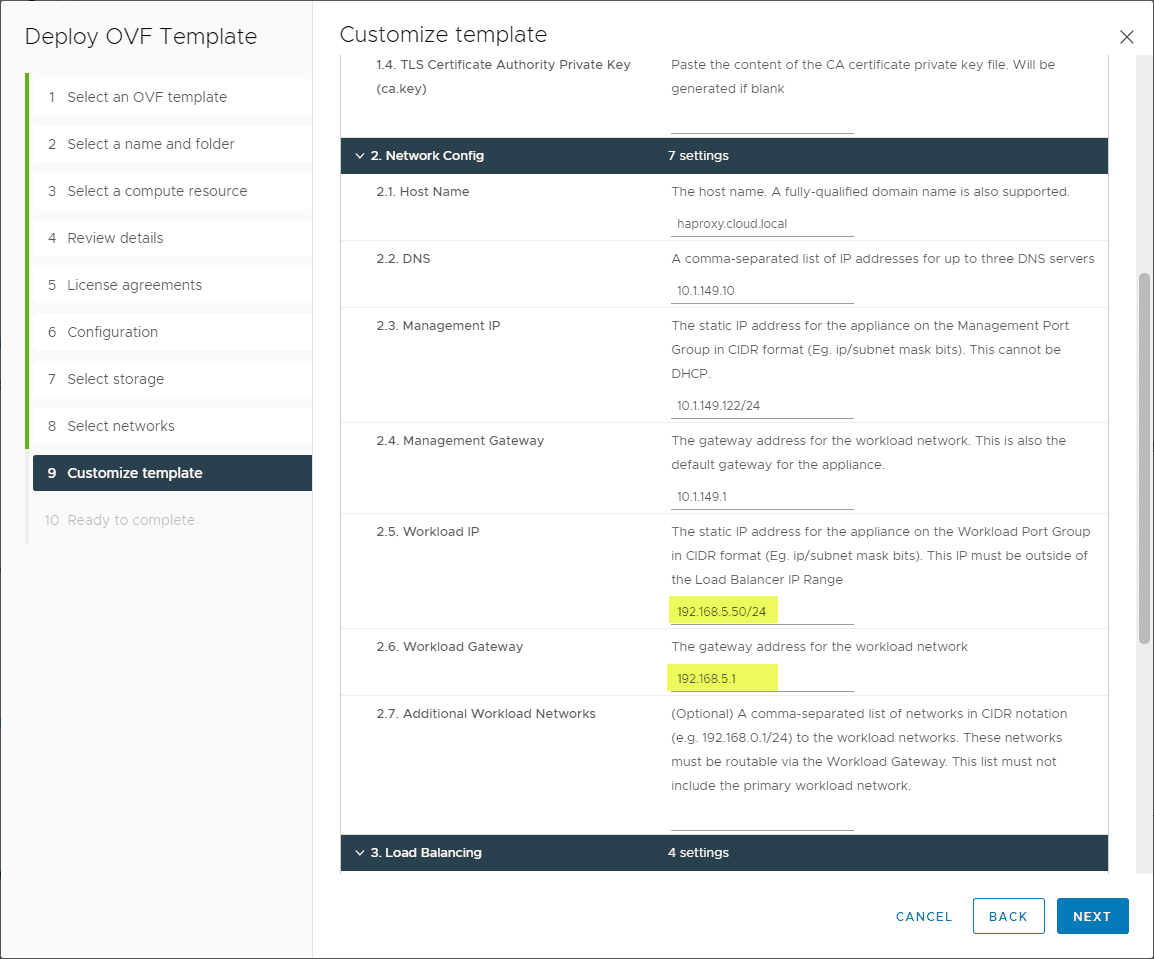
Most of the configuration you want to pay attention to is on the step 9 Customize template screen. Make sure on the Load Balancer IP ranges, you use the CIDR format as mentioned earlier. Make sure to take note of the Dataplane API management port. You need to append this to the IP in the workload management setup later.
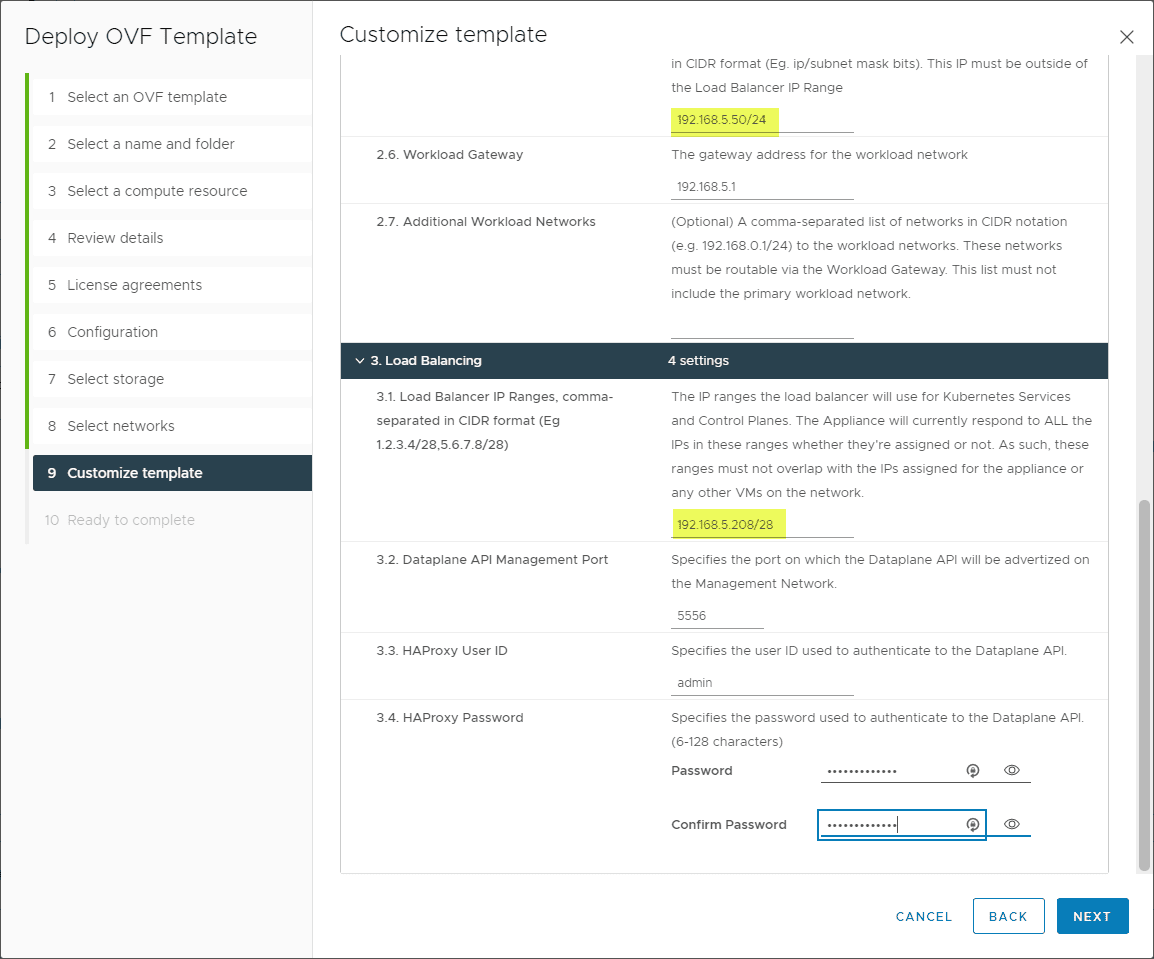
Note again, the workload IP is in CIDR format.
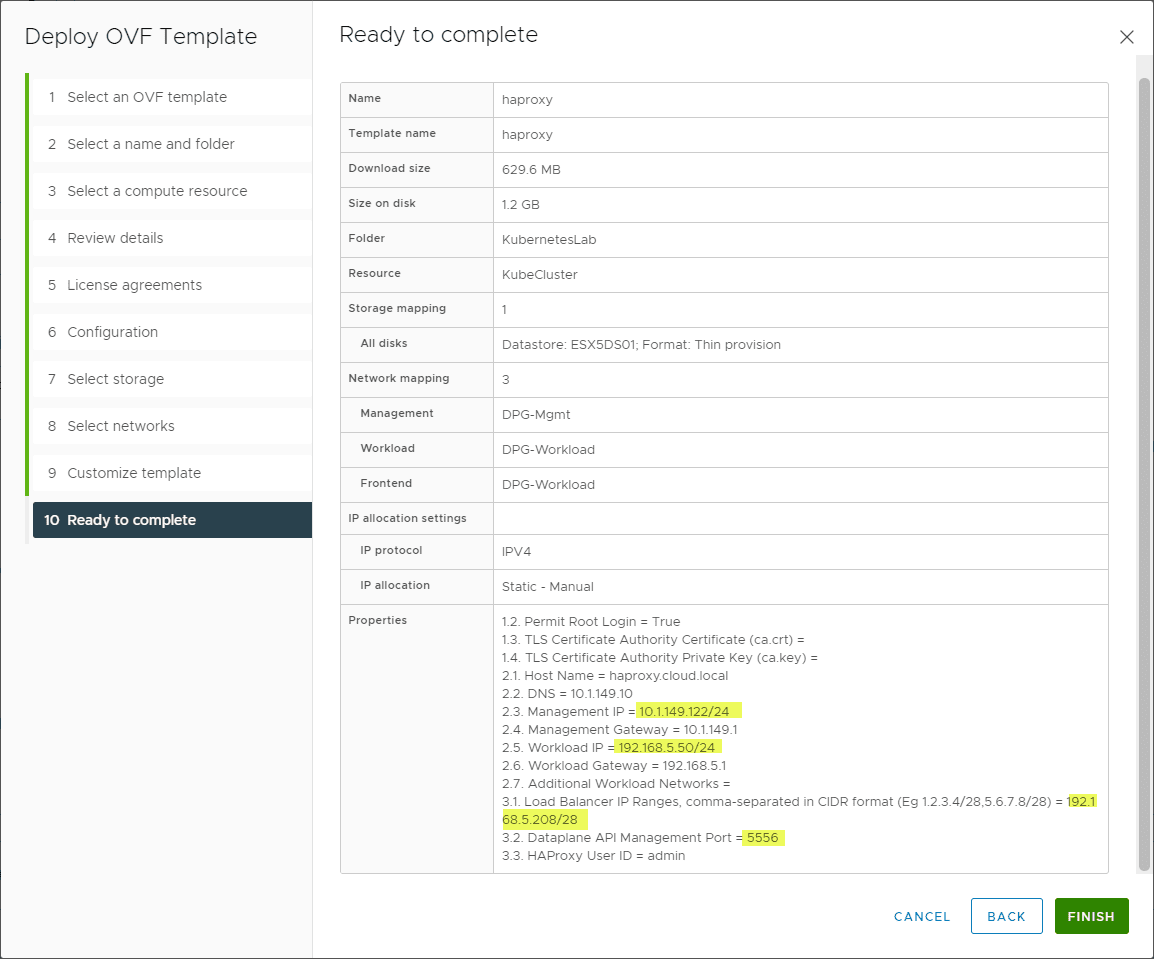
It is a good idea to take a screenshot of your summary screen to reference when setting up the workload management configuration on your vSphere cluster. It makes it easier to remember what you configured and get the configuration exact.
Enable Workload Management on your vSphere cluster
Now, let’s skip ahead to the workload management configuration. You can see a screenshot by screenshot walkthrough on my post some months ago here:
Note the captions below and where your IPs go that you configured when setting up HAProxy. One of the areas of confusion is the workload management setup has you configure things in network ranges and not CIDR format. Make sure you translate these correctly. Also, don’t forget to include the API management port to your address.

Create a Kubernetes Namespace
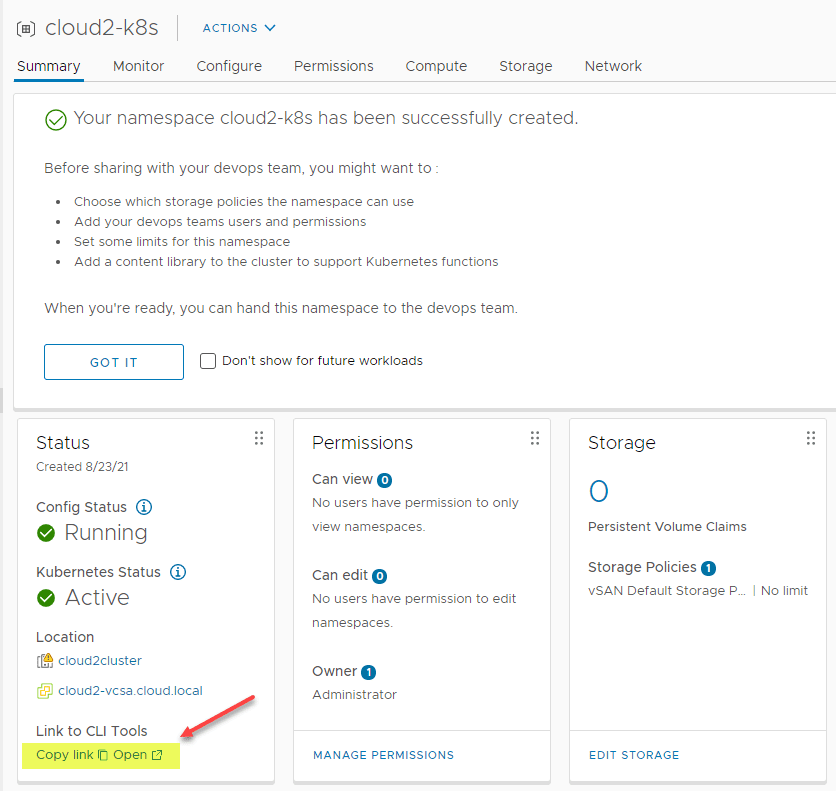
Once workload management is successfully enabled on your cluster, you need to create a namespace. Click the Create Namespace button. For my more detailed walkthrough on that process see my post here:

After you have configured the permissions and storage for the namespace as detailed in the post I linked to above, you need to grab the CLI tools to interact with your cluster. Click the Link to CLI Tools link.
Connect to the Tanzu Kubernetes Supervisor Cluster
Once you have the tools downloaded, kubectl and kubectl-vsphere, you need to connect to the Supervisor Cluster. From here, it will allow you to create the workload clusters to actually run Kubernetes Pods.
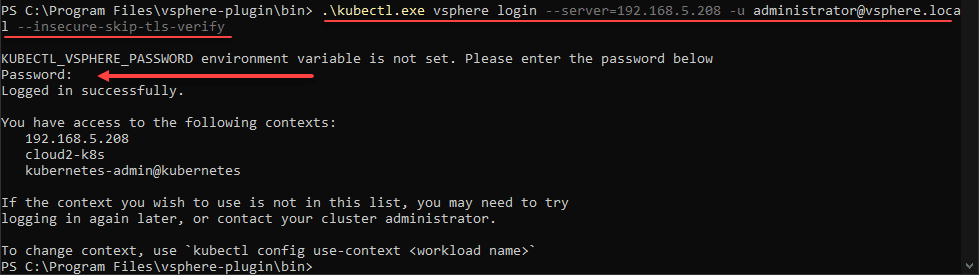
To connect, use the command:
.\kubectl.exe vsphere login --server=<your server address> -u <your username> --insecure-skip-tls-verifyIt will prompt you to enter your password.
Change to your management namespace by using the command:
kubectl config use-context <your namespace you created above>Create TKG Guest cluster using manifest file
Now that you are logged into your Supervisor cluster and changed to the namespace context you need, we can create the TKG Guest cluster using a manifest file. This can be a very basic file. I am using the file below. You will find great examples of these files here:
apiVersion: run.tanzu.vmware.com/v1alpha1
kind: TanzuKubernetesCluster
metadata:
  name: cloudlocal-tkc01
  namespace: cloud2-k8s
spec:
  distribution:
    version: v1.19
  topology:
    controlPlane:
      class: best-effort-xsmall
      count: 1
      storageClass: vsan-default-storage-policy
    workers:
      class: best-effort-xsmall
      count: 1
      storageClass: vsan-default-storage-policy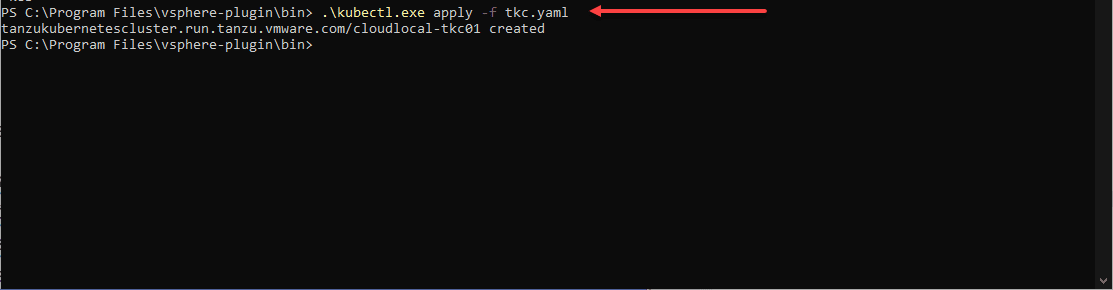
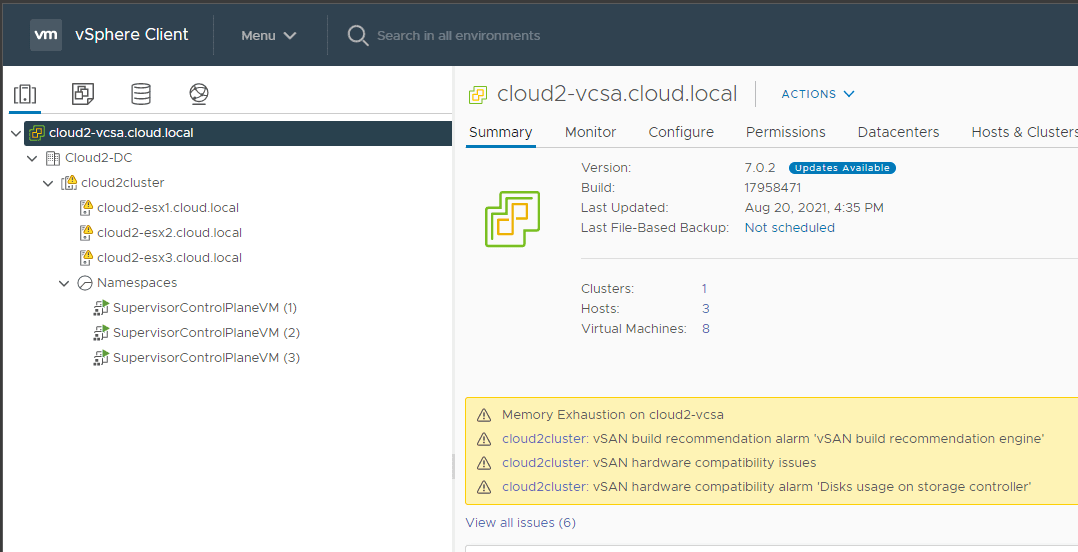
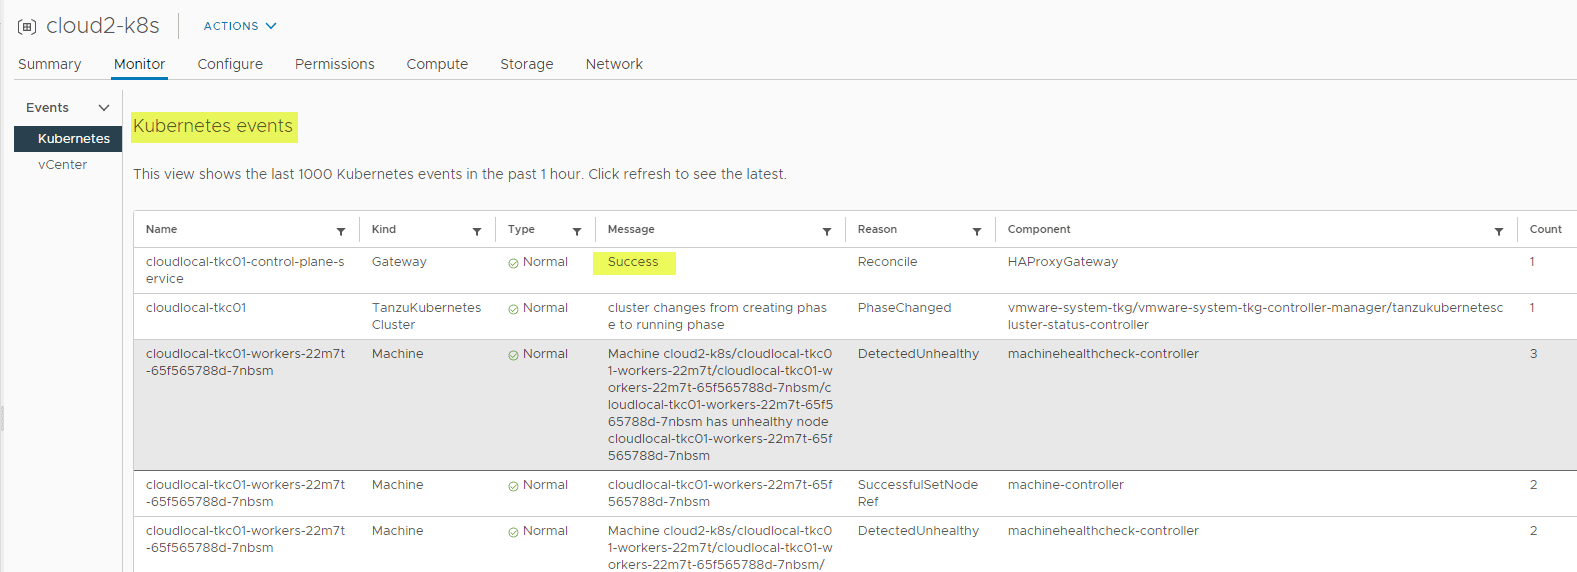
One of the issues I initially ran into in my vSphere 7.0 Update 2 vSphere with Tanzu Kubernetes home lab was the control plane VM kept getting stuck in a provisoning state.
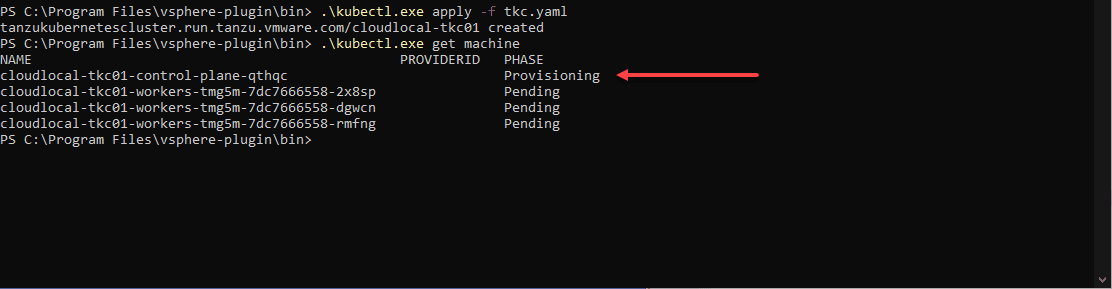
In investigating and with a blurb I found here on VMTN, it came down to the VM Service not being configured:
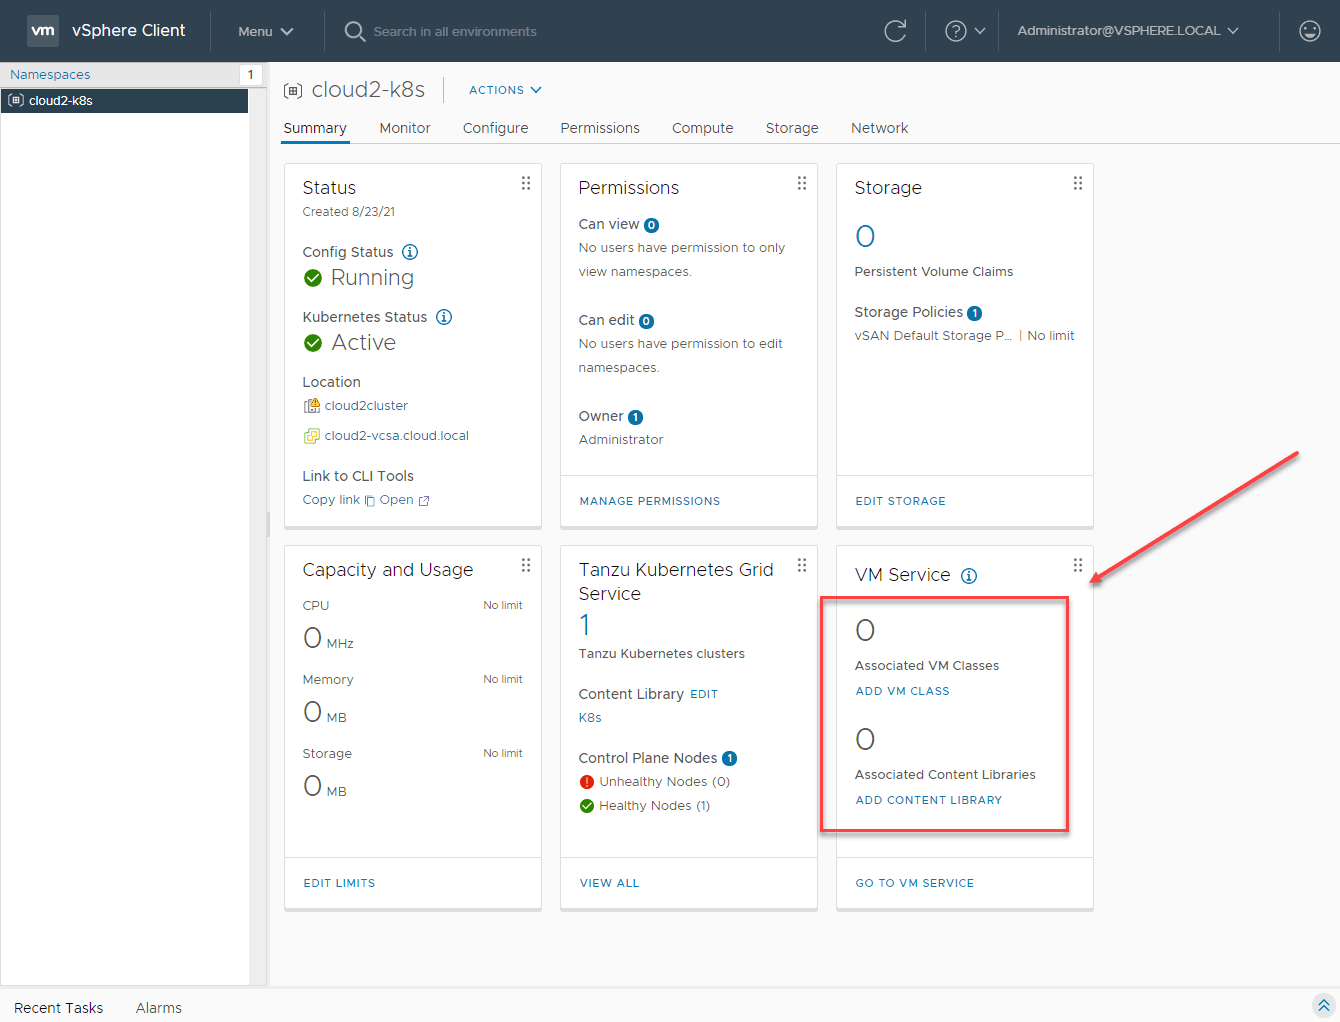
Below, I am adding a VM Class to the VM Service.

Next, I am adding the Content Library to the VM Service.
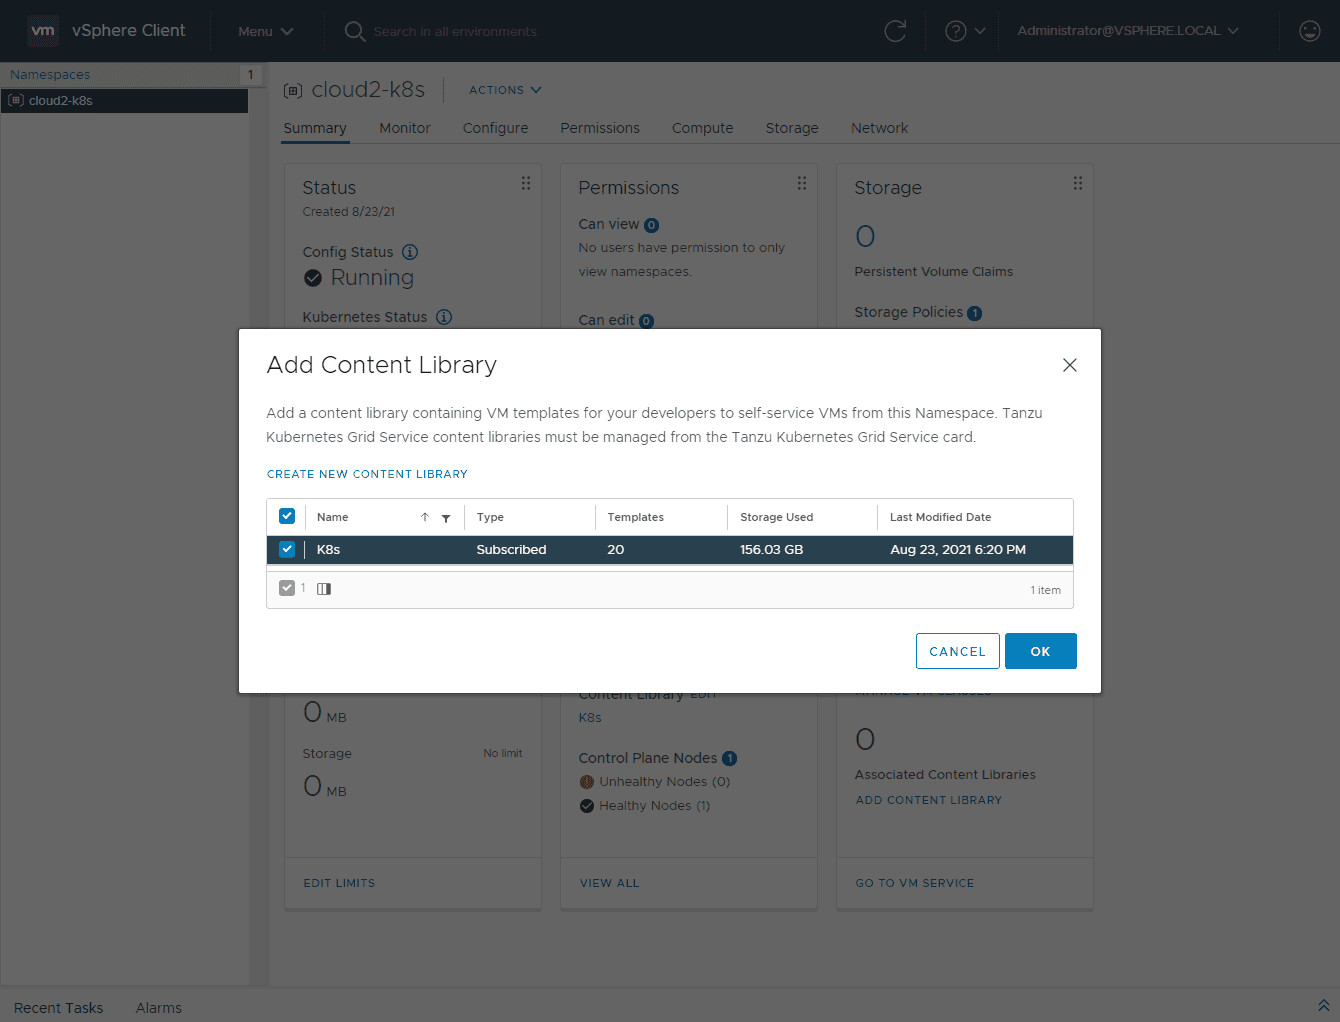
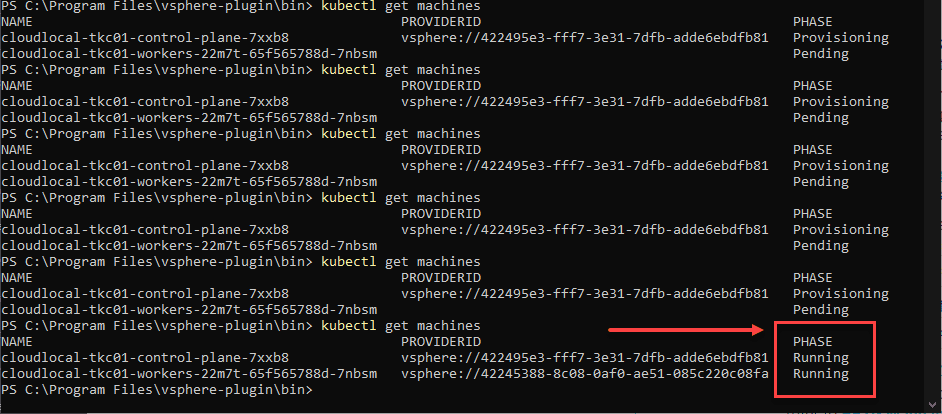
After applying the TKG manifest file again, I kept refreshing with the kubectl get machines command and in a couple of minutes, both the control and worker were showing as running.
Login to your TKG Guest Cluster
Now, we should be able to login to our TKG Guest Cluster. To do that use the command:
.\kubectl-vsphere.exe login --insecure-skip-tls-verify --vsphere-username <your username> --server=<api address> --tanzu-kubernetes-cluster-namespace <your namespace> --tanzu-kubernetes-cluster-name <cluster name>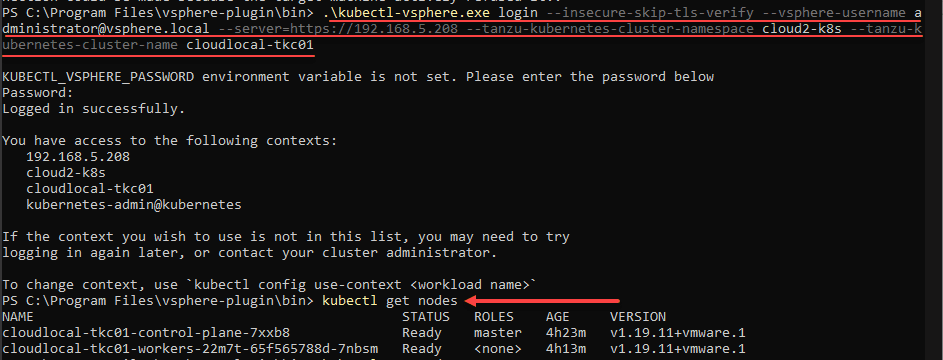
Verifying by getting the pods using the kubectl get pods -A command.

Great Resources
There are many great resources I used to get my vSphere with Tanzu Kubernetes home lab. These included the following:
- Deploying Tanzu Kubernetes “guest” cluster in vSphere with Tanzu – CormacHogan.com
- vSphere with Tanzu Quick Start Guide V1a | VMware
- Connect to and Examine Tanzu Kubernetes Clusters (vmware.com)
- Update a Tanzu Kubernetes Cluster by Upgrading the Kubernetes Version (vmware.com)
- Use Tanzu Kubernetes Cluster Operational Commands (vmware.com)
- Examples for Provisioning Tanzu Kubernetes Clusters (vmware.com)
Wrapping Up
The exercise of spinning up a VMware vSphere with Tanzu Kubernetes Home Lab was a great learning experience and is a great platform to consume Kubernetes. It can easily be provisioned in a nested lab for learning purposes as well. Pay attention to the networking aspect of Tanzu Kubernetes as this is by far the area that will cause failures during the deployment and afterward.
Google is updating how articles are shown. Don’t miss our leading home lab and tech content, written by humans, by setting Virtualization Howto as a preferred source.
About The Author