Windows 10 Network Adapter Order Configuration
You may be in a position where you have multiple network adapters assigned to your Windows 10 workstation. You may need to connect to multiple physical network segments via Layer 2 instead of having your traffic routed. Things get tricky however when you assign multiple network adapters to a Windows 10 machine. With multiple paths to the destination, Windows needs to be able to decide how to get there and which path to take.
No Easy GUI in Windows 10 for Network Adapter Order
If you recall in legacy operating systems, there was a GUI interface where you could click the “Up” or “Down” arrow to move an adapter connection up or down which related to the priority of the connections. However, Windows 10 does not include this GUI to do this. There are other ways to do this, with the GUI as well as with PowerShell that we will take a look at.
Both methods, GUI and PowerShell have you manipulate the metric value of the interface connections. Metric values are commonly associated with the cost of a network connection. Generally, the lower the metric associated with a connection, it means the connection is preferred over a connection with a higher metric.
Going off this concept, with Windows 10, you can adjust the Windows 10 network adapter order configuration by changing the metric value associated with each connection. By increasing or lowering the metric associated with each network adapter, you effectively move the adapter up or down in the list of preferred connections.
Now that we have a background of the process and the theory of how this works, we can take a look at the process for adjusting the Windows 10 network adapter order.
Windows 10 Network Adapter Order Configuration
As mentioned, we will look at a couple of different ways that the network adapter order can be adjusted. It includes the following:
- GUI Advanced TCP/IP settings
- PowerShell
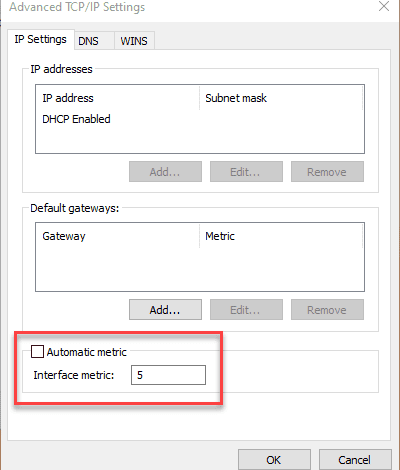
First, let’s see where the metric value is located in the Advanced TCP/IP settings.
Advanced TCP/IP settings
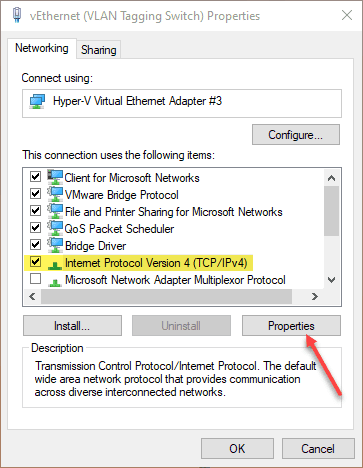
It is not a setting that is readily obvious for most when looking at the properties of your network connections, however, there is a metric checkbox found in the Advanced TCP/IP settings. Navigate to the properties of your network connection that you want to start with. Click to highlight Internet Protocol Version 4 (TCP/IPv4) and then click the Properties button.
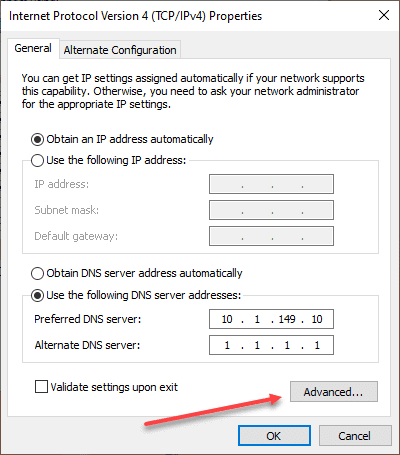
Select the Advanced button at the bottom lower right.
Now, you will see the Automatic metric checkbox. It will be selected by default. Uncheck the automatic metric checkbox and enter the metric value you want to assign.
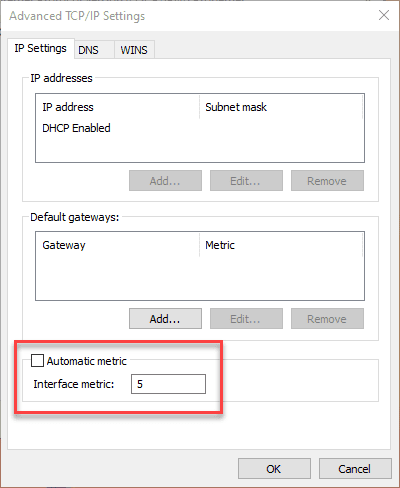
As an example, if you have (3) network adapters or connections configured in Windows 10, and you want them in a specific order, you would do that by assigning the metric values similar to the following. As you can see, it has nothing to do with the number of the adapter, only the metric.
- Network Adapter #2 – metric 5
- Network Adapter #3 – metric 10
- Network Adapter #1 – metric 15
Powershell to configure Windows 10 Adapter Order
Using Powershell, you can easily view the interface metrics currently assigned to your adapters. To change the interface metric using PowerShell, you need to take note of the interface index column and the metric column.
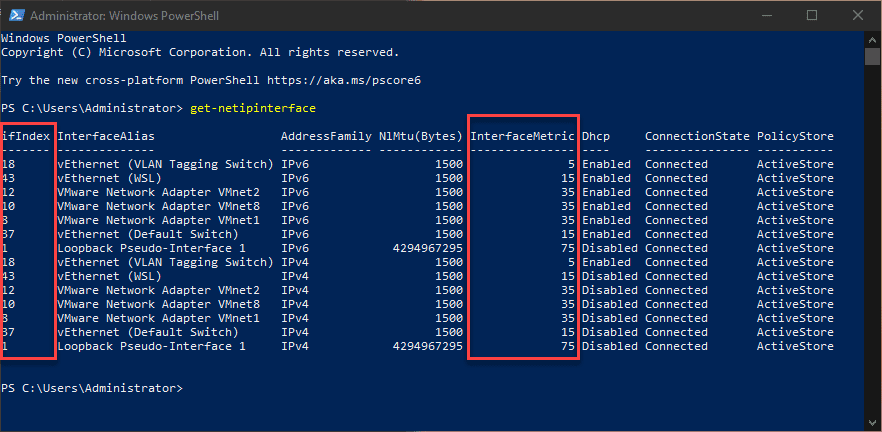
Use the following command to assign a different metric to a particular interface, replacing with your specific values for ifIndex and InterfaceMetric:
Set-NetIPInterface -InterfaceIndex 37 -InterfaceMetric 10Adjusting Route Metrics in Windows 10 after changing adapter order
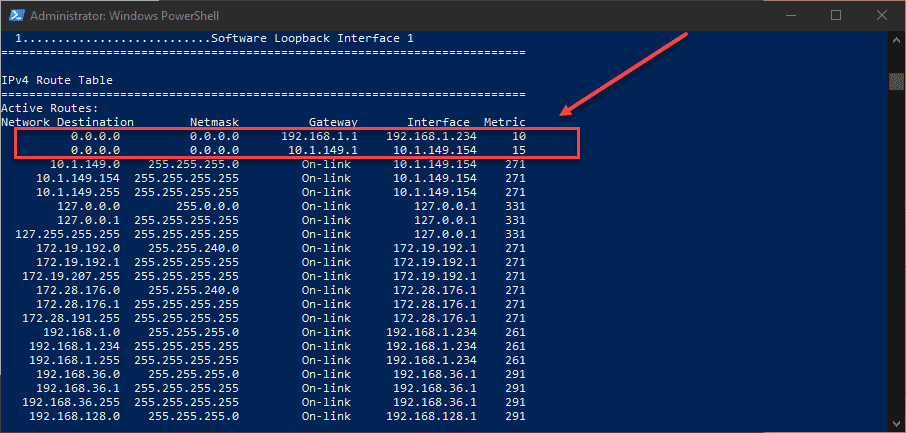
I have still seen issues from time to time with how traffic is routed, regardless of setting the interface metric. If you find that after you set your Windows 10 adapter order that traffic is still not being routed correctly, you may need to look at your route table. Take note of the following output. Note how I have two routes that can get to 0.0.0.0/0 or the default gateway. What if I want 10.1.149.1 to be the preferred route? As you see below, it has a higher metric than the 192.168.1.1 route. This means traffic will be routed to the default gateway of 192.168.1.1 instead of the preferred 10.1.149.1. To affect this, we need to change the route metric.
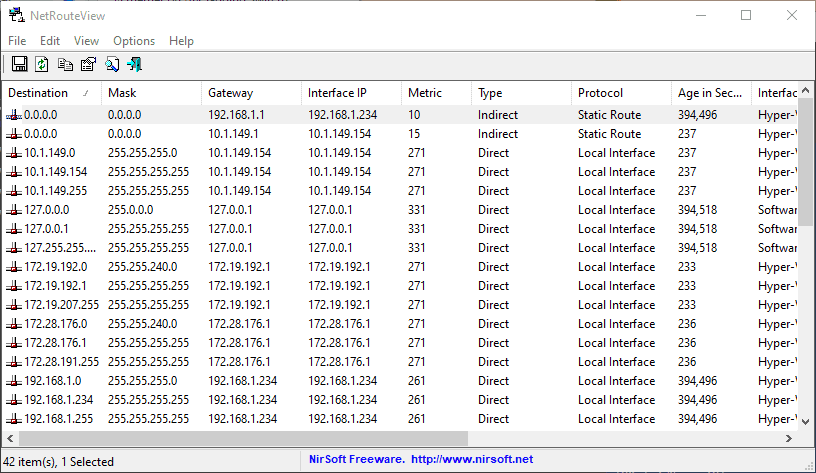
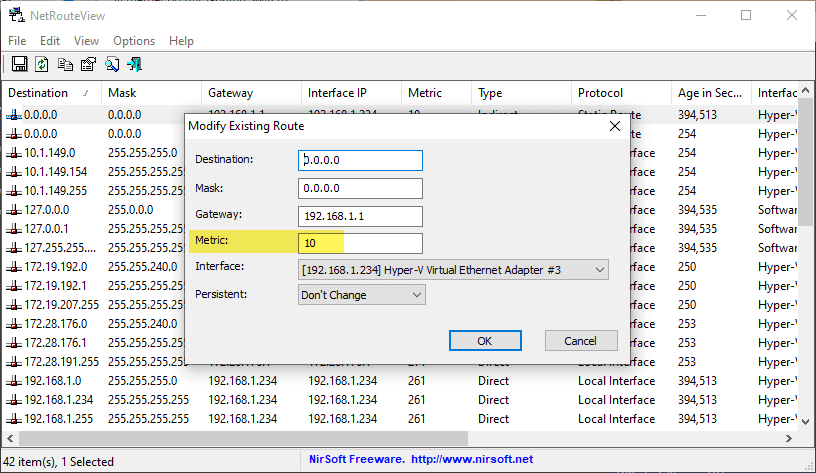
There is a great little freeware tool that allows doing this easily. It is called NetrouteView. it is freely downloaded from the link here: NetRouteView – Network Route Utility for Windows (nirsoft.net)
You can also use PowerShell to change Windows routes and route metrics. The Set-NetRoute command allows changing various properties of your Windows routes, including route metrics.
Concluding
If you have multiple physical or virtual adapters on your Windows 10 machine, you may need to change your Windows 10 network adapter order. As shown this is easily accomplished using the network properties GUI as well as PowerShell. Keep in mind that route metrics may also need to be adjusted to get the right traffic flow, even after you set your adapter order.