Ansible Hashicorp Vault Storing vCenter Password
Recently I had detailed how to Install Hashicorp Vault on Ubuntu 20.04. If you followed along that post, you will see how easy it is to get a working installation of Hashicorp Vault up and running on your Ubuntu 20.04 installation. Now that you have an installation of Hashicorp Vault, let’s put it to use in some VMware vSphere automation. I use Ansible a lot in the home lab for various tasks. It is a great place to start seeing the benefit of Vault and see how it can help secure automation in your environment. Let’s take a look at Ansible Hashicorp Vault store vCenter password and see how it can secure your connection to vCenter.
Automation is great but security must come first
While automation is great, we must also keep security at the forefront of any solution implemented. Security has become front and center in all business-critical processes and is part of DevOps as well. Many of us, myself included having in the past hardcoded passwords in flat files for a quick solution when working to get something up and running quickly.
Hardcoded passwords are dangerous. The password is freely visible in the files, variable files, and others and have virtually no security outside of the drive they reside on.
Securing Sensitive Information with Hashicorp Vault
Hashicorp Vault provides a very powerful solution to secure secrets of all varieties in a way they can be accessed without the danger that comes from hardcoding into flat files. It provides a very diverse set of access methods to access sensitive information such as passwords securely. Additionally, it allows securing access even further by restricting the accessing of those secrets even further by role name, the network address, and many other ways.
Ansible Hashicorp Vault Storing vCenter Password
Ansible is a great configuration management platform that can greatly streamline many vSphere operations. Take a look at one example in my post here: Ansible Provisioning VMware with vmware_guest Example. It can help to easily automate your vSphere environment.
With each environment that Ansible interacts with, it needs a way to authenticate to the respective environment, including vSphere. Generally, you will authenticate Ansible to vCenter Server so you can interact with the environment as a whole, all hosts, virtual machines, etc.
In many of the examples that you see cited working with Ansible and vSphere, the vCenter Server passwords is shown to be hardcoded in a variables file. This means you are storing the key to your vCenter kingdom in your Ansible variables and is dangerous for any type of production use.
So, let’s talk about Ansible Hashicorp Vault storing vCenter password. How can we do this? The below walkthrough is going to assume a few things:
- You have a working vCenter Server
- You have a working Ansible environment
- You have installed Hashicorp Vault and have this running
To get started with automating VMware vSphere and making use of Hashicorp Vault to store your vCenter Server credentials, we will follow the steps here:
- Create a new secrets engine
- Create a key-value pair
- Use the hashi_vault module to query Vault for the password
- Test you Ansible code with Hashicorp Vault
Step 1 – Create a new secrets engine
The first step with using Hashicorp Vault with Ansible is to creat a new secrets engine within Hashicorp Vault to serve out the vCenter Server password. This is going to be key value pair.
To create this from the command line of your Vault server, you use the following syntax:
vault secrets enable -tls-skip-verify -path=vcenter kv
This creates a new key value secrets engine to store the credentials.
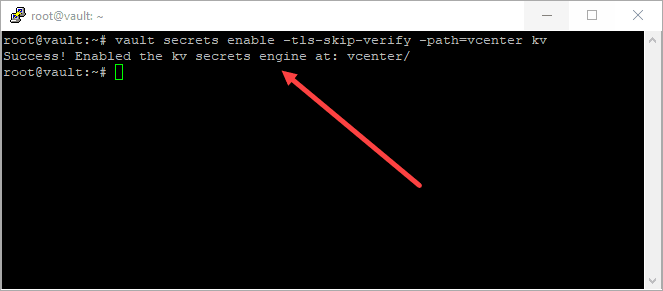
As a note. I am creating a v1 version of the secrets engine. There is some quirkiness with the v2 secrets engine in Vault. I was able to get to the engine created and the values to pull, however, was not able to get the password to pull correctly. This will require a bit more tinkering as I am assuming there is a workaround.
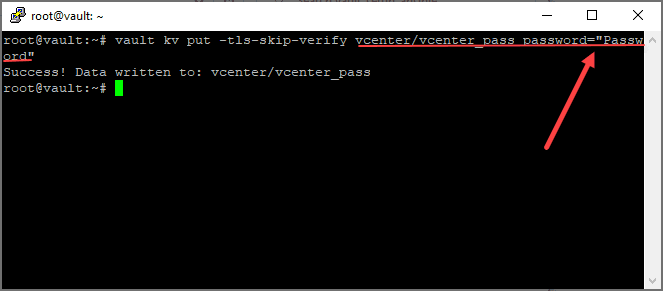
Step 2 – Create a new key value pair
Next, we need to create the actual key that will store the password in the new secrets engine. To do that use the following:
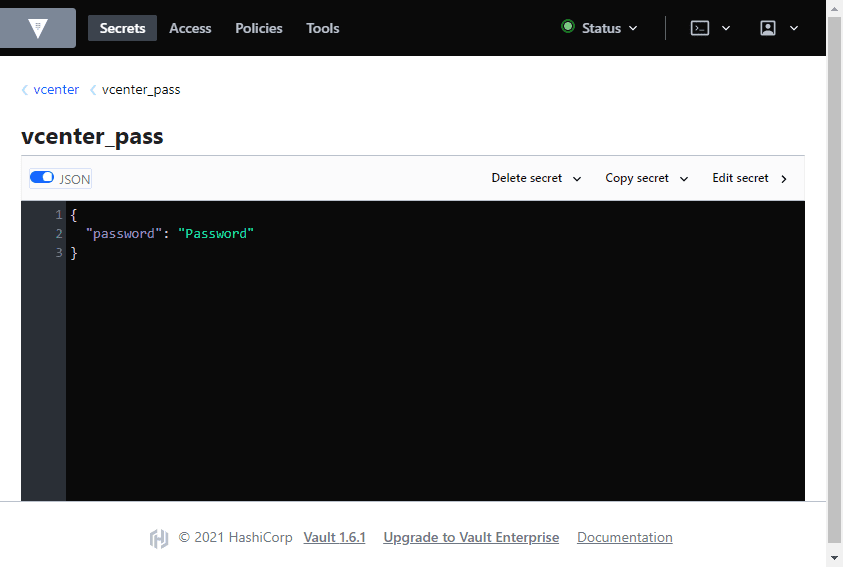
vault kv put -tls-skip-verify vcenter/vcenter_pass password="Password"
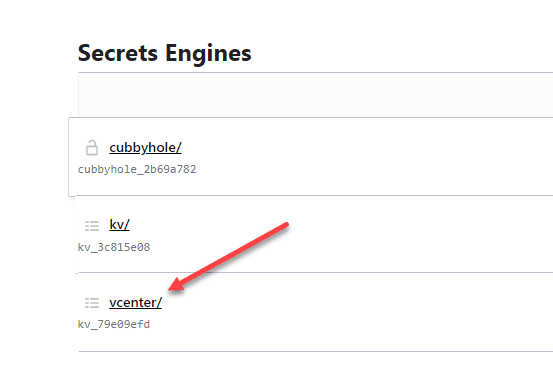
You can open the UI and look at the new vcenter_pass key. Flag on the JSON view to look at the value.
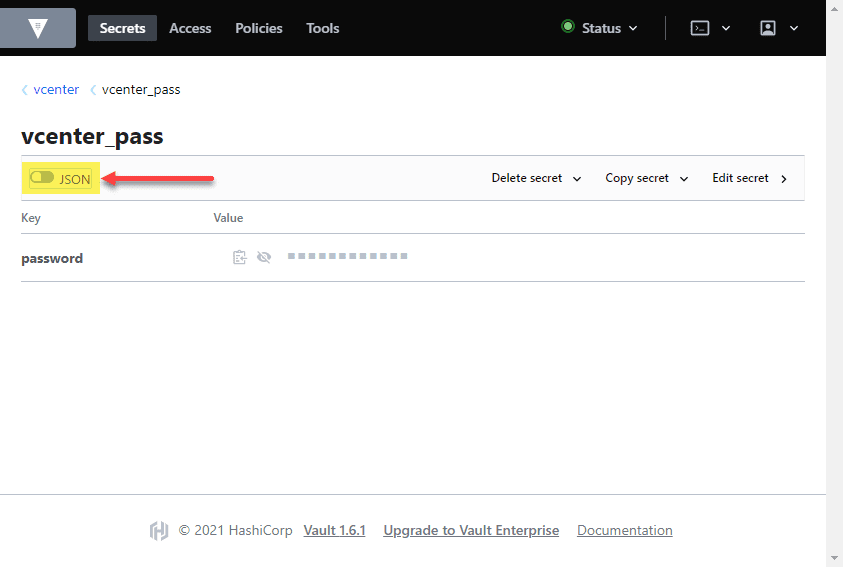
We can see the password that has been set for the password field.
Step 3 – Use the hashi_vault module to query Vault for the password
The next step is where we finally implement this inside our Ansible playbook. Ansible has a special-purpose module called hashi_vault that allows querying Hashicorp Vault for secrets to use in the playbook.
Below, take note of the password and how we are using the hashi_vault module to lookup the secret in Hashicorp Vault. Here I am using a root token. You will want to create a special purpose token for this purpose and assign roles, ACLs around it. Also, the address is the address of the Vault server and also a note to ignore self-signed certificates warnings.
name: Clone multiple VMs
hosts: localhost
gather_facts: false
vars_files:
 multiple_vms_vault.yml
tasks:
- name: Clone multiple VMs from template
  local_action:
    module: vmware_guest
    hostname: "{{ vcenter_hostname }}"
    password: "{{ lookup('hashi_vault','secret=vcenter/vcenter_pass:password token=s.YyyofZhFMaxS5sxQlbpH9EkG url=https://10.1.149.22:8200 validate_certs=False') }}"
    username: "{{ username }}"
    validate_certs: no
    folder: "{{ folder }}"
    template: "{{ vmtemplate }}"
    name: "{{ item }}"
    cluster: "{{ vmcluster }}"
    datacenter: "{{ datacenter }}"
    state: "{{ state }}"
    customization_spec: "{{ customization_spec }}"
  with_items: "{{ servers }}"
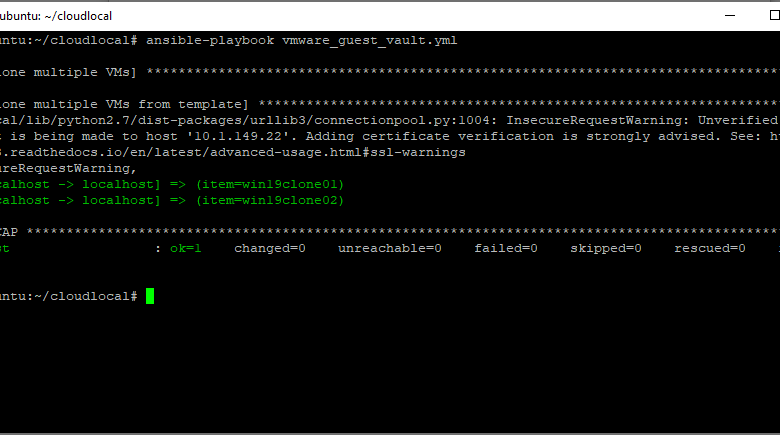
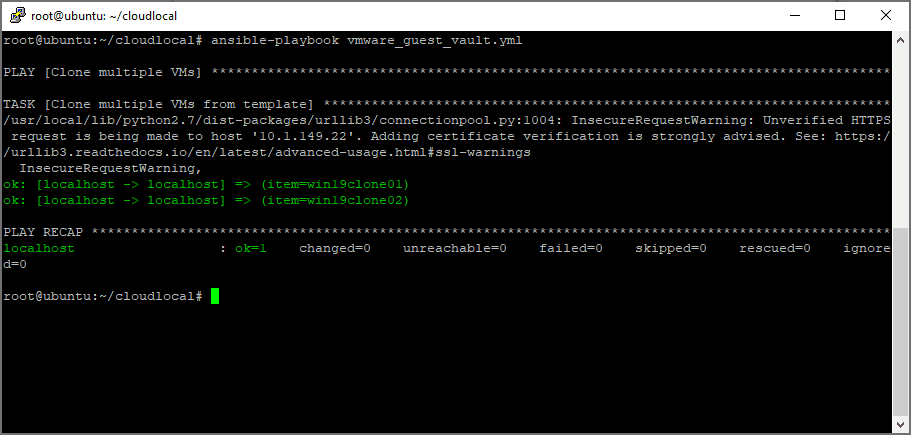
Testing the connection to vCenter Server from Ansible.
The last thing left to do is actually test the Ansible playbook which pulls vCenter Server credentials from Hashicorp Vault. As you can see below, it works.
Wrapping Up
As you can see, it isn’t too terribly difficult to get started using Hashicorp Vault in some basic Ansible automation. Once you have Vault up and running, in just a few minutes you can create your secrets engine, key value, and assign the password to a value. Then it is just a matter of using the hashi_vault module to query Vault for the credentials.