One of the things that I have been wanting to do for quite some time now is play around with Hashicorp Vault in the lab. In case you haven’t heard (which is doubtful), Hashicorp Vault allows you to have a secure way to store sensitive objects such as passwords and other types of sensitive information. Coming from Hashicorp, arguably one of the major forces in the world of automation, one of the many things that it does well is allow you to use Vault for the purposes of DevOps. If you have scripts and other code that needs to make use of some type of secrets information, Vault can allow you to do this very easily. In addition, it provides the ability to rotate secret keys for you as well so that this type of information can stay as secure as possible. First though, you have to get Vault installed. In this post we will take a look at Installing Hashicorp Vault Password Management in Ubuntu 18.04 and see how this can be done.
Hashicorp Vault Use Cases
There are many different use cases when it comes to Hashicorp Vault. These include everything from general purpose password management to dynamic API key generation.
- General secret storage – Vault can be used as a simple password management tool that can store sensitive information ranging from environment variables, databases credentials, and API keys
- Employee credential storage – Credential storage is a basic requirement for employees. Vault provides really great logging as well that helps to determin which employees access which credentials and easily roll those credentials if an employee leaves.
- API key generation – When it comes to scripts and security, having the ability to dynamically “rotate” those secrets is powerful and provides for the best type of security for automated solutions. This provides the ability to create credentials that may only exist for the duration of a script run and then are “burned” so they can no longer be used.
- Data encryption – Vault can be used for encrypting data that may exist elsewhere. This allows not having to worry about encryption programatically in code, but offloading this to Vault to handle
Installing Hashicorp Vault Password Management in Ubuntu 18.04
For the purposes of getting Hashicorp Vault up and running in my lab environment, I stuck with strictly provisioning Vault without Consul. I did this so I can concentrate on the features of Vault without Consul, and then later go back and add Consul to the mix for further testing and use.
In case you are wondering what Consul is and does exactly, from the official “about Consul” page at Hashicorp:
“Consul is a service mesh solution providing a full featured control plane with service discovery, configuration, and segmentation functionality. Each of these features can be used individually as needed, or they can be used together to build a full service mesh. Consul requires a data plane and supports both a proxy and native integration model. Consul ships with a simple built-in proxy so that everything works out of the box, but also supports 3rd party proxy integrations such as Envoy.“
What resources did I use for the installation process? For the most part I used the following guide which is the official “installation” guide from Hashicorp Learn:
Below is the reference network connectivity overview for a Hashicorp Vault solution:
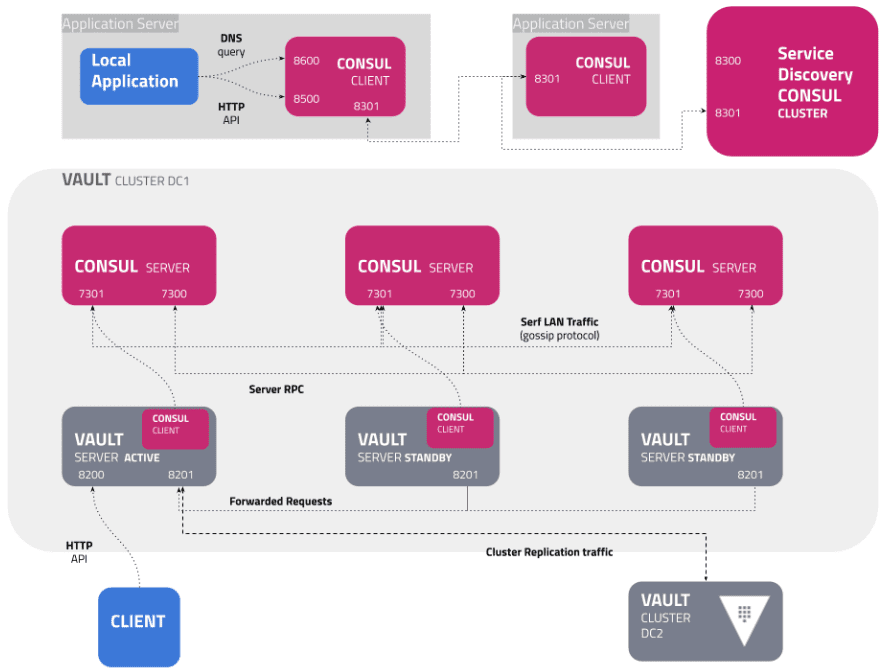
As shown above, Vault is tightly integrated with Consul. However, I will show you how I was able to get Vault up and running just by itself, to learn the ins and outs of the product a bit better first without Consul.
Follow the Hashicorp Guide to Install
As mentioned above, follow the Hashicorp guide to install Vault on an Ubuntu 18.04 LTS server. I have a Packer-built Ubuntu box that I simply cloned from my template.
I am not going to re-paste the steps mentioned in that guide, however, for simplicity, I followed:
- Step 1: Download Vault
- Step 2: Install Vault
- Step 3: Configure systemd
- Step 4: Configure Consul (skipped)
- Step 5: Configure Vault
- Step 6: Start Vault
After you navigate your way through Step 3 then into Step 5, below is my vault.hcl configuration file that I found that worked with my Ubuntu 18.04 installation. Two things to note:
- the “0.0.0.0” designation represents all IP addresses associated with the system, including the loopback and configured IP addresses. You can place specific IPs here, however, the 0.0.0.0 designation will cover all network addresses.
- You will need to generate a key pair for TLS if you choose to use with your Vault installation.
- The ui = true turns on the web-driven UI that you can access for the solution if you enable in the config file
listener "tcp" {
  address       = "0.0.0.0:8200"
  tls_cert_file = "/etc/ssl/certs/selfsigned.crt"
  tls_key_file  = "/etc/ssl/private/selfsigned.key"
}

storage "file" {
  path = "/mnt/vault/data"
}

api_addr         = "https://0.0.0.0:8200"

ui = true
Generate an Self-Signed SSL cert for use with Vault
To generate the cert and key files that you enter in the configuration file, you can easily generate a self-signed SSL cert to use with Vault using openssl. Use the command below, customizing as you like:
sudo openssl req -x509 -nodes -days 365 -newkey rsa:2048 -keyout /etc/ssl/private/selfsigned.key -out /etc/ssl/certs/selfsigned.crt
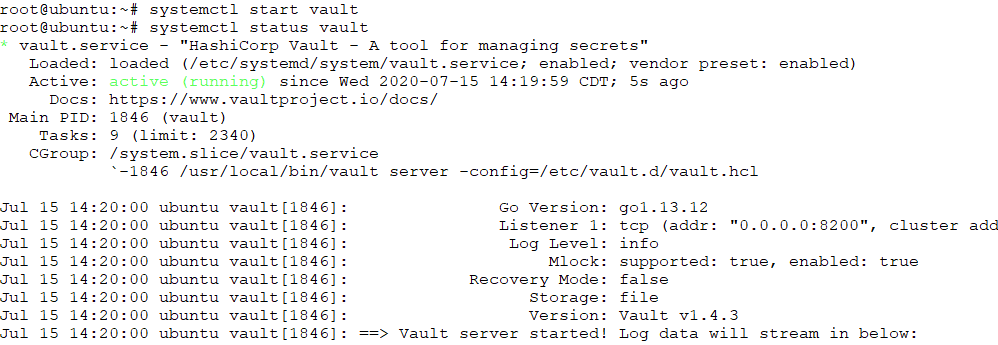
Starting Vault Viewing Status and Troubleshooting
After you have your config file in place and the SSL cert and key generated, you can start the solution.
If you have issues with the Vault service starting, there is a helpful command that will provide much greater visibility into why the service didn’t start. It is:
journalctl -u vault
Below, I had an issue where the service didn’t have permissions to the key file that I had generated using openssl.

How is this resolved? I found this snippet on a Stackoverflow threat regarding another issue involving Postgres, but worked in my case and may help someone else:
mkdir /etc/ssl/private-copy; mv /etc/ssl/private/* /etc/ssl/private-copy/; rm -r /etc/ssl/private; mv /etc/ssl/private-copy /etc/ssl/private; chmod -R 0700 /etc/ssl/private; chown -R vault /etc/ssl/private
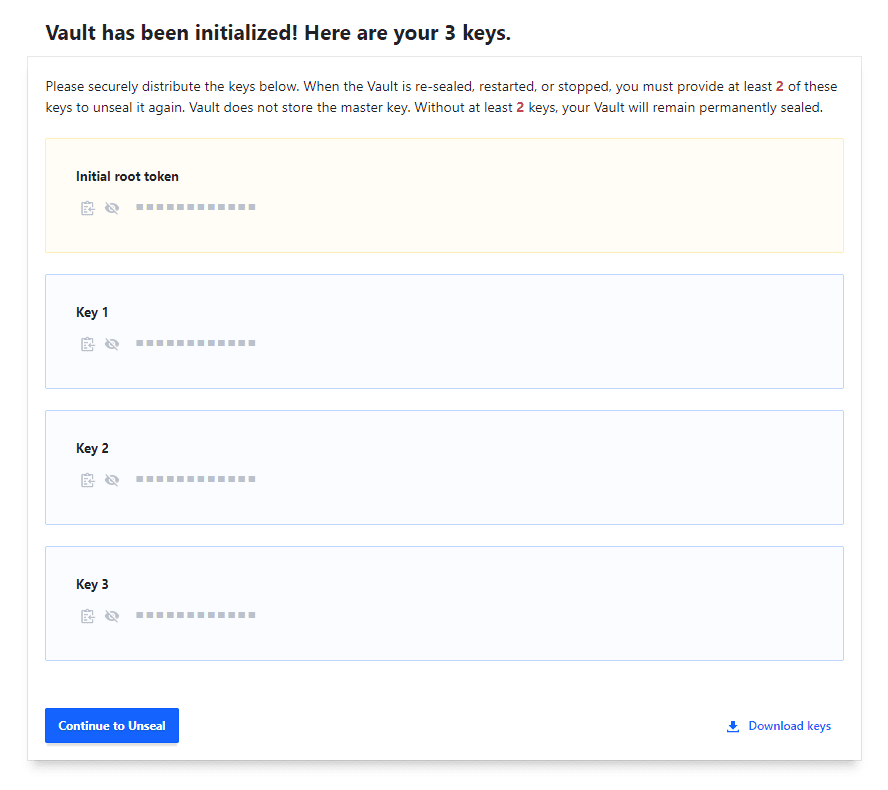
Initializing Hashicorp Vault
Before you start using Vault, you need to initialize Vault so that it can encrypt the secrets you place in it. I went ahead and did this from the UI management interface.
To get there, you can simply browse in a browser to https://<your IP>:8200. The first thing you have to do is define the key shares and the key threshold. A note below, I got these backwards, your threshold can’t be larger than the shares, so reversed the below and it worked fine.
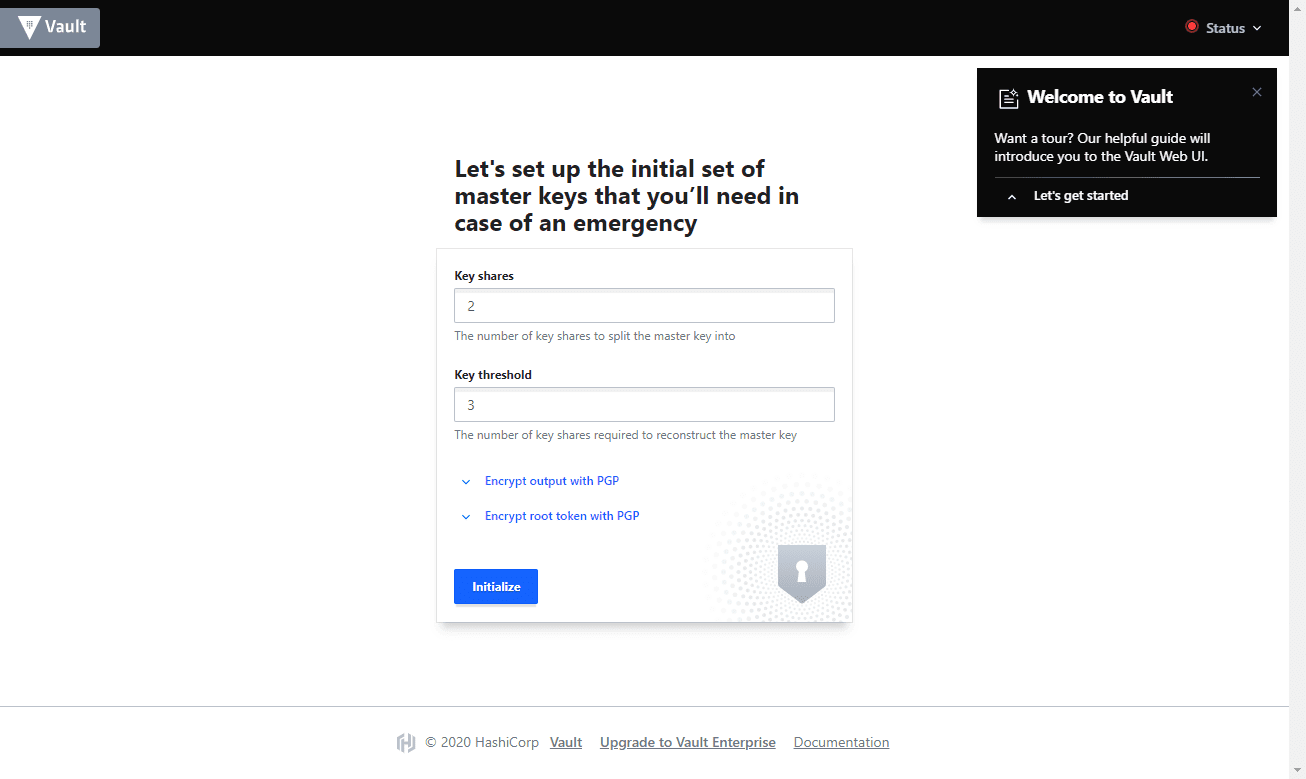
After initialization, you will have a token generated and keys. When the Vault is re-sealed, restarted, or stopped, you must provide at least 2 of the keys to unseal it again. A note also, Vault does not store the master key. Without at least 2 keys, your Vault will remain permanently sealed.
Wrapping Up
After I completed the walk through from the Hashicorp guide as well as the few little things I needed to do such as the SSL generation and troubleshoot a few permissions related to the SSL cert, my Vault was up and running.
Stay tuned as I continue my journey using Hashicorp Vault in helping to secure my Devops activities across the board.
Google is updating how articles are shown. Don’t miss our leading home lab and tech content, written by humans, by setting Virtualization Howto as a preferred source.
About The Author