How to Create a Self-Signed Certificate for Nginx in Ubuntu 18.04
In the last post, we looked at how to configure and setup a Netbox installation to model and document your network. Netbox serves as the “source of truth” for network information in an environment. It is easily deployed following a few steps on an Ubuntu installation running either Apache or Nginx for persistent web access. In the previous post, we didn’t get into enabling SSL on your installation. SSL is critical for security, even internally. If you have configured a LogRhythm NetMon installation, you will be able to detect and see potential security issues presented by HTTP clear text traffic traversing your network. To enable SSL, you need to have a certificate. If you have an internal server, you can simply create a self-signed certificate for Nginx to use. In this post, we will take a look at how to create a self-signed certificate for Nginx in Ubuntu 18.04 and see how this is easily accomplished.
Securing Web Traffic via SSL is Extremely Important
Having traffic secured via HTTPS with SSL is extremely important and fundamental to web security. Why is this? Any traffic that traverses your network over HTTP is sent as clear text. This means any passwords, PINs, CCNs, SSNs, or any other sensitive information that is passed to a website over HTTP is clear for anyone to read. If you have an attacker that has compromised the network or a malicious user who can snoop network traffic, this information will be easily stolen “over the wire” by simply snooping network packets.
Using HTTPS with SSL ensures the traffic that is sent and received from the website is encrypted. This is done with SSL certificate encryption. How does SSL encryption work?
- Via a browser, the end user connects to a server that has SSL encryption enabled. The browser session requests the web server to present its identity
- The web server presents the SSL certificate
- The browser checks to see if the SSL certificate is trusted or not and sends a message. If trusted, or forcibly trusted by the end user (self-signed certificate), it sends the acknowledgement back to the web server
- A digitally signed acknowledgement is sent back from the web server to start the SSL-signed session
- Encrypted communication is now enabled between the web server and end user client
How to Create a Self-Signed Certificate for Nginx in Ubuntu 18.04
As mentioned, in the previous post, we simply saw how to stand up an Nginx web server on port 80 to get a Netbox installation up and running. However, once you begin using the Netbox server, you will want to make sure your information is encrypted as it traverses the wire. Let’s see how to create self-signed certificate for Nginx in Ubuntu 18.04. We will follow the following steps to enable a self-signed certificate in Nginx.
- Use OpenSSL to create the SSL key and CRT files needed for Nginx
- Create a Diffie-Hellman group for Perfect Forward Secrecy
- Create an Nginx SSL configuration file
- Update Nginx sites-available file to use SSL encryption
- Test Nginx configuration and Restart Nginx
- Test the Self-Signed SSL certificate
For my purposes, I am using a modified version of the steps located in the Digital Ocean walk through of enabling SSL on an Nginx instance in Ubuntu 16.04.
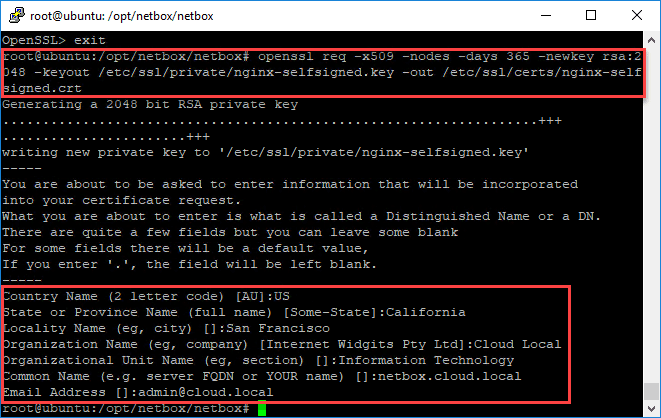
Use OpenSSL to create the SSL key and CRT files needed for Nginx
openssl req -x509 -nodes -days 365 -newkey rsa:2048 -keyout /etc/ssl/private/nginx-selfsigned.key -out /etc/ssl/certs/nginx-selfsigned.crt
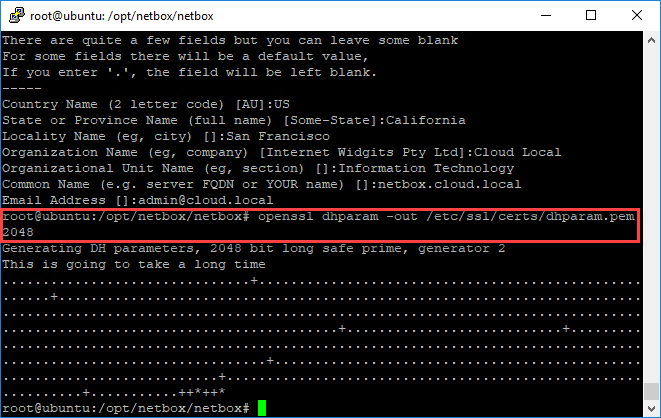
You will be asked to populate the normal SSL certificate information:
- Country Name
- State or Province Name
- Locality Name (City)
- Organization Name
- Organizational Unit Name
- Common Name
- Email Address
Create a Diffie-Hellman group for Perfect Forward Secrecy
openssl dhparam -out /etc/ssl/certs/dhparam.pem 2048
Create an Nginx SSL Configuration File
Next, create an SSL configuration file for use with SSL configuration parameters with Nginx. I saved this file to /etc/nginx/ssl_config/ssl_config.conf
# from https://cipherli.st/
# and https://raymii.org/s/tutorials/Strong_SSL_Security_On_nginx.html

ssl_protocols TLSv1 TLSv1.1 TLSv1.2;
ssl_prefer_server_ciphers on;
ssl_ciphers "EECDH+AESGCM:EDH+AESGCM:AES256+EECDH:AES256+EDH";
ssl_ecdh_curve secp384r1;
ssl_session_cache shared:SSL:10m;
ssl_session_tickets off;
ssl_stapling on;
ssl_stapling_verify on;
resolver 8.8.8.8 8.8.4.4 valid=300s;
resolver_timeout 5s;
# Disable preloading HSTS for now.  You can use the commented out header line that includes
# the "preload" directive if you understand the implications.
#add_header Strict-Transport-Security "max-age=63072000; includeSubdomains; preload";
add_header Strict-Transport-Security "max-age=63072000; includeSubdomains";
add_header X-Frame-Options DENY;
add_header X-Content-Type-Options nosniff;

ssl_dhparam /etc/ssl/certs/dhparam.pem;
Update Nginx sites-available file to use SSL encryption
One of the last things to do before testing is to enable SSL in the actual sites-available file for your server host to use 443 SSL. For my Netbox configuration, the SSL server block looks like the following:
server {
    listen 443 ssl;
    server_name netbox.cloud.local 10.1.149.158;
    ssl_certificate /etc/ssl/certs/nginx-selfsigned.crt;
    ssl_certificate_key /etc/ssl/private/nginx-selfsigned.key;
    include ssl_config/ssl_config.conf;

    client_max_body_size 25m;

    location /static/ {
        alias /opt/netbox/netbox/static/;
    }

    location / {
        proxy_pass http://127.0.0.1:8001;
        proxy_set_header X-Forwarded-Host $server_name;
        proxy_set_header X-Real-IP $remote_addr;
        proxy_set_header X-Forwarded-Proto $scheme;
        add_header P3P 'CP="ALL DSP COR PSAa PSDa OUR NOR ONL UNI COM NAV"';
    }
}
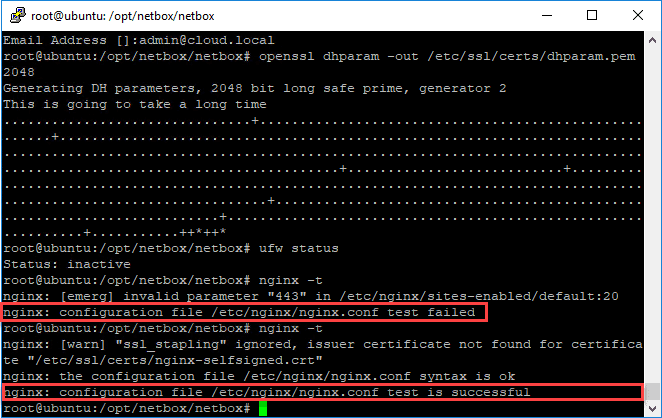
Test Nginx configuration and Restart Nginx
Before restating the Nginx server instance, you will want to test the configuration and then when it tests out ok, restart Nginx. To test and then restart, use the following commands:
nginx -t
service nginx restart
As you can see below, the nginx -t command is useful as it can flush out syntax errors in the configuration file as I had initially.
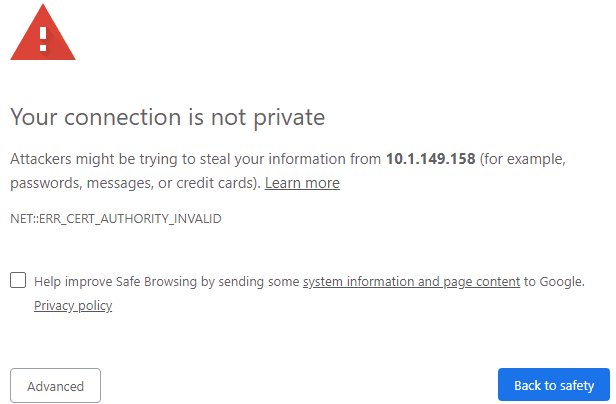
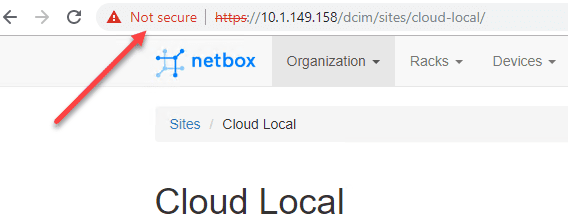
Test the Self-Signed SSL certificate
Browse to the Nginx web server address via 443 SSL. You should see the normal certificate warning for the server since we are using the self-signed certificate.

Wrapping Up
We have looked at the process of How to Create a Self-Signed Certificate for Nginx in Ubuntu 18.04. As you can see it is fairly simple and only requires a few command line commands to be ran and files created. Enabling SSL is extremely important for the security of web server traffic as it keeps information obscured from being able to be read in clear text. By enabling SSL you are encrypting the web server traffic. Even if the SSL certificate is not trusted, having a self-signed certificate does the same thing, albeit with a certificate warning.