Backup and Restore Nutanix VMs with NAKIVO

NAKIVO has been feverishly releasing new updates to their NAKIVO Backup & Replication product and increasing its functionality and adding impressive new features. NAKIVO has a really great way to introduce new upcoming functionality and releases to their customers via their beta program. I really like the beta program as it allows effectively seeing new features before they land in GA. It is great for NAKIVO as well since it allows a wide customer base to test and find any potential issues with the new versions before releasing them as GA with full support. A great new feature of the NAKIVO Backup & Replication 8.5 verson, currently in beta, is the ability to backup and restore Nutanix VMs. In this post, let’s take a look at how to backup and restore Nutanix VMs with NAKIVO Backup & Replication 8.5.
NAKIVO Protecting Nutanix is a Great New Feature
While there are a lot of major players in the virtualization, hypervisor, and HCI space, Nutanix provides a great solution that is utilized in many enterprise data center environments. If you haven’t heard of Nutanix, straight from their website:
Nutanix is an open platform for virtualization and application mobility.
Nutanix Acropolis hyperconverged infrastructure supports customer choice in virtualization solutions including VMware vSphere (ESXi), Microsoft HyperV, Citrix XenServer, and Nutanix AHV. Nutanix AHV is a license-free virtualization solution included with Acropolis that delivers enterprise virtualization ready for a multi-cloud world. With Acropolis and AHV, virtualization is tightly integrated into the Enterprise Cloud OS rather than being layered on as a standalone product that needs to be licensed, deployed and managed separately.
https://www.nutanix.com/products/acropolis/virtualization/
Common tasks such as deploying, cloning and protecting VMs are managed centrally through Nutanix Prism, rather than utilizing disparate products and policies in a piecemeal strategy.
Importance of Backups with Nutanix
Nutanix is a very solid and mature hypervisor platform with wide adoption. It has various high availability mechanisms built in that allow the platform to have redundancy and resiliency despite failures. Regardless of the “high availability” mechanisms that are present in a virtualization solution, data MUST be protected. While high availability is absolutely needed in production business-critical systems, it does not protect organizations from all forms of data loss. What are other concerning threats to business data that necessitates data protection?
When thinking about protecting your data as well as high availability, both are needed. High availability mechanisms built into today’s hypervisors and virtualization platforms go a long way in protecting the environment from failures as a result of hardware, network, or storage availability issues. However, threats such as accidental or intentional data deletion or ransomware are not addressed by the built in mechanisms found in the virtualization platform.
If ransomware encrypts all the data inside a VM, the healthy hypervisor hosts do not see an issue from a host availability standpoint since the VM host is not affected and the VM is running and available. This helps to illustrate the need for backups.
Backups in the form of data protection allows businesses to have options to protect their data and meet the best practice recommendation of 3-2-1 backups, effectively spreading backups across multiple locations and forms of storage.
Backup and Restore Nutanix VMs with NAKIVO
With the release of NAKIVO Backup & Replication 8.5 Beta, NAKIVO has extended its data protection solution to include the Nutanix platform. NAKIVO has a great solution that spans multiple hypervisors and various platforms for running backups such as installing their data protection directly on NAS appliances. The extended support to include the Nutanix AHV hypervisor provides even more options to the already capable data protection solution.
Want to know how to install a nested Nutanix AHV Cluster on top of VMware vSphere? Check out my post here.
Let’s take a look at walk through of the process to add a Nutanix environment in NAKIVO, protect a VM running in the Nutanix environment with NAKIVO, and finally restore a backed up VM running in Nutanix with NAKIVO Backup & Replication 8.5.
Adding a Nutanix Environment to NAKIVO Backup & Replication 8.5
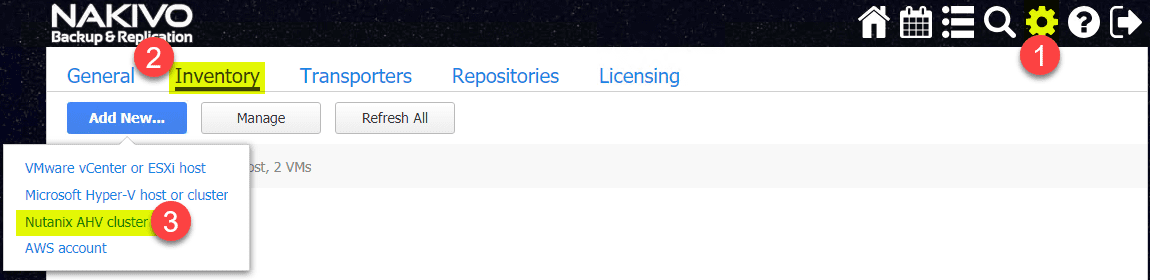
The first thing that needs to be done is add the Nutanix AHV cluster to the NAKIVO environment. To do that, you click on the settings “cog” in the upper right-hand corner, click Inventory and then click Nutanix AHV Cluster.
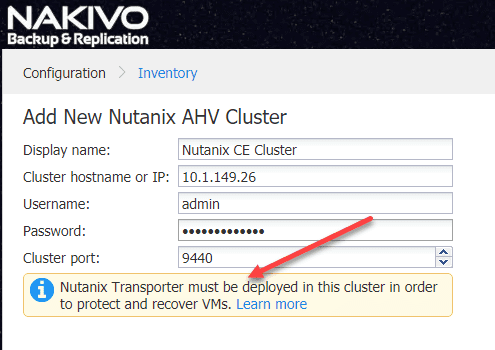
This will launch the Add New Nutanix AHV Cluster wizard. Information to configure includes:
- Display Name
- Cluster hostname or IP
- Username
- Password
- Cluster port
NAKIVO gives you a heads up here in the Add New Nutanix AHV Cluster wizard that you will need to deploy a Nutanix Transporter in the Nutanix AHV cluster in order to protect and recover VMs. However, the Nutanix AHV Cluster can successfully be added before you have the transporter in place.
After populating the appropriate information for the Add Nutanix AHV Cluster wizard, the process will begin adding the cluster to NAKIVO.
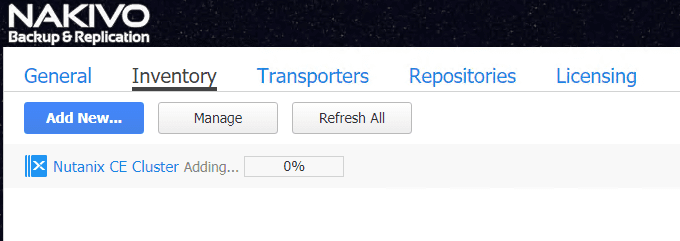
Cluster should successfully add and display in the NBR 8.5 inventory.

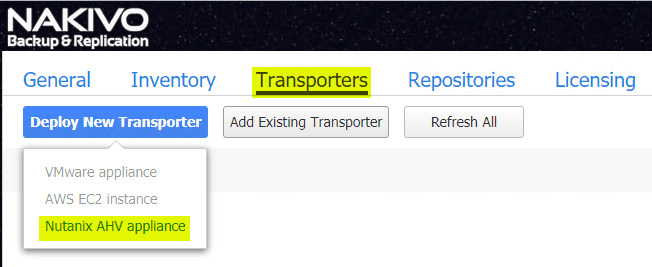
Navigate to Settings > Inventory > Deploy New Transporter to deploy a new NAKIVO transporter appliance in the Nutanix AHV cluster environment.
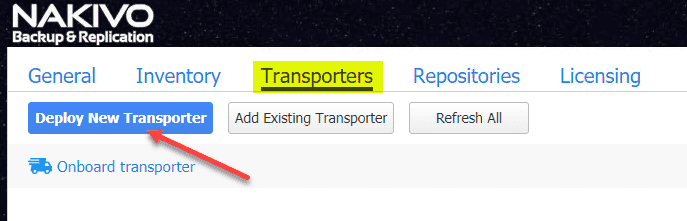
Select Nutanix AHV appliance.
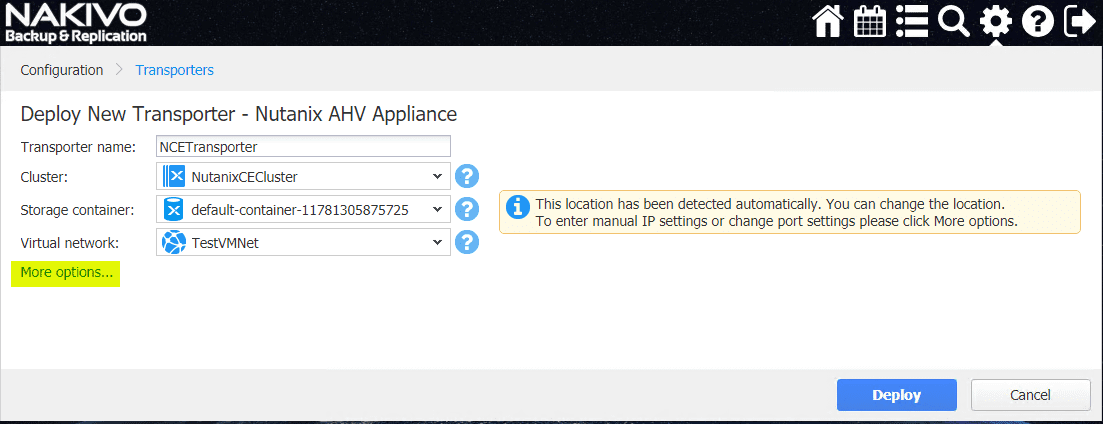
This will launch the Deploy New Transporter – Nutanix AHV Appliance wizard. The deploy transporter process will simply use the existing Nutanix AHV cluster connection that was just made and will be available in the Cluster selection box in the screenshot below. The various configuration of the Nutanix AHV environment will be pulled, including the Storage container and Virtual network. If you want to have further configurable options for the Nutanix AHV transporter deployment, click the More options button.
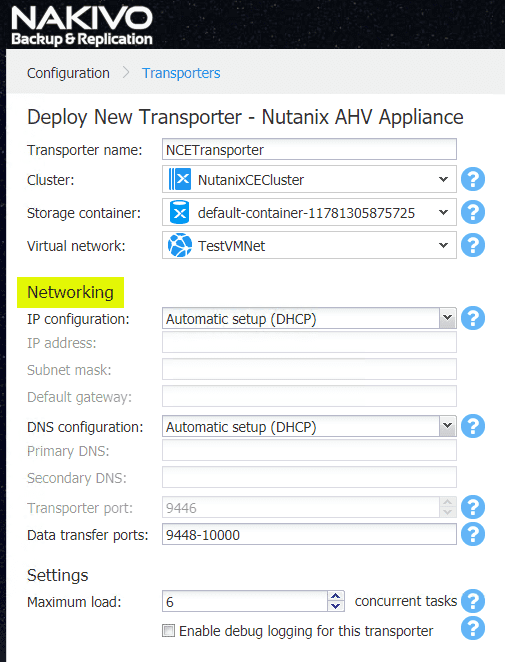
After clicking the More Options button, you will see quite a few additional configuration options that mainly pertain to the network configuration, including IP provisioning, DNS, and ports. Additionally, you can configure load settings (concurrent tasks) and debug logging.
The transporter begins deploying. During this process, NAKIVO will copy over the required image files to the Nutanix AHV environment and then start the provisioning process of deploying the NAKIVO transporter inside the Nutanix AHV environment.
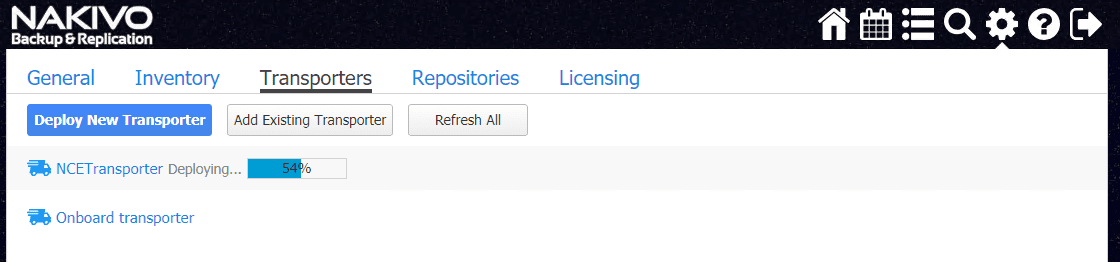
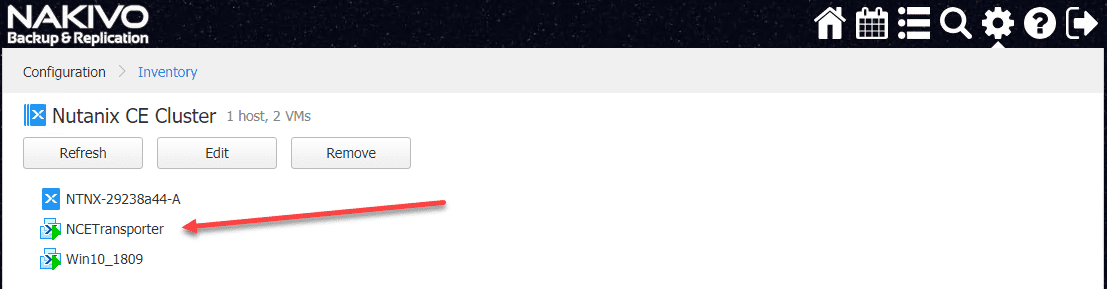
You can verify the Nutanix transporter is added correctly, by looking under the Transporters menu under Settings.

You can verify from the Nutanix AHV side the NAKIVO VM has been deployed and is running along with IP address information, CPU, etc.
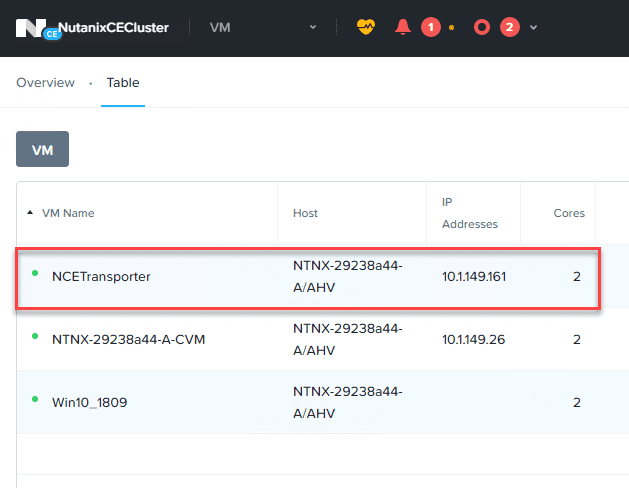
Under inventory, you should be able to see NAKIVO successfully pull the inventory of the VMs residing in the Nutanix AHV environment.
Backing Up Nutanix AHV VM with NAKIVO
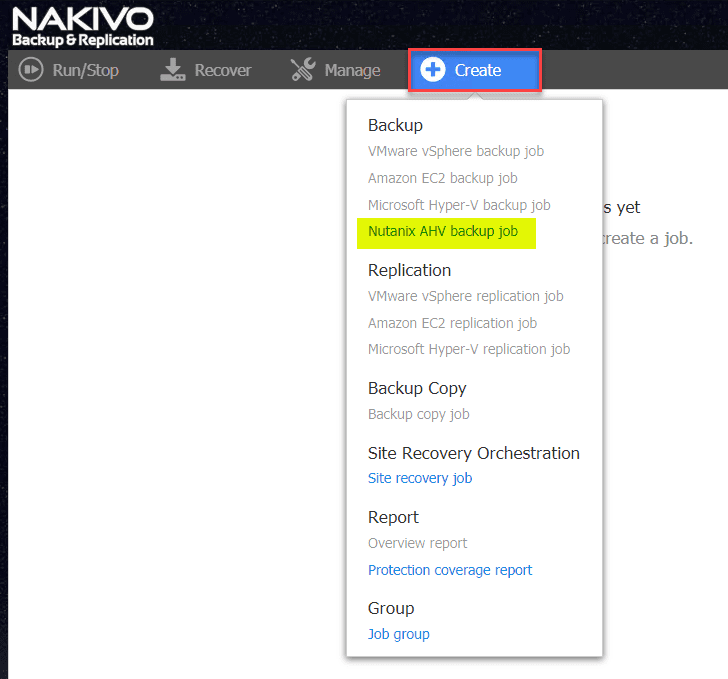
The whole point of adding the environment is so we can begin backing up VMs. Navigate back to the main NAKIVO dashboard. Click Create > Nutanix AHV backup job.
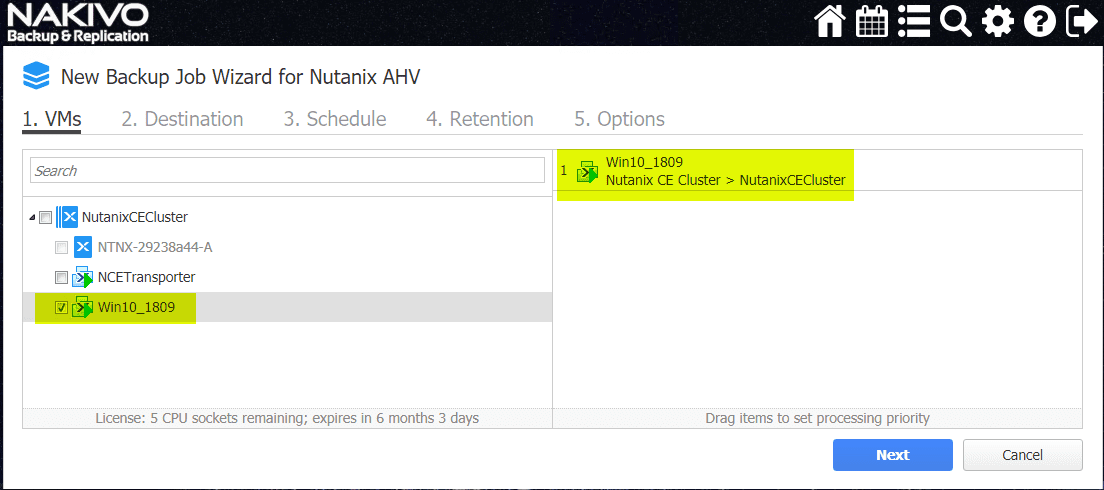
The New Backup Job Wizard for Nutanix AHV wizard begins. In the first step of the New Backup Job Wizard for Nutanix AHV, you select the Nutanix VMs that you want to protect from the inventory pulled from the Nutanix environment. Simply place a checkbox next to the VM(s) you want to protect.
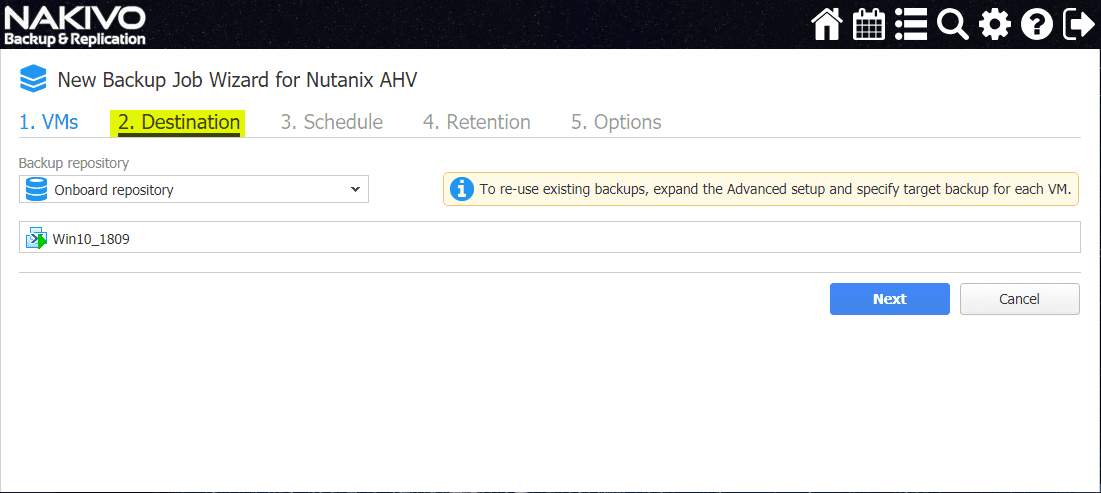
Select the destination backup repository. This applies to the NAKIVO environment.
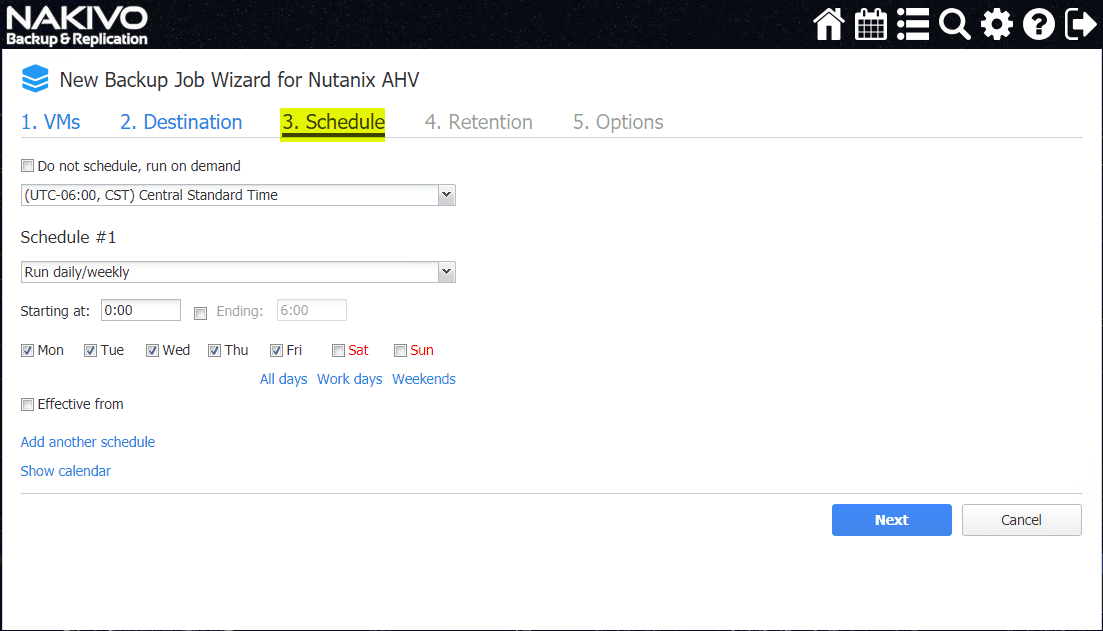
Schedule the Nutanix AHV VM backup job. Nakivo has the ability to granularly configure backup schedules and even have multiple backup schedules to fit your needs and work around peak production traffic or load times.
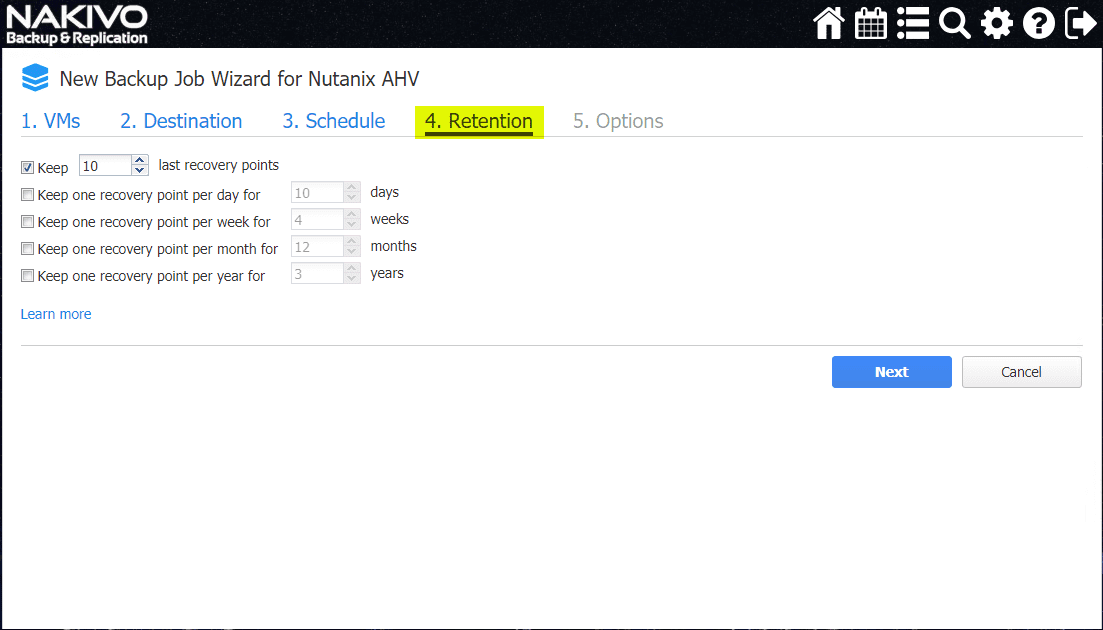
Retention determines how many restore points of your Nutanix AHV VMs you want to keep on disk. You have other advanced settings here including keeping additional recovery points as specified.
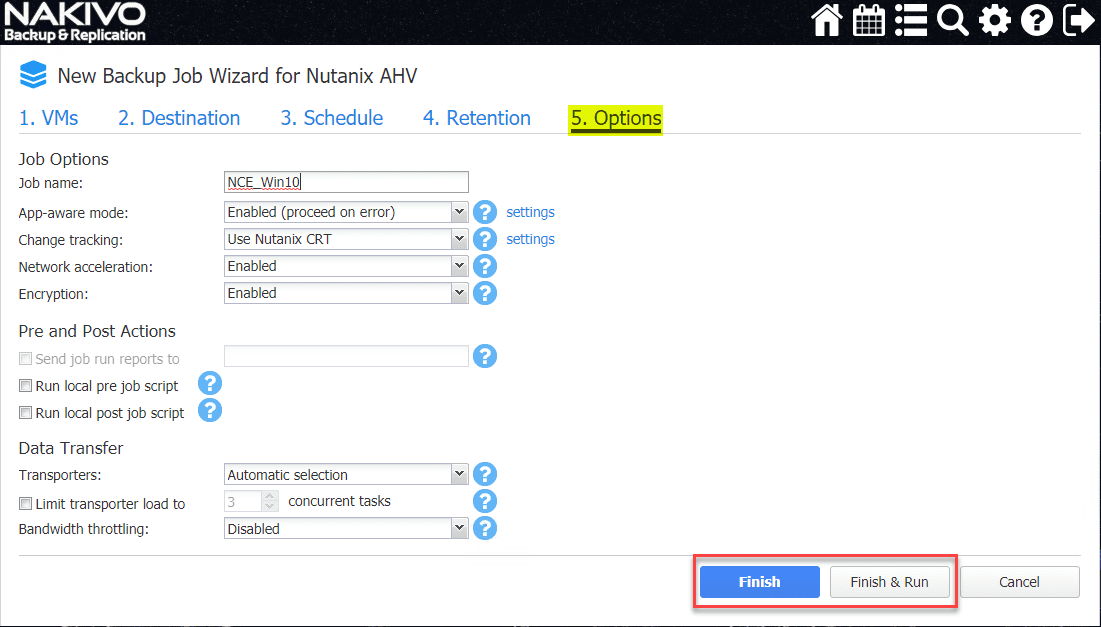
Finally, under the Options screen in step 5, you can configure various backup job options here including:
- Job name
- App-aware-mode
- Change tracking
- Network acceleration
- Encryption
- Pre and Post actions
- Data transfer and bandwidth configuration
After configuring the Options listed, either choose Finish or Finish & Run.
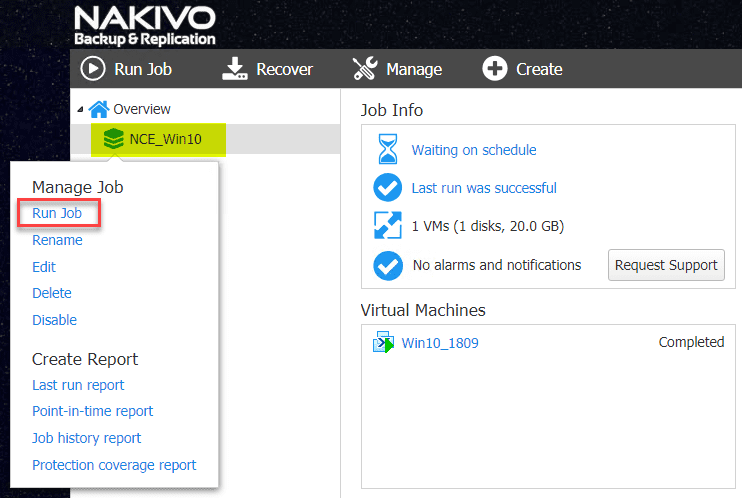
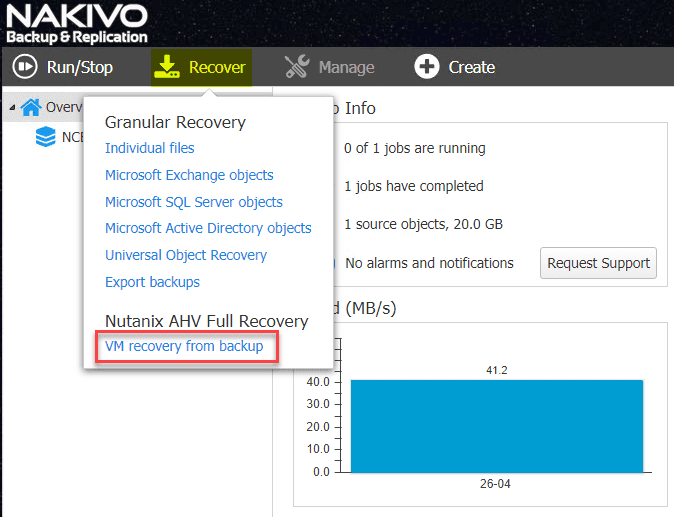
Restoring Nutanix AHV VM Backup with NAKIVO
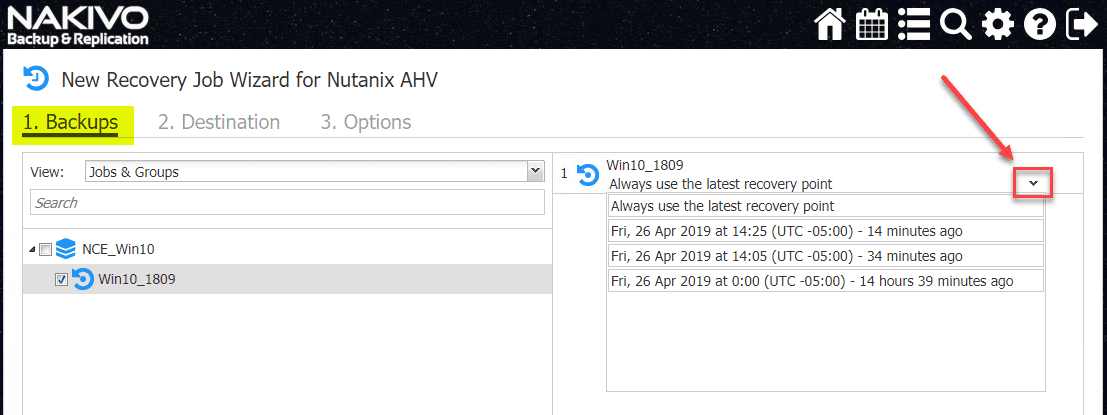
This will launch the New Recovery Job Wizard for Nutanix AHV. The first step in the Recovery Job Wizard is to choose the VM backup you want to restore and then select the restore point for recovery. Notice on the right hand side, after you select the VM backup to recover, you can pull down the triangle drop down to reveal the available restore points to choose from for recovery. The process always defaults to Always use the latest recovery point. As noted, this can be changed.
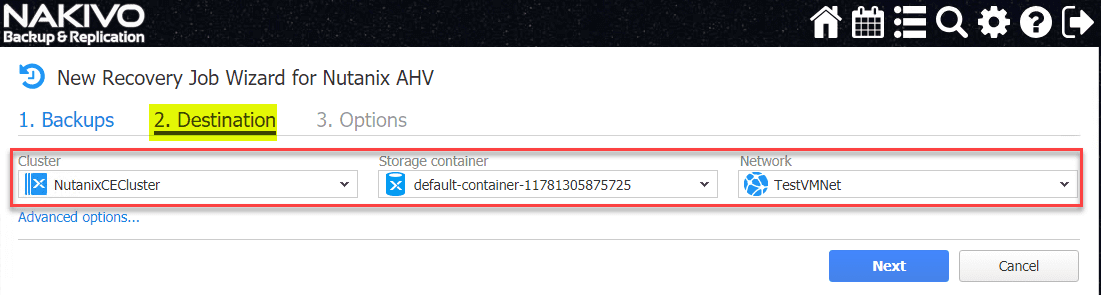
On step 2, Destination, you select the destination compute, storage, and network for the recovery process. Here, I am simply selecting the same Nutanix AHV cluster that I am backing up from in the lab.
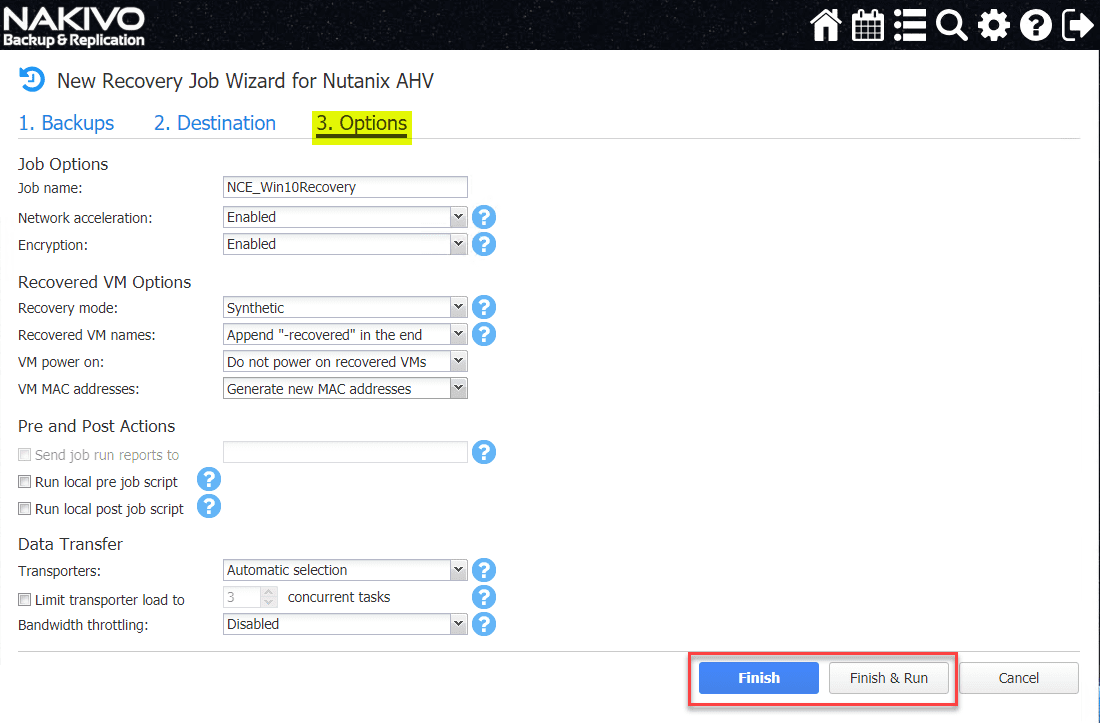
Finally, on the Options screen, you name the recovery job and select additional advanced recovery configuration. Below, since I am restoring to the same Nutanix AHV cluster, I opted to not power on the recovered VM as well as to generate a new MAC address. This allowed me to recover to the same cluster. Additionally, as you can see, you have other pre and post actions as well as data and bandwidth settings that can be configured. You can click Finish or Finish & Run, depending on whether or not you want to run the job immediately or at a later time.
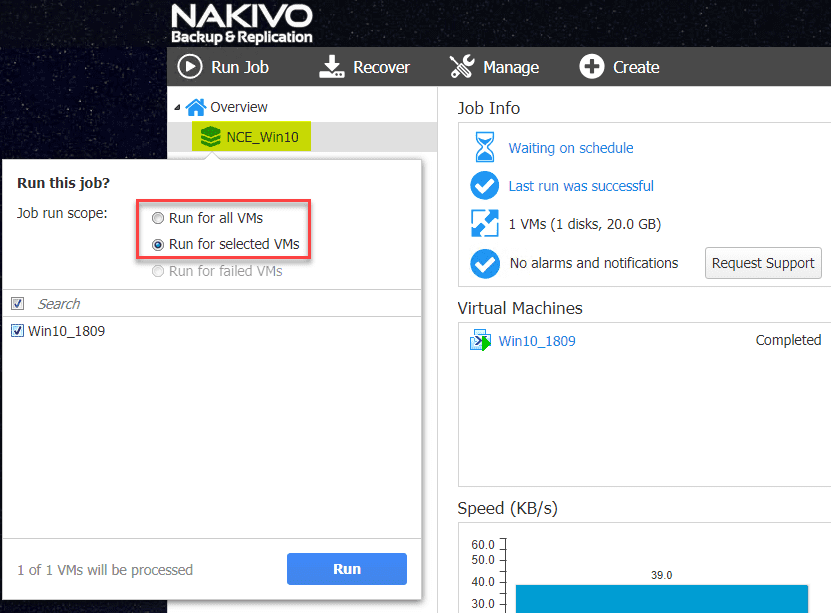
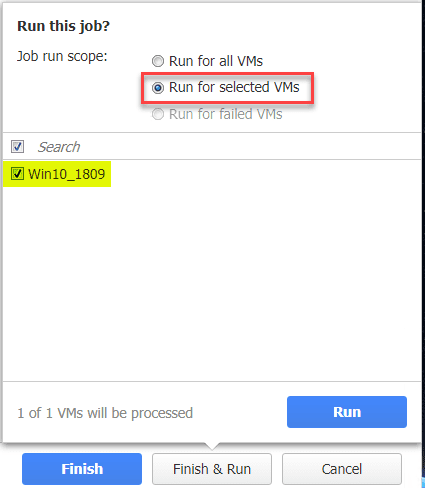
After selecting Finish & Run, you have to select if you want to run for all or only selected VMs.
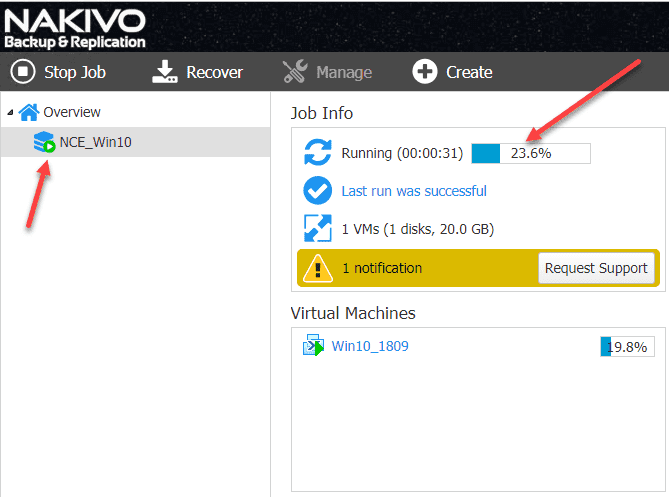
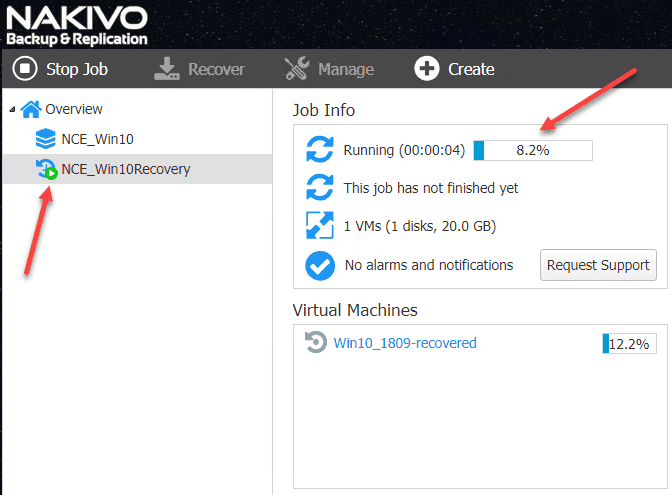
The Nutanix AHV recovery job in NAKIVO kicks off and progresses along.
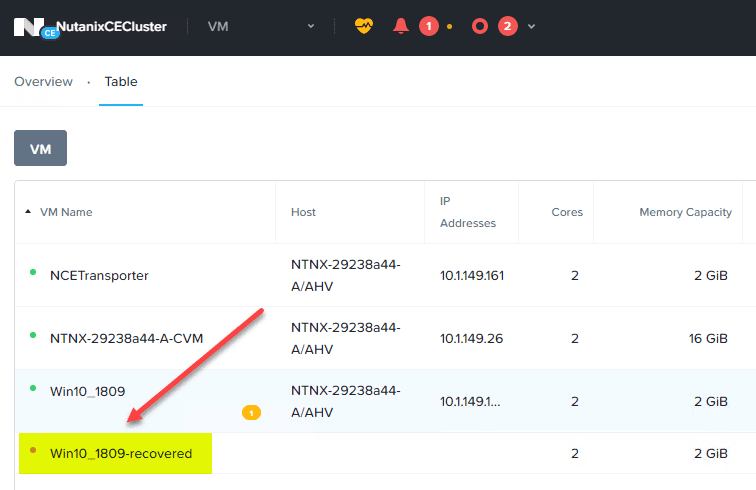
Hopping over to the Nutanix AHV environment, I see the recovering VM created in the inventory of the Nutanix cluster environment.
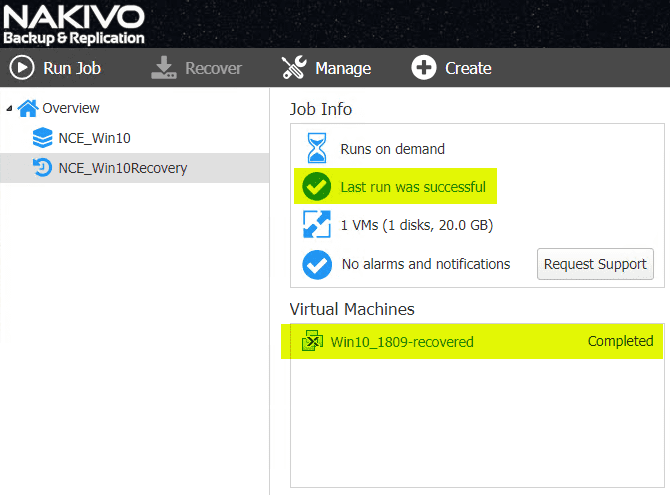
Shortly thereafter, the Nutanix AHV recovery job completes successfully.
Wrapping Up
Many environments out there are running on top of Nutanix hypervisor platforms. For those looking for a change of solution or a new solution to provide data protection, Backup and Restore Nutanix VMs with NAKIVO Backup & Replication looks to be very promising as a powerful platform to provide data protection for your Nutanix AHV cluster environment. As shown in the post, it only takes a few steps to add the Nutanix AHV cluster, create a Nutanix AHV VM backup job, and also restore a Nutanix AHV VM using NAKIVO Backup & Replication 8.5. Keep in mind this functionality is only in beta release currently and this post provides a preview of the Nutanix AHV backup and restore functionality. However, version 8.5 GA should drop fairly soon. Download the NAKIVO Backup & Replication 8.5 Beta here.