VMware PowerCLI 6.5.1 New Way to Install
If you haven’t updated your VMware PowerCLI installation in a while, you will be interested to know there is a new way to install VMware PowerCLI. With the release of VMware PowerCLI 6.5.1, we can now pull the PowerShell module directly from the Powershell gallery instead of the legacy MSI installation method that we have become familiar with. This new method is a welcomed departure from the previous installation method. The integration with PowerShell feels much smoother and more native now that we can simply install from the gallery in this module based format. The VMware PowerCLI 6.5.1 new way to install is a step in the right direction and a great path forward! Let’s take a look at this process.
VMware PowerCLI 6.5.1 New Way to Install
The VMware PowerCLI 6.5.1 new way to install is well documented on the VMware official blog post here. However, I wanted to show you guys a couple of things I ran into, as well as the simple change to get integration with PowerShell ISE working again with this new version.
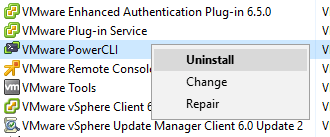
The first thing we need to do to move forward with the VMware PowerCLI 6.5.1 new way to install is we need to uninstall the old MSI file. To do this we simply remove the program in programs and features.
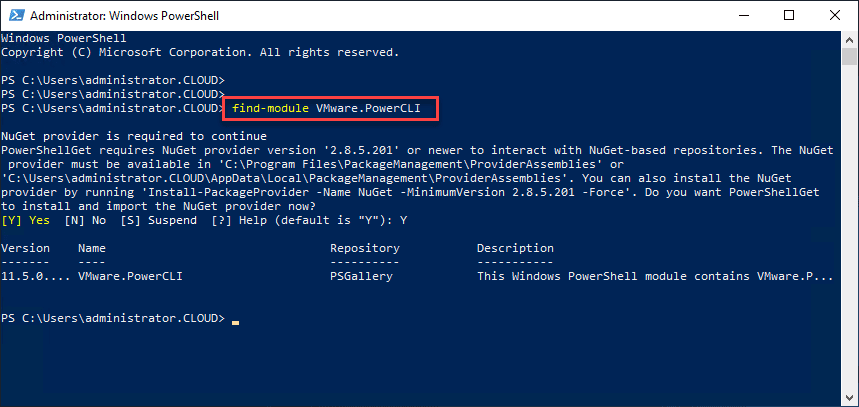
Now that we have uninstalled the MSI installation, we can begin the new installation method. We use the PowerShell commands below to find the module and install it.
Find-Module -Name VMware.PowerCLI

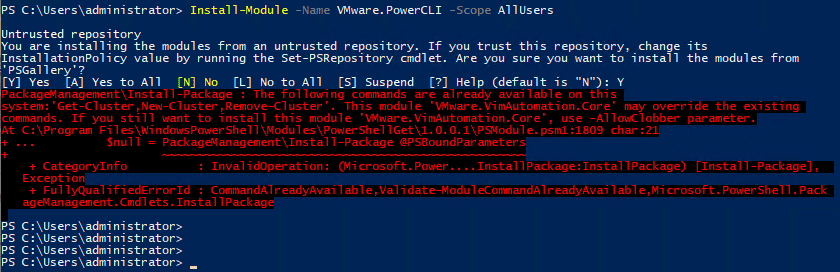
To install the new PowerCLI for all users, we need to use an administrative PowerShell session and use the -Scope command for AllUsers:
Install-Module -Name VMware.PowerCLI -Scope AllUsers
To avoid needing an admin PowerShell session, you can use the scope for CurrentUser instead.
Install-Module -Name VMware.PowerCLI -Scope CurrentUser
VMware PowerCLI 6.5.1 Install Error
When I ran the installation command scoped to AllUsers I received an error about overwriting existing commands. However, I followed the directive listed to use the -AllowClobber parameter to force the overwrite just in case any one else has this issue.
Install-Module -Name VMware.PowerCLI -Scope AllUsers -AllowClobber

Verifying the Installation
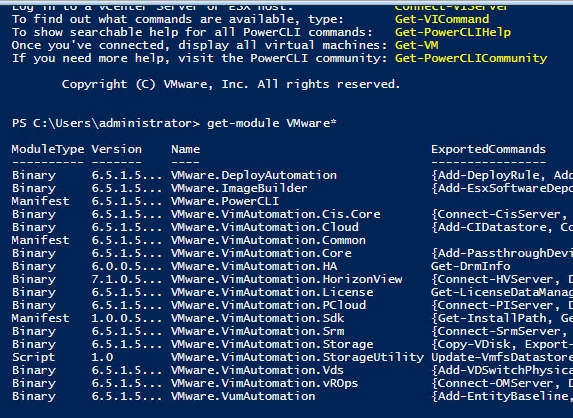
After the installation is complete, you can verify you are using the latest VMware PowerCLI version 6.5.1 by using the get-module command like so.
Get-Module VMware*
VMware PowerCLI 6.5.1 PowerShell ISE integration
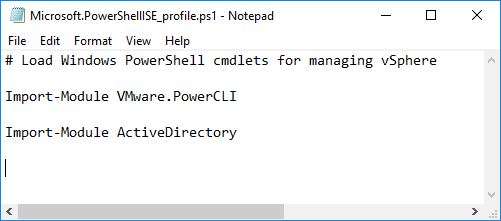
For those using PowerShell ISE who were using the old command to load VMware PowerCLI into your PowerShell ISE profile, we only need to make a small change to the profile file.
My profile looked like the below before the 6.5.1 version. I used the command:
& 'C:Program Files (x86)VMwareInfrastructurePowerCLIScriptsInitialize-PowerCLIEnvironment.ps1'

This is now greatly simplified in the profile as we can now simply add:
Import-Module VMware.PowerCLI
Thoughts
The VMware PowerCLI 6.5.1 new Way to install is definitely a great new leap forward for PowerCLI and its integration with PowerShell in general. This new module based approach pulling directly from the PowerShell gallery without the need to install from an MSI file is way better in my opinion. It now truly “feels” like PowerCLI is tightly integrated with PowerShell. We can only imagine even better things to come in the future road map of PowerCLI